An application in Event Portal represents a client of an event broker. A client application may be a program, process, microservice, IoT device, integration component, or other runnable consumer, producer, or processor of events that interacts with an event broker.
You can create new applications in Designer and you can add applications to Designer by importing Solace queues and Kafka consumer groups from your runtime data in Runtime Event Manager. For more information on importing applications, see Importing Runtime Objects into Event Portal.
This section includes the following tasks:
- Creating an Application
- Updating an Application
- Changing the State of an Application Version
- Adding an Application Version to an Environment
- Downloading an AsyncAPI Document for an Application
- Applications
You can move applications to a different application domain. For more information, see Moving Objects Between Application Domains.
You can also create custom attributes for applications. For more information, see Using Custom Attributes
Creating an Application
You can create an application in any application domain where you have Editor or Manager level access. When you create an application, you can specify several attributes:
- name
- broker type
- version display name, number, and state for each version
- event flows
When you model event flows for an application you can use the following options:
- Specify events that the application publishes to be consumed by other applications.
-
Specify events that the application intends to subscribe to.
This option is most useful early in the design process when you may not be ready to specify topic addresses or consumer details but you want to specify the intent of an application to consume a particular event. Identifying the intent can be helpful in these ways:
- It flags the event in the modeled event mesh if no application publishes it.
- It flags the application in the modeled event mesh to remind you that you still need to configure a consumer to attract the event.
- It enables Event Portal to provide suggestions to help you create the consumer and topic subscription when you are ready to do so.
- It includes the application when calculating the event reuse index in KPI Dashboard.
-
Specify the consumers, such as event queues, direct clients, and Kafka consumer groups, that subscribe to the event in the runtime. You can specify three types of consumers:
- Event Queue—an endpoint on a Solace event broker that attracts Guaranteed messages with topic subscriptions. You have the option to specify configuration details for the queue in Designer. For information, see Setting Queue Configurations in Event Portal.
- Direct Client—a direct connection to a Solace event broker that attracts Direct messages with topic subscriptions but does not store messages while the consumer is offline or reconnecting
- Consumer—a consumer group in a Kafka cluster that subscribes to topics
You can create an application from the graph view or the component view:
- If you want to create several applications and events and specify their relationships quickly, and then add more details later, you may want to start in the graph view.
- If you want to specify the consumer details when you create the application, you may want to start in the component view.
To create an application in the graph view, perform these steps:
- On the Application Domains page, click the application domain that you want to add the application to.
- In the graph view, click Add Objects and drag a new Solace or Kafka application onto the graph. Alternatively, you can right-click on the graph where you want to position the application.
- Enter a name for the application.
-
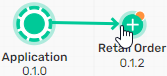
(Optional) If you want to specify that the application version publishes an event version that shows in the graph, hover over the application and drag the arrow that appears to an event version of the same type (Solace or Kafka).
-
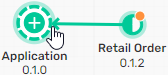
(Optional) If you want to specify that the application version subscribes to an event version that shows in the graph, hover over the event and drag the arrow that appears to an application version of the same type (Solace or Kafka).
- Click the application to open the details panel.
- To update the version or description:
- In the Details panel click
 .
. - Update the attributes as necessary.
- Click Save.
- In the Details panel click
- To update any custom attributes:
- In the Custom Attributes panel, click .
- Select This Version or Event. to display version or event attributes.
- Update the attributes as necessary.
- Click Save.
- In the Custom Attributes panel, click
- To update topic addresses or schemas:
- In the Details panel, click Open Application to open the application version in the Component View.
- Click Edit This Version.
- To specify a consumer that the application receives events from, perform these steps:
- In the Event Flows section, select Consumers.
- Click Add Consumer.
- Type a Name for the consumer.
- Select a consumer type. The options available depend on the selected Broker Type.
- (Optional) If you set the Type to Solace Event Queue, enter Configuration details for the queue. For more information, see Setting Queue Configurations in Event Portal.
- Click Reset to default to add default queue settings.
- If you use the default settings, you must add a name for the queue, for example:
"queueName": "Product",.For ease of management, you may want to use the same name for the consumer in the application and the queue it represents on the event broker. - After you set the configuration, clicking Reset to Default removes any customizations.
- To add a topic subscription to the consumer, click Add Subscription. You can add more than one subscription to a consumer.
- Enter a topic subscription for the consumer to subscribe to. You can use
*and>as wildcard characters to subscribe to a group of related topics. For more information, see Topic Subscriptions. When you enter a topic subscription, a Preview of Attracted Events shows all event versions with a matching topic address that are published by an application version that has been added to at least one modeled event mesh. - Repeat steps b to f for every consumer that you want to add.
- Click Save & Close.
To create an application in the component view, perform these steps:
- Click Components
 to switch to the component view.
 -
Select the Applications tab and click Create Application.

- Enter a Name for the application.
- Select the Broker Type for the application.
- (Optional) Add values for any application custom attributes that have been set up in your organization.
- In the Version field, specify a semantic version value for the application in the format major.minor.patch. The default is 0.1.0.
- (Optional) Enter a Version Name for the initial version of the application.
- (Optional) Enter a Description for the application. The Description field supports Markdown. Click toggle preview
 to preview the rendered text.
 - To select events that the application publishes or intends to subscribe to, perform these steps:
- In the Event Flows section, select Events.
- Click Manage Events.
- In the Application Domain list, select the application domain for an event that you want the application to publish or subscribe to. By default, the list shows events from the current application domain. If you select a different application domain or remove the filter, the list also shows shared events in selected application domain or in all application domains that you have access to.
- (Optional) In the Modeled Event Mesh list, select a modeled event mesh and environment to list only event versions published in the selected modeled event mesh.
- Expand an event to see the list of event versions.
- Select Sub for a version of each event that you want the application to subscribe to.
- Select Pub for a version of each event that you want the application to publish.
- When you are finished selecting events, click Close
 .
.
- To specify a consumer that the application receives events from, perform these steps:
- In the Event Flows section, select Consumers.
- Click Add Consumer.
- Type a Name for the consumer.
- Select a consumer type. The options available depend on the selected Broker Type.
- (Optional) If you set the Type to Solace Event Queue, enter Configuration details for the queue. For more information, see Setting Queue Configurations in Event Portal.
- Click Reset to default to add default queue settings.
- If you use the default settings, you must add a name for the queue, for example:
"queueName": "Product",.For ease of management, you may want to use the same name for the consumer in the application and the queue it represents on the event broker. - After you set the configuration, clicking Reset to Default removes any customizations.
- To add a topic subscription to the consumer, click Add Subscription. You can add more than one subscription to a consumer.
- Enter a topic subscription for the consumer to subscribe to. You can use
*and>as wildcard characters to subscribe to a group of related topics. For more information, see Topic Subscriptions. When you enter a topic subscription, a Preview of Attracted Events shows all event versions with a matching topic address that are published by an application version that has been added to at least one modeled event mesh. - Repeat steps b to f for every consumer that you want to add.
- (Optional) Add values for any application version custom attributes that have been set up in your organization.
- Click Save Application.

Updating an Application
When you update an application, you can update an existing version or create a new version of the application. Versions allow you to work on updates and test new versions in development and staging environments while the stable version remains in the production environment. Each version also has a lifecycle state. For more information, see Object Versions and Lifecycle States.
The version number uses semantic versioning in the format major.minor.patch. When you update an object, you have three options:
-
If the object version is in Draft state, you can update an existing version and retain the version number
-
If the object version is in Released, Deprecated, or Retired state, you can duplicate a version and increment the version number to create a new Draft version.
-
If the object version is in Released, Deprecated, or Retired state, you can create a new version of the object from scratch
If you want to update a version that is not in Draft state it is best practice to create a new version rather than returning the version to Draft state.
When you reference an object, for example, you specify the schema that an event uses or an event that an application publishes, you select the version of the object that you want to reference. If a new version of a referenced object is created, the reference does not update automatically. You can choose when to update references to the new version.
The graph view displays the most recent non-retired version of an application. If you create a new version, the new version takes the place of the previous version in the graph and the displayed event flows change if the new application version is not associated with the same event versions.
If allowed for objects in the application domain, the description of an application version can be edited at any lifecycle state. This option allows you to add information to the description at a later time, such as deprecation and retirement dates and notes about the object's functionality or runtime behavior.
To update an application from the graph view, perform these steps:
- On the Application Domains page, click the application domain that contains the application you want to update.
- If you need to create a new draft version with the same properties as the existing version, right-click the application and select Duplicate.
- To update the draft version displayed in the graph view:
- Right-click on the application and select View Details.
- Click Open Application.
- Click Edit This Version.
- Update the application version as necessary.
- Click Save & Close.
To update an application version from the component view, perform these steps:
- On the Application Domains page, click the application domain that contains the application you want to update.
- Click Components to switch to the list view.
- Select the Applications tab.
- In the list of applications, click More Actions
 for the application that you want to update and select Open Application.
 - Perform one of the following actions:
- In the Versions list, click More Actionsfor the version that you want to update and select Edit. Any changes you make update that version of the application. You can edit an application version only if it is in Draft state.
- In the Versions list, click More Actionsfor the version that you want to update and select Duplicate. All properties of the existing version are copied into a new version. By default, the new version number is incremented by 0.0.1. You can change the version number to any number not already in use.
- Above the Versions list, click Add
 to create a new version of the application without duplicating an existing version. By default, the new version number is the next unused major version. You can change the version number to any number not already in use.
 - Update the application version as necessary.
- Click Save Version or Save & Close.
Changing the State of an Application Version
When you create a new version of an application, the version is in Draft state. When the version is ready, you can change the version state to Released. When you release a new version of an application, you may also want to change older versions of the application to Deprecated or Retired. You must have at least Manager level access to the application domain to change the version state of an object. For more information about version states, see Object Versions and Lifecycle States.
You can only change an application version from Draft to Released state after all event versions that the application references have been changed out of Draft state.
You can change the state of the most recent version in the graph view. If you change the state to Retired, the version disappears from the graph, and is replaced by the latest non-retired version if one exists.
To change the state of an application version from the graph view, perform these steps:
- On the Application Domains page, click the application domain that contains the application you want to update.
- Right-click the application and select Change State.
- Select the new state and click Change State.
To change the state of an application version from the component view, perform these steps:
- On the Application Domains page, click the application domain that contains the application you want to update.
- Click Components to switch to the list view.
- Select the Applications tab.
- In the list of applications, click More Actionsfor the application that you want to update and select Open Application.
- Select the version that you want to change the state of, then click Manage Lifecycle.
- Select the new state.
- (Optional) If you set the State to Deprecated or Retired, set the End of Life date. If you set a planned or actual End of Life date, the date displays in the version details.
- Click Save.
Adding an Application Version to an Environment
When a version of an application is ready to add to a model event broker, you add it to an environment from Designer. When you add an application version to an environment, you choose the modeled event mesh and event broker to associate the application version with. For more information about environments, see Creating and Managing Environments.
You should be aware of the following considerations when you add application versions to environments:
-
You must have at least Editor level access to both the application domain and the environment to add an application to an environment.
-
Before you add an application version to an environment, the environment must have at lease one modeled event mesh of the same type as the application (Solace or Kafka) and the modeled event mesh must have at least one model event broker. For more information about adding and updating modeled event meshes, see Designing Modeled Event Meshes.
-
Only one version of an application can be associated with an event broker. If you add a new version of an application to an event broker while another version is associated with it, the other version is removed from the model event broker.
-
You can add the same application version to more than one model event broker or add different versions of an application to different model event brokers. For example, you may have a Released version of an application in a production environment and an updated draft version in two different model event brokers in a development environment.
-
You can add application versions in any lifecycle state to an environment.
-
Administrators and Event Portal Managers can also add applications to environments by importing consumers from runtime event brokers. For more information, see Importing Runtime Objects into Event Portal.
Adding Applications to Environments
To add an application version to an environment, perform these steps:
- On the Application Domains page, click the application domain that contains the application you want to update.
- In the graph view, click the application that you want to add to an environment.
-
In the application detail panel that appears, click More Actions
and select Manage Runtime Environments,The application opens to the Runtime tab. The Runtime tab displays a list of all environments in your organization. Each environment shows the number of model event brokers it contains of the same type (Solace or Kafka).

Clicking an environment expands it to show the model event brokers of the same type in the environment and the name of the modeled event mesh each event broker belongs to.
You can select the With Applications filter to hide event brokers that don't have associated applications.
- Click the environment that you want the add the application to.
- Click Add for the event broker that you want to add the application to.
-
Select the Application version to add and click Add.
Event Portal adds the application version to the event broker. The version number and state display next to the event broker name. You can also view the application version in the modeled event mesh in Runtime Event Manager.
Downloading an AsyncAPI Document for an Application
An AsyncAPI document is a JSON or YAML file generated according to the AsyncAPI Specification. For more information, see the AsyncAPI Initiative. You can give the AsyncAPI document to developers to help them create the actual applications that are part of your event mesh.
You can download an AsyncAPI document for an application with or without server details and operation bindings for any model event brokers that the application is associated with in an environment.
To download an AsyncAPI document for an application, perform these steps:
- On the Application Domains page, click the name of the application domain that contains the application.
- Click Components to switch to the list view.
- Select the Applications tab.
- In the list of applications, click the name of the application.
- In the Versions list, select the version that you want to download the AsyncAPI document for.
- In the version details, click More Actions and select Download Async API.
- If you want to include server details and operation bindings for an event broker that you have associated the application with, select the event broker from the Event Broker drop-down list.
-
(Optional) If you selected an event broker, select Include both attracted and designed events to include events that are specified by both the pub/sub and consumer event flows.
If you select an event broker but don't select this option, only events attracted by a consumer topic subscription are included in the AsyncAPI file.
If you don't select an event broker, this setting is not available and only events that have a publish or subscribe event flow specified in Designer are included in the AsyncAPI file.
- Select JSON or YAML file format.
- Click Download File.
Downloading a Consumer Queue Configuration
If you specify an event queue configuration for a consumer, you can download the queue configuration as a JSON file.
To download the queue configuration, perform these steps:
- On the Application Domains page, click the application domain that contains the application you want to update.
- Right-click the application in the graph view and select View Details.
- Click Open Application.
- In the Versions list, click More Actions , next to the version that you want to download the queue configuration for, then select Edit.
- In the Event Flows section of an the application, select Consumers.
- In the Consumer Details section for a Solace Event Queue, click Download
 above the Configuration field.