Designer is a tool to design and view all aspects of your event-driven architectures (EDA). You use Designer to create new events and associate a payload schema to these events. Designer provides a graphical representation of application domains, applications, schemas, and events in your EDA to help you visualize the interaction of events between applications and to provision your architecture in Event Portal.
If you're just getting started designing an EDA, you should also take a look at Designing Your Event-Driven Architecture.
Prerequisites
Ensure that you have the correct user role and permission in Event Portal.
- Users with Event Portal Manager and Administrator roles can access and edit all application domains and its resources.
- Users with Event Portal User roles have limited viewing access in Event Portal. By default, they can only view shared events, shared schemas and Event API Products. They can be given higher-level access to one or more application domains. For more information on how to set user access, refer to Configuring User Access with Role-Based Access Control.
Using Designer
On the Designer homepage, you can access all your application domains and Logical Event Meshes. Your ability to view or edit an application domain will depend on your role and access level.
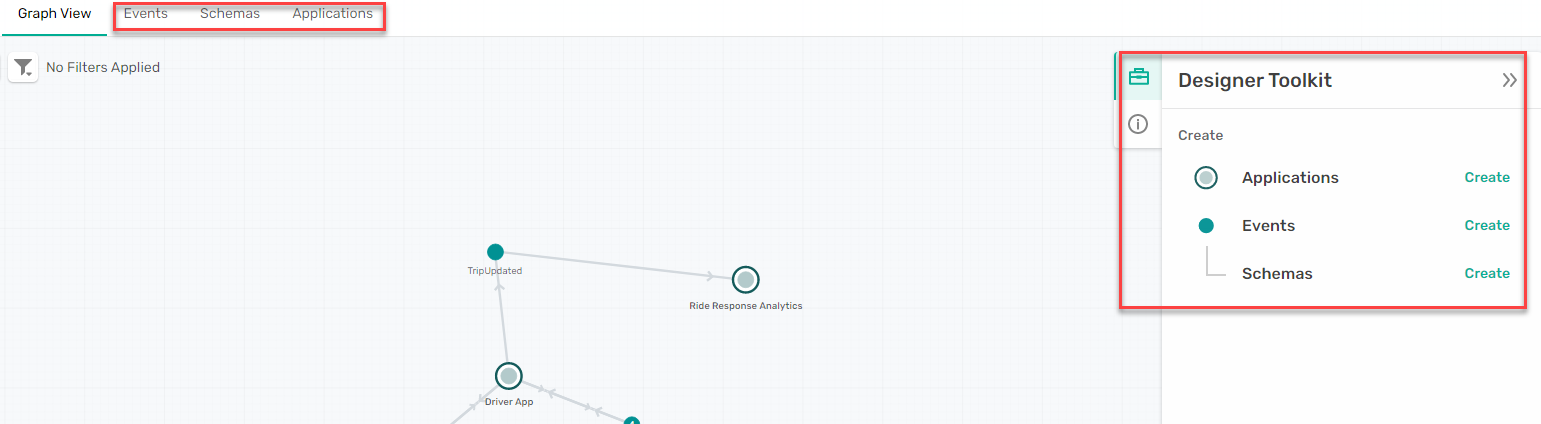
Double-click an application domain you want to drill into. On the application domain page, the Graph View displays all the applications, connectors (for Kafka brokers only), events, schemas, and the associated relationships. Selecting the Events, Schemas or Applications tab will display the objects in a list view with additional information and options to explore.

Topology and Graph View
There are tools located at the top of the screen that you can use to adjust the Topology or the Graph View inside an application domain. You can use the tools to perform the following actions:
| Tools (icons) | Description |
|---|---|
|
|
Zoom in and zoom out Topology or Graph View |
|
|
Refer to the Legend to understand the what the event-related icons indicate:
|
|
|
Re-center Graph |
|
|
Relayout Graph |
|
|
Use Graph Control to group events |
|
|
Apply filters to highlight applications and events that match a set criteria |
|
|
Use Designer Toolkit to create or import an application domain, or create applications, events, or schemas |
|
|
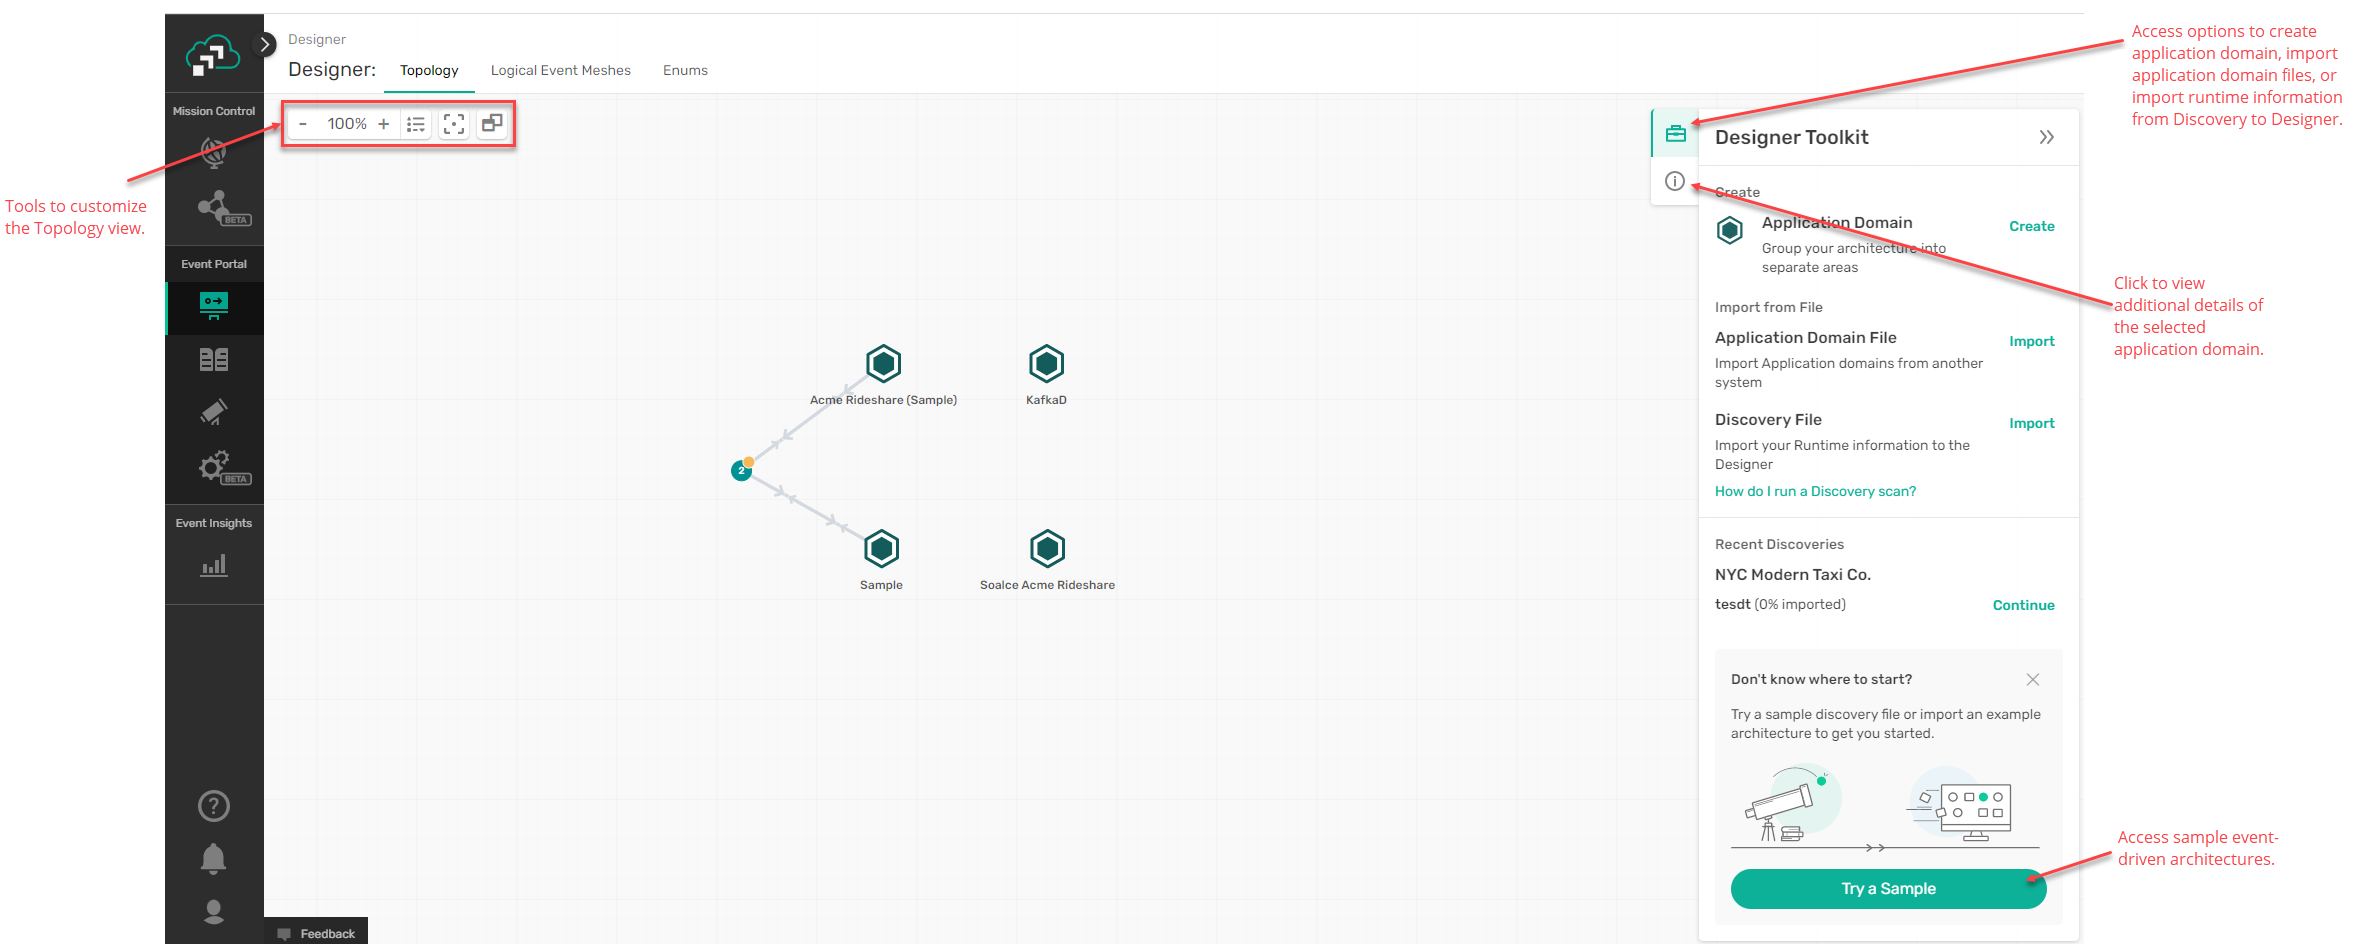
Click the Domain details icon to see additional information for a selected object |
 —Event Path. On the event path, the arrows indicate event direction
Event Path
Event path shows the direction of the event. As shown in the image below, hovering your cursor over an event or application displays an arrow ![]() that you can drag and drop to create a connection between applications and events. This feature allows you to build and modify your EDA designs quickly.
that you can drag and drop to create a connection between applications and events. This feature allows you to build and modify your EDA designs quickly.
Connections created using the drag-and-drop feature are not fully configured. You must also add subscriptions to the Application.
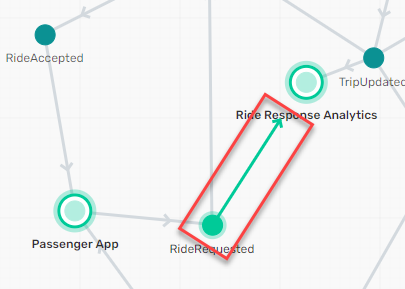
Non-shared Events
By default, you can only reference events within their own application domain. To reference an event between two more applications, the event must be marked as shared.
Non-shared events that are used across one or more application domains are flagged with orange markers. The orange marker warns the user if the non-shared event that belongs to one application domain is intended to be referenced by an application in another application domain. The orange marker highlights a possible flaw in the EDA design, or it could mean that the event should be updated to shared.
The orange markers on the non-shared/cross-domain events are only visible to users with the following roles:
- Administrator
- Event Portal Manager
- Event Portal Users with Editor or Manager access level to the application domains where the non-shared events belong
These users have permission to update the events to resolve the orange marker. For further discussion on these roles and access levels, refer to Configuring User Access with Role-Based Access Control.
Managing Application Domains
The application domain enables you to split the enterprise into sub-components. These sub-components could represent different lines of business, development teams, or microservice applications. The purpose is to groups applications, events and schemas into logical categories. Furthermore, you can apply role-based access control (RBAC) to applications domains to manage who has access to the domains and their resources and what they can do with it.
The following tutorials outline the activities you will perform when creating, importing or exporting application domains, including multiple application domains with shared and non-shared objects.
Creating an Application Domain
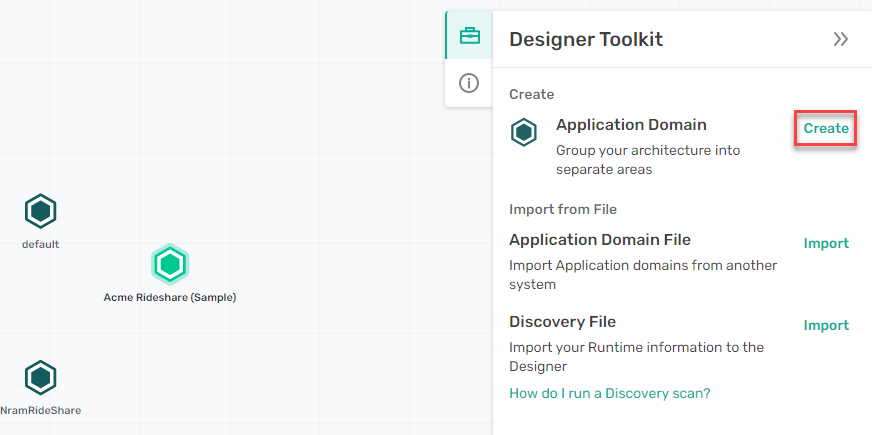
To create an application domain, do the following:
- Click Designer on the left navigation bar.
- Select the Designer Toolkit (
 ) located on the top right and, next to Application Domain, click Create.
- On the Designer page, type the Name, Topic Domain and Description for the application domain. The Description text box supports native Markdown. Click toggle preview
 to preview raw markdown text in HTML format.
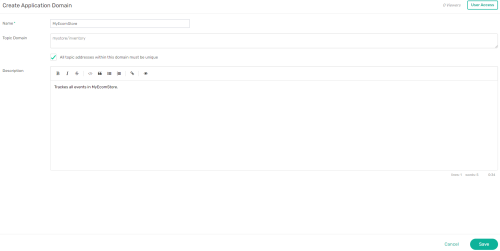
- (Optional) Under the Topic Domain field, the checkbox ensures all topics within that domain are unique. The checkbox is enabled by default. Leaving this feature enabled avoids the creation of multiple events having the same topic; therefore, preventing potential conflicts between event types in an environment.
The Topic Domain field is important to understand and consider. For all the events defined within the application domain, the Topic Domain is added at the beginning by default, which is helpful in the creation of runtime Access Control Lists (ACLs).
- (Optional) Set User Access to provide Viewer, Editor, or Manager access level to users with the Event Portal User role. To do so, refer to Designer.
- Click Save.

Configuring User Access with Role-Based Access Control
Event Portal role-based access control helps you manage users access to applications domains and enables you to grant access to resources based on their area of responsibility and organizational role.
The following information summarizes the capabilities of the roles within Event Portal:
- Users with the PubSub+ Cloud Administrator role have full access to all application domains. They can add users with Event Portal User roles to application domains and grant them higher-level access to individual domains. Administrators can also assign or modify any roles in PubSub+ Cloud.
- Users with the Event Portal Manager role have full access to all application domains. They can add users with Event Portal User roles to application domains and grant them higher-level access to individual domains.
- Users with the Event Portal User role have limited access and viewing capabilities. By default, they can't access an application domain unless they are granted access by someone with an Administrator or Manager role. Application domains that are not available to users appear locked
 . The following access levels can be granted to users with the Event Portal User role for individual application domains:
- Manager - Event Portal Users with Manager access to an application domain can perform the following functions:
- Create, view, update, or delete application domain resources (schemas, events, and applications).
- Export the application domain and download the applications AsyncAPI document.
- Modify the application domain information, including Name, Topic Domain, Topic address or Description.
- Assign or un-assign users with the Event Portal User role to the application domain and set their access level.
- Editor - Event Portal Users with Editor access can create, view, update, or delete application domain resources, export the application domain, and download the AsyncAPI document of the applications.
- Viewer- Event Portal Users with Viewer access can view the application domain resources, export the application domain, and download the AsyncAPI document of the applications.
- Manager - Event Portal Users with Manager access to an application domain can perform the following functions:
The table below provides a detailed breakdown of each role and their scope of operation in Event Portal.
| Roles | Administrator | Event Portal Manager | Event Portal User |
|---|---|---|---|
| Scope of Operation | PubSub+ Cloud | Event Portal | |
| Assign Event Portal user roles |
|
|
|
| View Event Portal users & roles |
|
|
|
| Assign application domains and access levels to users with Event Portal User role |
|
|
|
| Designer screen access |
|
|
Limited access1 |
| Catalog screen access |
|
|
Limited access2 |
| Discovery screen access |
|
|
|
| Event API Product screen access |
|
|
|
1. Limited access based on the assigned application domains and access levels.
2. Information is limited to shared events, shared schemas, and assigned application domains.
Setting User Access with Role-Based Access Control
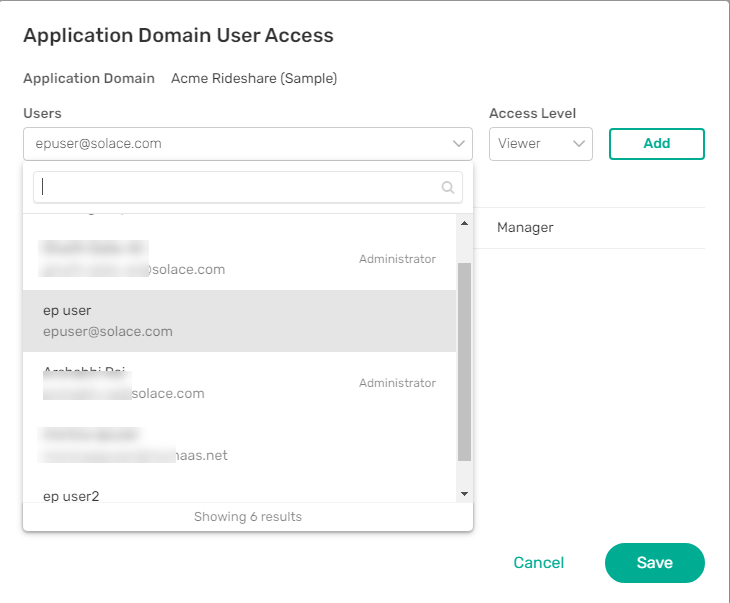
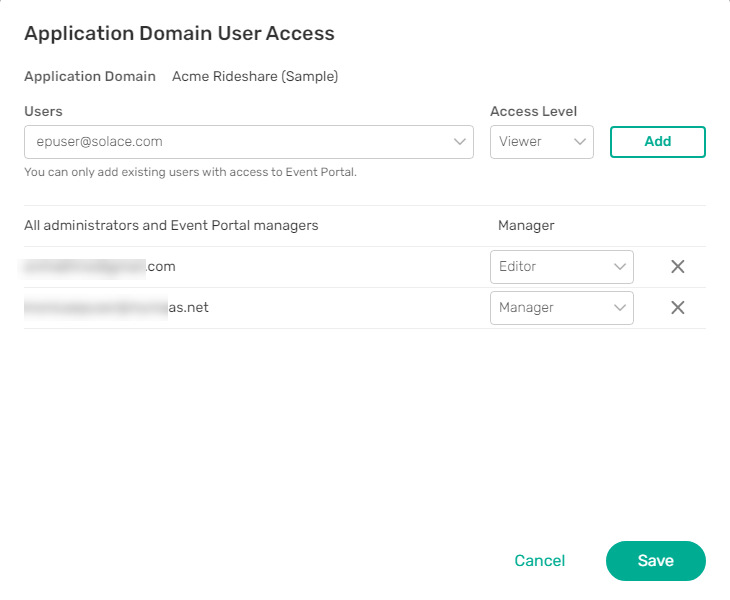
To set application domain user access, perform the following steps:
- You can set User Access while creating a new application domain or on an existing application domain.
- While creating a new application domain, on the Create Application Domain page, click the User Access button.
- To update an existing application domain, on the Topology screen, right-click on an application domain and select Set User Access. Alternatively, if you are already inside an application domain, click the User Access button.
- On the dialog that appears, click the expander arrow to view the list of users with the Event Portal User role. You can use the search to quickly find the Event Portal Users you want to add to the application domain.

- Select an Event Portal User from the list and click Add. Users with Event Portal User role can be assigned multiple application domains, each with different access levels. Users with Administrator or Event Portal Manager roles cannot be assigned application domains as they already have full access to all application domains.

- Click Save.
Moving Objects Between Application Domains
Users with PubSub+ Cloud Administrator or Event Portal Manager roles can move objects between any two application domains. Users with Event Portal User role can only move objects between two application domains if they assigned to both domain with either Manager or Editor access.
To move objects between two application domains, do the following:
-
Log in to the PubSub+ Cloud Console if you have not done so yet. The URL to access the Cloud Console differs based on your authentication scheme. For more information, see
- Click Designer on the left navigation bar.
- Double-click on an application domain to view its details.
- Select the Events, Schemas or Applications tab.
- Click the checkbox best the event, schema, or application of your choice.

- Select Move to Domain
 located on the top right corner.
 - On the dialog that appears, expand the dropdown menu and select an application domain.
- Click Move.

Importing an Application Domain
To import an application domain from your system, do the following:
-
Log in to the PubSub+ Cloud Console if you have not done so yet. The URL to access the Cloud Console differs based on your authentication scheme. For more information, see
-
On the navigation bar, select Designer.
-
Select the Designer Toolkit
and click Import beside the application domain file. -
Select the application domain File in your sytem and click Open. The imported application domain will be visible in Designer.
Exporting an Application Domain
The steps below outline the different ways you can export an application domain:
- Log in to the PubSub+ Cloud Console if you have not done so yet. The URL to access the Cloud Console differs based on your authentication scheme. For more information, see
-
On the navigation bar, select Designer.
- Right-click on the application domain you want to export.
- Select Export.
- In the dialog that appears, the filename will be auto-filled .Update the filename (if required) and then click Export.
The application domain as a JSON file will be downloaded to your computer. You can reuse it to import into a different instance of the Event Portal or keep it as a backup.
Exporting and Importing Multiple Application Domains
You can export and import multiple application domains including their shared objects, or objects and their association.
To export multiple application domains with shared objects, do the following:
- Log in to the PubSub+ Cloud Console if you have not done so yet. The URL to access the Cloud Console differs based on your authentication scheme. For more information, see
-
On the navigation bar, select Designer.
- Press and hold the Ctrl button on your keyboard and then select the application domains you want to export.
- Right click on the highlighted objects and then click Export.
- In the dialog that appears, the filename will be auto-filled .Update the filename (if required) and then click Export. Since you will be exporting multiple application domains, the downloaded JSON file will have an array of domains.
Configuring a Logical Event Mesh
A Logical Event Mesh (LEM) represents the event mesh over which the associated published and subscribed events flow within an event-driven architecture.
To create a Logical Event Mesh, perform the following steps:
- Log in to the PubSub+ Cloud Console if you have not done so yet. The URL to access the Cloud Console differs based on your authentication scheme. For more information, see
-
On the navigation bar, select Designer.
- Select the Logical Event Meshes tab and click the add symbol (
 )
) - On the dialog that appears, do the following:
- In the Name field, give the LEM a name—the name must be unique in the account
- (Optional) In the Description field, add information to help you understand the background. The Description text box supports native Markdown. Click toggle preview to preview raw markdown text in HTML format.
- In the Level Delimiter drop-down, select the delimiter based on Broker Type for your Discovery.
- For Solace, it's a forward ("
/") which is automatically provided for you. - For Kafka, it can be a either a dot ("
."), dash ("-"), or underscore ("_"). You must select a delimiter.
- For Solace, it's a forward ("

- Click Create.

You can now add the newly created LEM to an event of your choice.
Managing Events
The event is where you define metadata that describes and categorizes the event. From a modelling perspective, events reference payload schemas, and events are referenced by applications, thus forming the glue that links applications together.
The tutorials below show you how to create an event and set a topic address.
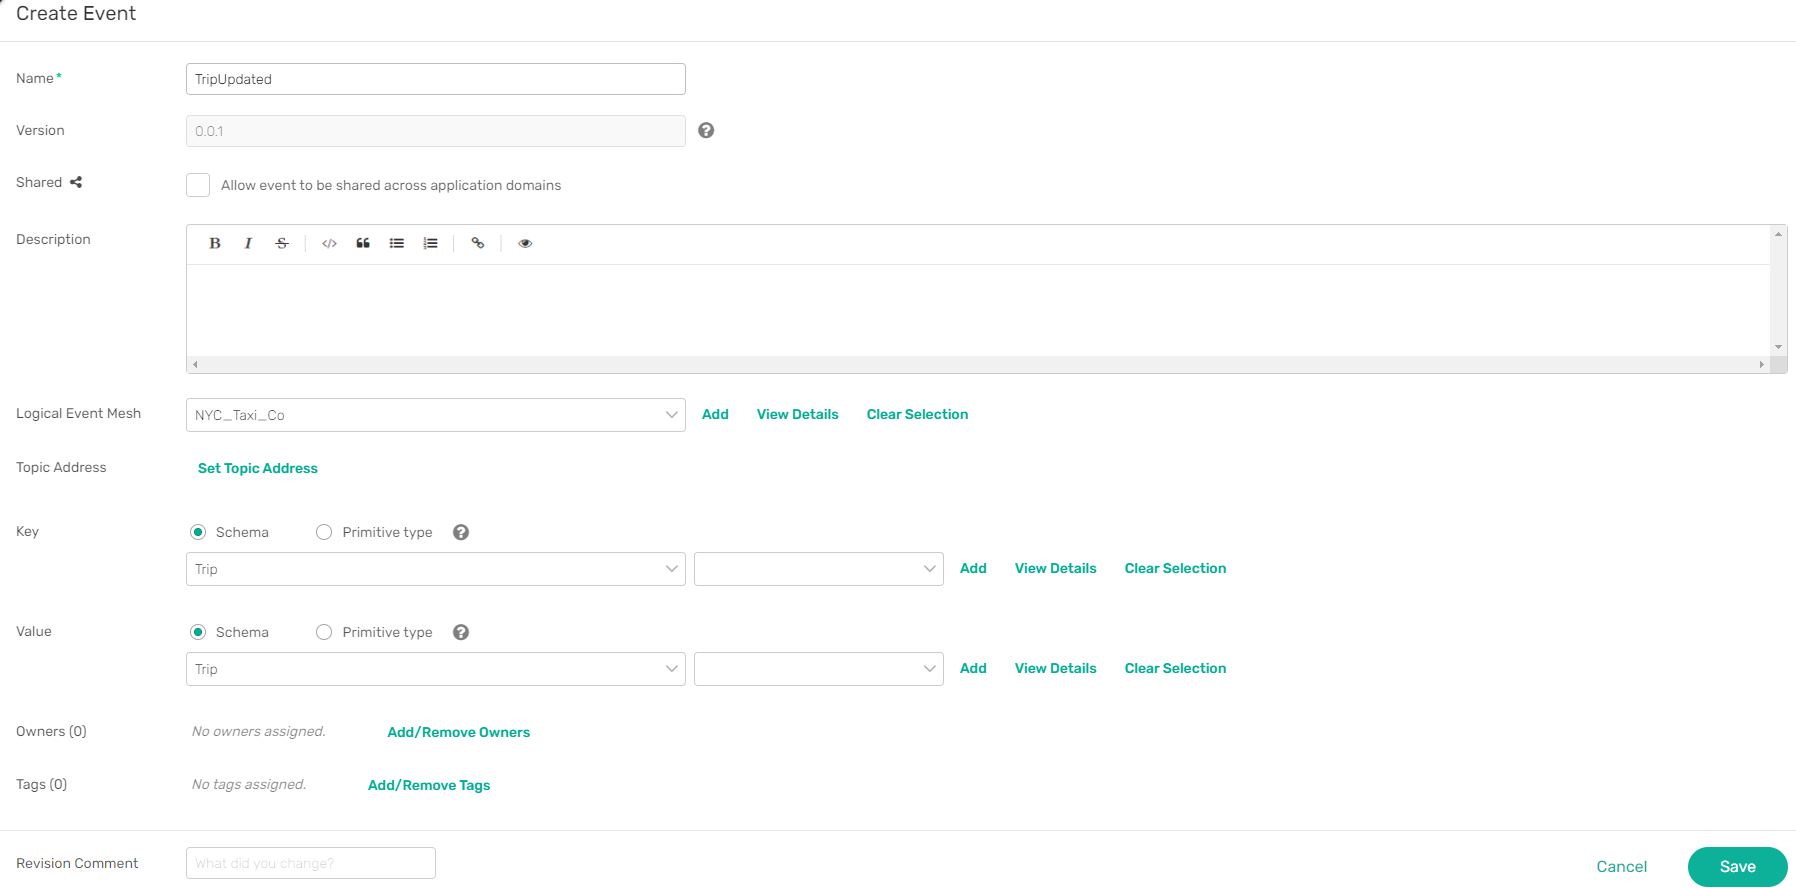
Creating an Event
To create an event, complete the following steps:
- Double-click the application domain where you want to create the event.
- Select the Events tab and then click Create Event or click Designer Toolkit located on the top right and click Create.

- In that dialog that appears, complete the details as shown in the example below.

Field Description Name The name of the event Version Version control (coming soon)
Shared Allows the event to be referenced by applications in other application domains. Additionally, sharing an event will enable Event Portal Users to view the event details even if they do not have Viewer level access to the application domain where the event belongs. Further, an event must be shared to be part of an Event API Product. The shared options is disabled by default. Description Information about the event. It is important to thoroughly explain the change in state (a business moment) and stimuli that kicks off the event so that consumers understand its proper usage and business implications. The Description text box supports native Markdown. Click toggle preview to preview raw Markdown text in HTML format.Logical Event Mesh Select a LEM using the drop down menu. If you don't have a LEM setup, click Add New to create one. Depending on the LEM selected, additional fields will be need to be configured. For more information about creating a LEM, see Designer Topic Address Topic Address is a set of topic levels that is used to construct a topic for a published event. To build a topic address, refer to Setting a Topic Address. Key This option will be available when a Kafka-based Logical Event Mesh is selected. When a message is published in Kafka, it has two parts: keyandvalue. Each of the key and the value can have a schema or primitive type defined for allowing the Kafka clients to know how to serialize/deserialize the message.Value Select the Schema or Primitive Type. You can use an existing Schema or create a new one, or use a supported Primitive type from the list. Refer to Primitive Types to review the list of supported types. Owners Add or remove other members of your organization as event owners. Tags Add or remove event tags. Learn more about tags and its usage in the overview section (Tags). - Click Save to complete the event creation.
Setting a Topic Address
Topic Address is a set of topic levels that is used to construct a topic for a published event.
To set a topic address for an event, do the following:
- Open an application domain and select an event you want to use or add a new event.
- Click Set Topics Address located beside the Topic Address label.
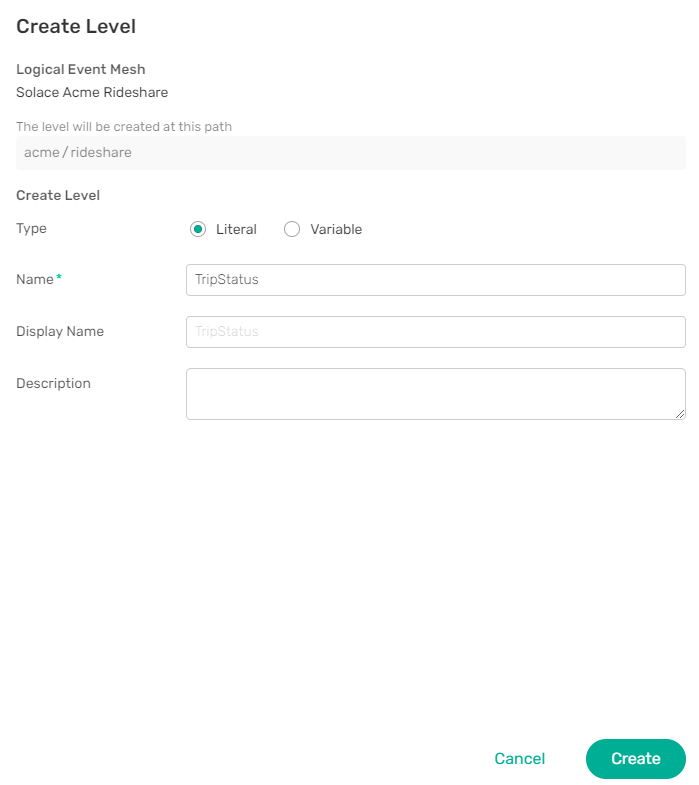
- On the Set Topic Address screen, click Create Level.
- You can create two types of topic level: Literal or Variable. To learn more about topic level types, see Topic Level. On the dialog that displays, do the following:
- To create a literal topic level, perform the following steps:

- Select the Literal checkbox.
- Write the topic level Name and Display Name.
- Add an appropriate description.
- Click Create.
- To create a variable topic level, perform the following steps:
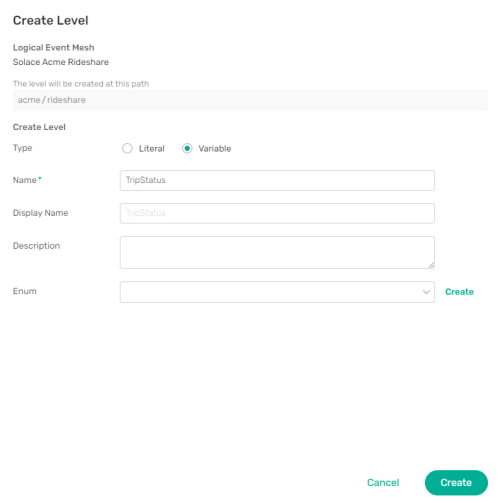
- Select the Variable checkbox.
- Write the topic level Name and Display Name.
- Add an appropriate description.
- Additionally, you can also add an enum by selecting from list of available enums or create a new one. To learn more about managing enums, refer to Managing Enums.
- Click Create.
- To create a literal topic level, perform the following steps:
- Click Set and Return to Event to save your Topic Address settings. You can now have an application subscribe to an event in this topic address.

To get more information about designing topics, refer to Topic Architecture Best Practices guide.
Managing Enums
Event Portal supports the ability to centrally manage topic level enum type variables. You can access enums through the Enums tab in Designer and perform the following tasks:
- view a list of all available enums.
- create, edit, clone or delete enums.
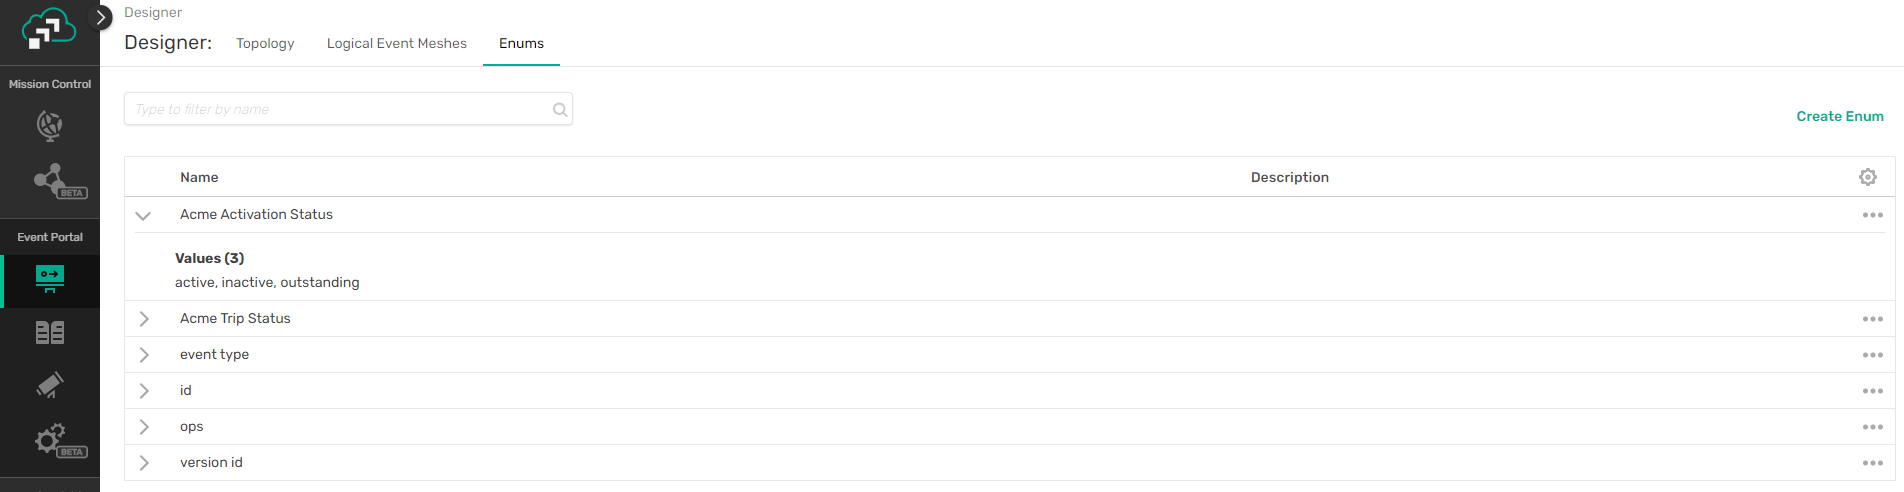
Note that you must have Event Portal Manager or PubSub+ CloudAdministrator role to create, edit, clone, or delete enums.
Creating Enums
You can create enums through the Enums tab on Designer or while setting a topic address. The following example shows how to create enums through the Enums tab in Designer.
- Log in to the PubSub+ Cloud Console if you have not done so yet. The URL to access the Cloud Console differs based on your authentication scheme. For more information, see
-
On the navigation bar, select Designer.
- Select the Enums tab and click Create Enum.
- On the dialog that appears, do the following:
- Give the enum a Name.
- Optionally, add an appropriate Description.
- In Value field, enter the enum value. When creating an enum, you can add multiple values that applications can subscribe to.
- Optionally, add a Display Name.
- Click Create.
Your newly created enum will be visible on the enums table and available for use when you set a topic address.
Editing, Cloning, or Deleting Enums
You can edit, clone or delete an existing enum through the Enums tab in Designer.
To edit, delete, or clone an enum, do the following:
- Log in to the PubSub+ Cloud Console if you have not done so yet. The URL to access the Cloud Console differs based on your authentication scheme. For more information, see
-
On the navigation bar, select Designer.
- Select the Enums tab.
- Identify the enums you want to edit, delete or clone. You can use the search to quickly find an enum.
- Click Actions (...) and select Edit, Clone or Delete.
- Follow the prompt to complete your task.
Managing Schemas
You can create or import existing payload schemas in either JSON, AVRO, or XML schema. If your payload does not adhere to the above formats, you can choose Binary or Text. Make sure to provide a description to help developers with serialization/deserialization. Furthermore, you can search and view JSON schemas in a more human-readable format along with the actual schema source. This makes it easy for users to easily read, browse, and understand the schema contents without going through the source.
To create a new schema, complete the following steps:
- Double-click the application domain where you want to create the schema.
-
Select the Schemas tab and then click Create Schema or click Designer Toolkit
located on the top right and click Create beside the Schema label.
- In the dialog that appears, complete the details as shown in the example below.
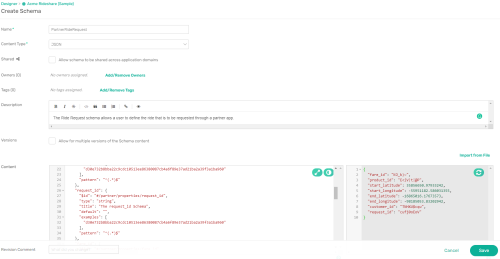
Field Description Name The name of the schema. Content Type JSON, AVRO, XML, Binary or Text.
Shared Allows the schema to be referenced by events in other application domains. Additionally, sharing a schema will enable Event Portal Users to view the schema details even if they do not have Viewer level access to the application domain where the schema belongs. Further, a schema must be shared to be part of an Event API Product. The shared options is disabled by default. Owners Add or remove other members of your organization as schema owners. Tags Add or remove schema tags. Learn more about tags and its usage in the overview section (Tags). Description Information about the schema. The Description text box supports native Markdowm. Click toggle preview to preview raw Markdown text in HTML format. Versions Create schemas with our without versions. Click the checkbox to create multiple versions of a schema. For more information, see Creating Multiple Versions of a Schema. Content Write a new schema or import it from a file. If you are using JSON Schema, the right screen dynamically generates a sample that you can use as a guide to enhance the readability of your schema design. Additionally, we support semantic error checking of the schema when developing with JSON Schema.
For this example, we have used the following JSON schema.
 JSON schema sample
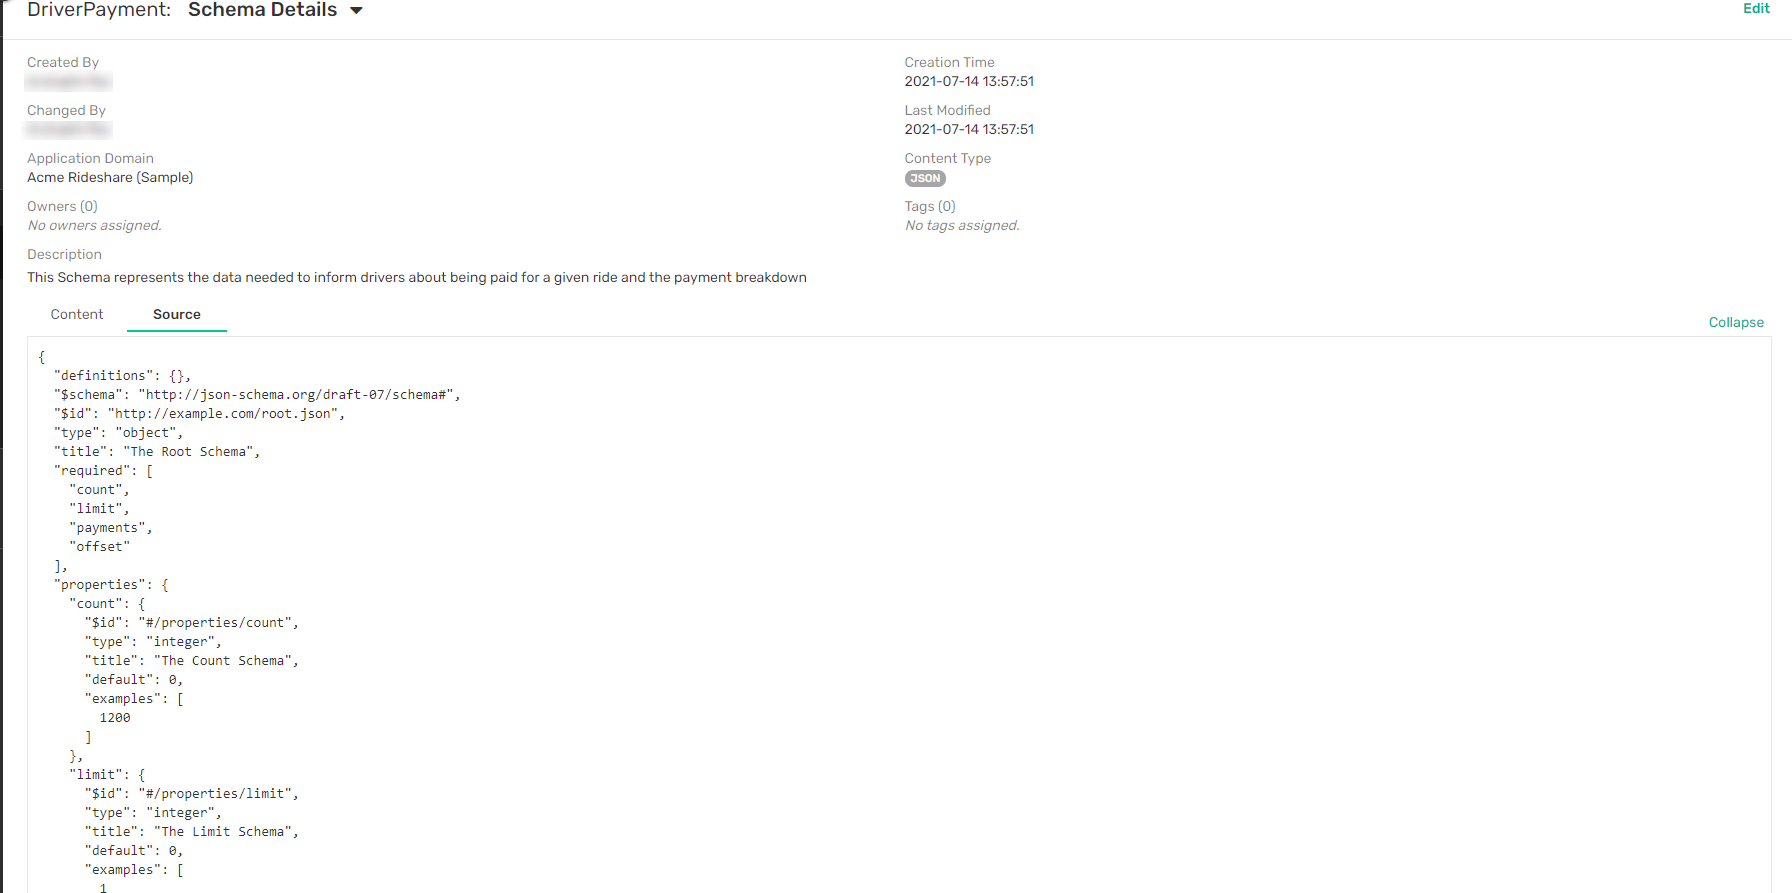
{ "definitions": {}, "$schema": "http://json-schema.org/draft-07/schema#", "$id": "http://example.com/root.json", "type": "object", "title": "The Root Schema", "required": [ "count", "limit", "payments", "offset" ], "properties": { "count": { "$id": "#/properties/count", "type": "integer", "title": "The Count Schema", "default": 0, "examples": [ 1200 ] }, "limit": { "$id": "#/properties/limit", "type": "integer", "title": "The Limit Schema", "default": 0, "examples": [ 1 ] }, "payments": { "$id": "#/properties/payments", "type": "array", "title": "The Payments Schema", "items": { "$id": "#/properties/payments/items", "type": "object", "title": "The Items Schema", "required": [ "payment_id", "category", "event_time", "trip_id", "cash_collected", "amount", "driver_id", "breakdown", "rider_fees", "partner_id", "currency_code" ], "properties": { "payment_id": { "$id": "#/properties/payments/items/properties/payment_id", "type": "string", "title": "The Payment_id Schema", "default": "", "examples": [ "5cb8304c-f3f0-4a46-b6e3-b55e020750d7" ], "pattern": "^(.*)$" }, "category": { "$id": "#/properties/payments/items/properties/category", "type": "string", "title": "The Category Schema", "default": "", "examples": [ "fare" ], "pattern": "^(.*)$" }, "event_time": { "$id": "#/properties/payments/items/properties/event_time", "type": "integer", "title": "The Event_time Schema", "default": 0, "examples": [ 1502842757 ] }, "trip_id": { "$id": "#/properties/payments/items/properties/trip_id", "type": "string", "title": "The Trip_id Schema", "default": "", "examples": [ "5cb8304c-f3f0-4a46-b6e3-b55e020750d7" ], "pattern": "^(.*)$" }, "cash_collected": { "$id": "#/properties/payments/items/properties/cash_collected", "type": "integer", "title": "The Cash_collected Schema", "default": 0, "examples": [ 0 ] }, "amount": { "$id": "#/properties/payments/items/properties/amount", "type": "number", "title": "The Amount Schema", "default": 0, "examples": [ 4.12 ] }, "driver_id": { "$id": "#/properties/payments/items/properties/driver_id", "type": "string", "title": "The Driver_id Schema", "default": "", "examples": [ "8LvWuRAq2511gmr8EMkovekFNa2848lyMaQevIto-aXmnK9oKNRtfTxYLgPq9OSt8EzAu5pDB7XiaQIrcp-zXgOA5EyK4h00U6D1o7aZpXIQah--U77Eh7LEBiksj2rahB==" ], "pattern": "^(.*)$" }, "breakdown": { "$id": "#/properties/payments/items/properties/breakdown", "type": "object", "title": "The Breakdown Schema", "required": [ "other", "toll", "service_fee" ], "properties": { "other": { "$id": "#/properties/payments/items/properties/breakdown/properties/other", "type": "number", "title": "The Other Schema", "default": 0, "examples": [ 4.16 ] }, "toll": { "$id": "#/properties/payments/items/properties/breakdown/properties/toll", "type": "integer", "title": "The Toll Schema", "default": 0, "examples": [ 1 ] }, "service_fee": { "$id": "#/properties/payments/items/properties/breakdown/properties/service_fee", "type": "number", "title": "The Service_fee Schema", "default": 0, "examples": [ -1.04 ] } } }, "rider_fees": { "$id": "#/properties/payments/items/properties/rider_fees", "type": "object", "title": "The Rider_fees Schema", "required": [ "split_fare" ], "properties": { "split_fare": { "$id": "#/properties/payments/items/properties/rider_fees/properties/split_fare", "type": "number", "title": "The Split_fare Schema", "default": 0, "examples": [ 0.5 ] } } }, "partner_id": { "$id": "#/properties/payments/items/properties/partner_id", "type": "string", "title": "The Partner_id Schema", "default": "", "examples": [ "8LvWuRAq2511gmr8EMkovekFNa2848lyMaQevIto-aXmnK9oKNRtfTxYLgPq9OSt8EzAu5pDB7XiaQIrcp-zXgOA5EyK4h00U6D1o7aZpXIQah--U77Eh7LEBiksj2rahB==" ], "pattern": "^(.*)$" }, "currency_code": { "$id": "#/properties/payments/items/properties/currency_code", "type": "string", "title": "The Currency_code Schema", "default": "", "examples": [ "USD" ], "pattern": "^(.*)$" } } } }, "offset": { "$id": "#/properties/offset", "type": "integer", "title": "The Offset Schema", "default": 0, "examples": [ 0 ] } } } - Click Save to complete the schema creation.

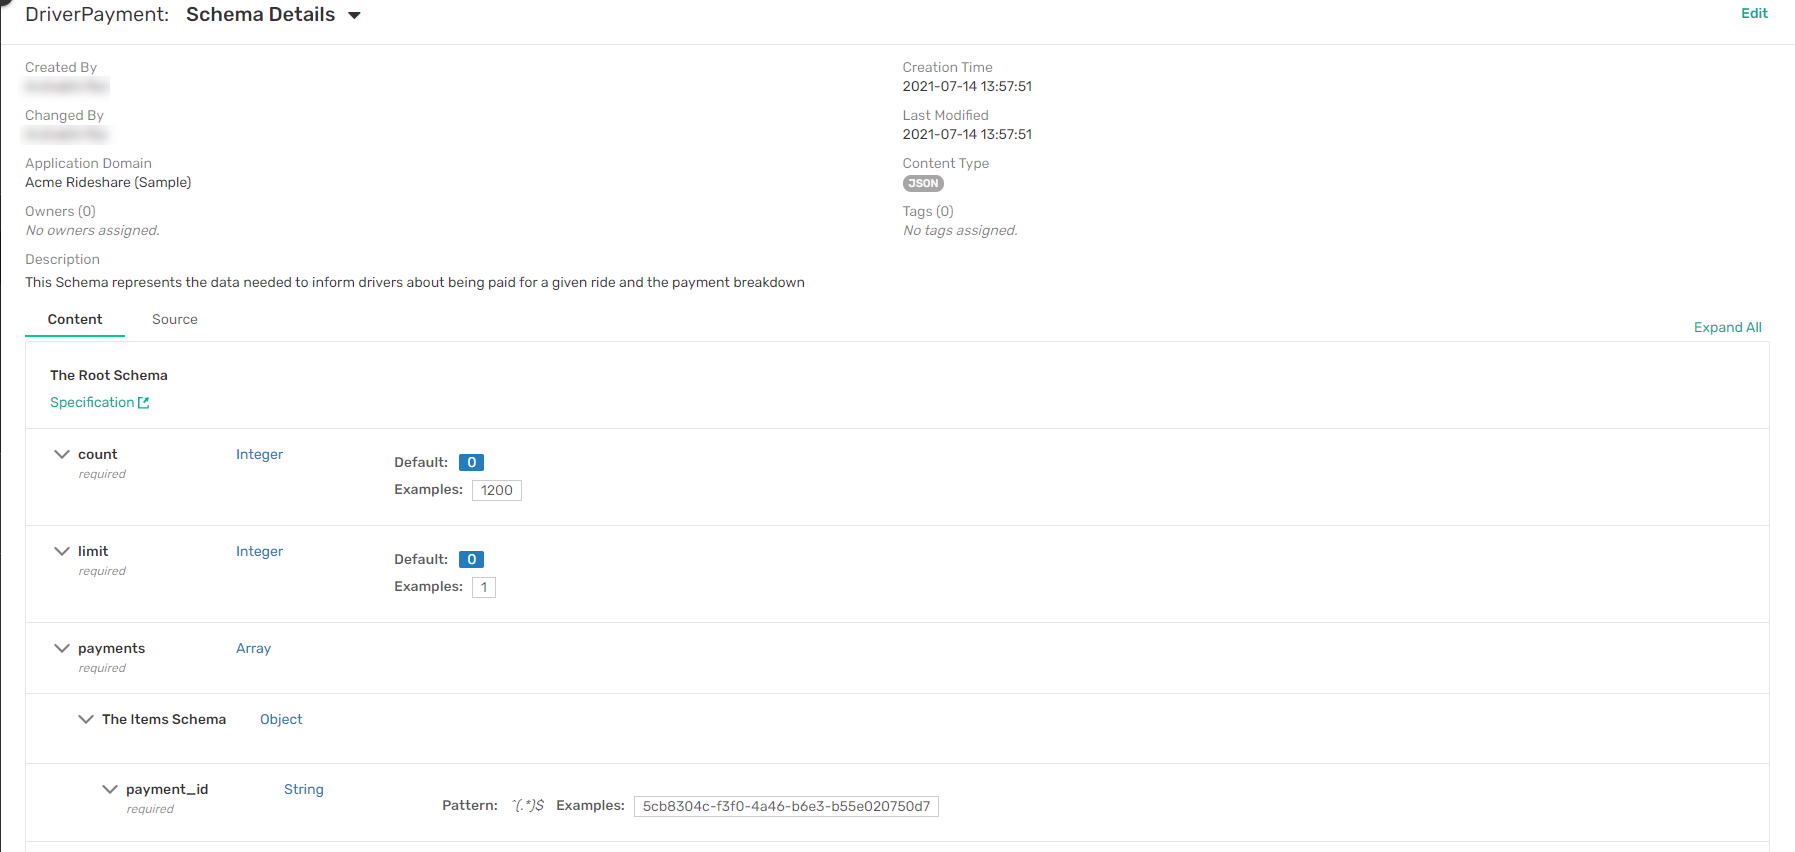
Viewing Human-Readable JSON Schema
The option to view JSON schemas in a human-readable format along with the actual source enables both technical and non-technical users to review and understand the data at their disposal quickly. Human-readable JSON schema makes it easy to read, browse, and understand the schema contents without going through the source file.
The following JSON schema keywords are currently supported in a human-readable format: title, required, type,
description, default, enum, examples, pattern, format, properties, items, minimum, exclusiveMinimum, maximum, exclusiveMaximum, anyOf, oneOf, allOf, not, $defs (definitions),$id, and $ref. The schema keyword $ref references another schema within the same document defined by either $id, $defs or definitions keyword. You can click a $ref value to navigate and view the referenced schema quickly.
In this example, we will walk you through the steps to view schemas in a human- or machine- readable format in Designer. You can also view these options in Catalog and Discovery.
-
Double-click an application domain you want drill into.
- Select the Schemas tab.
- Click a schema that you want to view.
- On the Schema Details page, the schema content is displayed in the human-readable format by default.
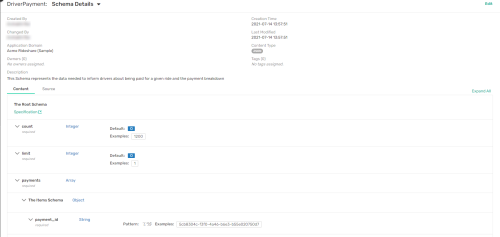
- To view the schema source, select the Source tab.

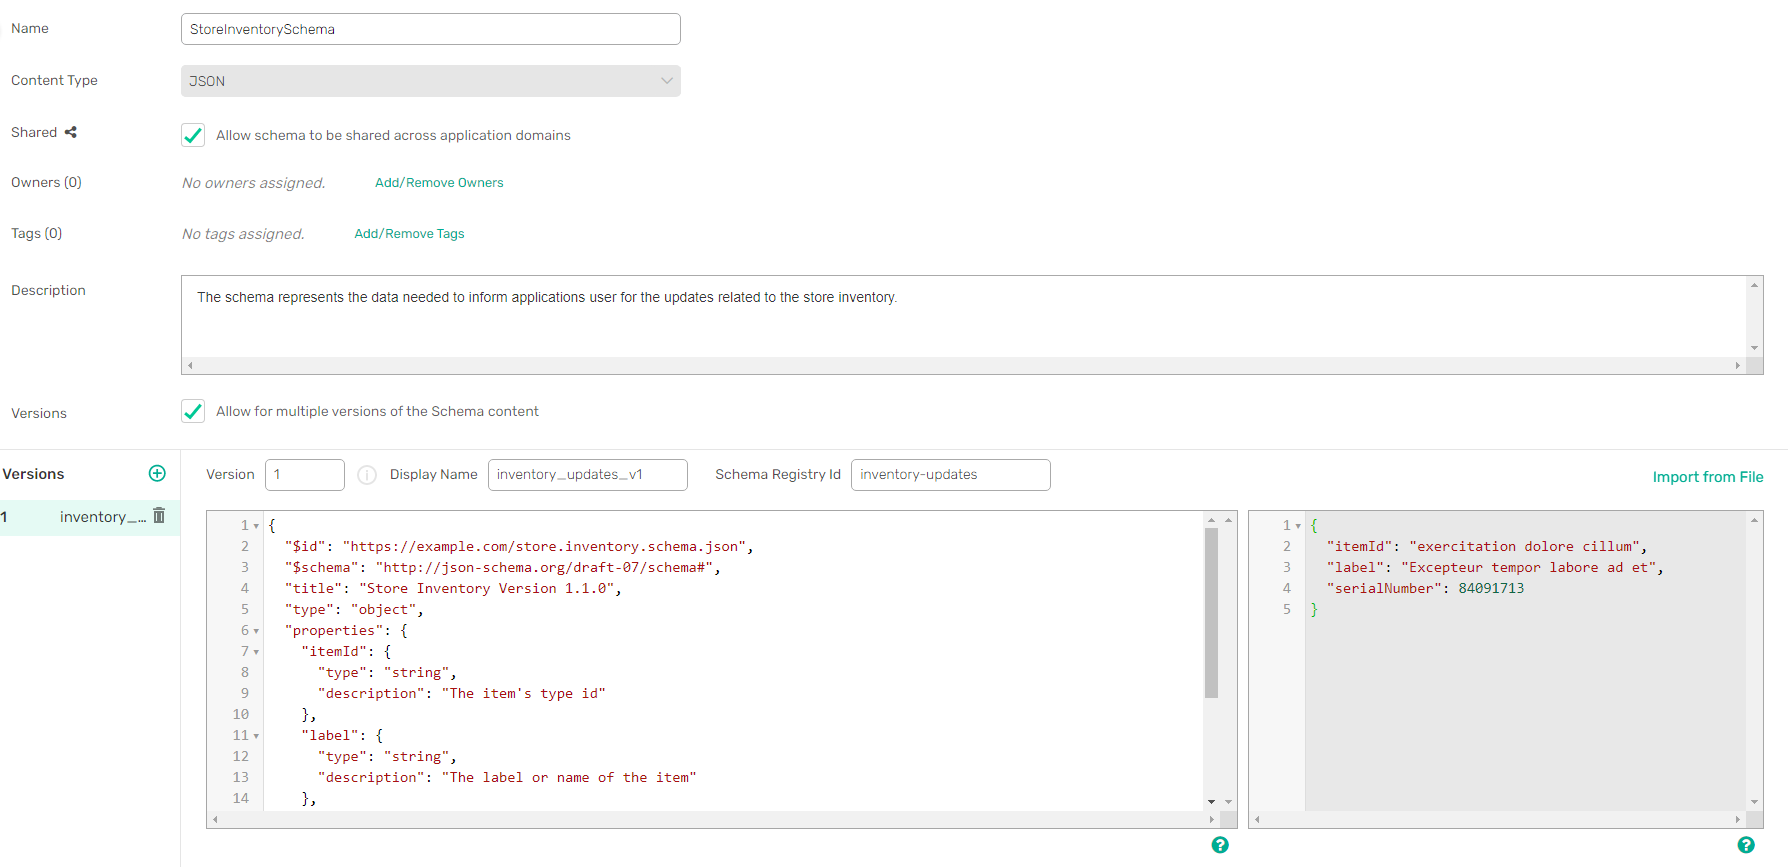
Creating Multiple Versions of a Schema
You can create and store multiple versions of the same schema, which can be used in your EDA designs that require multiple versions of a specific schema.
To create multiple versions of a schema, do the following:
- Edit an existing schema or see Managing Schemas to create a new one.
- Click the checkbox to allow multiple versions of the Schema.
- Under Versions, click the icon. Additional options to configure schema versions will display.
- Write the Version number, Display Name, and Schema Registry ID as shown in the example below.

- Version: Version number. The version must be an integer or follow semantic versioning (e.g., 1, 1.0).
- Display Name: Schema's unique display name. Display names can used to search and quickly find a schema or a list of schemas.
- Schema Registry ID: Set, store, and display the Schema Registry ID for a schema. The schema registry is used to identify each schema with it's unique ID for new or existing discoveries. You can also use the ID to conduct a search in Catalog.
- Write your schema content or import from file.
- Click Save.
You can save revisions of each schema version, see changes in the revisions, and revert to an older revision. To learn more about revision history, see Managing Object Revisions.
Applications
An application represents a program, process, microservice, IoT device, integration component or other runnable consumer, producer, or processor that interacts with the event broker. The following tutorials will walk you though some of the activities you will perform when creating and managing an application, including configuring Client Delivery Endpoints (CDE) and adding subscriptions.
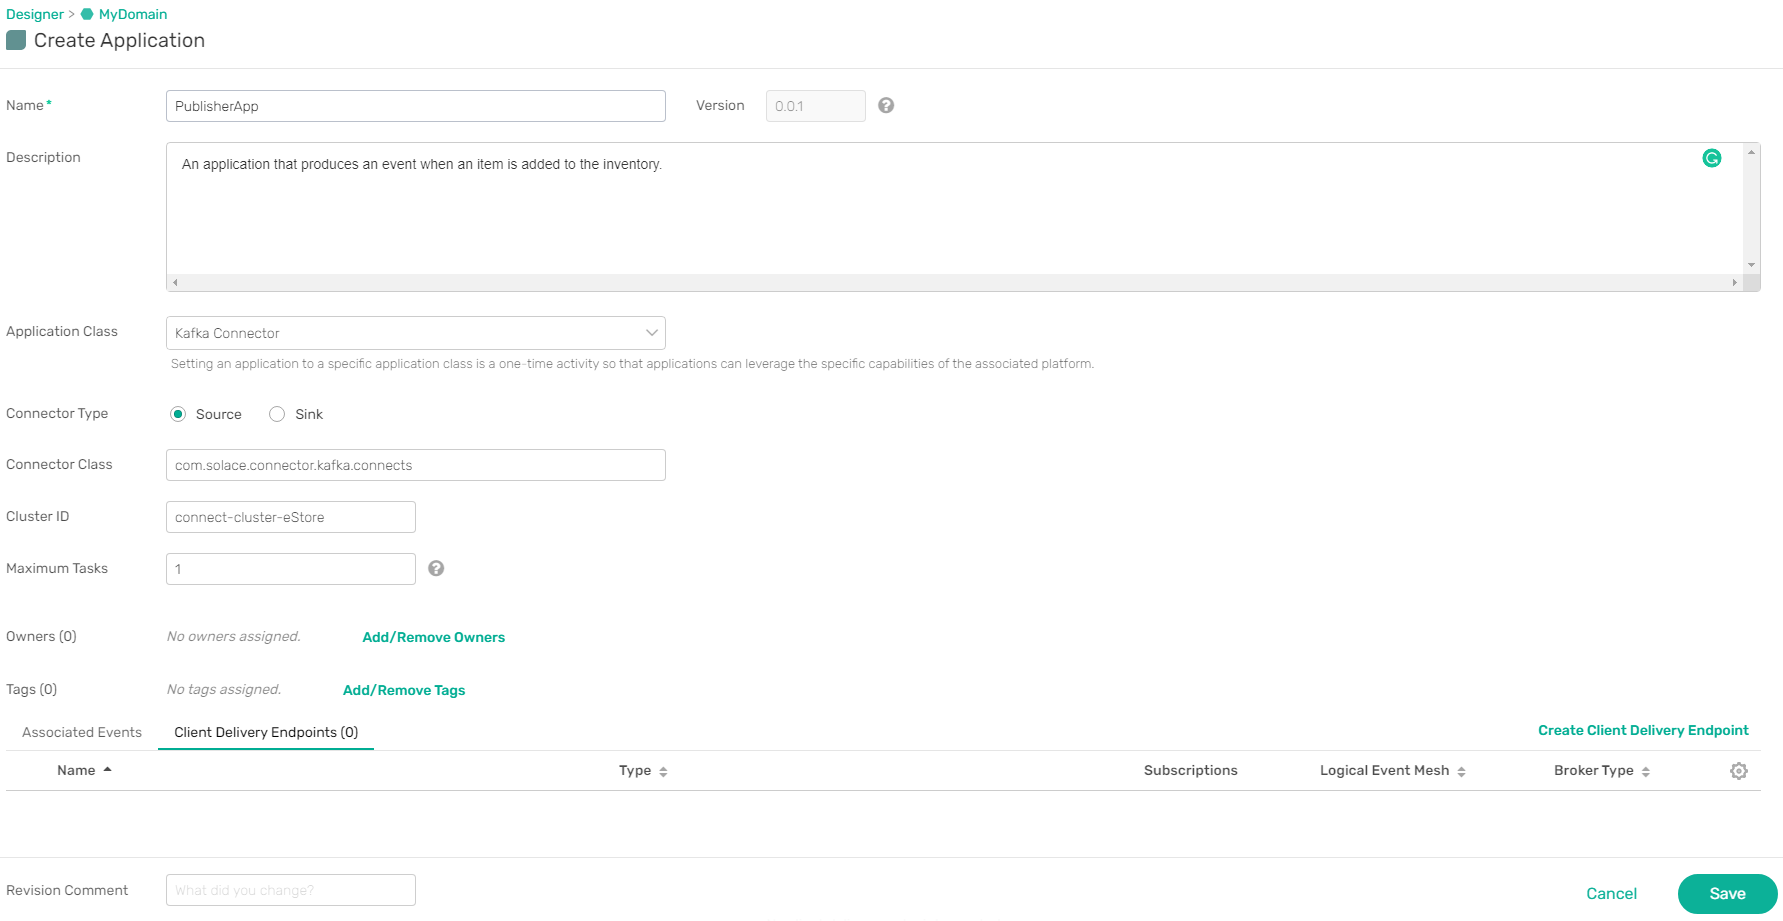
In this topic, we will walk you through the basic steps to create an application, configure Client Delivery Entpoints (CDEs), and add subscriptions. Along with PubSub+ event, we will also show you how to configure some of the Kafka-native attributes that will help in the design-time architecting of Kafka's event-driven architectures (EDAs), and in discovering EDAs directly from Kafka clusters.
Creating an Application
To create an application, do the following:
- Double click the application domain where you want to create an application.
- Select the Applications tab and then click Create Application or click Designer Toolkit located on the top right and click Create beside the Application label.
- On the Create Application page, complete the details as shown in the example below.
Field Description Name The name of the application. Description Provide information about the Application. It is important to thoroughly explain the application, so that its proper usage and business implications are clearly understood. The Description text box supports native Markdown. This enables you to include custom attributes in Markdown to be included in the AsyncAPI document. Click toggle preview
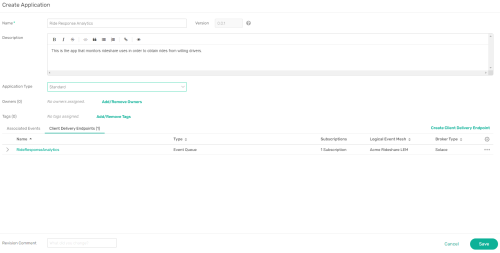
to preview raw markdown text in HTML format.Application Type Select the application type. You can select the Kafka Connector or leave it Unspecified (See step 4 for more information). Setting an application to a specific application type is a one-time activity so that applications can leverage the associated platform's specific capabilities. Owners Add or remove other members of your organization as application owners. Tags Add or remove application tags. Learn more about tags and its usage in the overview section (Tags) Associated Events Manually add or remove events to the application. See https://docs.solace.com/Cloud/Event-Portal/event-portal-designer.htm#Modify for more information Client Delivery Endpoints Create a Client Delivery Endpoints (CDEs) and add a subscription. A CDE specifies the location on an Event Mesh that is used by an application to consume events. To create a CDE, see Configuring a Client Delivery Endpoint - If you selected Kafka Connector in the Application Type list, provide additional information.
- Kafka Connector: A connector is used in Kafka for connecting Kafka event brokers with external systems to stream data into or out of Apache Kafka. In the Event Portal, a Kafka Connector is an application class you select to configure associated published and/or subscribed events and a set of Kafka-native attributes as described below, as shown below.

- Kafka Connector: A connector is used in Kafka for connecting Kafka event brokers with external systems to stream data into or out of Apache Kafka. In the Event Portal, a Kafka Connector is an application class you select to configure associated published and/or subscribed events and a set of Kafka-native attributes as described below, as shown below.
- You now need to create a CDE and assign subscriptions to it. To do so, see Configuring a Client Delivery Endpointand Adding Subscriptions to a Client Delivery Endpoint
- Once the above configurations are completed, click Save.

Your newly created application will be visible in the Graph View.
Configuring a Client Delivery Endpoint
The Client Delivery Endpoint (CDE) specifies the location on an Event Mesh used by an application to consume events. You can create one more CDEs within an application and add multiple subscriptions to each CDE. The CDEs will then attract events to the application that are published to the corresponding LEM based on their subscriptions.
To create a CDE and add a subscription, do the following:
- Right-click on the application you want to use and select Edit. If you are already inside the application, click Edit located on the top right. In Edit mode, the Associated Events tab lists the subscribed events that were manually added to the application.
- Select the Create Client Delivery Endpoint tab.

- Click Create Client Delivery Endpoint located on the right.
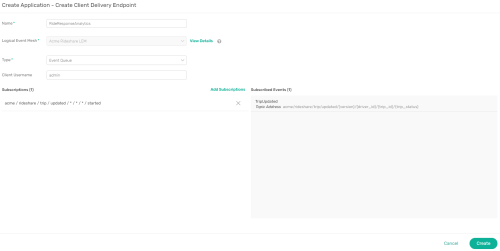
- On the dialog that appears, complete the following steps:
- In the Name field, give the CDE a name—the name must be unique in the account.
- Select a LEM using the drop down menu. If you don't have a LEM setup, click Add New to create one. For more information about creating a LEM, see Designer
- Select the CDE Type. Your CDE can be a Kafka Consumer Group, Event Queue, Durable Topic Endpoint, or Direct Client Endpoint.
- Add the Client Username you want to use.
- You now need to Add Subscriptions to subscribe to an event for the application to consume. To learn how to add subscriptions, refer to Adding Subscriptions to a Client Delivery Endpoint
- Once the subscriptions are added, click Save.

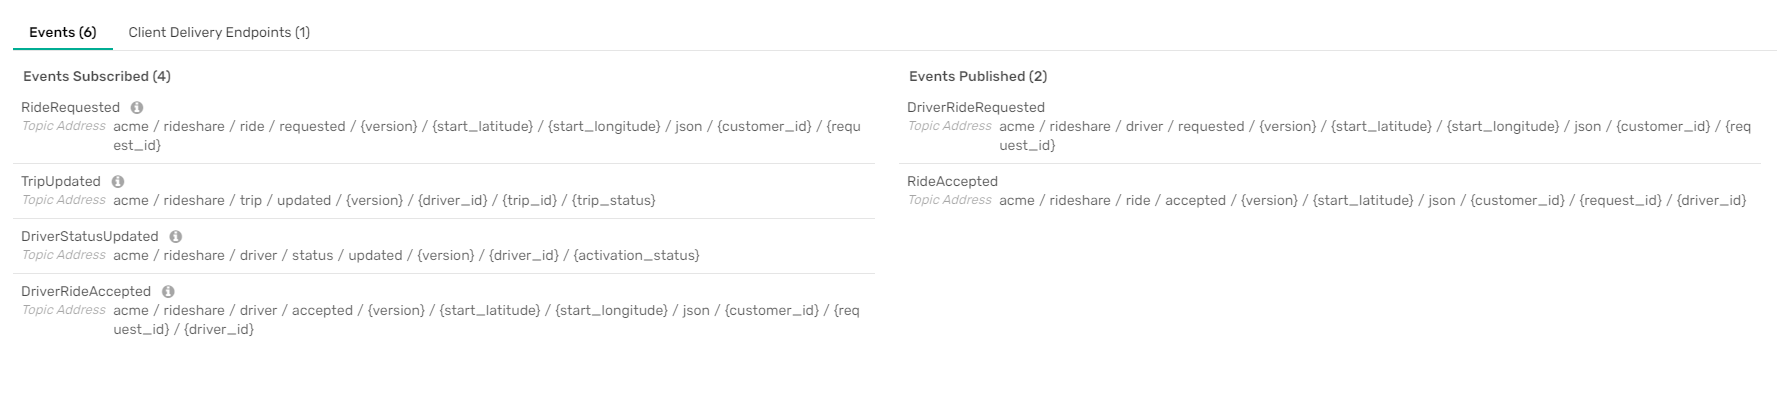
Right-click on the application and select View Details. In View Details mode, the Events tab lists all events attracted to the application, including the manually associated events and those attracted to the application based on the CDE's subscription. The information symbol ![]() beside the events indicates that the events are dynamically attracted to the application based on the CDE's subscriptions. You can hover your cursor over the icon to get more information.
beside the events indicates that the events are dynamically attracted to the application based on the CDE's subscriptions. You can hover your cursor over the icon to get more information.
Adding Subscriptions to a Client Delivery Endpoint
You can add subscriptions to a Client Delivery Endpoint (CDE) By Events or Manually. The manual subscription builder is not supported for Kafka subscriptions.
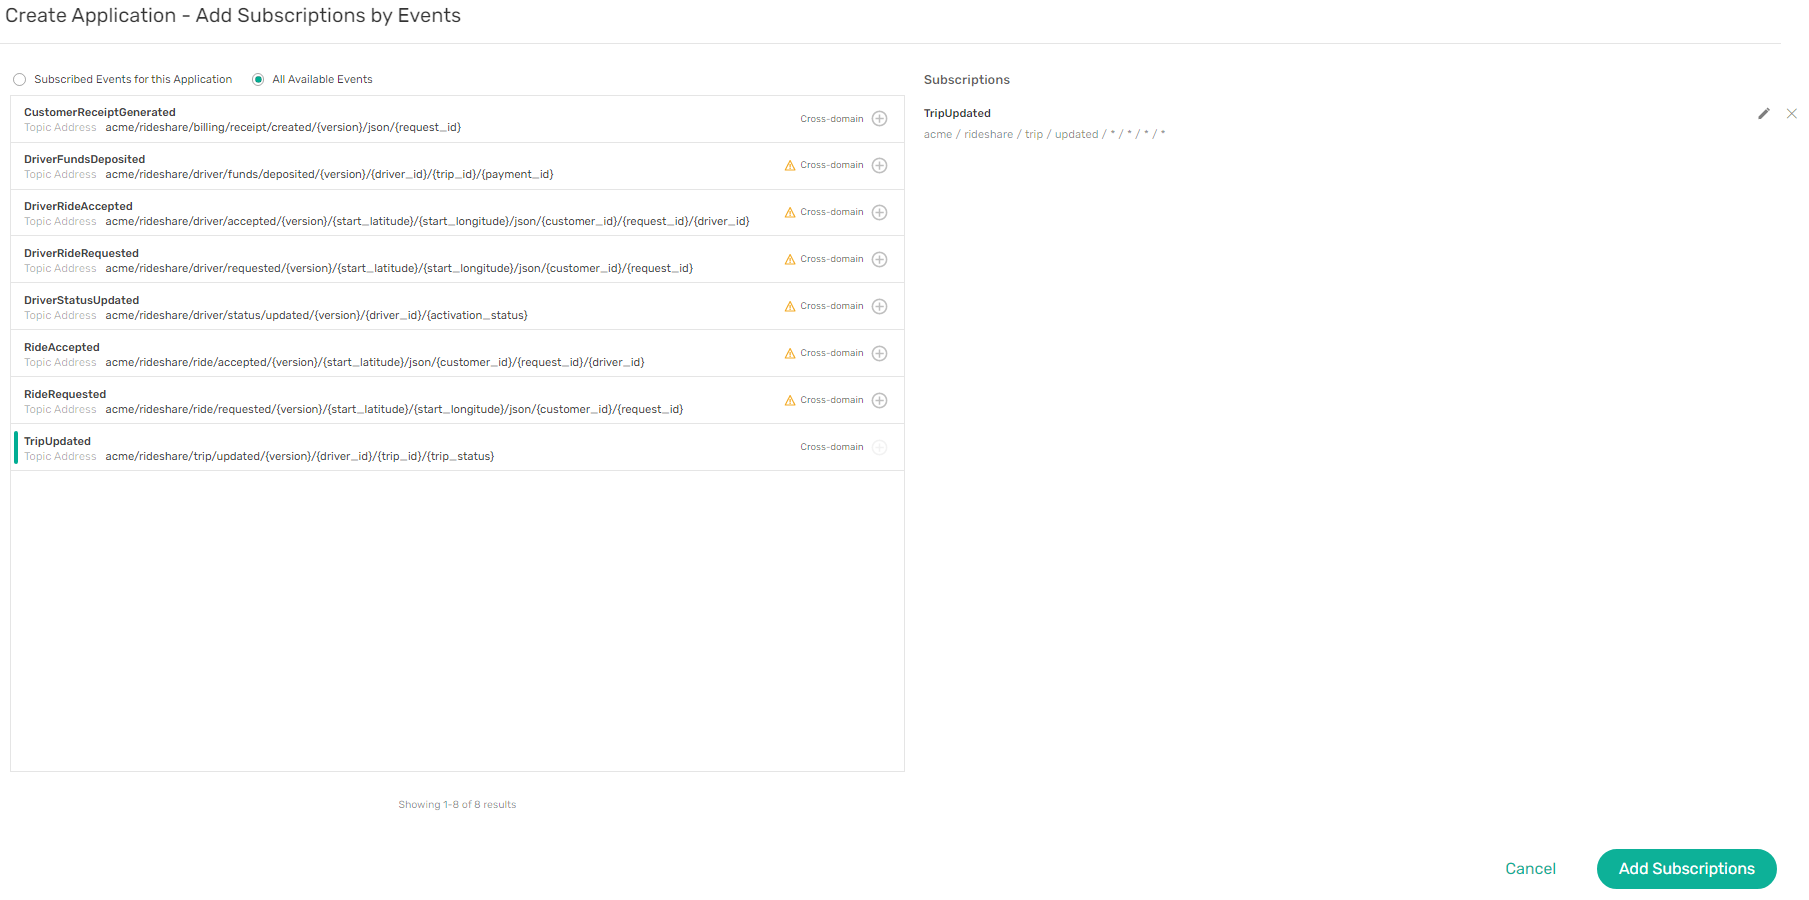
To add subscription By Events, perform the following steps:
- Select Add Subscription > By Events.
- Click the add symbol () beside an event to build subscriptions. In this case, we will select TripUpdated event. .
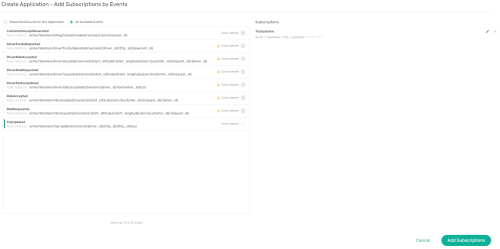
Cross-domain events (events originating from another application domain) that are non-shared are flagged with an orange marker. To be able to view cross-domain non-shared events and to use them to build subscriptions, users must be assigned to the application domain where the non-shared events belong. For more information, see Non-shared Events.
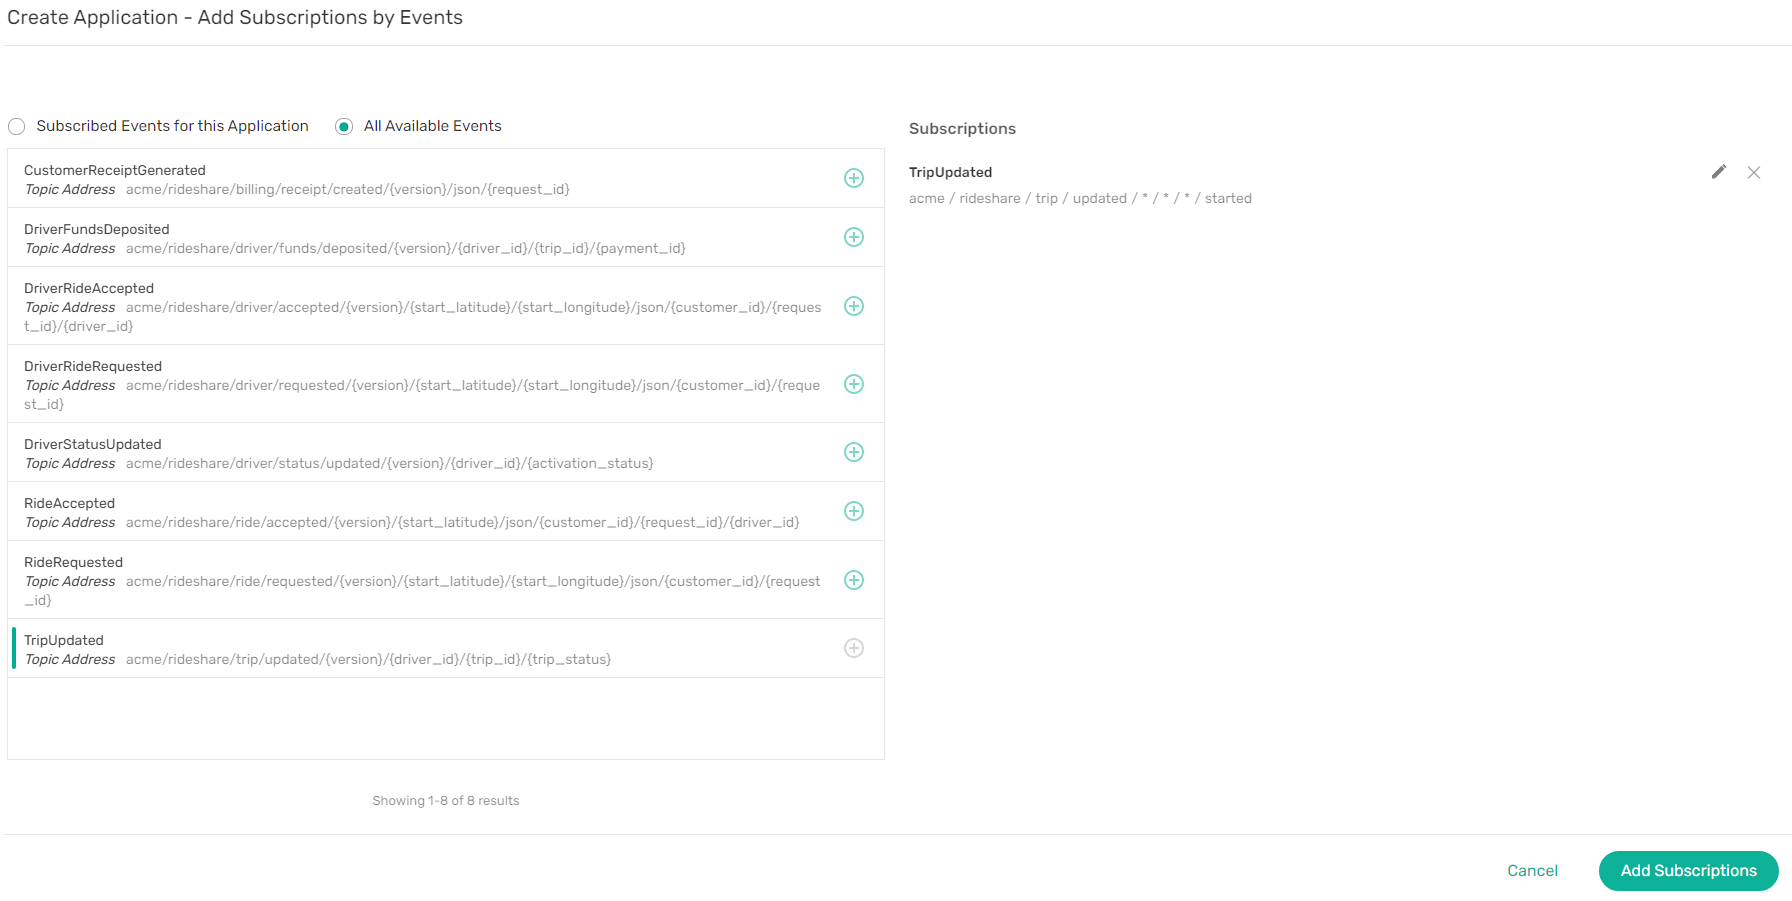
- On the dialog that appears, if you have variables you can set the variables to specify the events you want to subscribe to. In the example below we update the
{trip_status}variable as we want the time-stamp information for the entire trip. To add the subscription, select Add Subscriptions and then click the Select button.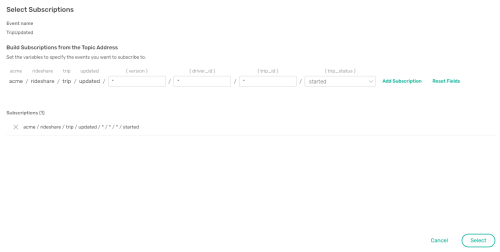
- Click Add Subscriptions. The event will display on the Subscribed Events list.
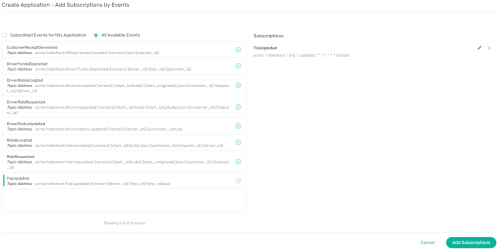
- Click Create.
- Click Save.


To add subscriptions Manually, do the following:
- Click Add Subscription > Manually
- Add a topic address in the Type Your Subscription field. You can use the following wild cards:
*to match topics at a level. For example,inventory/*/shoesorinventory/*.>to match topics at any level above.>is placed at the end of a topic address. For example,inventory/wearable/>.
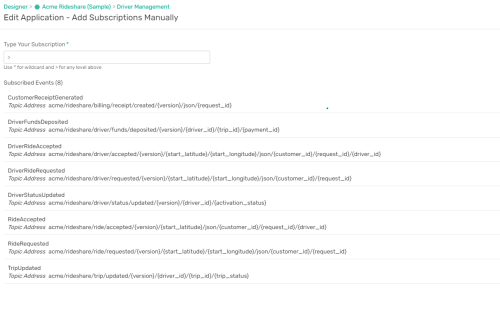
- From the available list of events, select an event you want to use.
- Click Add.
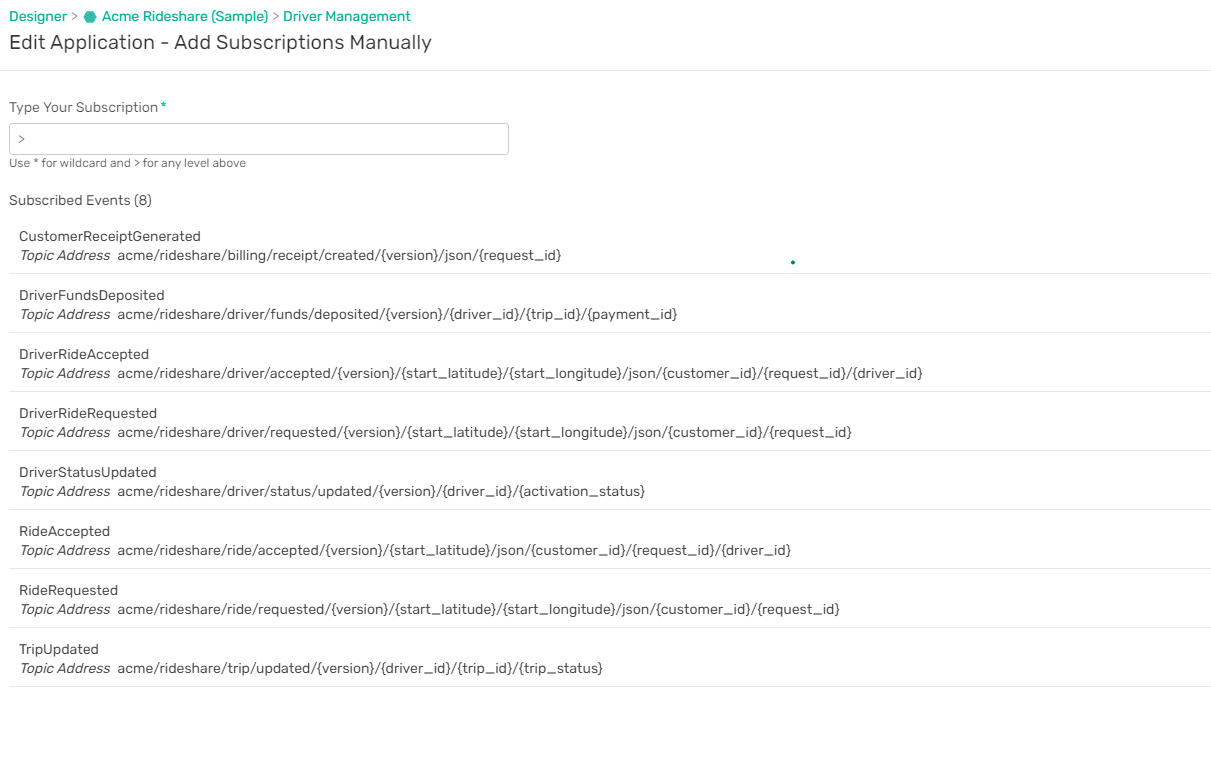
The added events will display on the Events Subscribed list. You can now manage the events and add them to the Event Published or Event Subscribed list.
To learn more, see Adding Events to Your Application.
Adding Events to Your Application
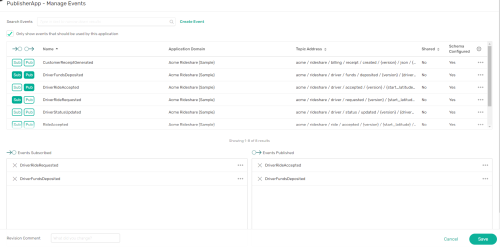
When modelling applications in Event Portal, you need to add events to your application. The following tutorial will walk you through the steps to add an event to the Events Subscribed or Events Published list for your application.
To add events to the Events Published or Events Subscribed list for your application, do the following:
- Navigate to the Designer tab and select an application domain.
- Inside the application domain, select an application. A panel will appear on the top right.
- On the panel, click Manage Events. The Manage Events screen will display all the events that are available. Based on the user role and access level, the following events will be available for selection.
Administrator or Event Portal Manager role:
- events in the current application domain
- shared and non-shared event from all application domains.
Event Portal User role:
- events in the current application domain
- all shared events from application domains that the user does not have access
- non-shared events from application domains that the user is assigned to. Users with Event Portal User roles must have at least Viewer level access in other application domains to view non-shared events.
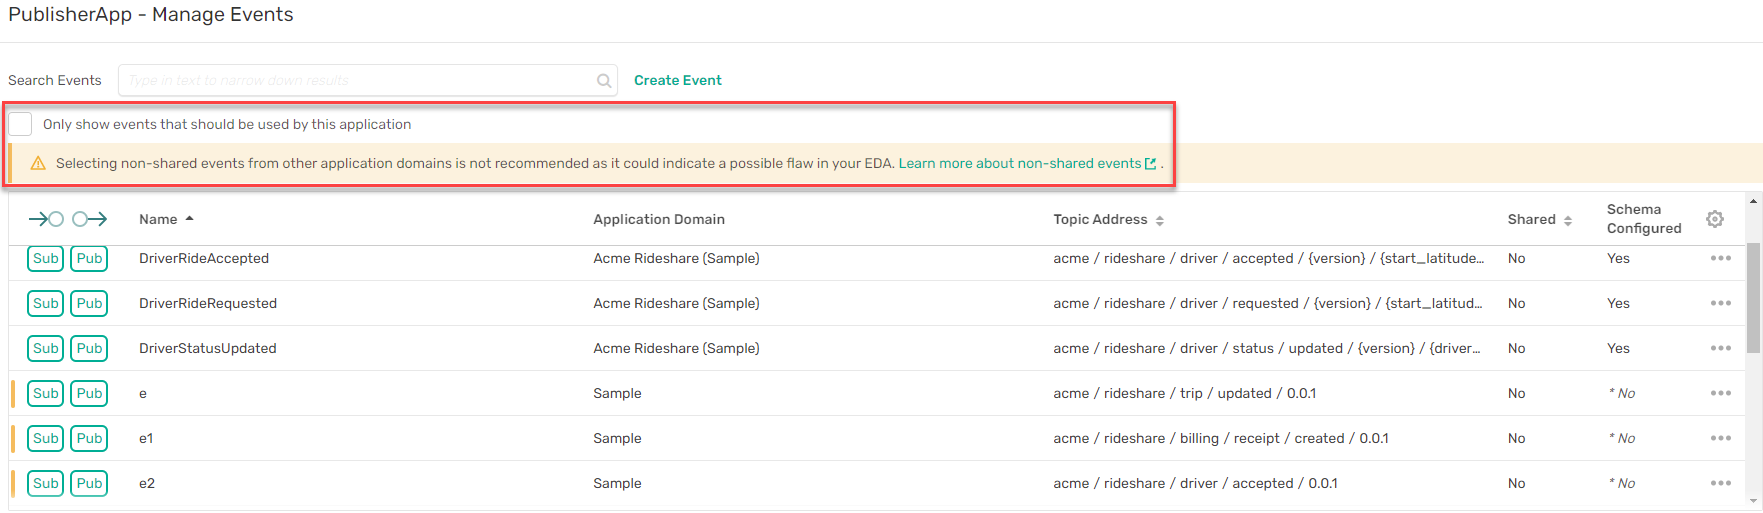
Note that by default, non-shared events from other application domain will be hidden. To view non-shared events, uncheck the checkbox as shown in the image below.
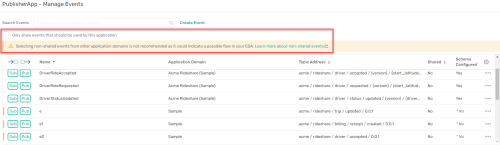
- Once you've identified the event you want to use, select the Pub or Sub icon. The selected event will be added to the Events Published, or the Event Subscribed list. You can also add events to both the Events Published or Events Subscribed list simultaneously.
Search events using keywords to filter your results or select the checkbox to only view events in the current application domain.
- Click Save.

Generating an AsyncAPI
You can generate an AsyncAPI document for each application in a relationship graph. To generate an AsyncAPI document for an application, perform the following steps:
-
Navigate to Designer and open the application domain in which your application resides.
- Select the application for which you want to generate the AsyncAPI specification.
- Right-click on the application and select AsyncAPI.
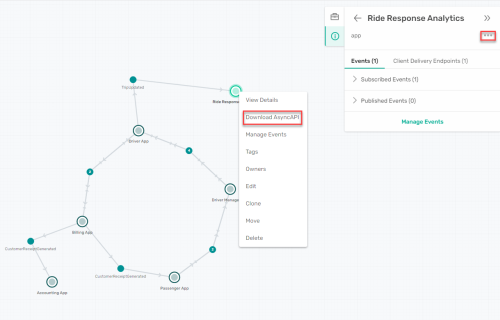
-
Choose your file format and click the Download button. The Async API specification will be downloaded to your computer.

You can now use the AsyncAPI specification as an input to a code generator to created your event-driven application using the language and framework of your choice. For a hands-on tutorial on how to generate AsyncAPI specs from the Event Portal check out the Design to Code using Event Portal + AsyncAPI Code Generation codelab.
Managing Object Revisions
The Event Portal tracks the history of changes made to objects defined in the Event Portal — Schema, Event and Application — by creating a new revision of the object each time it's modified. You can view the changes between different revisions and roll back to a previous revision if you need to.
Viewing the Revision History
To view or edit the revisions of an application, event, or a schema, do the following:
- Log in to the PubSub+ Cloud Console if you have not done so yet. The URL to access the Cloud Console differs based on your authentication scheme. For more information, see
- On the navigation bar, select Catalog or the Designer.
- Double-click the application domain.
- On the top menu, click Schemas, Events, or Applications.
-
From the available list, select an event, schema, or application.
-
Click on the revisions icon
 located on the top right to view the list of revisions for that object.

Viewing an Older Revision
You can view each revision to see the name of the person who made changes in that Rev. You can also see their change comments if they left any. When you select a previous revision of the object, you'll see a header, like the image below, at the top of the page. You can navigate and view changes for each revision.
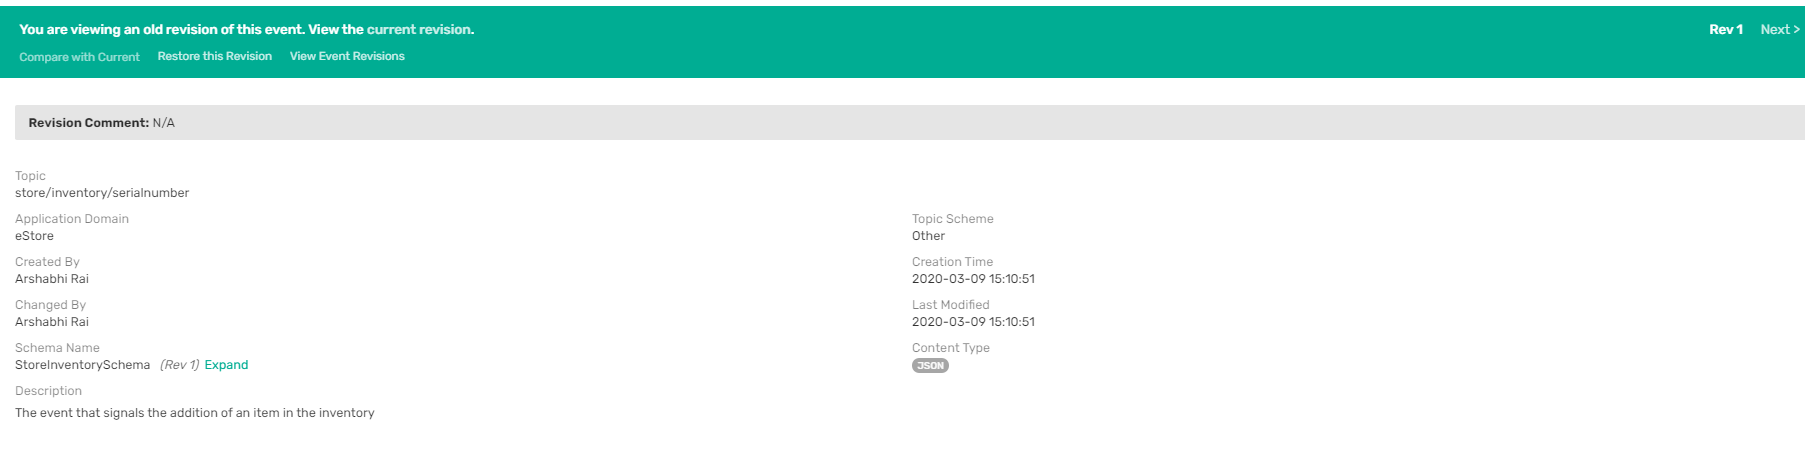
The functions displayed on the revisions menu, similar to the above image, are described in the following table.
| Function | Description |
|---|---|
|
View Current Revision |
View the latest revision of the object. |
|
Compare with Previous |
Coming Soon |
|
Compare with Current |
Coming Soon |
|
Restore this Revision |
Roll back the content of the object to the previous revision that you are viewing. |
|
View Event Revisions |
Return to the list of event revisions. |
| View Schema Revisions | Return to the list of schema revisions. |
| View Application Revisions | Return to the list of application revisions. |
|
Previous and Next |
View the previous or next revision of the object. |
Restoring a Previous Revision
To restore an event, application, or a schema to a previous revision, do the following:
- Select the event, application, or schema that you want to restore to a previous version
- Click the revision icon () located on the top right.
- Select the version you want to restore and click the Restore or the Restore Revision icon.


Revision history is retained in Event Portal up to a max of 100 revisions per object before the oldest revisions is deleted. When you restore an older revision, a copy of the previous revision is automatically created. For example, if you restore Rev 39, a copy of Rev 39 is created, and that copy will become the new (current) revision.
Deleting an Object
You can delete applications, events, and schemas or restore deleted objects if required. Note that when a schema is deleted, all the revisions of that schema are also deleted.
To delete an object, do the following:
- Navigate to the application domain of your choice
- At the top of the screen, click on Schemas, Events or Application.
- Select the desired event, schema, or application from the list.
- Click the delete (
 ) on the top right.
To restore a deleted object, do the following:
- Navigate to the application domain of your choice
- At the top of the screen, click on Schemas, Events or Application.
- Click the ellipsis (...) on the top right and follow the prompt.
- Locate the object you want to restore and then click Restore.
Additional Resources
- Learn the fundamentals of Event Portal at PubSub+ Event Portal 1.0.
- Check out the best practices for creating an event topic architecture in Topic Architecture Best Practices
- Overview information, sample codes, and reference guides for the Event Portal v1 REST API.