Creating Agents
An agent is a large language model (LLM) loop shaped by a set of instructions, a model, and the tools it can call. For more information about agents, see What Is an Agent?. An agent runs inside the Agent-Workflow Executor, the process that hosts the LLM loop and dispatches tool calls. You describe the agent through the Agent Mesh UI, and the runtime brings it online. There is no YAML to write and no restart required.
Agent Configuration
Each agent you build is composed of the following configuration that you can configure and modify:
-
Agent Details — The name and description.
-
Instructions — The instructions the agent follows. They define the agent's role, tone, and behavior.
-
Skills — Specialized bundles of tools and context that your agent loads on demand. They are ideal for less frequent, complex tasks where detailed instructions and reference material are needed alongside the tools.
-
Toolsets — Toolsets give your agent always-on capabilities, such as data analysis and web search.
-
Connectors — Connectors allow your agent to connect and interact with external systems.
-
Model — The named model configuration the agent uses for its reasoning. The general configuration is the default and suits most agents. General is your deployment's default model configuration. You can select other models depending on what the agent does. The list of models available depends on what your administrator has configured in your deployment.
- Agent Card — The agent card describes its expertise and supported data formats, helping other agents and entry points find and discover what your agent does. This includes:
Abilities — You can include up to 10 abilities, which are descriptions of what the agent can do.
Communication Modes — The communication modes include the input and output modes supported by the agent. You can specify the inputs and outputs as files or text. The defaults are
text.
When you create an agent, Solace Agent Mesh stores it, deploys it, and makes it available for you and other agents to use. You can create and manage agents from the Agent Management page in the Agent Mesh UI. For information about:
-
Viewing Agents, see Viewing Agents
-
Creating Agents, see Creating an Agent
-
Managing Existing Agents, see Managing Agents
Alternatively, you can also create agents using the Agent Mesh CLI. For more information, see Creating Agents with the CLI. In addition to creating agents, you can register an agent that runs in another Agent-to-Agent (A2A)-compatible framework. For more information, see Connecting External Agents.
Prerequisites
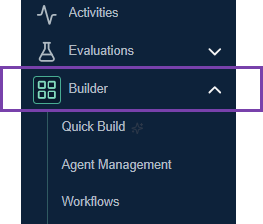
If authentication and role-based access control (RBAC) are enabled on your Agent Mesh, Builder > Agent Management may not be available in the navigation bar. You may need to contact your Agent Mesh administrator to configure access for you. For more information, see RBAC Reference. Before proceeding, ensure you see Builder in the navigation bar as shown:
Viewing Agents
To access Agent Management, in the UI, select Builder > Agent Management from the navigation bar.
The Agent Management page shows the agents that are available in the following tabs:
-
Deployed: Agents that are online and ready for use with Agent Mesh. All built-in agents, including the Orchestrator, appear in this tab.
-
Undeployed: Agents that are saved but not yet running or available to Agent Mesh.
Each row shows the agent's name, status, type, and creator, and a More menu with the actions for that agent. For more information, see Managing Agents.
Creating an Agent
You can create an agent. The Agent Mesh UI provides convenience features, such as a Generate button to draft descriptions for you. The description is important for other users and other agents to understand what the agent does. For this reason, we recommend that you put the appropriate amount of information in the description field.
After you create and deploy your agent, you can start a chat to test it. For more information about starting chats, see Chatting with Agents.
As an example, the following steps show how to create a release-notes assistant.
Creating an Agent Using AI
You can create an agent using AI to help propose values for the required fields based on a description of the problem you are solving. You can later edit the fields and modify them based on your requirements before creating the agent.
For a broader, multi-turn conversational flow that also refines the draft with you before saving, use Quick Build (Experimental). The Add Agent > Create New Agent dialog documented here is a single-shot draft.
Perform the following steps to create an agent using AI:
-
In the Agent Mesh UI, select Builder > Agent Management from the navigation bar.
-
On the Agent Management page, select Add Agent > Create New Agent. For example, you can type the following text to describe the problem or goal:
We require a release-notes assistant for a software team. When given a list of merged changes, group them into Features, Fixes, and Breaking Changes, and write a concise summary formatted in Markdown. The release note should have an informative, friendly, and professional tone. Ask clarifying questions if the version number or release date is missing or if it is not clear what the changes are accomplishing.
-
After a few minutes, review the proposals provided by AI for the agent information. You can click Edit, change the proposed suggestions, and then click Apply. The sections that you can modify are:
-
Agent Details
-
Instructions
-
Skills
-
Toolsets
-
Connectors
-
Model
-
Agent Card
For information about the agent configuration, see Agent Configuration.
-
-
After you have completed your edits and reviews of the different areas for your agent, click one of the following buttons:
-
Create to only create the agent. You must deploy it to make it available to Agent Mesh.
-
Create and Deploy to create and deploy the agent.
-
Creating an Agent Manually Using the Agent Mesh UI
You can create an agent manually. This method allows you to specify the agent configuration individually.
To create an agent manually, perform the following steps:
-
In the UI, select Builder > Agent Management from the navigation bar.
-
On the Agent Management page, select Add Agent > Create New Agent.
-
Click Create Manually.
-
In the Create Agent dialog box, enter values for the Name and Description fields, then click Continue. For example:
-
Name:
My-First-release-notes-assistant -
Description:
Turns a list of merged changes into a grouped Markdown release-notes summary.
-
-
In the Instructions section, click Add Instructions, enter a prompt, then click Apply. For example:
You are a release-notes assistant for a software team. When given a list of merged changes, group them into Features, Fixes, and Breaking Changes, and write a concise Markdown summary in a friendly, professional tone. Ask a clarifying question if the version number or release date is missing.
-
(Optional) In the Skills section, click Add Skills, and select built-in or custom skills to give your agent specialized capabilities and instructions at runtime. Click Apply.
-
(Optional) In the Toolsets section, click Edit. Select the built-in and custom toolsets (uploaded by your organization), and then click Apply. For example, select Time Tools so the agent can resolve the current date for release notes.
The editor attaches the Artifact Tools toolset to every new agent. Agent Mesh also adds a data-analysis toolset automatically, even though it does not appear in the toolset list, because the runtime relies on both to shape and return results. The toolset count reflects only the toolsets you add on top of these.
-
(Optional) In the Connectors section, click Edit, and then click Add Connector. In the Add Connectors box, select the connectors you want and then click Close. Click Apply.
-
(Optional) In the Model section, click Edit, select the model you want to use, and then click Apply. You can select only one model for an agent.
-
(Optional) In the Agent Card section, click Edit, add abilities and specify the input or output modes, and then click Apply. In this section, you can:
-
Click Add Ability to add custom descriptions to describe what your agent does.
-
Select
textorfileas the input or output modes.
-
-
Click one of the following buttons to create your agent:
-
Create to only create the agent. You must deploy it to make it available to Agent Mesh.
-
Create and Deploy to create and deploy the agent. This button stays disabled until you add instructions.
-
For example, to test the release-notes assistant, start a new chat, and enter a list of merged changes.
Managing Agents
You can manage the status of an agent, the model and tools that an agent uses, view the audit information, and the agent card details depending on the state of the agent, which is deployed or undeployed.
Select an agent's row to open its detail panel, which shows the agent's status, its tools, its model, its agent card, and audit information such as who created it and when. The More menu on each row holds the lifecycle actions, which differ by the agent's state.
For a Deployed agent:
-
Chat with Agent — Open a chat session with the agent.
-
Edit — Reopen the agent editor to change its instructions, tools, model, or agent card.
-
View Access — List the users who can invoke this agent, whether they receive that access directly or through a claim mapping. For more information, see Managing Users and Roles.
-
Undeploy — Take the agent offline. The agent moves to the Undeployed tab and stops responding, but its configuration is retained. Confirmation is required to undeploy an agent.
For an Undeployed agent:
-
Open Agent — View the agent's detail panel.
-
Edit — Reopen the agent editor and modify the details.
-
Deploy — Bring the agent online. It moves to the Deployed tab and starts responding.
-
Delete — Remove the agent permanently. Deleting an agent requires you to type
DELETEto confirm.
Deleting an agent does not delete the chat sessions it handled. Those sessions are retained, but they are disassociated from the agent and are no longer reachable through it.
Defining Agents as Code Using the CLI
Alternatively, you can use the Agent Mesh CLI (the sam CLI command) to define your agents using a declarative config to describe the agents. The declaration is specified in YAML format. Using the CLI to create your agents allows you to version-control the specifications and is suitable for automation and continuous integration and continuous delivery workflows. For more information, see Creating Agents with the CLI.
Next Steps
You have an agent running in Agent Mesh. Most readers next want to give it richer capabilities:
-
To bundle reusable tools with the instructions that drive their use, see Creating Toolsets.
-
To package on-demand instructions and tools as a skill, see Creating Skills.
-
To connect an agent to a database or other external system, see Configuring Connectors.
-
For the catalog of tools that ship with Agent Mesh and can be attached without custom code, see Built-In Tools.