Disk Drive Replacement
This section describes how to replace a failed disk drive in the Solace 3530 or Solace 3560 appliance event broker.
A Solace 3530 or Solace 3560 has four system drive bays that are accessible from the front of the appliance event broker. The drives are fully hot swappable, which allows you to remove and install a disk drive without powering down the appliance event broker or removing it from its rack.
Before you begin, review the ESD/Safety Precautions and Tools and Equipment Requirements.
To replace the disk drive, see Replacing Solace 3530/Solace 3560 Disk Drives.
ESD/Safety Precautions
Before replacing appliance event broker disk drives, review the following safety warning.
To prevent equipment damage from Electrostatic Discharge (ESD), always ensure that the appliance event broker chassis is electrically connected to earth ground. Always follow ESD prevention procedures when removing and replacing power supplies. Use an anti-static wrist strap, or another anti-static device. If no wrist strap or mat is available, touch the metal part of the chassis to ground yourself.
Tools and Equipment Requirements
- Electrostatic discharge wrist strap
- Anti-static mat
- Replacement disk drive (supplied by Solace)
Replacing Solace 3530/Solace 3560 Disk Drives
To replace a disk drive in a Solace 3530 or Solace 3560, perform the following steps:
- Step 1: Shut Down Failed Disk Drive
- Step 2: Remove Failed Disk Drive
- Step 3: Install New Disk Drive
- Step 4: Enable and Rebuild New Disk
Step 1: Shut Down Failed Disk Drive
To shut down a failed disk drive, use the following procedure:
- Enter the following command at the User EXEC Level prompt:
solace> enable
solace#
The Solace Event Broker CLI is now at the Privileged EXEC level.
- Recommended: As a precaution, enter the following Privileged EXEC command to copy the current configuration database file from the event broker to an external SFTP or SCP server (as applicable) for backup:
Ensure that you have an SFTP or SCP server on the event broker network to which you have IP connectivity.
solace# copy current-config sftp://[<username>@]<ip-addr>/<remote-pathname>
or
solace# copy current-config scp://[<username>@]<ip-addr>/<remote-pathname>
Where:
<username>is the CLI user name and<ip-addr>and<remote-pathname>point to the location where the current configuration database file is copied onto the SFTP or SCP server - To confirm that the disk drive has failed, enter the following User EXEC command:
solace# show disk
An example display from
show diskUser EXEC command with a failed disk drive is:Reload required: No Attribute Disk 1 Disk 2 ------------------ -------------------- -------------------- Device Model INTEL SSDSC2BB120G4 INTEL SSDSC2BB120G4 Capacity (MB) 114473 114473 Admin State enabled enabled Operational State failed up RAID in fully redundant state: Yes Attribute Disk 3 Disk 4 ------------------ -------------------- -------------------- Device Model Capacity (MB) Admin State shutdown shutdown Operational State down down RAID in fully redundant state: No
Note which disk drive has failed.
- To shut down the failed disk drive, enter the following CONFIG commands:
solace# configure
solace(configure)# hardware
solace(configure/hardware)# disk <disk-name> shutdownWhere:
<disk-name>is the number of the failed disk drive. Valid values are 1, 2, 3, or 4. - To confirm that the failed disk drive is shut down, enter the following Global CONFIG command:
solace(configure/hardware)# show disk
In the displayed output, the
Admin Statefor the disk should beshutdown.
Step 2: Remove Failed Disk Drive
Do not attempt to remove a disk drive before completing Disk Drive Replacement. Removing a disk drive from an appliance event broker without performing a disk shutdown results in service interruption and/or data loss.
To remove a failed disk drive from an appliance event broker, follow this procedure:
- To reveal the available disk drives, pull down the top of the hinged portion of the front panel.
- Locate the disk drive you want to remove.
- Slide the release button to the right (that is, toward the disk drive) to open the latch on the system drive bay.
Opening the System Drive Bay
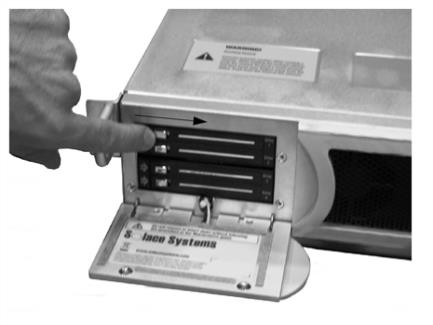
The latch springs open and the disk drive is released from the system drive bay.
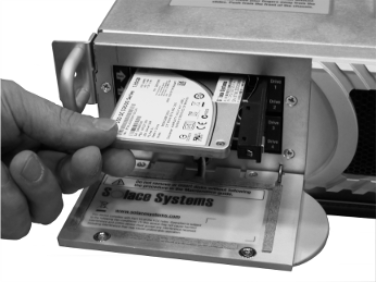
- Pull the disk drive completely out of the system drive bay.
Removing a Disk Drive
- Return the failed disk drive to Solace.
Step 3: Install New Disk Drive
To install a new Solace-supplied disk drive in an appliance event broker, follow this procedure:
Only use a new Solace-approved replacement disk drive for this procedure. Attempting to use an existing disk drive from another appliance event broker or any other source could result in communication problems and/or data loss.
- Insert the disk drive into the vacant appliance event broker drive bay, and shut the latch on the system drive bay to return it to the full closed position.
Install the new disk drive into the vacant bay only. Moving the operational disk drive to the vacant bay may result in communication problems or data loss within the event broker.
The new disk drive is now locked into the appliance event broker bay
- Close the hinged portion of the front panel.
Step 4: Enable and Rebuild New Disk
To enable and rebuild a new disk drive, follow this procedure:
- To enable the new disk drive, enter the following Hardware CONFIG command:
solace# configure
solace(configure)# hardware
solace(configure/hardware)# disk <disk-name> no shutdownWhere:
<disk-name>is the number of the failed disk drive. Valid values are 1, 2, 3, or 4. - To confirm that the new disk drive is in waiting for rebuild mode, enter the following command:
solace(configure/hardware)# show disk
An example display from
show diskwith a waiting for rebuild disk is:Reload required: No Attribute Disk 1 Disk 2 ------------------ -------------------- -------------------- Device Mode INTEL SSDSC2BB120G4 INTEL SSDSC2BB120G4 Capacity (MB) 114473 114473 Admin State enabled enabled Operational State waiting-for-rebuild up RAID in fully redundant state: Yes Attribute Disk 3 Disk 4 ------------------ -------------------- -------------------- Device Model Capacity (MB) Admin State shutdown shutdown Operational State down down RAID in fully redundant state: No
It can take several seconds for the
Operational Stateof a disk to change towaiting-for-rebuild. - Enter the following commands:
solace(configure/hardware)# end
solace# admin
solace(admin)#
solace(admin)# disk - To start rebuilding the new disk drive, enter the following commands:
solace(admin/disk)# rebuild
- Optional: To shorten the rebuilding time, enter the following Disk Admin EXEC command, then
ywhen prompted to continue:solace(admin/disk)# rebuild-speed high
Changing the disk rebuild time may impact performance of the appliance event broker.
This should only be done if the appliance event broker is not passing traffic.
Do you want to continue (y/n)? y - To confirm that the new disk drive is recovering, enter the following commands:
solace(admin/disk)# exit
solace(admin)# show disk
It can take several seconds for the
Operational Stateof a disk to change torecovering.An example display from
show diskwith a recovering disk drive is:Reload required: No Attribute Disk 1 Disk 2 ------------------ -------------------- -------------------- Device Mode INTEL SSDSC2BB120G4 INTEL SSDSC2BB120G4 Capacity (MB) 114473 114473 Admin State enabled enabled Operational State recovering up RAID in fully redundant state: Yes Attribute Disk 3 Disk 4 ------------------ -------------------- -------------------- Device Model Capacity (MB) Admin State shutdown shutdown Operational State down down RAID in fully redundant state: No