Power Supply Replacement
This section provides information for how to replace power supplies in Solace Appliance Event Brokers.
Before you begin, ensure that you review the ESD/Safety Precautions and Tool and Equipment Requirements.
If your appliance event broker is running with redundant power supplies installed and one is found to be defective, Solace recommends that you leave the defective power supply in the appliance event broker until the replacement unit arrives to ensure that correct airflow is maintained in the appliance event broker.
ESD/Safety Precautions
Before hot swapping appliance event broker power supplies, review all safety warnings in this section.
Use this information in conjunction with the safety information contained herein and the safety guidelines listed in Preparing Your Site.
To avoid the risk of personal injury or death from electric shock, before performing any of the following power supply procedures, unplug the power cord from the power source outlet on AC units to ensure that power is removed.
Wear protective gloves when hot swapping the power supply to keep from being burned. Under full load conditions the power supply can be very hot.
To prevent equipment damage from Electrostatic Discharge (ESD), always ensure that the appliance event broker chassis is electrically connected to earth ground. Always follow ESD prevention procedures when removing and replacing power supplies. Use an anti-static wrist strap, or another anti-static device. If no wrist strap or mat is available, ground yourself by touching the metal part of the chassis.
Tool and Equipment Requirements
- protective gloves
- electrostatic discharge wrist strap
- anti-static mat
- replacement power supply (supplied by Solace)
Replacing Solace 3530/3560 Power Supplies
This section describes the procedure for hot swapping an AC power supply in Solace 3530 or Solace 3560. Hot swapping allows you to remove and install a power supply without powering down the appliance event broker. Follow these steps:
If problems occur, you can review the Troubleshooting section for more information.
Use this information in conjunction with the safety information contained herein and the safety guidelines listed in Preparing Your Site.
Step 1: Removing Power Supplies
To remove the failed power supply, follow this procedure:
- Use an anti-static wrist strap or other device to ground yourself.
- Put on protective gloves to keep from being burned by a hot power supply.
- Facing the rear of the appliance event broker, identify the failed power supply by checking the bay that it is installed in, and checking that the Green LED on the power supply is off.
Power Supply Rear View

- Unplug the power cable from the power connector to ensure that power is not supplied.
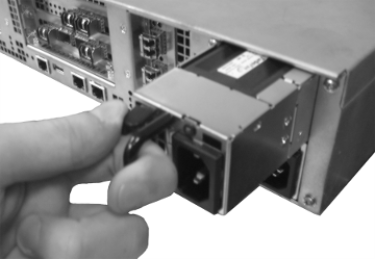
- Grasp the metal handle on the power supply while pushing the release latch to the right (that is, toward the handle), and pull the failed power supply out of the chassis slot.
Removing a Power Supply from the Chassis
- Return the failed power supply to Solace.
Step 2: Installing New Power Supplies
To install a new power supply, follow this procedure:
- Allow the power supply to reach room temperature before installing.
- Use an anti-static wrist strap or other device to ground yourself.
- Inspect the power supply to ensure that the pins and electrical connections are not damaged.
- Insert the power supply in the intended chassis slot, and, using your hand, firmly push on the power supply to ensure proper seating. Do not use excessive force when inserting the power supply.
An audible click is heard when the power supply is properly seated and the latch is fully engaged.
- To ensure that the power supply is properly seated and latched, tug on the power supply handle with moderate force. You should not be able to unseat the power supply.
- When the power supply is installed in the appliance event broker chassis, insert the female end of a provided AC power cord in the power supply module.
- Push firmly on the AC power cord to ensure it is fully inserted in the power supply socket.
- Insert the male end of the AC power cord in into a three-terminal, single-phase power source that provides AC power within the acceptable range.
- Verify that the Green LED located in the upper right-hand corner of each power supply turns on.
- Verify that the LED on the front panel of the appliance event broker is lit blue. When lit, it indicates that the power is on. If you encounter problems, refer to Troubleshooting.
Troubleshooting
If you encounter problems with the hot-swapped power supply installation, check the following items:
- With the power on, for a Solace 3530/Solace 3560, is the front LED a steady blue color?
- If it is unlit, check the AC input, AC source, appliance event broker circuit breaker, and the power supply cable.
- If the blue power LED is still unlit, the problem might be a power supply failure.
- If it is flashing, the appliance event broker hardware has successfully initialized but the software has not.
- Does the appliance event broker shut down after being on a short time?
- If the system temperatures rise rapidly, the appliance event broker can overheat and shut itself down due to insufficient air flow. Monitor the system temperatures and chassis fan status by entering the
show environmentUser EXEC command. - Ensure that the chassis fans are working.
- Ensure that the chassis intake and exhaust vents are clear.