Micro-Integration Manager
Managing and monitoring your Micro-Integration is crucial to ensuring the smooth functioning of your data pipeline. To help you stay on top of this, Solace Micro-Integration Manager:
-
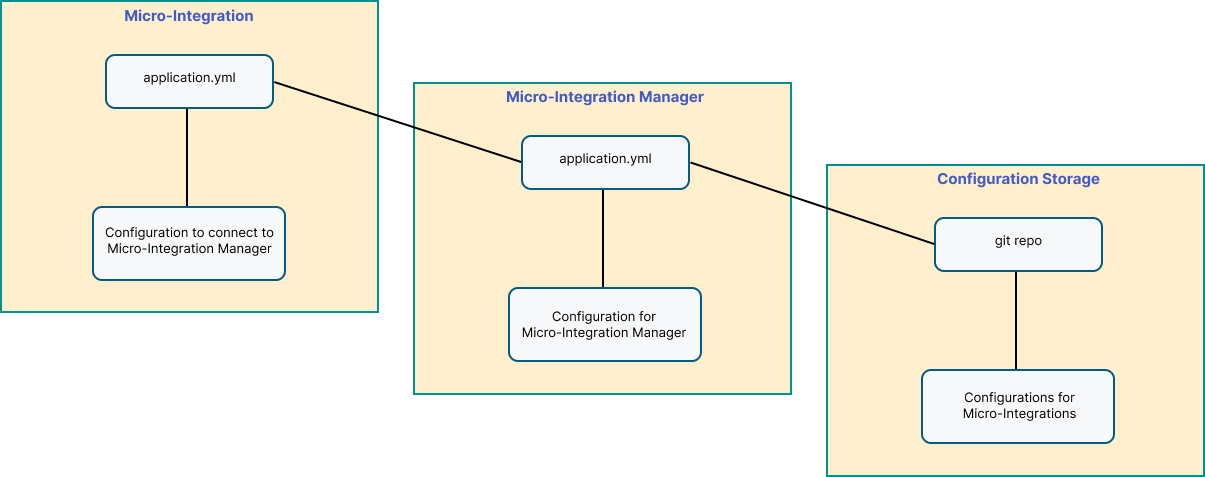
acts as a central configuration source for all self-managed Micro-Integration instances, making it easier to manage them in a consistent manner.
-
provides real-time monitoring and reporting on self-managed Micro-Integration performance. This includes all metrics configured and shared through the management interface, such as data throughput, latency, and error rates. You can use this information to identify potential issues in a self-managed Micro-Integration deployment and troubleshoot and resolve them.
-
provides configuration version control by maintaining the version history of each self-managed Micro-Integration's configuration, allowing you to identify changes and roll back to previous versions if needed. This ensures that changes are made in a controlled and traceable manner.
To understand how to use Micro-Integration Manager, see:
The sections that follow use Micro-Integration for IBM MQ, which is one of the examples provided in the download package for Micro-Integration Manager, as a reference.
Installing Micro-Integration Manager
To set up and install Micro-Integration Manager, you must download the package from the Solace product website. Micro-Integration Manager is available with a subscription to a support plan from Solace. The Micro-Integration Manager download is an archive file (ZIP) of a Docker (or Podman) container.
Starting Micro-Integration Manager
The extracted archive has the following structure:
For Micro-Integration Manager 2.0 and later.
.
├── solace-micro-integration-manager-2.0.0
├── LICENSE.pdf
├── licenses.txt
├── solace-micro-integration-manager-2.0.0.jar
└── samples
        ├── manager
        │   ├── README.md
        │   ├── start.sh
        │   ├── cloud-configs
        │   │   ├── ibmmq.yml
        │   │   └── tibcoems.yml
        │   ├── config
        │   │   ├── application-operator.yml
        │   │   └── application.yml
        │   └── docker
        │       ├── docker-compose.yml
        │       └── README.md
        └── micro-integrations
            ├── micro-integration.sh
            ├── applications
            ├── libs
            ├── micro-integrations-configs
            │   ├── ibmmq
            │   │   └── application.yml
            │   └── tibco
            │       └── application.yml
            └── security
                └── demo.jks
.
├──pubsubplus-connector-manager-1.2.4
├── LICENSE.pdf
├── licenses.txt
├── pubsubplus-connector-manager-1.2.4.jar
└── samples
        ├── connectors
        │   ├── connector.sh
        │   ├── applications
        │   ├── connectors-configs
        │   │   └── ibmmq
        │   │       └── application.yml
        │   ├── libs
        │   └── security
        │       └── demo.jks
        └── manager
            ├── README.md
            ├── config
            │   ├── application-operator.yml
            │   └── application.yml
            ├── cloud-configs
            │   └── ibmmq.yml
            ├── docker
            │   ├── README.md
            │   └── docker-compose.yml
            └── start.sh
This bundle contains a nested samples folder, which includes various examples of Micro-Integration Manager configurations, along with shell scripts to initiate their operation. In this folder, there are two subfolders:
-
micro-integrationscontains all the necessary example configurations and startup scripts for sample self-managed Micro-Integrations that are meant to be started with Micro-Integration Manager (with themicro-integration.shshell script). -
managercontains the initial configuration for Micro-Integration Manager (with thestart.shshell script).
Before you use the any of the provided scripts, you must verify and set the appropriate permissions. If the execution bit is missing, you can fix it by running these commands:
chmod +x ./manager/start.sh
chmod +x ./micro-integrations/micro-integration.sh
Other subfolders in the samples directory contain necessary configuration files, as well as a security keystore. For example, the provided Micro-Integration Manager archive has a pre-generated keystore called demo.jks in the samples/micro-integrations/security folder, which is used solely for demonstration purposes.
Starting Micro-Integration Manager With a Shell Script
A shell script to start Micro-Integration Manager allows you to initiate a Micro-Integration Manager instance and pre-configure it with essential parameters (see Script Shell Parameters). This script is stored in the samples/manager folder.
To start Micro-Integration Manager with the provided shell script, run:
# working directory is set to: [./samples/manager]

$> ./start.sh -j ../../solace-micro-integration-manager-2.0.0.jar
The previous command:
-
sets the configuration folder for Micro-Integration Manager to
samples/manager/config -
sets the remote configurations folder to
samples/manager/cloud-configsand initializes it as a Git repository -
initiates the Java JAR artifact with the name
solace-micro-integration-manager-2.0.0.jar
You can now access Micro-Integration Manager on the local machine at port 9500 with the default credentials (user as the username and pass as the password):
java -jar <...ABSOLUTE_PATH...>/solace-micro-integration-manager-2.0.0.jar  \
      --spring.config.additional-location=./config/ \
      --spring.cloud.config.server.git.uri=file://<...ABSOLUTE_PATH...>/samples/manager/cloud-configs/
This is a full list of the parameters that you can use with the shell script for Micro-Integration Manager:
Examples
These examples show how to start Micro-Integration Manager with various configurations and options. All scripts must be run from the samples/manager folder for Micro-Integration Manager and from the samples/micro-integrations folder for the self-managed Micro-Integrations.
To start Micro-Integration Manager with different credentials:
$> ./start.sh -j ../../solace-micro-integration-manager-2.0.0.jar -U admin -P admin
To start Micro-Integration Manager on a different port:
$> ./start.sh -j ../../solace-micro-integration-manager-2.0.0.jar --port 9100
To start Micro-Integration Manager with a different profile:
$> ./start.sh -j ../../solace-micro-integration-manager-2.0.0.jar -p operator
To start Micro-Integration Manager with a different config folder:
$> ./start.sh -j ../../solace-micro-integration-manager-2.0.0.jar -c different/config/folder
To start Micro-Integration Manager with a different cloud config repository:
$> ./start.sh -j ../../solace-micro-integration-manager-2.0.0.jar -C different/config/repo
The cloud config repository must be initiated as a Git repository. By default, this script initializes the provided folder as a Git repository (if it doesn't contain the .git folder) and commits all changes as an initial commit. However, it does this only for folders that can be accessed locally (not through SSH or HTTP/HTTPS protocols).
Show start CLI command:
This script prints the CLI commands to be executed during the script run. To do this, add -s as a parameter to the script input:
$> ./start.sh -j ../../solace-micro-integration-manager-2.0.0.jar -p operator -C different/config/repo -U admin -P admin -H 10.0.0.100 --port 8000 -s
This command doesn't start Micro-Integration Manager, but prints out the following CLI command:
java -Dspring.profiles.active=operator -jar <...ABSOLUTE_PATH...>/solace-micro-integration-manager-2.0.0.jar --spring.cloud.config.server.git.uri=file://<...ABSOLUTE_PATH...>/samples/manager/different/config/repo/ --solace.micro-integration-manager.security.users[0].name=admin --solace.micro-integration-manager.security.users[0].password=admin --server.host=10.0.0.100 --server.port=8000 --spring.config.additional-location=./config/
This might be useful if you want to use your own generated keystore file to encrypt values but not leave that functionality enabled permanently.
Starting Micro-Integration Manager as a Docker (or Podman) Container
The Micro-Integration Manager Docker (or Podman) container contains all necessary dependencies as well as the archive. Before you start Micro-Integration Manager as a container, you must bind a volume with the configuration file and provide access to the folder containing configurations for the self-managed Micro-Integrations.
To start Micro-Integration Manager as a container, run:
docker run -p 9500:9500 \
-v <MICRO-INTEGRATION CONFIGURATION>:/config \
-v <CONFIGURATION STORAGE FOLDER>:<CONFIGURATION STORAGE FOLDER> \
pubsubplus-micro-integration-manager:2.0.0;
This command starts the container and binds two volumes:
-
One volume contains the configuration file (which is mapped to an internal folder called
config) for Micro-Integration Manager, where Micro-Integration Manager reads your configuration. -
One volume is the folder that contains the configuration files for the self-managed Micro-Integrations.
If the configuration folder with the configuration files is stored remotely, the container might need to access it via the ssh protocol. In this case, you must generate a separate key pair using the ssh-keygen command and provide access to it:
docker run -p 9500:9500 \
-v <MICRO-INTEGRATION MANAGER CONFIGURATION>:/config \ # mandatory
-v <FOLDER WITH SSH KEYS>:/root/.ssh \           # optional
pubsubplus-micro-integration-manager:2.0.0
Starting Micro-Integration Manager Using Docker Compose
You can use Docker Compose to start Micro-Integration Manager. An example of the docker-compose.yml file can be found in the samples/manager/docker/ folder. By default, it uses:
-
../config/application.ymlas the configuration file for Micro-Integration Manager.
-
../cloud-configsas the main configuration storage.
Before you start Micro-Integration Manager using Docker Compose, you must initiate a Git repository in the configuration storage and commit configuration files for self-managed Micro-Integrations that are used.
To start Micro-Integration Manager using Docker Compose, run:
# change folder
cd ../cloud-configs

# initiate git repository
git init

# commit changes
git add .
git commit -m "initial commit"

# go back to this folder
cd -
Configuring Micro-Integration Manager
To allow Micro-Integration Manager to start and serve different self-managed Micro-Integrations properly, you must configure some parameters in the Micro-Integration Manager configuration file. By default, Solace provides an example of the configuration file, which can be found in a zip archive in the Micro-Integration Manager package under the samples/manager/config folder.
Creating Users
Because Micro-Integration Manager supports Basic Authentication, it requires a username and a password.
To configure authentication, create the following section in the Micro-Integration Manager configuration file:
solace:
  micro-integration-manager:
    security:
      users:
        - name: user
          password: pass
          roles:
            - user
Where user is the username and pass is the password. You can create more than one user by assigning different roles.
Setting up Configuration Storage
Configuration storage is the folder that contains all configuration files for the self-managed Micro-Integrations that run with Micro-Integration Manager. You must make this folder path accessible to Micro-Integration Manager, although self-managed Micro-Integrations don't need to access it.
You can set up configuration storage in a few different ways with the relevant Git commands. However, it must be a Git repository.
To set up configuration storage (for a local or self-hosted git repository):
-
Run
git initafter you create a folder anywhere on your local or remote system. -
Add necessary configurations for the self-managed Micro-Integrations, and include them in the commit (so that Micro-Integration Manager has access to them).
To set up configuration storage as a hosted repo (on GitHub, Gitlab, BitBucket, and so on), see Git Backend for Configuration Storage.
To point Micro-Integration Manager to the configuration storage folder, expose its path using one of the following mechanisms:
-
A configuration file:
spring:
  cloud:
    config:
      server:
        git:
          uri: 'file:///${user.home}/configurations'
-
over SSH:
spring:
  cloud:
    config:
      server:
        git:
          uri: 'ssh://server:/home/server/configurations'
-
over HTTP/HTTPS:
spring:
  cloud:
    config:
      server:
        git:
          uri: 'https://server.com:/home/server/configurations'
In case you are providing access to configuration storage over SSH or HTTP/HTTPS for Micro-Integration Manager, you must configure key pairs. Micro-Integration Manager uses the system SSH configuration, or provides credentials in the connection string.
Using HTTPS Connections
By default, Micro-Integration Manager works over HTTP. You can configure Micro-Integration Manager to switch to HTTP/HTTPS to secure communication between Micro-Integration Manager and the self-managed Micro-Integrations served by it, and between Micro-Integration Manager and your browser view.
To enable security, configure this key in Micro-Integration Manager:
server:
  ssl:
    enabled: true
Enabling TLS might require configuring other parameters such as protocol type, keystore, and trust store. In this example, a custom configuration is provided for the keystore (in the zip archive under samples) and a default configuration is provided for the trust store (under the cert location that was generated, because TLS connection is set up using a self-signed certificate:
server:
  ssl:
    enabled: true
    protocol: TLS
    key-store-type: PKCS12
    key-store: 'file:./operator/security/server.p12'
    key-store-password: 'configserver'

    trust-store: 'file:/Library/Java/JavaVirtualMachines/jdk-17.0.3.1.jdk/Contents/Home/lib/security/cacerts'
    trust-store-type: PKCS12
    trust-store-password: 'changeit'
This is the default configuration for any Spring Boot application. For more information, see Configure SSL.
Encrypting Values for Cloud Configurations
To create encrypted values for cloud configuration files, you must start Micro-Integration Manager in local mode (completely isolated from any production environment with the keystore file that is generated for this purpose) with enabled encryption, or as a localhost. Solace recommends using the Spring Cloud Config Server encryption and decryption until this functionality is provided by Solace (Versions after 2.7.10 of Spring CLI and Spring Cloud CLI don't have this functionality).
You can encrypt any value using Micro-Integration Manager, as it provides two API endpoints by default: /encrypt for encrypting messages, and /decrypt for decrypting messages.
To encrypt any value, send a POST request to the appropriate API with these parameters:
curl --location --request POST 'http://10.0.0.100:9500/config/encrypt' \
--header 'Content-Type: text/plain' \
--data-raw '<...something to encrypt...>'
Where <...data to be encrypted...> is the request body. The response is an encrypted value that can be used as a configuration parameter.
At this point, all dependencies must be already pre-configured in the application.yml|properties file, so the Spring Cloud Config Server knows which ciphers to use for encryption.
By default, the encryption and decryption functionality is disabled in Micro-Integration Manager (to provide security for publicly accessed values). You can enable these endpoints at start time by providing these CLI parameters to the application:
--encrypt.keyStore.location=file://<...path to keystore file...>
--encrypt.keyStore.password=password
--encrypt.keyStore.alias=configserver
--encrypt.keyStore.secret=password
These parameters are not configurable through the startup script for security reasons.
Solace recommends using the Spring Cloud Config Server encryption and decryption until this functionality is provided by Solace (Versions after 2.7.10 of Spring CLI and Spring Cloud CLI don't have this functionality).
To start the local instance of Micro-Integration Manager:
-
Use the
-sconfiguration option (to obtain the shell CLI command and use it together with the parameters above):# use script to generate CLI command ./start.sh -j ../../solace-micro-integration-manager-2.0.0.jar -sThe expected result (command) is:
java -jar <...ABSOLUTE_PATH...>/solace-micro-integration-manager-2.0.0.jar --spring.cloud.config.server.git.uri=file://<...ABSOLUTE_PATH...>/samples/manager/cloud-configs/ --spring.config.additional-location=config/
-
Add the encryption parameters, so the full command looks this:
$> java -jar <...ABSOLUTE_PATH...>/pubsubplus-micro-integration-manager-2.0.0.jar --spring.cloud.config.server.git.uri=file://<...ABSOLUTE_PATH...>/samples/manager/cloud-configs/ --spring.config.additional-location=config/ \
    --encrypt.keyStore.location=file:security/demo.jks \
    --encrypt.keyStore.password=password \
    --encrypt.keyStore.alias=configserver \
    --encrypt.keyStore.secret=password
The
demo.jksfile that is provided in thesamples/micro-integrations/securityis generated with this command:$> keytool -genkeypair -alias configserver -keyalg RSA \ -dname "CN=CM,OU=CM,O=Solace,L=Kanata,S=ON,C=Canada" \ -keypass password -keystore demo.jks -storepass password
Because the
demo.jksfile is generated with this command, some encrypted variables are taken from configuration. Having these parameters enables the/encryptand/decryptendpoints and allows you to encrypt and decrypt your sensitive information using the key pair underalias, which is stored in the keystore calleddemo.jks.
After generating encrypted values for cloud configurations, it is important to stop this Micro-Integration Manager instance and start it normally in production mode. This is so it doesn't have a pointer to the keystore file and all secrets stay safe without the possibility to decrypt them on the server side.
Obtaining Logfiles from Remote Self-Managed Micro-Integrations
Currently, remotely running self-managed Micro-Integrations provide data about the relative local path of their logfiles to enable reading, and Micro-Integration Manager has limited access to these logfiles. To address this limitation, one option is to mount the remote filesystem onto the local filesystem and grant access to the logfile.
Self-Managed Micro-Integration Configuration
After you start Micro-Integration Manager, you must allow it to adjust your self-managed Micro-Integration's configuration. To do this:
-
Move your self-managed Micro-Integration configuration file to the configuration repository on the Micro-Integration Manager side.
-
Include the parameters needed to connect to Micro-Integration Manager in the local configuration file.
You can store the current configuration of your self-managed Micro-Integration in the Git repository, which should be used as a configuration storage after that. Remember to commit the changes that you made because Micro-Integration Manager operates on the Git repository.
The file name must be equal to the value of the spring.application.name configuration parameter (see Configuring Minimal Requirements).
Use encryption for any sensitive data on the remote configuration storage.
Configuring Minimal Requirements
After setting up the configuration storage and moving self-managed Micro-Integration configuration to it, you must change the local configuration for the self-managed Micro-Integration (it should be empty). The self-managed Micro-Integration configuration stores the data needed to connect to Micro-Integration Manager (see Self-Managed Micro-Integration Configuration).
This is an example of the self-managed Micro-Integration configuration file:
# parameters defining which config to get and where from.
# Must be enabled if application relies on Micro-Integration Manager's distributed configuration
# In case operator would like to ignore these parameters, full operator's configuration
# should be provided locally, withing this configuration file
spring.application.name: ibmmq
spring.config.import: 'optional:configserver:http://127.0.0.1:9500/config/'
# credentials to connect to the config server and get configuration
# should be specified here, in operator's configuration as they
# are intended to be modified by operator
spring.cloud.config:
  import-check.enabled: true
  username: user
  password: pass
  # this section enables security and TLS for config-server together with the
  # new [BlockingRegistrationClient] used to register application in Micro-Integration Manager
  # [BlockingRegistrationClient] should have access to thess fields directly
  # and should be instantiated before Spring Boot Admin built-in client tls:
    enabled: false
#    key-store-type: PKCS12
#    key-store: 'file://micro-integrations/ibmmq-micro-integration/operators-data/keystore/server.p12'
#    key-store-password: configserver
#    key-password: configserver
#    trust-store: 'file:/Library/Java/JavaVirtualMachines/jdk-17.0.3.1.jdk/Contents/Home/lib/security/cacerts'
#    trust-store-type: PKCS12
#    trust-store-password: 'changeit'

# these parameters are necessary to decrypt configuration from the server on the client
# please note that [encrypt.keyStore.location] should point out to the same file used
# for encryption otherwise the value won't be decrypted at all
encrypt.keyStore.location: "file:security/demo.jks"
encrypt.keyStore.password: password
encrypt.keyStore.alias: configserver
encrypt.keyStore.secret: password

# this section defines service URL used by Micro-Integration Manager to back access the Micro-Integration
# in case it would be omitted, Micro-Integration Manager will try to resolve it, however in case of enabled HTTPS
# it will do it improperly and specify a different port, not related to the [management.server.port] section
spring.boot.admin.client.instance:
  service-host-type: ip
  service-url: 'http://127.0.0.1:9009/'
  management-url: 'http://127.0.0.1:9009/actuator'
  health-url: 'http://127.0.0.1:9009/actuator/health'
# This section enables TLS for actuator endpoints used to be accessed from Micro-Integration Manager
# They used to be enabled separately, as they secure only /actuator endpoint access. In case security
# is enabled, operator MUST specify separate port for this endpoint and configure access to it
# within the [spring.boot.admin.client.instance] section
management:
  server:
    # sets a different port to server the actuator endpoint
    port: 9009
    # if this parameter is present operator must have [enabled] set to false|true
    # otherwise this parameter should be disabled    #    ssl:
    # if ssl is enabled, all other parameters must also be configured
#      enabled: true
#      protocol: TLSv1.2
#      key-store-type: PKCS12
#      key-store: 'file:./keystore/server.p12'
#      key-store-password: configserver
#      key-password: configserver
#      trust-store: 'file:/Library/Java/JavaVirtualMachines/jdk-17.0.3.1.jdk/Contents/Home/lib/security/cacerts'
#      trust-store-type: PKCS12
#      trust-store-password: 'changeit'
Micro-Integration Manager has two entry points for the management interface:
-
/for communication with the UI and Micro-Integration Manager. -
/configfor communication with the configuration storage.
These APIs are secured using different security techniques, which requires separate security configurations. For the / API, authentication credentials are managed in spring.boot.admin.client.instance, and for the /config API, authentication credentials are configured through the spring.cloud.config section. In the example above, the two APIs have the same authentication credentials, but it's possible for the authentication credentials to be different.
The name of the configuration file (which is stored in the configuration storage) must match the spring.application.name parameter, with the addition of any profile name (if used) separated by a dash. In the example above, this might look like ibmmq-operator.yml, where the application name is set to ibmmq and the profile name is operator.
In the example above, port 9500 (which is set by default) is used for the management interface, and port 9009 is used for the data interface. It is important to keep all links updated according to this data:
# data interface URL and port to update
spring.boot.admin.client.instance.service-url: 'http://127.0.0.1:9009/'
spring.boot.admin.client.instance.management-url: 'http://127.0.0.1:9009/actuator'
spring.boot.admin.client.instance.health-url: 'http://127.0.0.1:9009/actuator/health'

# management interface URL and port to update
spring.config.import: 'optional:configserver:http://127.0.0.1:9500/config/'
spring.boot.admin.client.url: "http://127.0.0.1:9500/"
Micro-Integration Manager uses some specific APIs to retrieve data from every self-managed Micro-Integration. Most of these APIs are standard Spring Boot Actuator APIs. However, to be able to properly manage workflows, you must enable a few additional APIs through the configuration file:
management:
  endpoints:
    web:
      exposure:
        include: "health,metrics,loggers,logfile,env,workflows,leaderelection,bindings,channels"
Enabling TLS
Enabling TLS for Micro-Integration Manager happens on the self-managed Micro-Integration's side. TLS must be configured through these two ports:
-
/enables TLS for all requests circulating between the self-managed Micro-Integration and Micro-Integration Manager, including UI. -
/configenables TLS for all configurations retrieved from configuration storage.
For optimal security, enable TLS for both of these ports at the same time.
To configure the / and /config ports, use these configuration sections:
spring.cloud.config:
  tls:
    enabled: true
    key-store-type: PKCS12
    key-store: 'file:./keystore/server.p12'
    key-store-password: configserver
    key-password: configserver

    trust-store: 'file:/Library/Java/JavaVirtualMachines/jdk-17.0.3.1.jdk/Contents/Home/lib/security/cacerts'
    trust-store-type: PKCS12
    trust-store-password: 'changeit'

management:
  server:
# sets a different port to server the actuator endpoint
    port: 9009
    ssl:
      enabled: true
      key-store-type: PKCS12
      key-store: 'file:./keystore/server.p12'
      key-store-password: configserver
      key-password: configserver

      trust-store: 'file:/Library/Java/JavaVirtualMachines/jdk-17.0.3.1.jdk/Contents/Home/lib/security/cacerts'
      trust-store-type: PKCS12
      trust-store-password: 'changeit'
Using Profiles
Configuration for Micro-Integration Manager can come in an application.properties or application.yml file. You can use profiling to start up Micro-Integration Manager. In this case, the configuration file must follow the same name pattern and include the profile name as a suffix after the word application separated by a hyphen (for example, application-operator.yml).
If you want to use profiling to start up Micro-Integration Manager, you must also provide an additional parameter to the JAR file --spring.profiles.active=<PROFILE NAME>.
Enabling Email Notifications
Micro-Integration Manager uses Spring Boot Admin to monitor applications and can send email notifications as HTML emails when the status of the Micro-Integration changes (e.g., when an application goes down/up). Email notifications are available for versions Micro-Integration Manager 1.2.0 and later. To enable email notifications, you must configure an email server using spring.mail.*.
After you enable email server, you can customize the email notifications. For more information, see Mail Notifications in the Spring Boot Admin documentation.
For example, you can configure the email notifications to use a custom HTML template name named example.html file located in /app/external/classpath/:
The location we've specified as an example is only applicable when you run your Micro-Integration within a container.
 spring:
  mail:
    host: smtp.example.com
    port: 587
    username: <your-user-name>
    password: <your-password>
  boot:
    admin:
      notify:
        mail:
          enabled: true
          to: email@example.com
          from: "Spring Boot Admin <noreply@localhost>"
          template: "example.html"