Messaging Components and Application Interactions
At a high-level, there are a number of Solace event broker's messaging components that make data move from producers to the event broker, and from the event broker to consumers.
Solace event brokers provide a foundation for multi-protocol and standards eventing including (SMF), JMS1.1, MQTT3.11, REST, and AMQP1.0. As events move through the event broker, they are translated from an ingress messaging protocol to an egress messaging protocol for each consumer receiving messages. Given the range of protocol support, it's important recognize that each open source protocol your application uses adds complexity to the operation of the messaging components on the event broker. First we'll describe how the (SMF) protocol works, and then describe variations introduced by other protocols.
In this overview, we'll describe how the protocols operate from the perspective of your application. The protocols we'll describe include:
SMF
We're going to show you how the SMF protocol makes use of the Solace event broker's messaging components to move data from producers to the broker, and from the broker to consumers, all from the point-of-view of your app. There are a couple of ways we're going to do this:
-
The SMF Process Flow section contains a diagram that illustrates the steps from establishing a connection through to getting data flowing. This diagram begins with your app and moves through the broker's components
-
The SMF Component Operations section has more details about the steps described in the process flow.
SMF Process Flow
In the diagram below, follow the steps from establishing a connection to the event broker through to starting the message flow.
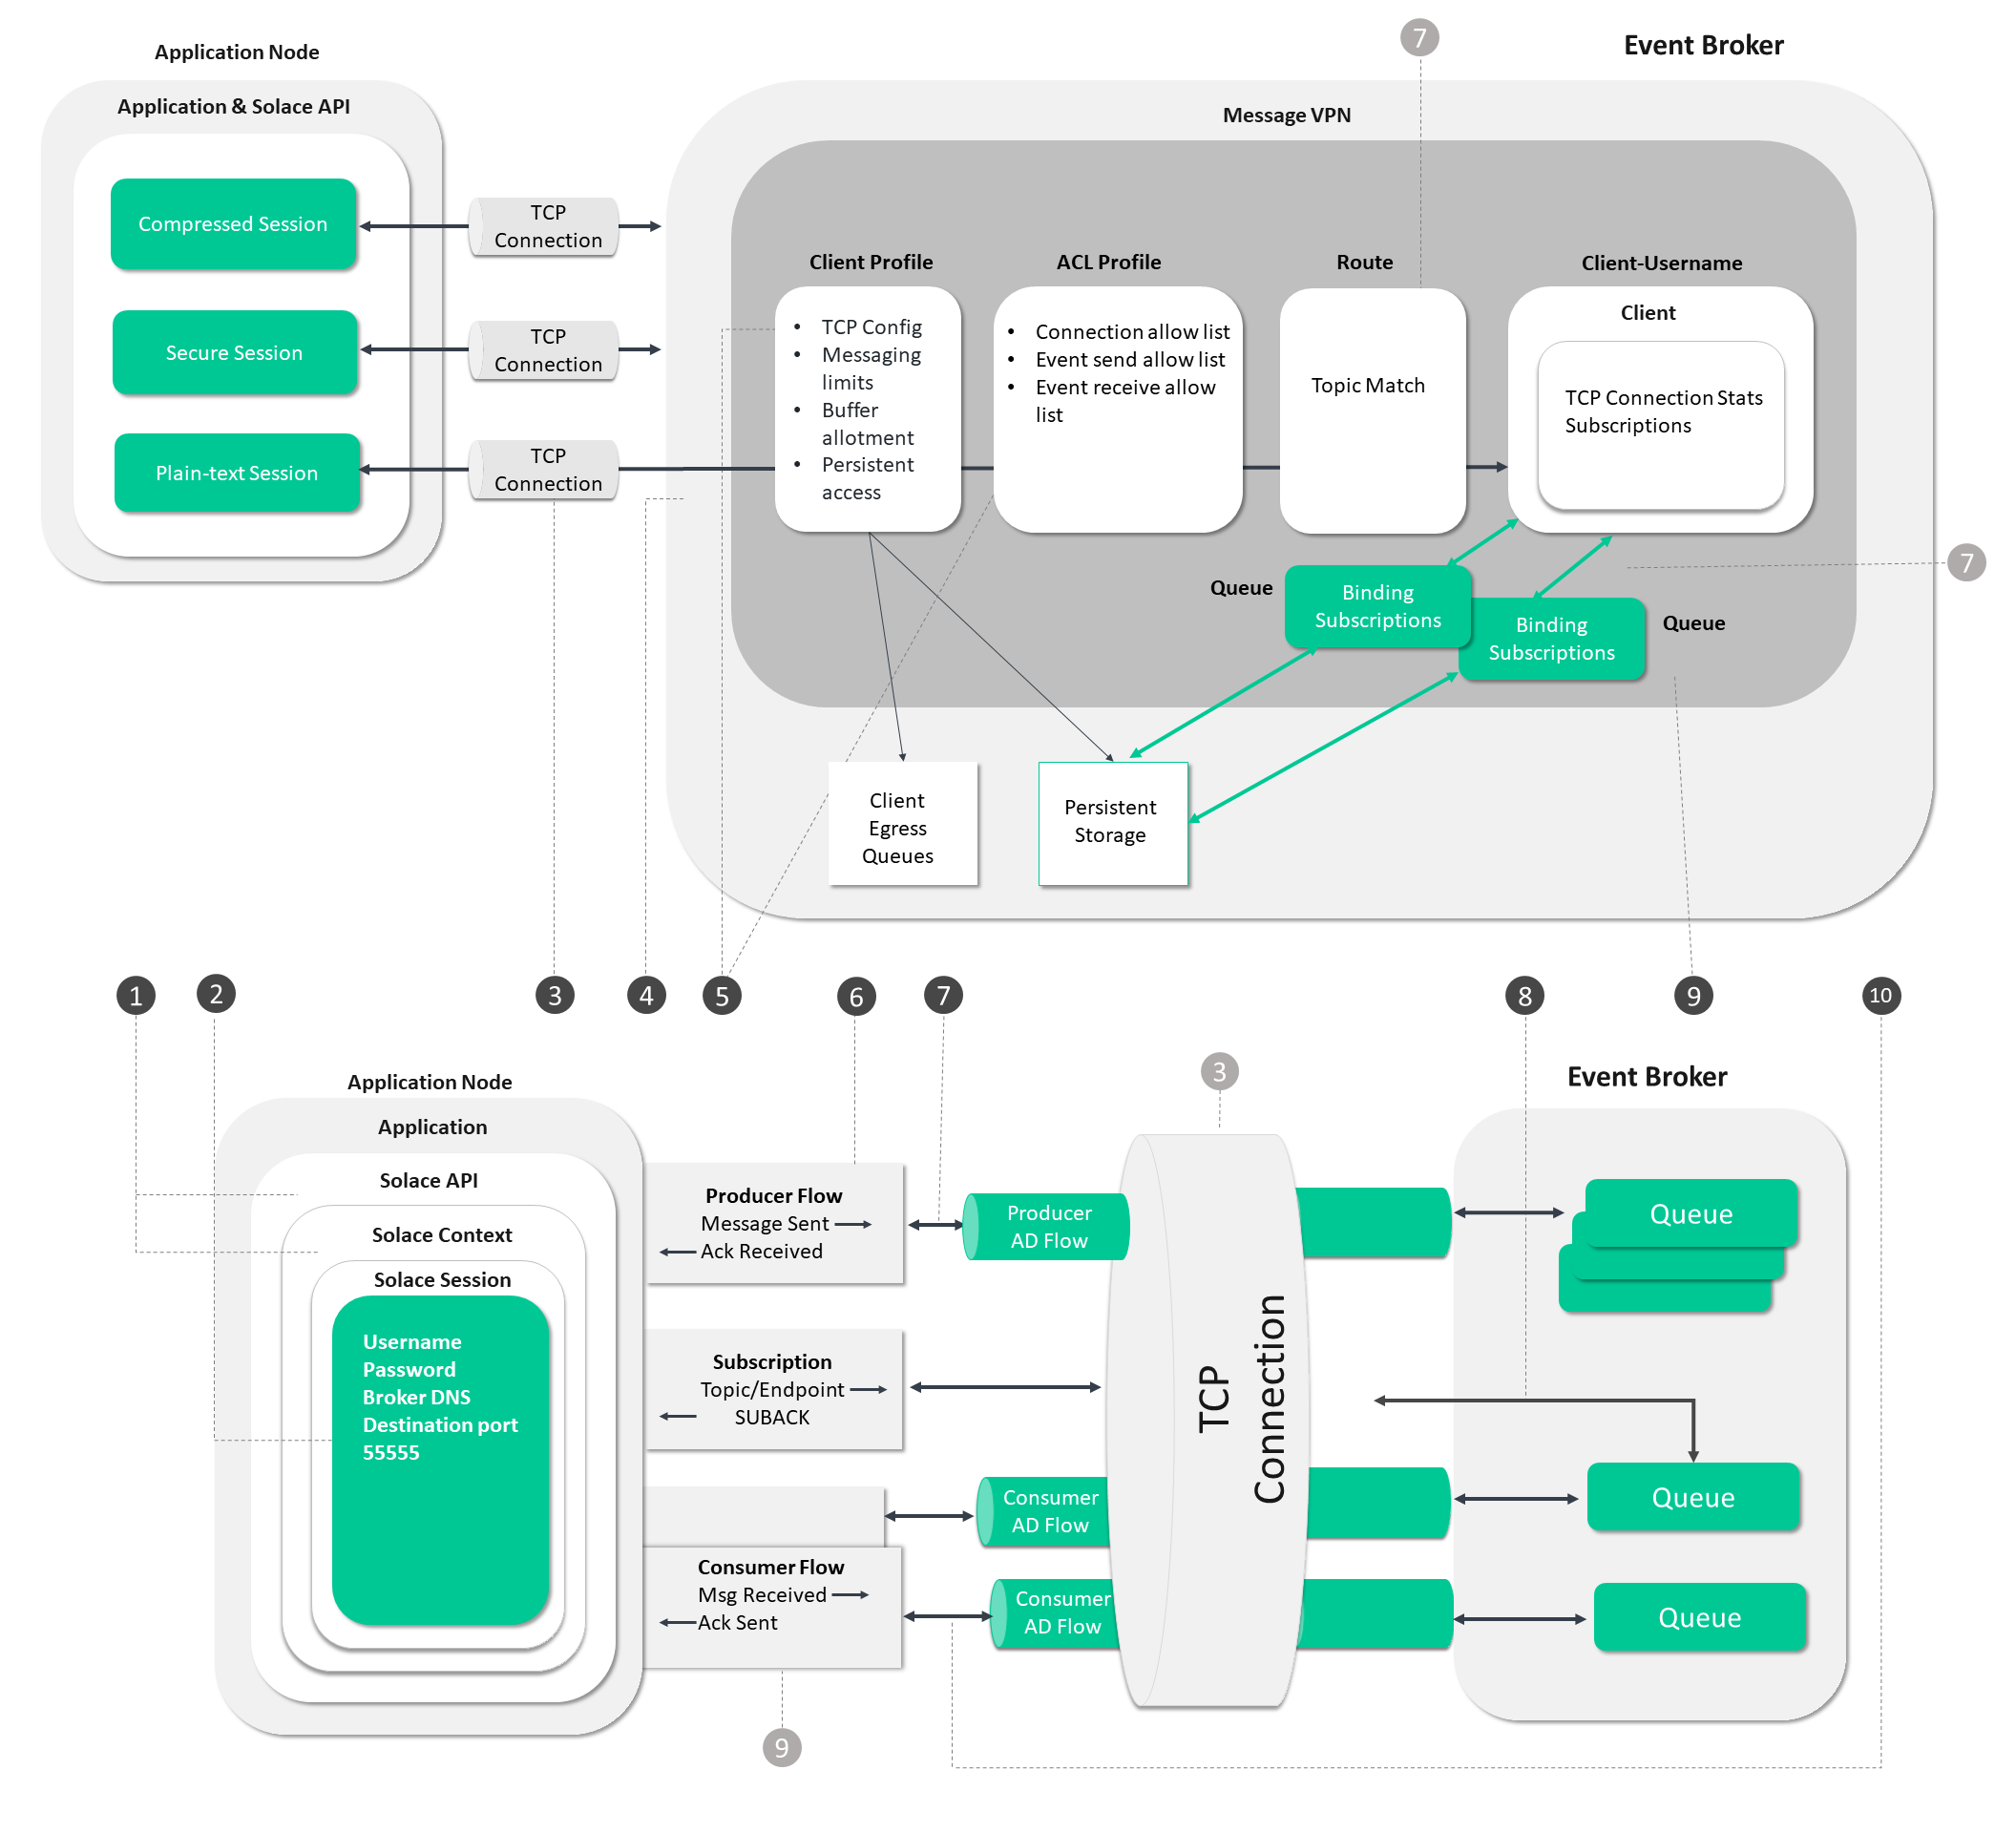
The circled numbers in the diagram correspond to the numbered steps described in detail as follows:
Steps 1 - 5
These steps deal with the operations the application and event broker undergo to establish a connection and get ready for event messaging.
- Application initiates Solace API and Solace Context (Optional, can use default).
- Application Create and config session, Username, password, broker DNS:Port, TLS, Compression
session = JCSMPFactory.onlyInstance().createSession(properties)
- Application connect session:
session.connect();- Host initiates TCP session
- Session sends CONNECT message
- Broker authenticates connection (happens automatically after step 3)
- Broker authorizes connection (happens automatically after step 4): an event broker sends CONNECT ACK
Steps 6, 7, 9 and 10
These steps focus on operations associated with sending and receiving event messages
- Application SDK creates publisher flow:
-
prod = session.getMessageProducer(..) - SDK sends last messageID sent and last messageID ACK received
- Broker sends last MessageID received and last messageID ACK sent
- Application maintains this state as message flow to allow for correct re-transmissions as required on reconnects.
-
- When a message is published:
-
prod.send(msg,topic) - Application sdk sends message and decrements available window by one
- Event broker receives, routes, and persists message
- Event broker sends ACK
- Application SDK receives ACK and increments available window by one.
-
- Application creates consumer flow, endpoint name, windowing sizes:
-
cons = session.createFlow(listener, flow_prop) - Application connect flow
- Application API handshakes flow and binds to Queue/Endpoint
- Messages are then able to move from broker to subscriber client.
-
- Application starts flow:
-
cons.start() - Broker sends message and decrements available window by one
- Client API receives message and passes to application
- Client SDK sends transport ACK
- Broker receives ACK and increments available window by one
- Application sends Application ACK when finished with message
- Broker receives Application ACK and deletes message from queue.
-
Step 8
This step deals with the establishment of application subscriptions.
- (Optional, can be admin or direct subn) Application Subscribes by adding subscription to queue:
session.addSubscription(queue, topic,...)- Application sends SUBSCRIBE message with topic and endpoint
- API sends message
- Broker adds subscription to connection or backing queue based on subscription endpoint
- Broker can send SUBACK.
Find out more about the Solace components that are involved
- Solace Messaging API: An overview of Solace Messaging API fundamentals.
- Producer AD Flow: A client application can publish Guaranteed messages, that is, messages that the client application assigns a Persistent or Non‑Persistent delivery mode to Queue or Topic destinations.
- Consumer AD Flow: To receive Guaranteed messages, a client must create a consumer Flow within a Session, and bind that flow to an endpoint on an event broker that messages are published or attracted to.
- Client Profile: Client profiles are associated with client username accounts so that you can easily apply common configurations to groups of clients.
- ACL Profile: After a client is successfully authenticated, the ACL profile assigned to the client username used by the client, or the LDAP authorization groups that the client belongs to (when LDAP authorization is used), is checked.
- Message VPNs: Message Virtual Private Networks (VPNs) are managed objects on Solace event brokers that allow for the segregation of topic space and clients.
- Route: Understand the fundamentals of publishing and subscribing to topics.
- Client Username: A client is only authorized to connect to a Message VPN if it has been assigned a client username associated with that VPN.
- Queue: Basic operation of guaranteed messaging.
SMF Component Operations
In this section we're going to elaborate on the steps shown in the process flow diagram.
As we previously noted, Steps 1 - 5 deal with the operations the application and event broker go through to establish a connection and get ready for event messaging. The following sections provide more information on those steps:
- Instantiating the Solace API and creating a Solace Session
- TCP Session properties
- TCP Connection
- Broker authorizes connection
Instantiating the Solace API and creating a Solace Session
Your client applications instantiate the Solace API. From here they can create Solace Contexts (which create a worker thread for event processing), and, subsequently, a Solace Session to connect to the broker. You have the flexibility to control the threading model by deciding how many sessions to add to a context. You can have multiple sessions per context, but only one context per session. If you need more threads to handle a single session, you'll need to pass event processing into an application worker thread pool. Also, a single session can only connect to a single broker instance at a time.
The Solace Session connection opens a TCP flow-controlled, bi-directional, connection from your application to the broker. This bi-directional session is the foundation of all communications for producers and consumers to send and receive messages for all Message Exchange Patterns (MEPs).
TCP Session properties
Fundamental properties of the TCP session are controlled via API session properties. This includes properties such as TCP (and possibly application) buffer sizes, and connection and reconnection behaviors. The session properties dictate the type of connection, be it plain-text, compressed , or encrypted. Finally, session properties can control application keep-alives from the client to the broker, which are used to detect connection failures.
TCP Connection
Now that we've discussed how an application connects, let's talk about the connection itself and its behavior.
As previously mentioned, every connection that sends or receives data is a stateful bi-directional TCP connection. On top of the TCP connection is a messaging layer session, which begins with a connect message, or a data message that contains credential headers that are used during authentication, which is discussed in Client Authentication. Based on destination port and connection header properties in the connection request, the broker will expect Session properties such as compression, encryption, and so on.
Broker authorizes connection
Once a session is connected to the required services and authenticated, we move on to the authorization stage. Based on the client-username in the connection credentials, two profiles are applied: the Client Profile and the ACL Profile.
- The Client Profile sets the broker resources the client can access. This includes configuration options like the ability to send and receive persistent messages, the ability to create queues, and set how many system resource buffers the client’s connection can consume. For more information, refer to Configuring Client Profiles.
- The ACL Profile defines which data events the client can produce and consume. For more information refer to Controlling Client Access with ACL Profiles.
Steps 6, 7, 9 and 10 focus on operations associated with sending and receiving event messages. You can find background information about those steps discussed below in Event processing Detail.
Event processing Detail
Now that we have an authenticated and authorized client connection, we're ready to send and receive messages.
For Direct event messaging this is quite simple, the client API contains a publish method to publish directly over the messaging session to send events and a subscribe directly to the messaging session connection to receive events. There are no messaging layer acknowledgments, timers, or re-transmissions, there are only TCP layer acknowledgments and retransmissions. If the TCP connection fails, and the messaging session is lost, then the events are also lost.
For Persistent event messaging things are a bit different in that there is messaging layer windowing, timers, acknowledgments, and retransmissions. This implies there's another layer of statefulness associated with persistent event publish and consumption. Each consumer state machine encapsulates an endpoint flow in the client API, and a Queue / Endpoint binding on the broker. These flows contain an endpoint, window, available window, last message sent, and last message acknowledged. This information allows the client to reconnect across sessions, and continue publish / consumption where the last session left off. If the Client-Profile allows for publishing persistent messages, there's at least one producer flow to allow publishing clients to send persistent message. If the Client-Profile allows for consuming persistent messages, there's a consumer flow per endpoint.
MQTT
Based on our understanding of SMF's operation, let's now look at how the MQTT service makes use of the Solace event broker's messaging components to move data from an MQTT producer to the broker, and from the broker to MQTT consumers. First, we'll look at the Differences between MQTT and SMF, and then examine the MQTT Process Flow.
Differences between MQTT and SMF
- VPN
- QoS
There is no concept of a message VPN in MQTT, so for each unique message VPN created a new listen port needs to be assigned for each variant of MQTT traffic, MQTT/TCP, MQTT/WS, MQTT/TLS, MQTT/WSS.
For QoS0 and QoS1 application publication, the system behaves as it does for SMF direct and persistent messaging, where QoS0 is like direct and QoS1 is like persistent. Qos2 published messages are processed as QoS1 messages by the broker. For QoS1 subscriptions, a unique, dynamically created queue is created for each MQTT session, and subscriptions are added to that queue. This allows the queue to attract events, and the MQTT consumer can retrieve these events once they connect. Also, there's no handshake between the API and broker to learn the last message, nor is there an ACK received on re-connect, which can lead to additional re-transmissions.
MQTT Process Flow
In the diagram below, follow the steps from establishing a connection to the event broker through to starting the data flow.
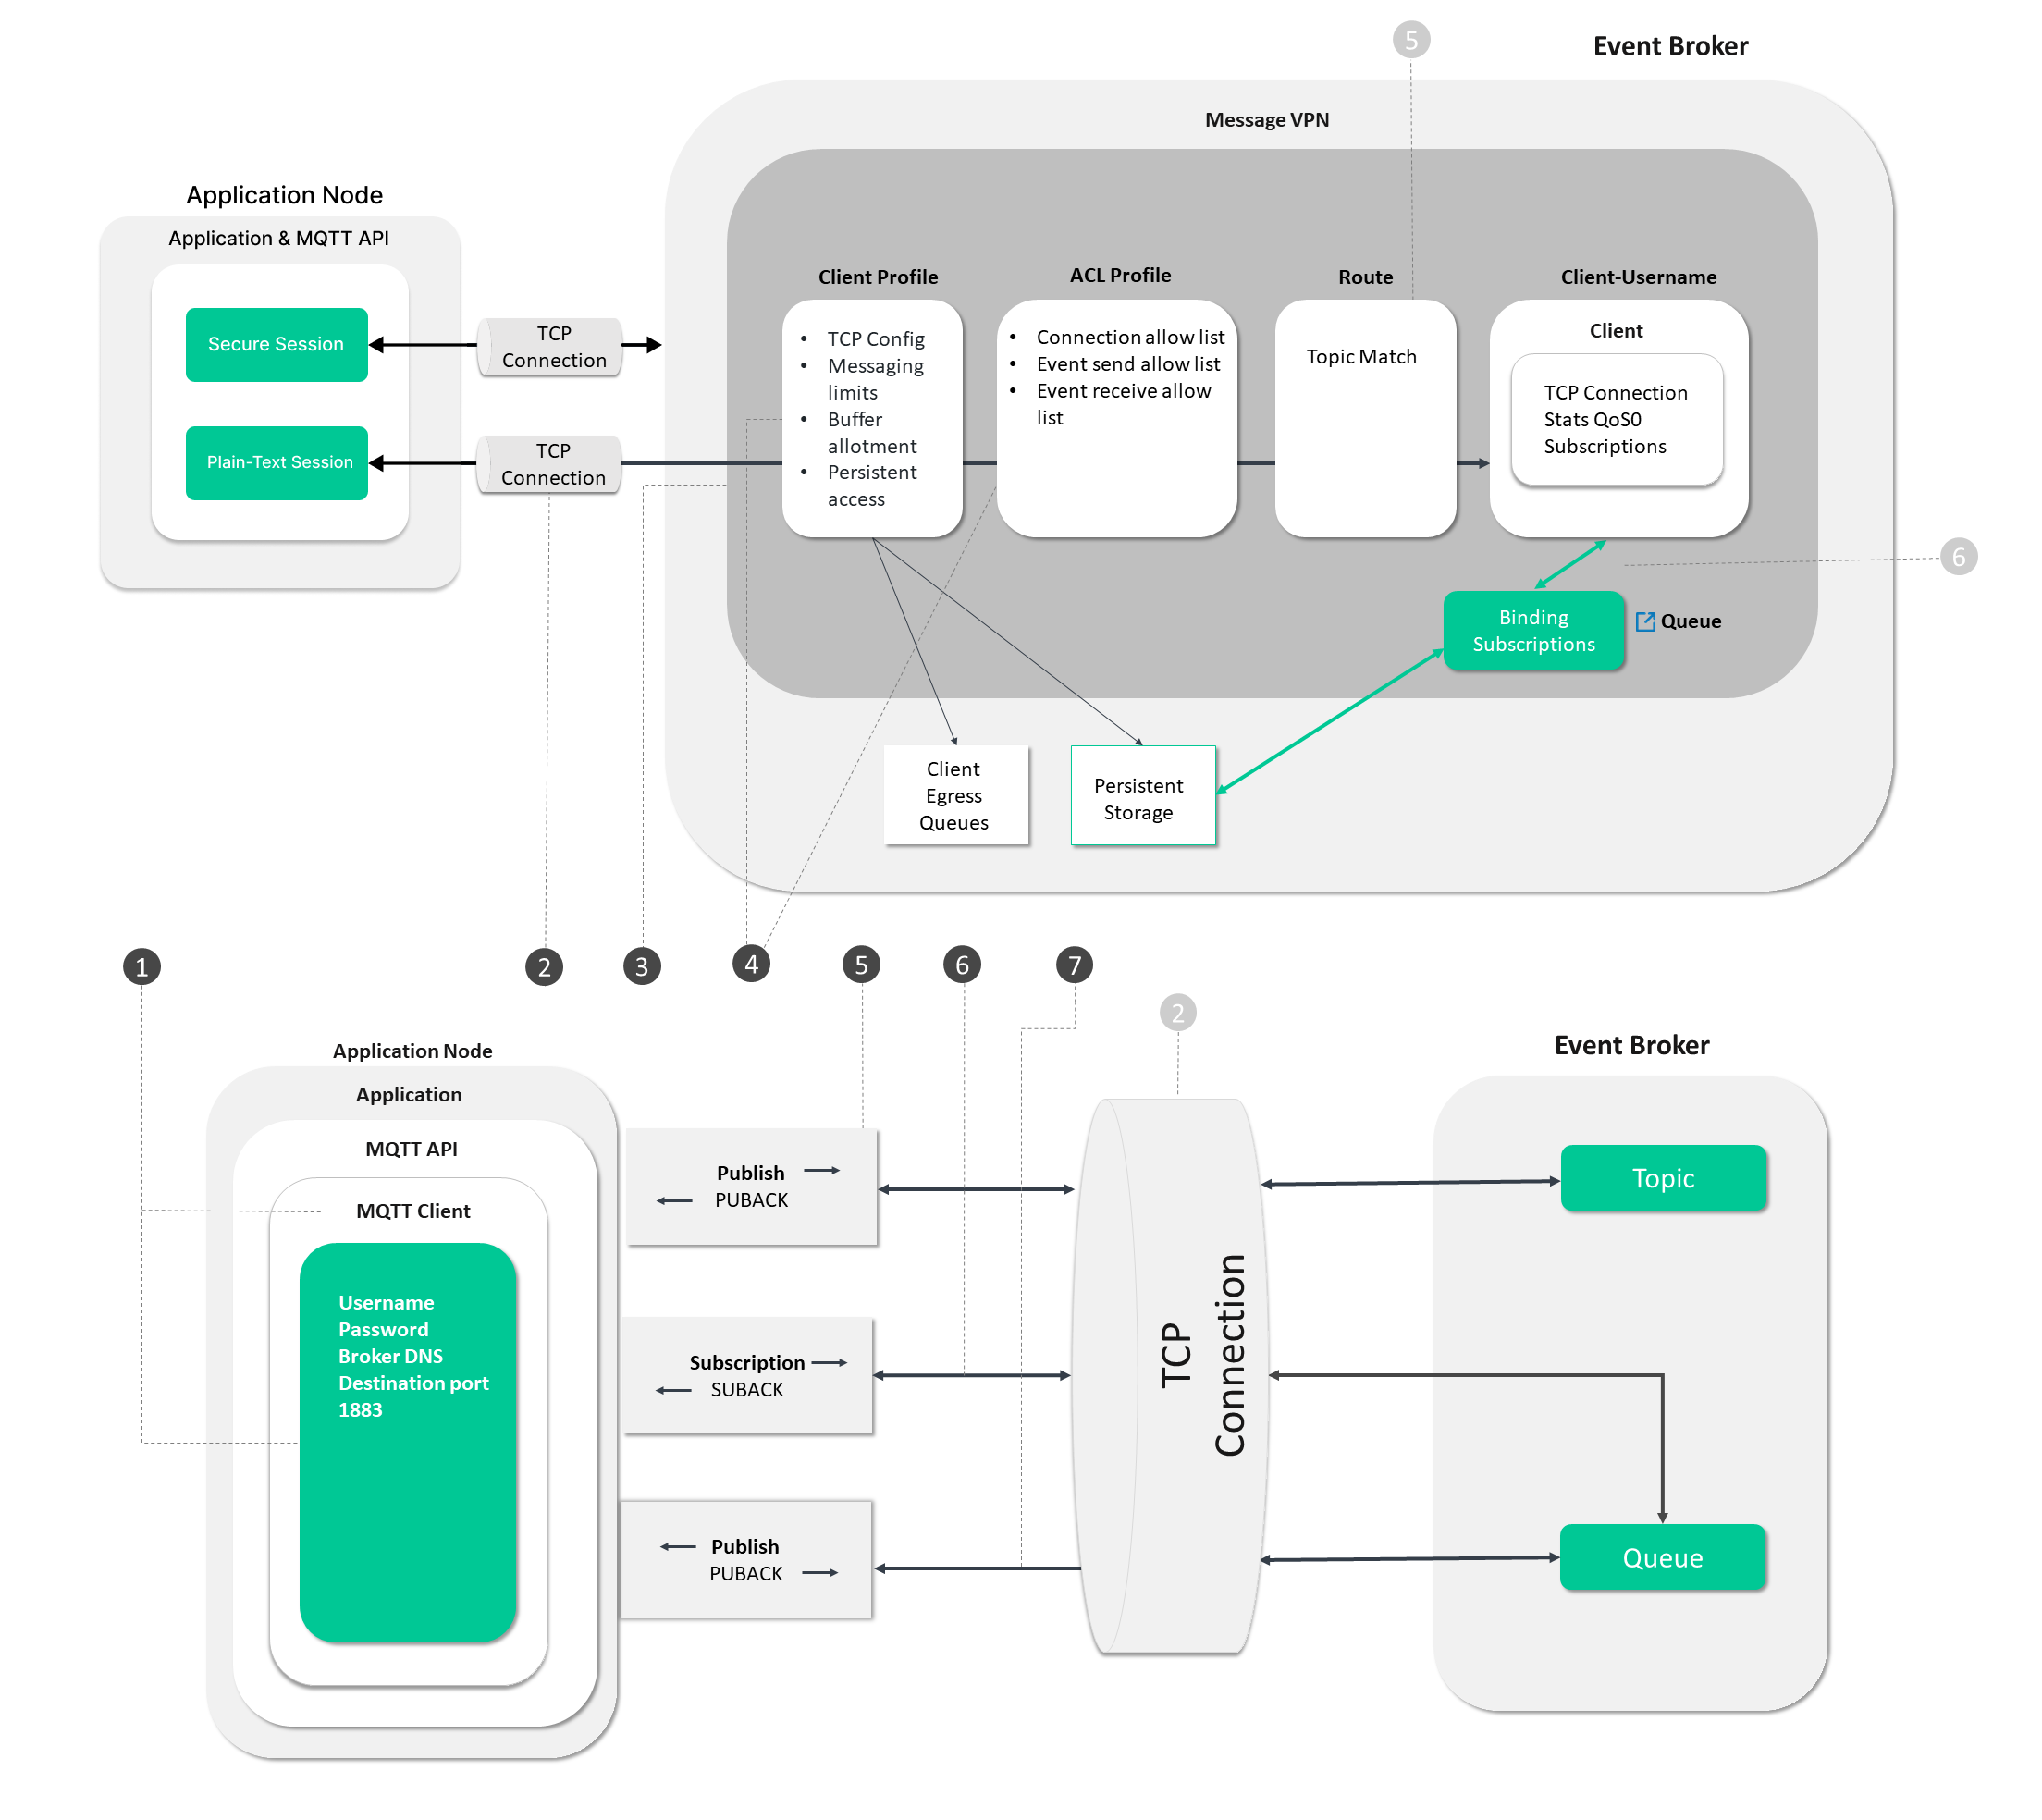
The circled numbers in the diagram correspond to the numbered steps described in detail as follows:
Steps 1 - 4
These steps deal with the operations the application and event broker undergo to establish a connection and get ready for event messaging.
- Application initiates MQTT SDK:
New MqttClient(host, clientName);- Application Create and config session, broker DNS:Port, TLS, Compression
- Application connect session, Username, password:
-
mqttClient.connect(connOpts); - Host initiates TCP session
- c. Broker receives messaging layer connect.
-
-
Broker authenticates connections
-
Broker authorizes connection
Steps 5 and 7
These steps focus on operations associated with sending and receiving event messages
-
When a message is published:
mqttClient.publish(topic, message);- Application sends PUBLISH message
- SDK store message in memory or to disk
- SDK sends message
- Broker receives message, routes and persists according to QoS
- Broker sends PUBACK
- SDK deletes message
-
When Broker sends a message:
- Broker sends PUBLISH message and decrements available window
- Client SDK receives message and passes to application
- Application sends PUBACK when finished with message
- Broker receives PUBACK and deletes message from queue
Step 6
This step deals with the establishment of application subscriptions.
-
When Applications subscribe:
mqttClient.subscribe(topic, 1);- Application sends SUBSCRIBE message
- SDK sends message
- Broker adds subscription to connection or backing queue based on subscription QoS
- Broker sends SUBACK
Find out more about the Solace components that are involved
- Client Profile: Client profiles are associated with client username accounts so that you can easily apply common configurations to groups of clients.
- ACL Profile: After a client is successfully authenticated, the ACL profile assigned to the client username used by the client, or the LDAP authorization groups that the client belongs to (when LDAP authorization is used), is checked.
- Message VPNs: Message Virtual Private Networks (VPNs) are managed objects on Solace event brokers that allow for the segregation of topic space and clients.
- Route: Understand the fundamentals of publishing and subscribing to topics.
- Client Username: A client is only authorized to connect to a Message VPN if it has been assigned a client username associated with that VPN.
- Queue: Basic operation of guaranteed messaging.
- MQTT Client: Learn more about MQTT Client at the Eclipse Paho JAVA documentation.
Next Steps
For more information on how to use MQTT with Solace, refer to the MQTT pages in the Open APIs and Protocols section.
AMQP
The walk-through discussed in this section is a little different than that shown in previous ones. Those were based on Java. This one is based on Node.js. For AMQP Java, the JMS2.0 programming interface seems to be standard and would be the preferred option. First, we'll look at the Differences between Solace implementation of AMQP and SMF, and then examine the AMQP Process Flow.
Differences between Solace implementation of AMQP and SMF
- Durability
- VPN
Currently, the Solace AMQP solution processes only persistent messages.
There's no concept of a Message VPN in AMQP, so for each unique message VPN created, a new listen port needs to be assigned for AMQP/TCP and AMQP/TLS.
AMQP Process Flow
In the diagram below, follow the steps from establishing a connection to the event broker through to starting the data flow.
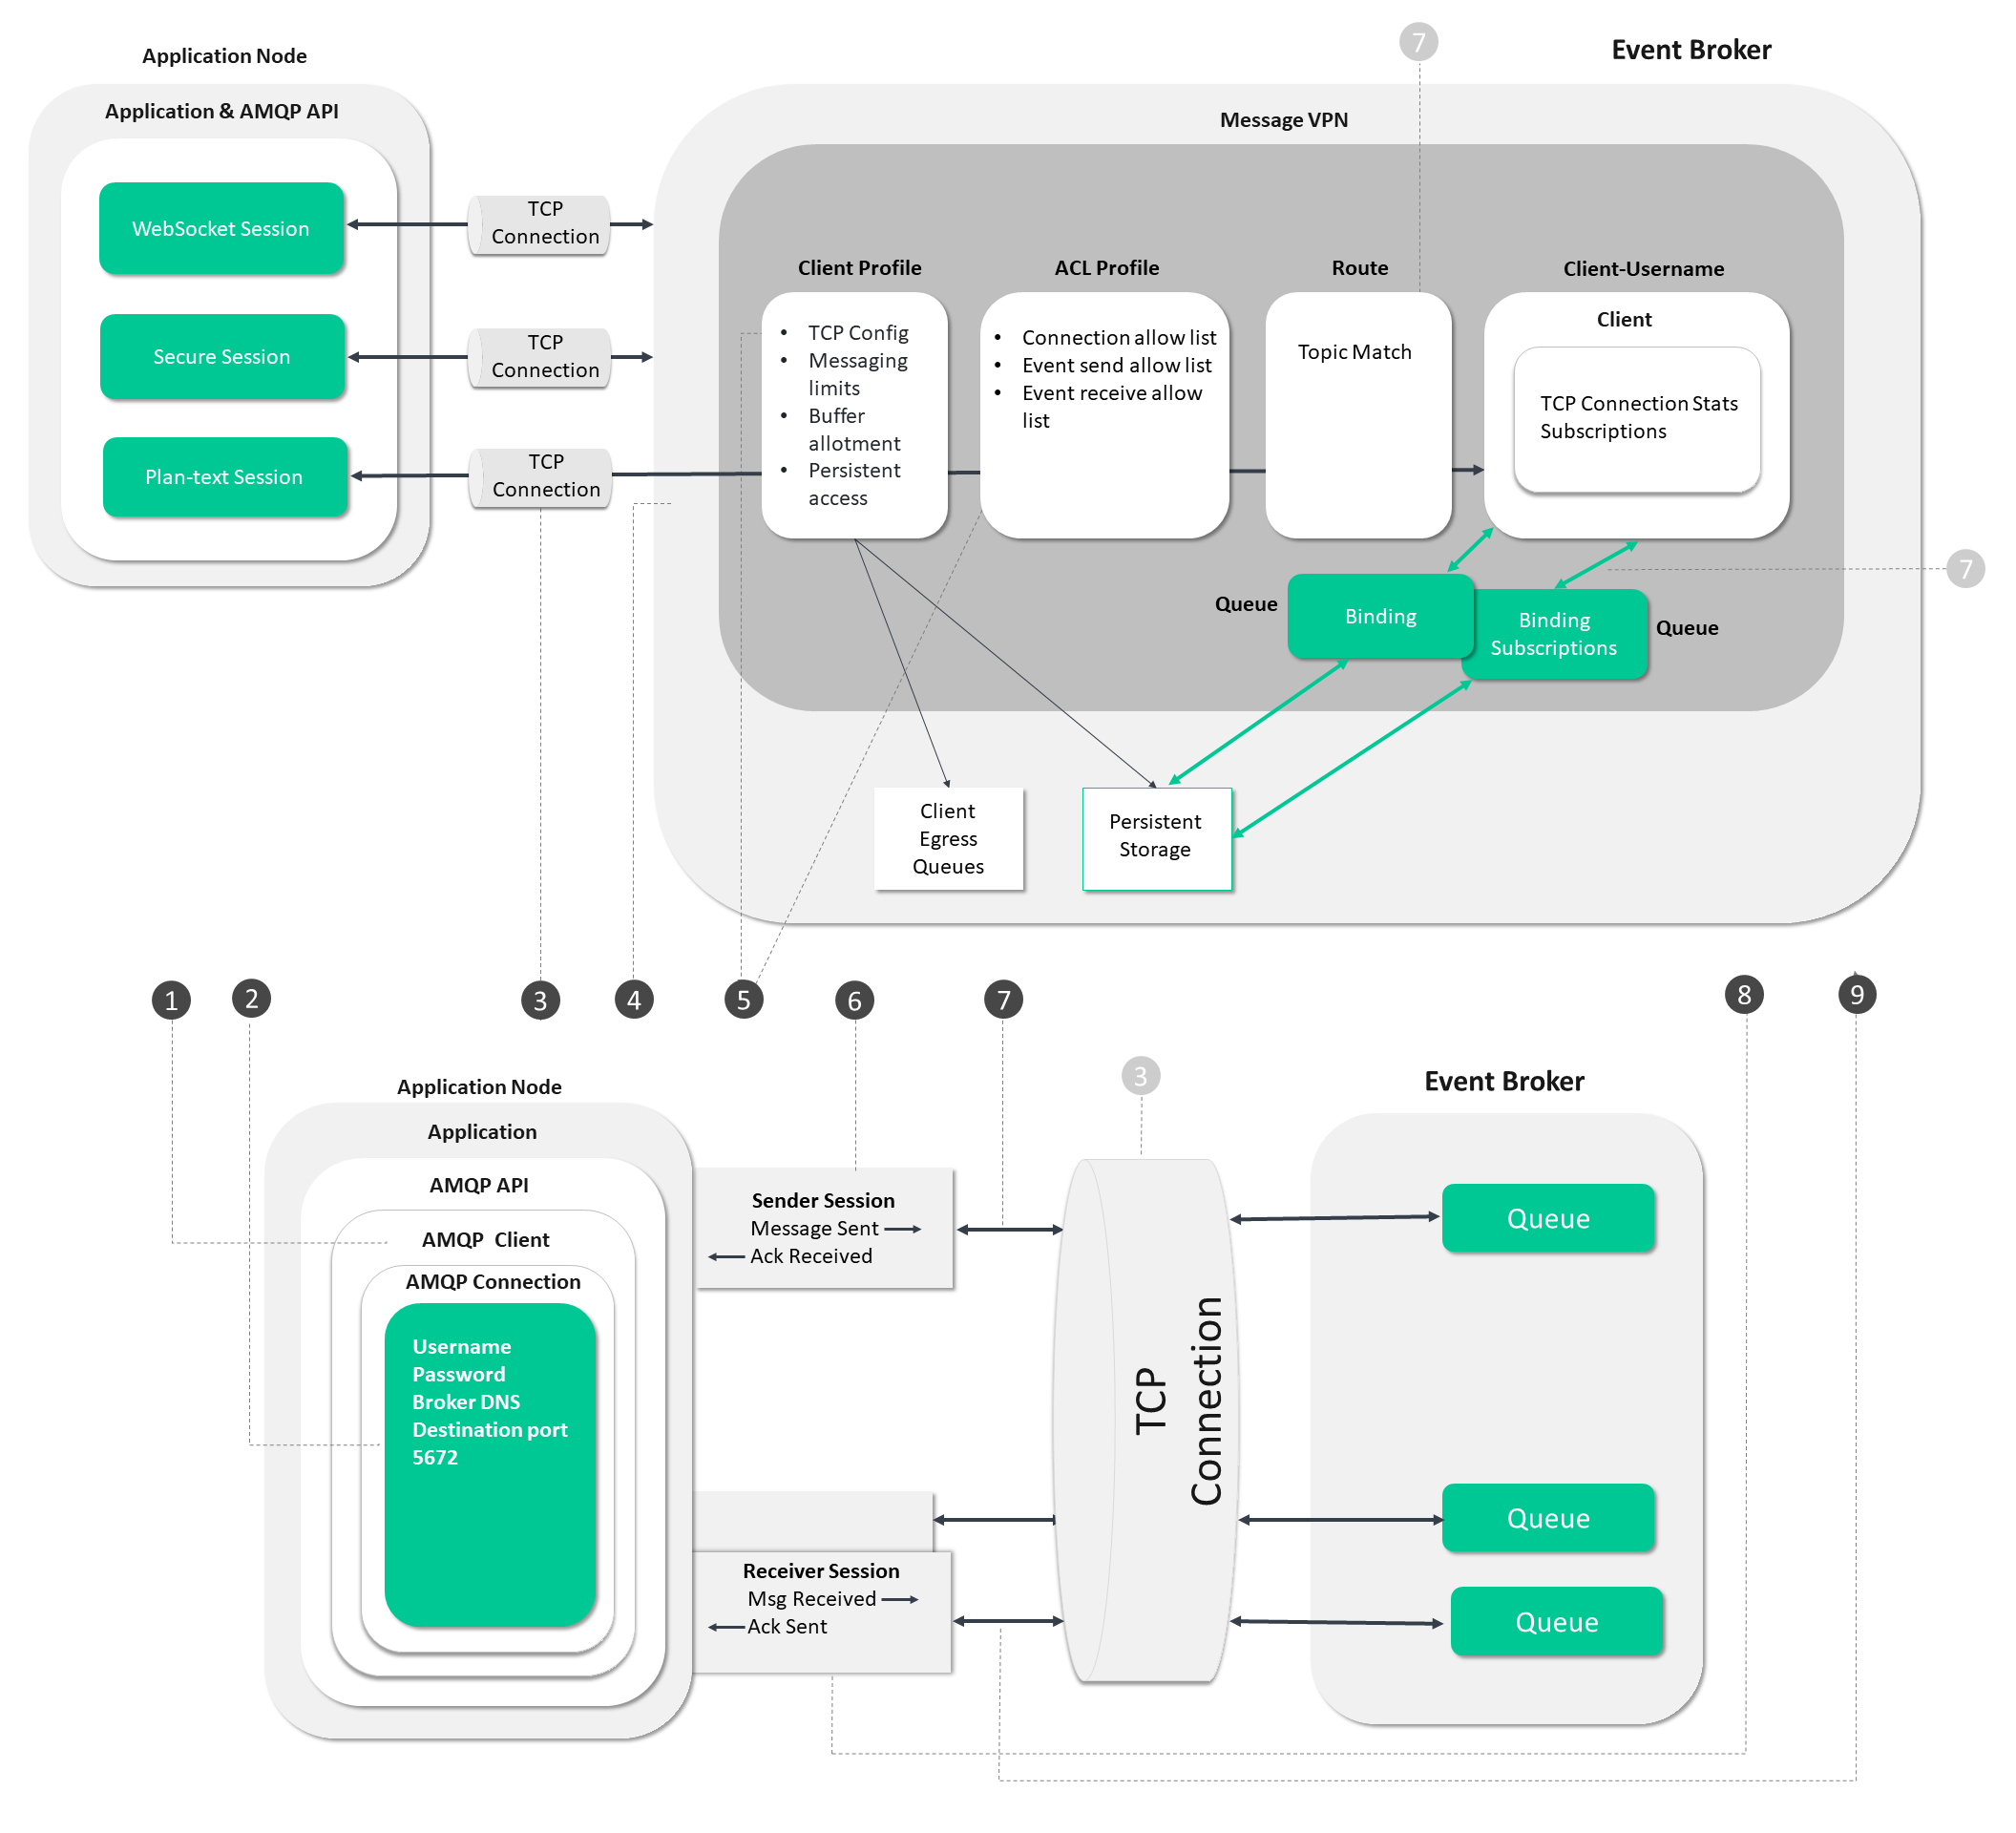
The circled numbers in the diagram correspond to the numbered steps described in detail as follows:
Steps 1 - 6
These steps deal with the operations the app and broker undergo to establish a connection and get ready for event messaging.
-
Application creates an AMQ10 Client:
a.
new AMQP.Client(AMQP.Policy.merge({defaultSubjects : false})); - Application connects the client:
amqpClient.connect(event broker)
- Application Node initiates TCP session:
- Host initiates TCP session
- Connect opens incoming and outgoing channels for the client connection
- Broker authenticates connection, (Automatically from Step 3).
- Broker authorizes connection, (Automatic from 4):
- Broker sends CONNECT ACK
- Application creates Sender:
amqpClient.createSender(queueName)- SDK creates a senderSession
Steps 8 and 9
These steps focus on operations associated with sending and receiving event messages.
- Application create Receiver.
amqpClient.createReceiver(queueName)- SDK creates a receiverSession
- Application starts callback for messages and errors:
amqpReceiver.on('message',...)- data placed in AMQP frame assigned a transferId
- data sent then increment its next-outgoing-id, decrement its remote-incoming-window
- SDK will ACK frame with disposition frame
Step 7
This step deals with the establishment of application subscriptions.
- When a message is published:
-
amqpSender.send(message) - data placed in AMQP frame assigned a transferId
- data sent then increment its next-outgoing-id, decrement its remote-incoming-window
- Broker will ACK frame with disposition frame
-
Find out more about the Solace components that are involved
- Client Profile: Client profiles are associated with client username accounts so that you can easily apply common configurations to groups of clients.
- ACL Profile: After a client is successfully authenticated, the ACL profile assigned to the client username used by the client, or the LDAP authorization groups that the client belongs to (when LDAP authorization is used), is checked.
- Message VPNs: Message Virtual Private Networks (VPNs) are managed objects on Solace event brokers that allow for the segregation of topic space and clients.
- Route: Understand the fundamentals of publishing and subscribing to topics.
- Client Username: A client is only authorized to connect to a Message VPN if it has been assigned a client username associated with that VPN.
- Queue: Basic operation of guaranteed messaging.
Next Steps
For more information on how to use AMQP with Solace, refer to the AMQP pages in the Open APIs and Protocols section.
JMS
Now that we've had a look at SMF's operation, we're in a position to use that to understand the twist JMS has on the operation of the broker's components. First, we'll look at the Differences between JMS and SMF, and then examine the JMS Process Flow.
One other thing we'll point out is that the differences between JMS over SMF documented in this section are also the differences between JMS over AMQP.
Differences between JMS and SMF
You should note that the differences shown here, the differences between JMS over SMF, are also the differences between JMS over AMQP.
- Persistent and Non-Persistent publisher flows
- JNDI
- Topic Endpoints
The JMS specification mandates synchronous and asynchronous data movement. All messages published as persistent are sent on a publisher flow with window of one and are synchronous; non-persistent messages can be sent within a configurable window on a second publisher flow.
To use a broker as the JNDI server, the JMS API lazily opens a second session to do JNDI lookups. Although this session isn't used to send data, it could be required to resolve JNDI names of the endpoints, and so on to complete the data send and receive functions.
Further Information on JNDI service can found in Solace JNDI Objects.
Although SMF supports topic endpoints, its topic-to-queue mapping features are much more powerful and are the recommended approach. JMS doesn't have a programmatic interface for topic-to-queue mapping and therefore recommends topic endpoints.
For more information, refer to Topic Endpoints.
JMS to Solace Terminology Reference
The following table maps JMS concepts to their event broker equivalents:
| JMS Concept | Solace Event Broker Equivalent | Additional Information |
|---|---|---|
| Topic | Topic (message property) and subscription (pattern) | In JMS, a topic is a destination. On the Solace event broker, a topic is a property of the message. Subscriptions are patterns that express interest in messages with the topics it wants to receive. Subscriptions also support wildcards. |
| Durable Subscription | Durable topic endpoint (or queue with subscription) | Durability comes from the endpoint; the subscription on a durable endpoint persists when the subscriber disconnects |
| Non-Durable Subscription | Temporary topic endpoint | The temporary endpoint is removed when the subscriber disconnects, so messages are not retained |
createConsumer(topic)
|
Binds to temporary topic endpoint | Non-durable; receives only while connected |
createDurableSubscriber(topic, name)
|
Creates/binds to durable topic endpoint | Durable; messages spooled when disconnected |
| Temporary Topic | Temporary topic | Exists only for session lifetime |
JMS has no concept of a durable topic. In JMS, durability is a property of the subscription. On the Solace event broker, durability is a property of the endpoint (queue or topic endpoint) that the subscription is attached to.
JMS Process Flow
In the diagram below, follow the steps from establishing a connection to the event broker through to starting the data flow.
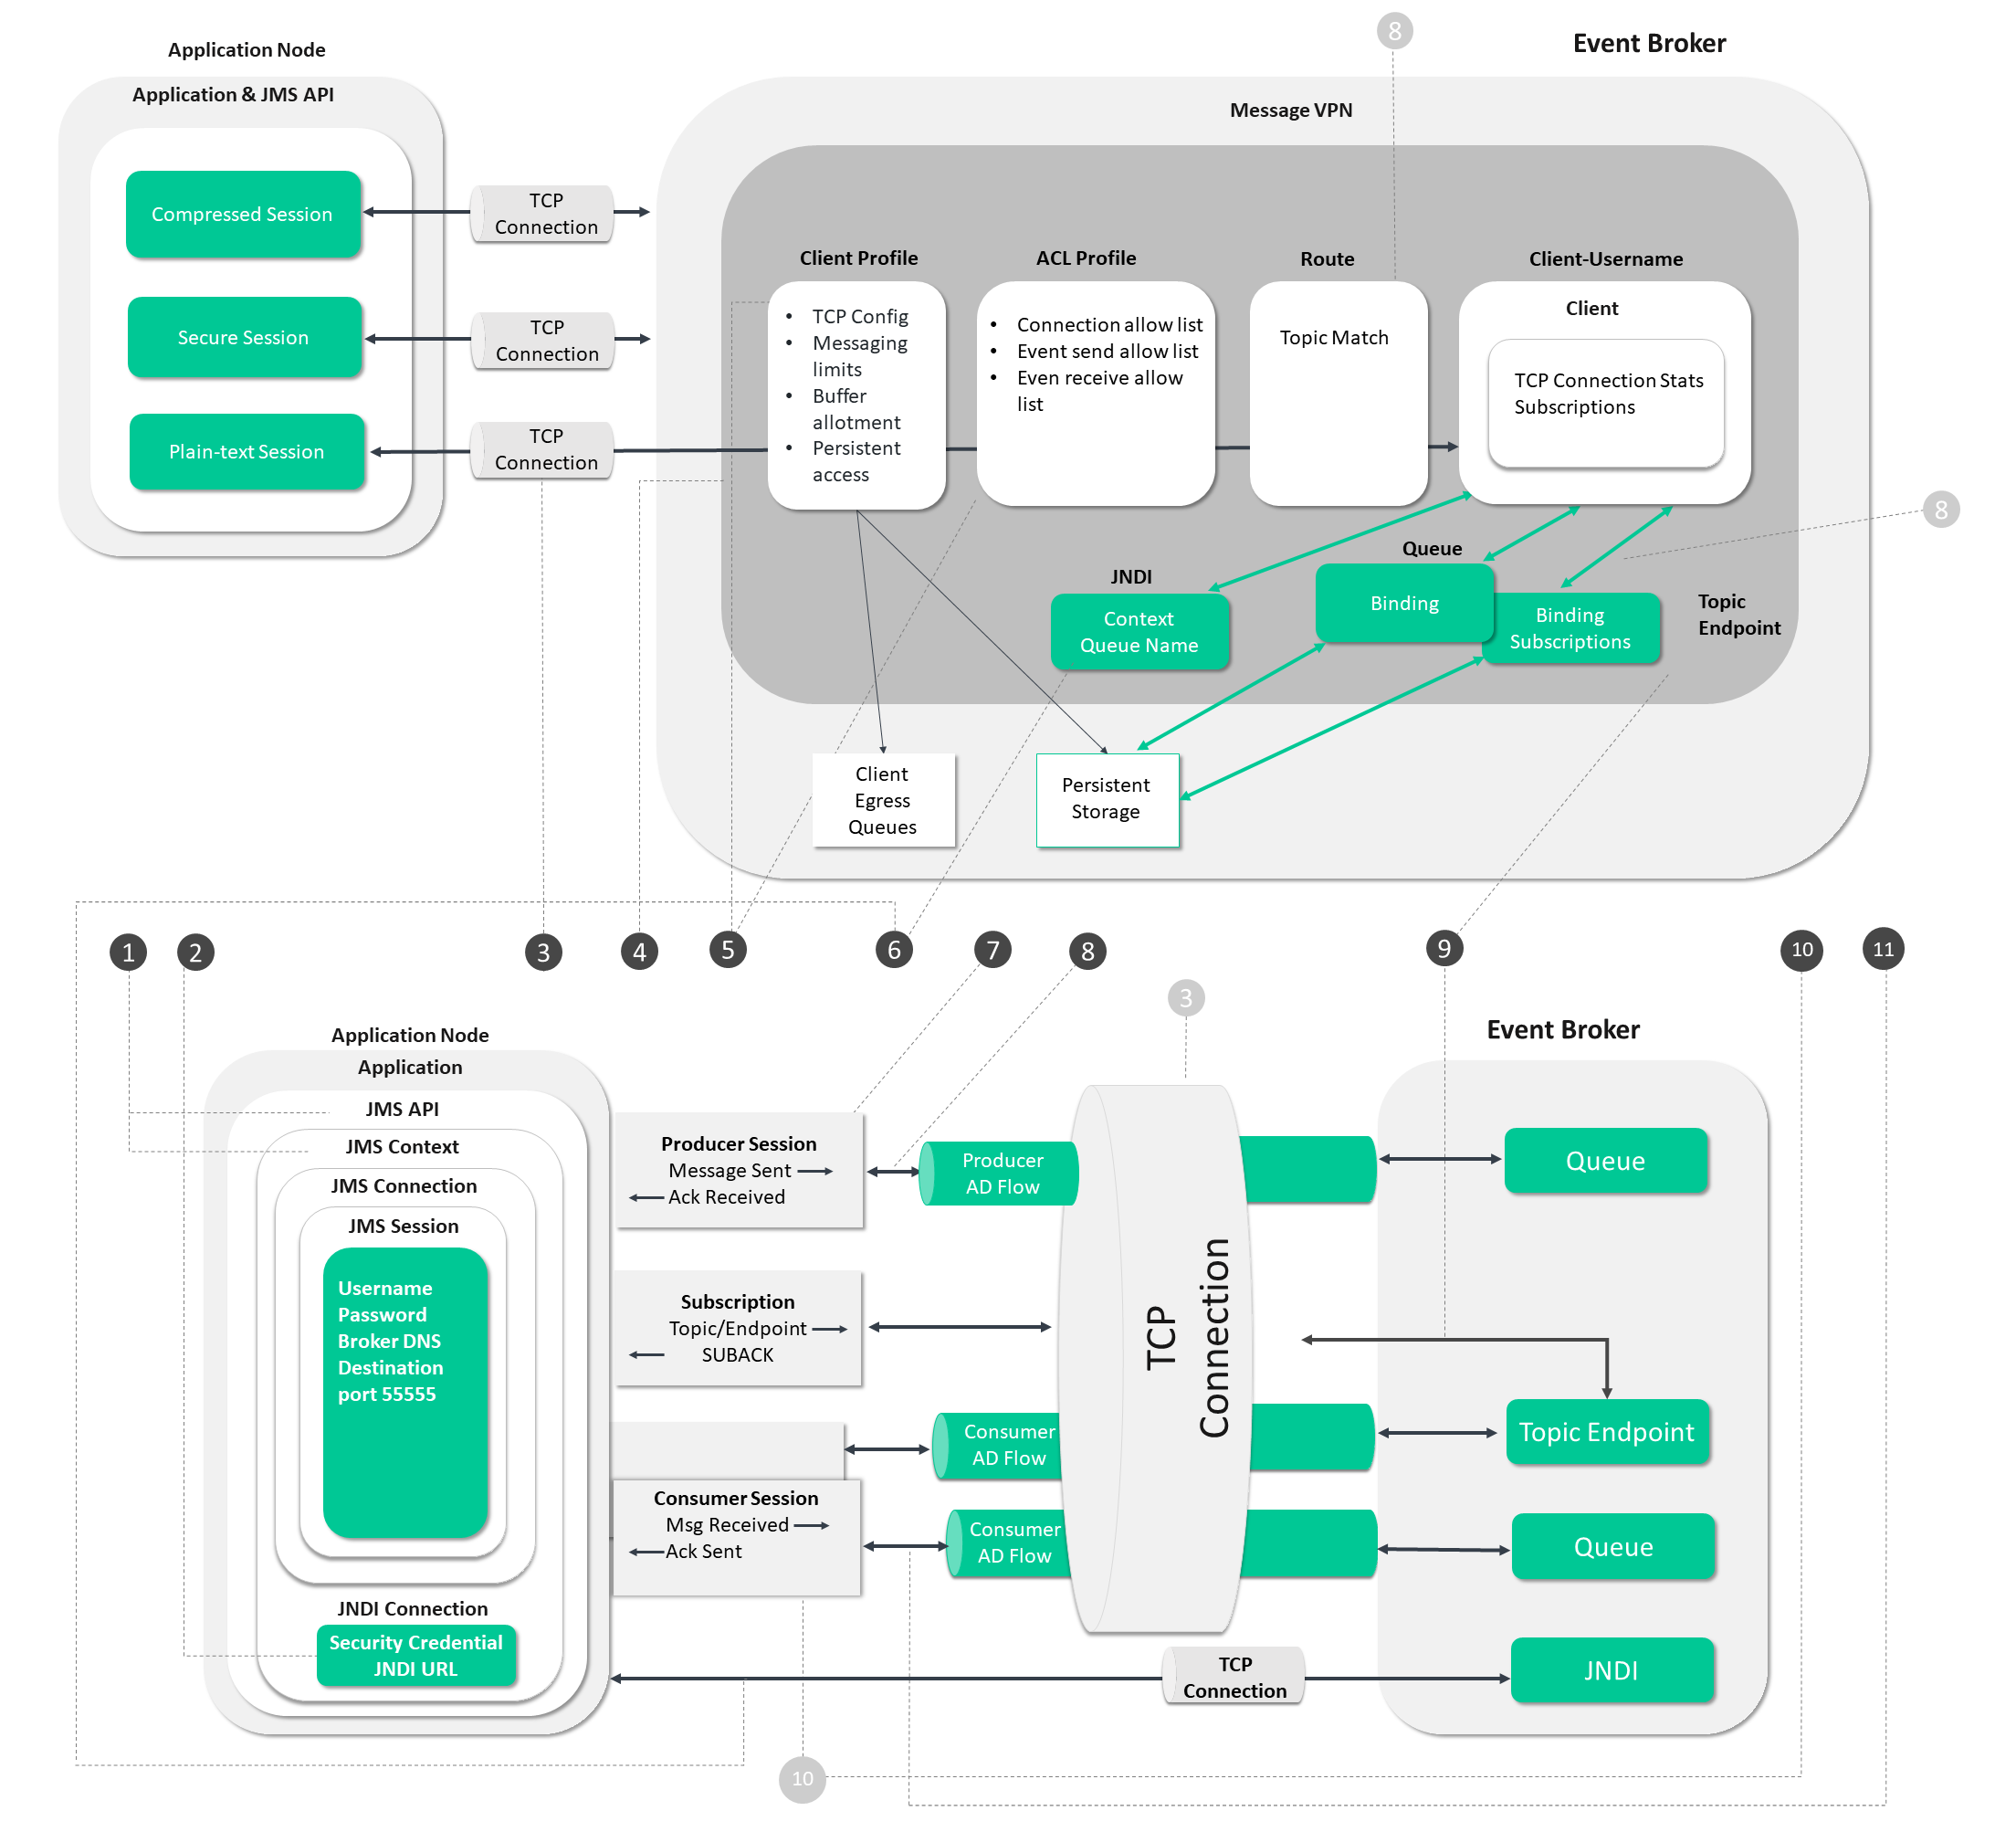
The circled numbers in the diagram correspond to the numbered steps described in detail as follows:
Steps 1 - 5
These steps deal with the operations the app and broker go through to establish a connection and get ready for event messaging.
- Application initiates JMS SDK which starts a single Solace Context.
- Application Creates initialContext , initialContext(env) with username, password, broker URL
- (Optional, can be programmatically created) Application does JNDI lookups to find context factory information,
initialContext.lookup(CONNECTION_FACTORY_JNDI_NAME):- This provides information such as messaging credentials and default message QoS, TLS, Compression
- Application connect connection to broker,
connectionFactory.createConnection():- Host initiates TCP session
- Broker receives messaging layer connect
- Broker authenticates connection
- Broker authorizes connection
Steps 6, 7, 8, 10, and 11
These steps focus on operations associated with sending and receiving event messages.
- Application does JNDI lookups to find endpoint names,
initialContext.lookup(QUEUE_JNDI_NAME). - Application SDK creates producer:
-
session.createProducer(..); - SDK sends last messageID sent and last messageID ACK received
- Broker sends last MessageID receives and last messageID ACK sent
- Application maintains this state as message flow to allow for correct re-transmissions as required on reconnects
-
-
When producer publishes a message:
producer.send(topic, message, DeliveryMode, Priority, TTL)- Application sdk sends message and decrements available window by one
- Event broker receives, routes and persists message
- Event broker sends ACK
- Application SDK receives ACK and increments available window by one
- (Optional can poll for message) Application create listener:
-
consumer.setMessageListener(..)
-
-
Application starts connection, which starts all consumers:
connection.start()- Broker sends message and decrements available window by one
- Client SDK receives message and passes to application
- Client SDK sends transport ACK
- Broker receives ACK and increments available window by one
- Application sends Application ACK when finished with message
- Broker receives Application ACK and deletes message from queue.
Step 9
This step deals with the establishment of application subscriptions.
- (Optional for Topic Endpoints only) Application adds subscriptions:
session.createConsumer(topic);- Application sends SUBSCRIBE message with topic and endpoint
- SDK sends message
- Broker adds subscription to connection or topic endpoint
- Broker can send SUBACK
For AMQP, context and queue names are created programmatically, and an example how to create them is shown here.
Find out more about the Solace components that are involved
- Client Profile: Client profiles are associated with client username accounts so that you can easily apply common configurations to groups of clients.
- ACL Profile: After a client is successfully authenticated, the ACL profile assigned to the client username used by the client, or the LDAP authorization groups that the client belongs to (when LDAP authorization is used), is checked.
- Message VPNs: Message Virtual Private Networks (VPNs) are managed objects on Solace event brokers that allow for the segregation of topic space and clients.
- Route: Understand the fundamentals of publishing and subscribing to topics.
- Client Username: A client is only authorized to connect to a Message VPN if it has been assigned a client username associated with that VPN.
- Queue: Basic operation of guaranteed messaging.
- Topic Endpoint: Creating durable topic subscribers.
- Subscription: You can create message consumers to receive messages from a queue or for a specific topic.
- Producer AD Flow: A client application can publish Guaranteed messages, that is, messages that the client application assigns a Persistent or Non‑Persistent delivery mode to Queue or Topic destinations.
- JMS Context: A JMSContext is the main interface in the simplified JMS API introduced for JMS 2.0.
- JMS Connection: A Connection object is a client's active connection to its JMS provider. It typically allocates provider resources outside the Java virtual machine (JVM).
- JMS Session: A Session object is a single-threaded context for producing and consuming messages.
Next Steps
For more information on how to use JMS with Solace, refer to the Solace JMS API pages in the Open APIs and Protocols section.
REST
In the previous sections, we looked at SMF's operation along with JMS and MQTT, all driven by messaging APIs. We'll now take a look at how REST's standards based HTTP exchange patterns work with the event broker's components. First, we'll look at the Differences between REST and SMF, and then examine the REST Process Flow.
Differences between REST and SMF
The REST messaging isn't driven by a messaging API, but instead by standards-based HTTP exchange patterns. However, at its core, the event broker treats REST messages exactly the same with respect to authentication, authorization, routing, and persistence. Here are the significant list of differences between the base SMF and REST:
- Publish
- Subscription
- Event delivery to consuming applications
All API publishes are HTTP POSTs with expected ACKs. The POSTs are not pipelined in that each must carry the required authentication header and are individually authenticated. This is different than a messaging-orientated protocol where the connection is authenticated with a connect messages containing authentication credentials and then the messages are pipelined on the connection.
There is no subscription type method in HTTP. All subscriptions are done by administrative actions.
A REST delivery endpoint is used to manage the connection from the broker to the application and deliver events via standard web-hooks HTTP.
REST Process Flow
In the diagram below, follow the steps from establishing a connection to the event broker through to starting the data flow.
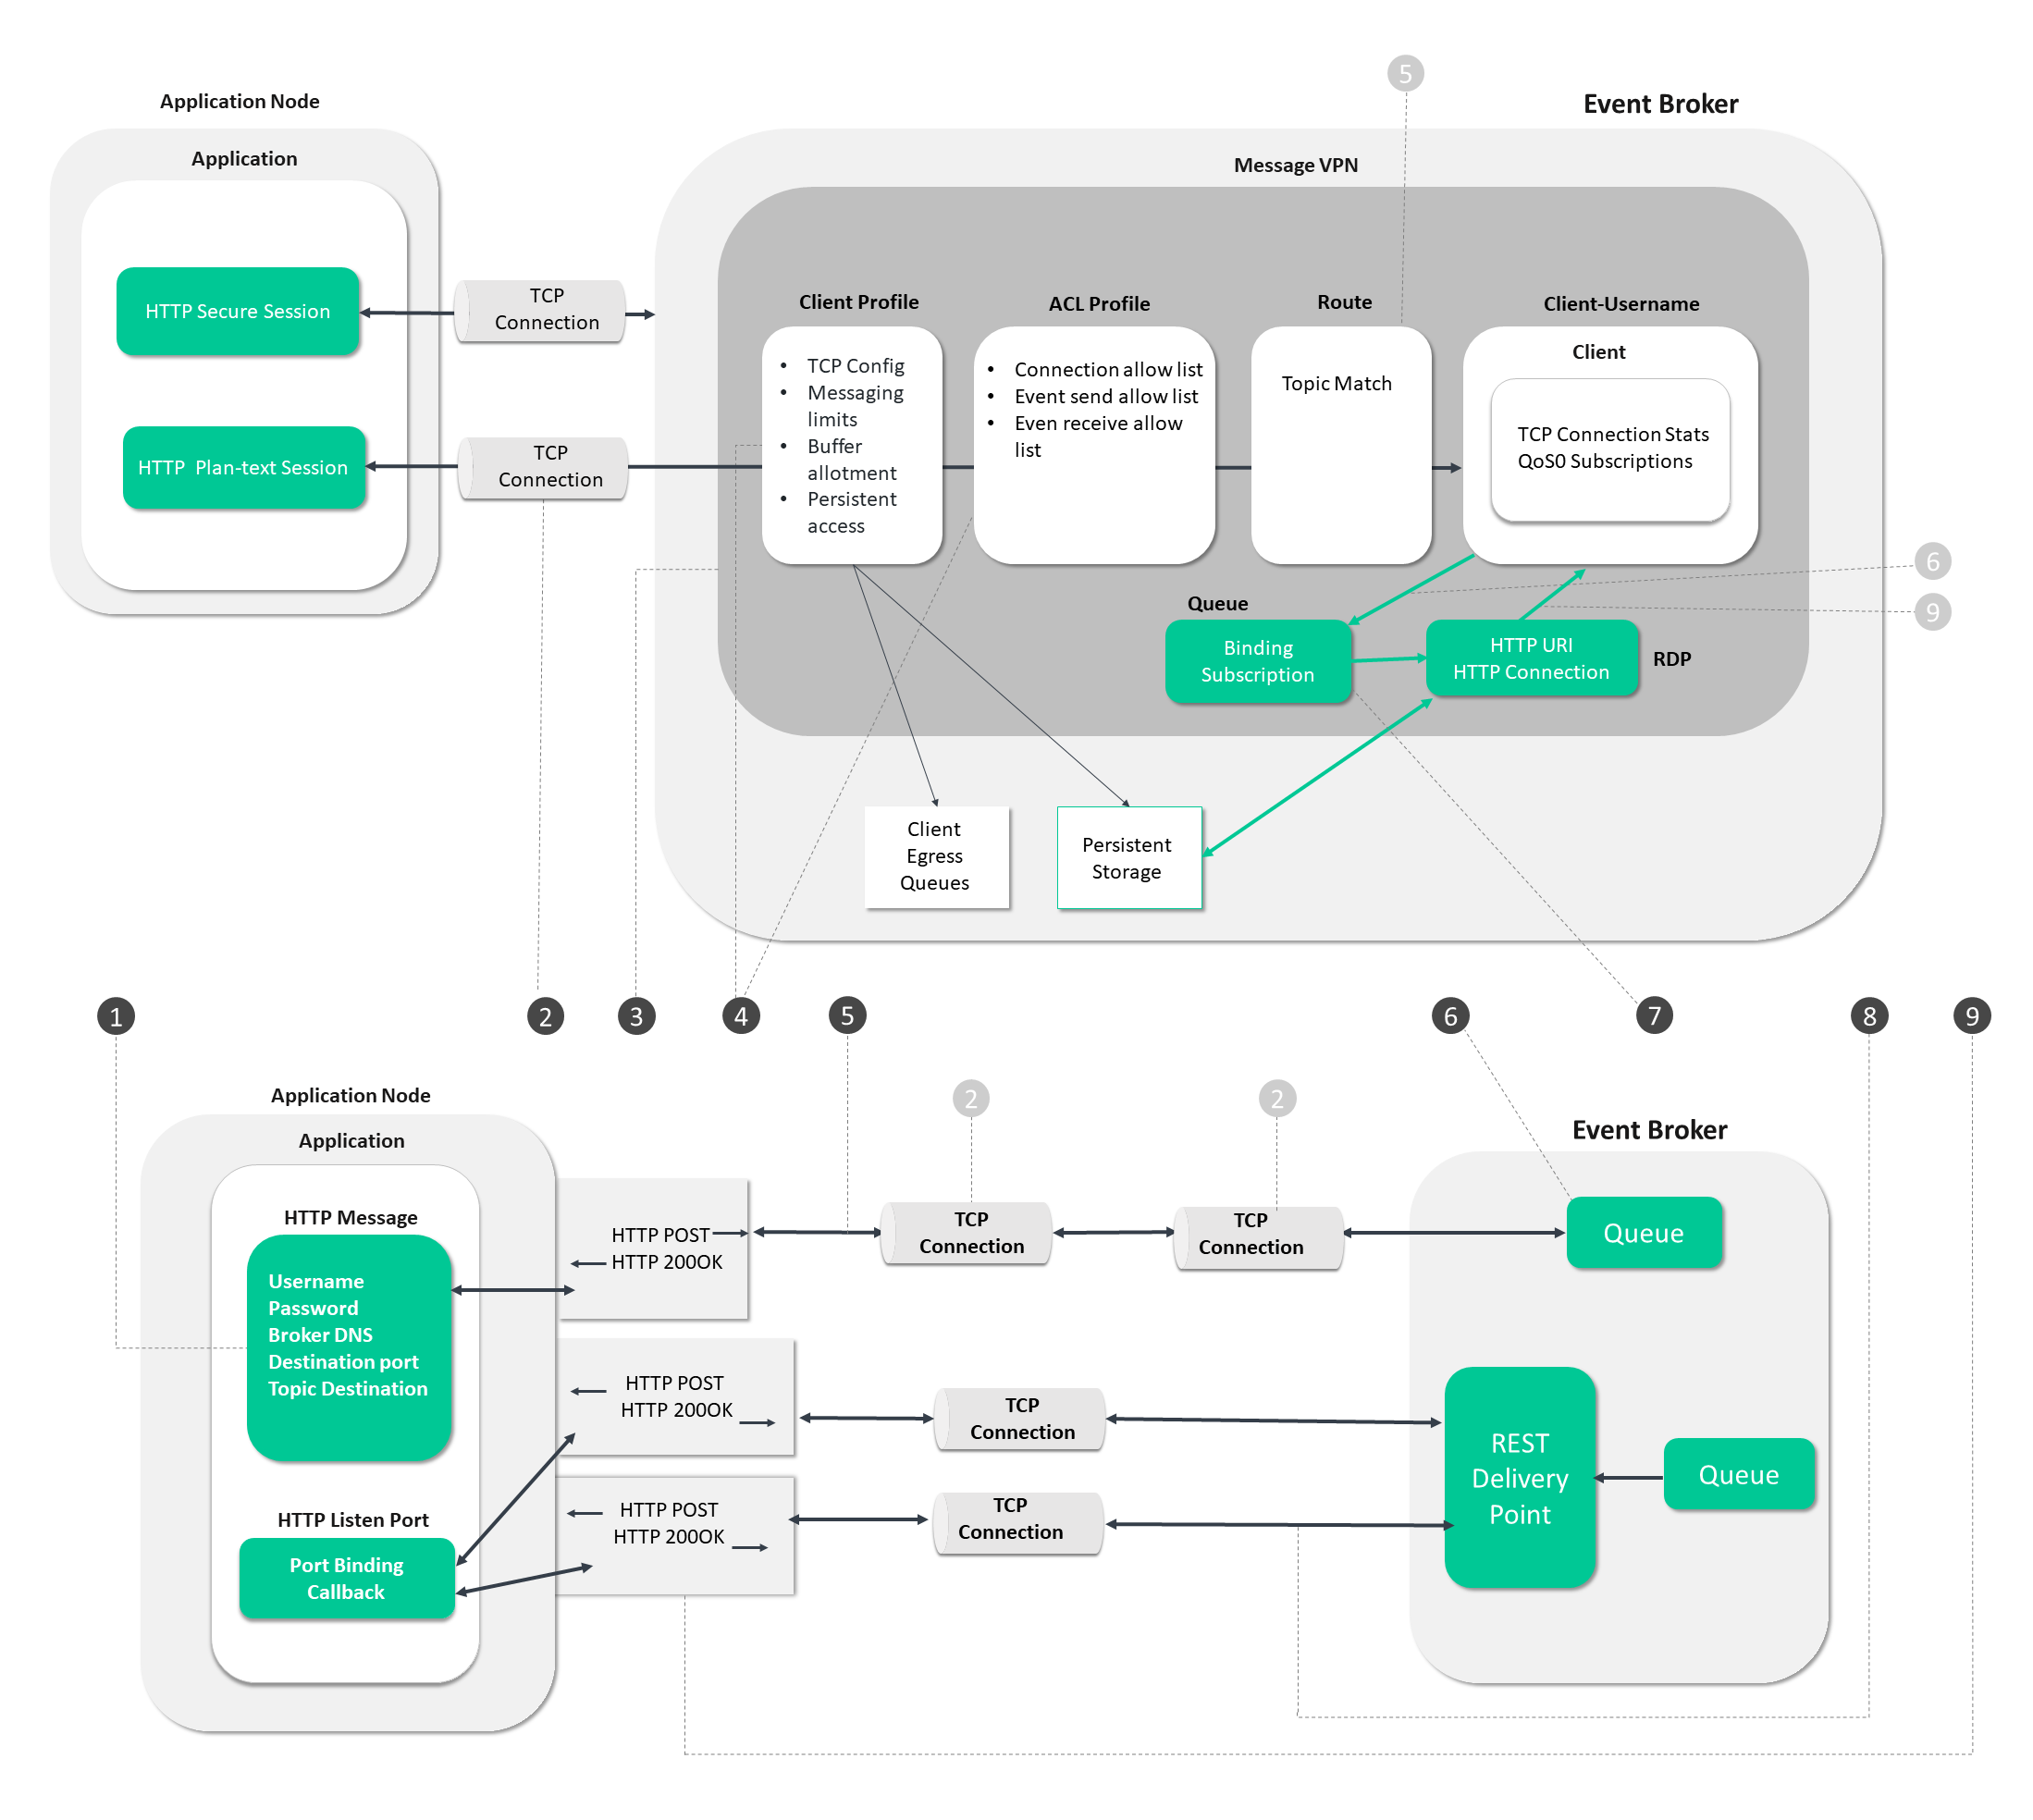
The circled numbers in the diagram correspond to the numbered steps described in detail as follows:
Steps 1 - 6
These steps deal with the operations the app and broker undergo to establish a connection and get ready for event messaging.
-
Application Creates REST message:
- Add Authentication Header
- Add Content-Type Header
- Add Solace-Reply-Wait-Time-In-ms if a reply is required
- Add Message Body
-
Application Sends REST Message:
- Includes the URI of the destination topic or queue from the event broker
-
Broker authenticates (Automatic from 2.):
- Includes the URI of the destination topic or queue from the event broker
-
Broker authorizes (Automatic from 2.)
-
Broker routes (Automatic from 2.):
- Based on URI
-
Broker persists:
- Broker ACKS (200 OK) either empty payload or reply body
Steps 8 and 9
These steps focus on operations associated with sending and receiving event messages.
-
Broker opens connection(s) to application via web-hooks:
- Broker opens connection to application. b. Broker send message with HTTP POST
-
Application ACKS (200 OK):
- Broker deletes message
Step 7
This step deals with the establishment of application subscriptions.
- Application Subscribes:
- This is not done programmatically. Administrators bind RDP to Queue containing subscriptions
Find out more about the Solace components that are involved
- Client Profile: Client profiles are associated with client username accounts so that you can easily apply common configurations to groups of clients.
- ACL Profile: After a client is successfully authenticated, the ACL profile assigned to the client username used by the client, or the LDAP authorization groups that the client belongs to (when LDAP authorization is used), is checked.
- Message VPNs: Message Virtual Private Networks (VPNs) are managed objects on Solace event brokers that allow for the segregation of topic space and clients.
- Route: Understand the fundamentals of publishing and subscribing to topics.
- Client Username: A client is only authorized to connect to a Message VPN if it has been assigned a client username associated with that VPN.
- Queue: Basic operation of guaranteed messaging.
Next Steps
For more information on how to use REST with Solace, refer to the REST pages in the Open APIs and Protocols section.