Fan Replacement

  • Solace PubSub+ 3230: A PubSub+ 3230 that uses a CHS-3230AC-02 chassis has a field serviceable fan assembly, and a Solace provided replacement fan assembly that can be installed on site.

    An appliance that uses a CHS-3230AC-01 chassis does not have a field serviceable fan assembly, and it must be returned to Solace for a fan replacement.

  • Solace PubSub+ 3260: A PubSub+ 3260 has a field serviceable fan assembly that can be installed on site.
  • Solace PubSub+ 3530/3560: A PubSub+ 3530 or PubSub+ 3560 contains four 2.4 in (60mm) fans; each fan is individually replaceable. The fans are not serviceable while the system is under power; however, the system is designed so that it can run for an indefinite amount of time with a single fan failure.

ESD/Safety Precautions

To prevent equipment damage from Electrostatic Discharge (ESD), always ensure that the appliance chassis is electrically connected to earth ground. Always follow ESD prevention procedures when removing and replacing power supplies. Use an anti-static wrist strap, or another anti-static device. If no wrist strap or mat is available, ground yourself by touching the metal part of the chassis.

Tools and Equipment Requirements

  • No. 1 and No. 2 Phillips head screwdrivers (Solace PubSub+ 3230, 3530, 3560 appliances)
  • Electrostatic discharge wrist strap
  • Anti-static mat
  • Replacement fan tray (supplied by Solace)

Replacing Solace PubSub+ 3230 Fans

To replace a fan in a Solace PubSub+ 3230 (CHS-3230AC-02), perform the following steps:

Step 1: Turn Off Power to the Appliance

To turn off power to Solace PubSub+ appliances, enter the power-down Privileged EXEC command:

solace# power-down

The appliances do not restart automatically after this command is run.

Notify the appropriate personnel to ensure that all traffic to and from appliances is stopped before issuing the power-down Privileged EXEC command. Otherwise, the power-down command will cause a disruption in customer service when run.

Step 2: Remove the Faceplate

To remove the faceplate from a Solace PubSub+ 3230, use the following procedure:

  1. Use an anti-static wrist strap or other device to ground yourself.
  2. To remove the appliance faceplate, use a No. 2 Philips screwdriver to remove the four retaining screws (as shown below).

    Keep these screws for later so that you can reattach the faceplate.

    Solace PubSub+ 3230 Faceplate Retaining Screw Locations

Step 3: Remove the Front Chassis Cover

To remove the front chassis cover to gain access to the appliance fan assembly, use the following procedure:

  1. Use a No. 1 Phillips head screwdriver to remove the five screws attaching the front half of the chassis cover.

    Remove Solace PubSub+ 3230 Cover Screws

  2. Slide the cover towards the front of the chassis, and lift it off.

Step 4: Remove the Failed Fan Assembly

To remove a failed fan assembly from the appliance, follow this procedure:

  1. Use a Philips No. 2 screwdriver to undo the two captive fasteners used to secure the fan to the appliance chassis.

    Front Portion of Cover Off

  2. Firmly pull apart the male/female connector of the fan wire harness.

    Pull Apart the Fan Wire Harness Connector

  3. Pull the disconnected fan tray up and out of the chassis.

Step 5: Install the Replacement Fan Assembly

To install a replacement fan assembly in the appliance, follow this procedure:

  1. Place the replacement fan tray assembly provided by Solace in the chassis.

    Ensure that the two captive fasteners line up with the existing threaded holes and that no wires are pinched.

  2. Use a Philips No. 1 screwdriver to securely fasten the two captive fasteners.

    Securing the Fan Tray Fasteners

  3. Reconnect the male and female connectors of the fan wire harness.

Step 6: Reattach the Chassis Cover and Faceplate

To replace the chassis cover and faceplate on a Solace PubSub+ 3230, perform the following steps:

Carefully follow these steps when replacing the faceplate. Failure to do so could result in an accidental restart of the event broker, which can cause data loss.

  1. Locate the five retaining screws that were removed.

    Place the front half of the chassis lid back on the chassis, and slide it back until it is firmly seated.

  2. Use a No. 1 Phillips head screwdriver to securely fasten the five screws.
  3. Locate the four faceplate retaining screws that were removed.
  4. Line up and insert the bottom two screws of the faceplate with the chassis openings.
  5. Gently move the faceplate in a side-to-side motion to ensure the screws are properly aligned with the chassis openings.
  6. Rotate the faceplate towards the appliance until the top two screws of the faceplate are aligned and inserted with the top chassis openings.
  7. Gently move the faceplate in a side-to-side motion to ensure all four screws are properly aligned with the chassis openings.
  8. Use a No. 2 Philips screwdriver to tighten the four retaining screws and fasten the faceplate to the chassis.

    When tightening the screws, do not turn them more than five times each.

Step 7: Turn On Power to the Appliance

Use a paper clip to press the (Standby button) on/standby button on the front panel of the appliance to turn power back on to the appliance (refer to Connections, LEDs, and Specifications for location and details on the on/standby button).

Alternately, use Wake On LAN (WOL) to turn power back on to the appliance through a WOL magic packet (refer to Powering Up an Appliance With WOL for details).

Replacing Solace PubSub+ 3260 Fan Trays

To replace a fan in a Solace PubSub+ 3260, perform the following steps:

Step 1: Turn Off Power to the Appliance

To turn off power to Solace PubSub+ appliances, enter the power-down Privileged EXEC command:

solace# power-down

The appliances do not restart automatically after this command is run.

Notify the appropriate personnel to ensure that all traffic to and from appliances is stopped before issuing the power-down Privileged EXEC command. Otherwise, the power-down command will cause a disruption in customer service when run.

Step 2: Remove the Faceplate and Failed Fan Tray

To remove the failed fan tray, use the following procedure:

  1. Pull firmly on the faceplate until the push pins disengage, and the faceplate separates from the front of the chassis.

    Removing the Faceplate

  2. Hand loosen the four captive thumbscrews in each corner of the fan tray, and pull firmly on the fan try to separate its male power connector from the female chassis connector.

    Loosening the Fan Tray Thumbscrews

Step 3: Install the Fan Tray and Faceplate

To install a new fan tray and faceplate on the Solace PubSub+ 3260, perform the following steps:

  1. Position the fan tray assembly so that the four thumbscrews and rear power connector align with the front of the chassis as shown below.

    Installing the Fan Tray

  2. Hand tighten the four captive thumbscrews in each corner of the fan tray to seat it firmly against the chassis.
  3. Position the faceplate over the installed fan tray so that it aligns with the front of the chassis.
  4. Align the four male push pins in the four corners of the faceplate with the female receptacles on the chassis.
  5. Press firmly in on the faceplate until the push pins engage, and the faceplate is flat against the front of the chassis .

    Installing the Faceplate

Step 4: Turn On Power to the Appliance

Use a paper clip to press the () on/standby button on the front panel of the appliance to turn power back on to the appliance (refer to Connections, LEDs, and Specifications for location and details on the on/standby button).

Alternately, use Wake On LAN (WOL) to turn power back on to the appliance through a WOL magic packet (refer to Powering Up an Appliance With WOL for details).

Replacing Solace PubSub+ 3530/3560 Fans

To replace a fan in a Solace PubSub+ 3530 or 3560 appliance, perform the following steps:

Step 1: Turn Off Power to the Appliance

To turn off power to Solace PubSub+appliances, enter the following Privileged EXEC command:

solace# power-down

The appliances do not restart automatically after this command is run.

Notify the appropriate personnel to ensure that all traffic to and from appliances is stopped before issuing the power-down Privileged EXEC command. Otherwise, the power-down command will cause a disruption in customer service when run.

Step 2: Remove the Appliance’s Top Cover

To remove the appliance’s top cover, refer to Replacing 3530/3560 Top Covers.

Step 3: Remove the Failed Fan

To remove a failed fan from the appliance, follow this procedure:

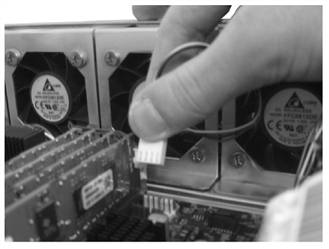
  1. Unplug the failed fan’s female connector from the motherboard’s male connector (as shown below).

    Disconnecting the Fan

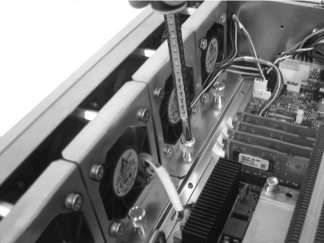
  2. Using a Philips No. 2 screwdriver, undo the captive fastener used to secure the fan to the appliance chassis.

    Loosening the Captive Fastener

  3. Remove the failed fan from the appliance chassis.

Step 4: Install the New Fan

  1. Place the new fan in the vacant fan bay.
  2. Using a Philips No. 2 screwdriver, reattach the captive fastener to secure the fan to the appliance chassis.
  3. Plug the fan’s female connector into the corresponding male connector on the motherboard.

Step 5: Reattach the Appliance’s Top Cover

To reattach the appliance’s top cover (refer to Replacing 3530/3560 Top Covers).

Step 6: Turn On Power to the Appliance

To turn on power to the appliance, follow this procedure:

  1. Restore power to the appliance by doing one of the following:
  2. Press the () on/standby button on the rear panel of the appliance.
  3. Use Wake On LAN (WOL) to turn power back on to the appliance through a WOL magic packet (refer to Powering Up an Appliance With WOL for details).
  4. Monitor the LED on the front of the appliance to verify that it is powering up properly.
  5. Verify that the Green LED on each power supply is on.
  6. Ensure that the following CLI login prompt displays on your management console screen:
    System Software. SolOS Version x.x.x.x
    Copyright 2004-2017 Solace Corporation. All rights reserved.
    solace>