Mapping Headers and Payloads
You can map header and payload values between your source and target systems when you create or edit a Micro-Integration Flow. Mapping allows you to define the relationships between the data fields in your source system and the data fields in your target system.
If you don't map any source headers, their values are not propagated to the target headers. If you don't map any payload fields, the payload is passed through to the target unchanged.
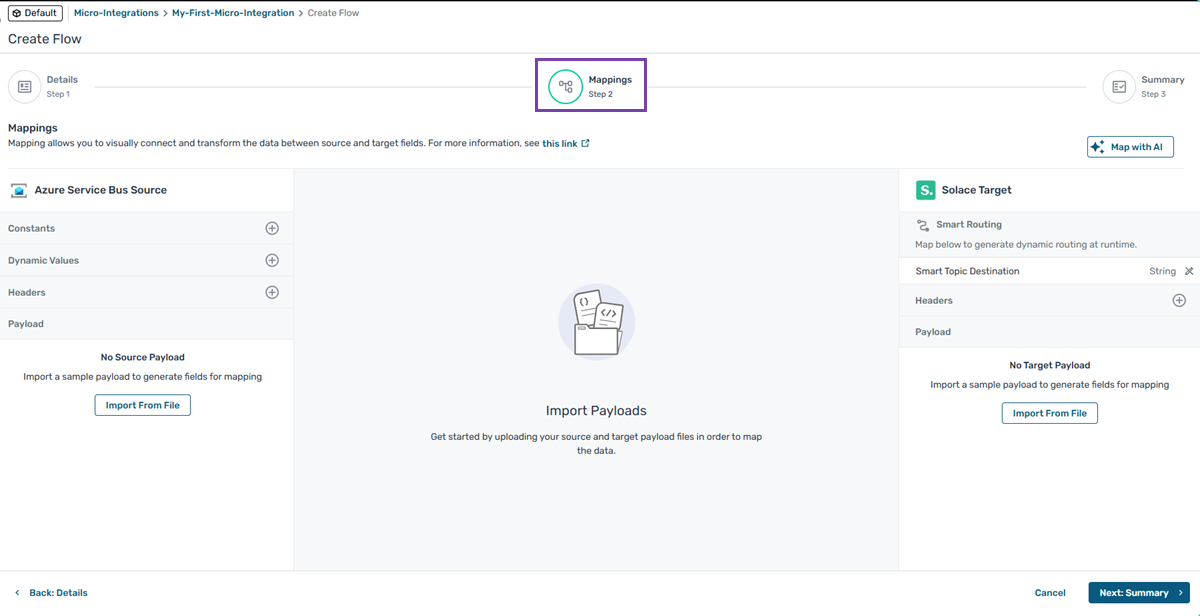
The Mappings step is laid out with source constants, dynamic values, headers, and payload on the left, and target Smart Routing, headers, and payload on the right. This step allows you to:
-
map header fields, including custom headers, from your source directly to your target. For more information, see Mappings and Selecting and Creating Headers.
-
define constants so that you can use String, Boolean, or Number values in your mappings. For more information, see Constants.
-
include dynamic values (such as the current system time) in your mappings. For more information, see Dynamic Values.
-
import JSON or XML files to map fields between the payloads of your two systems, or to map fields between headers and payloads. For details, see Payloads.
-
add transformation functions to your mappings to modify the source header or payload data so that it conforms to your target format. For more information, see Transformations.
-
define a Smart Topic Destination using simple mappings or mappings with transformation functions. For more information, see Smart Topic Destinations.
For information about the headings that are available to map for each Micro-Integration, see the Message Header Reference.
Mappings
In the Mappings step, you can drag and drop fields from your source system to your target system to create associations between the two. You can map any of the following:
-
Constants—You must have created the constant beforehand. For more information, see Mapping Headers and Payloads.
-
Message headers—You must select the headers you want before you can use them in mappings. The header fields that are available depend on the external system you are using and whether your Micro-Integration is a source or a target type. For more information, see Selecting and Creating Headers and the Message Header Reference.
-
Dynamic values—You must add dynamic values before you can use them in mappings. For more information, see Dynamic Values.
-
Payloads—These fields are available for mapping if you have imported a JSON or XML sample of your payload. For more information, see Payloads.
You can:
If you want to change an existing mapping, delete it and recreate it.
Creating a Mapping
Perform the following steps to create a new mapping for your Micro-Integration:
-
If you haven't already, open your Micro-Integration, open or create a Flow, and then select the Mappings step.
-
In the Source or Target panel, hover over the required field until you see an arrow appear beside it.
-
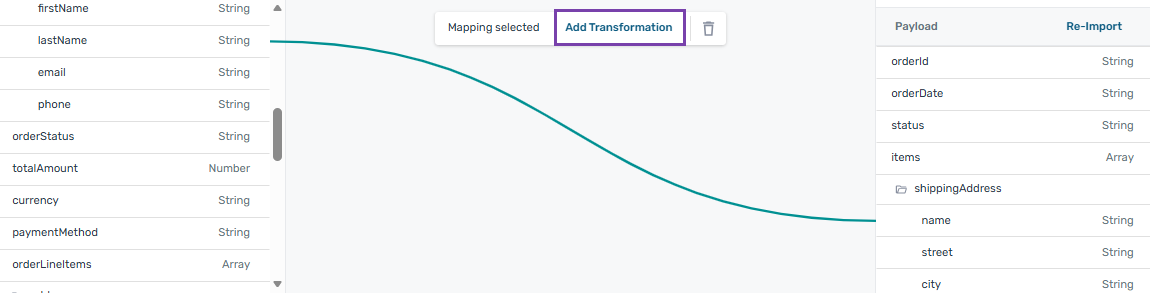
Click and drag the arrow to the field that you want to map to in the other panel. A line appears between the fields.
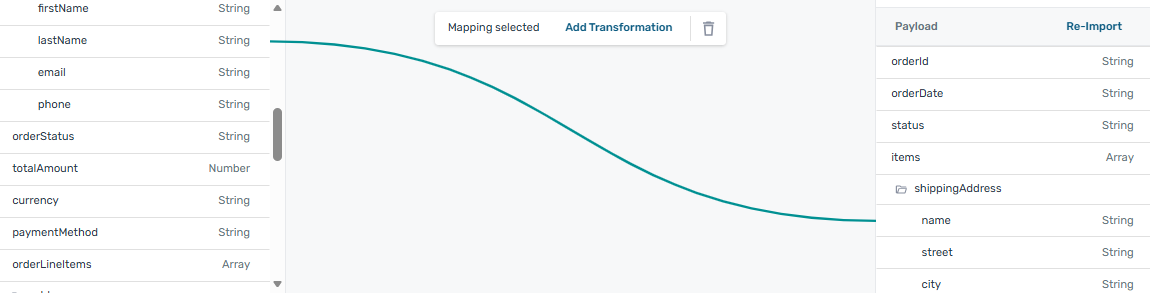
-
(Optional) Click Add Transformation to transform the data between the source and the target. For more information about adding a function, see Transformations. When you've finished adding a transformation, click Apply.
If you want to change the source or target fields for an existing mapping, delete it and recreate it.
Mapping with AI
You can have AI help you to map your payload fields. AI analyzes the data types and semantics of your payload fields to determine preliminary mappings. It also attempts to create the appropriate transformations where required.
Mapping with AI removes any previously existing mappings.
To map your payloads using AI:
-
If you haven't already, open your Micro-Integration, open or create a Flow, and then select the Mappings step.
-
Import both your source and your target payloads. For more information, see Payloads.
-
Click Map with AI.
-
(Optional) In the Instructions field, enter additional details or hints to help AI map your payload fields.
-
Click Map to confirm. AI begins mapping your payloads. This might take several minutes.
-
When the mapping process has finished, review all the results to make sure they are what you expected.
Always manually verify the mappings and transformations created by AI. The results may contain errors.
Deleting a Mapping
When you delete a mapping, its transformation functions (if any exist) and any related mappings are also deleted.
Perform the following steps to delete an existing mapping:
-
If you haven't already, open your Micro-Integration, open or create a Flow, and then select the Mappings step.
-
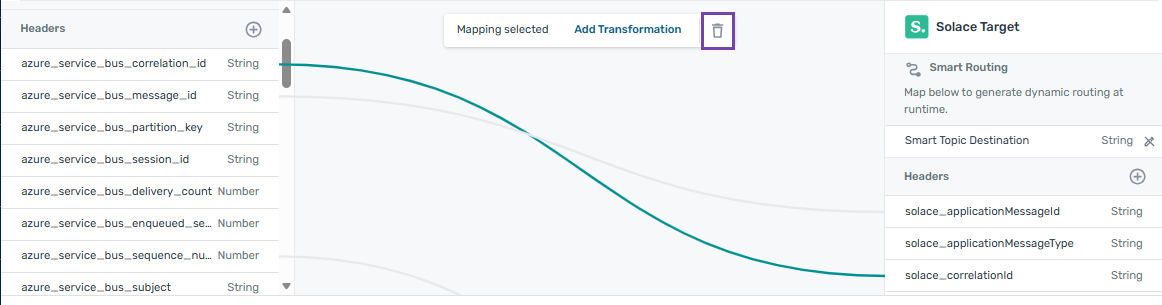
In the mappings area, click the mapping you want to delete to select it.
-
Click Delete
 .
.
-
If your mapping has transformations, a confirmation dialog appears that lists the affected functions and mappings. Click Delete to confirm.
Selecting and Creating Headers
You must select the headers you want before you can use them in mappings. In addition, you can optionally add custom header fields to map headers in your source data that are not detected automatically.
To select or add headers, perform the following steps:
-
If you haven't already, open your Micro-Integration, open or create a Flow, and then select the Mappings step.
-
In the Source panel beside Headers, click the plus sign
 . The Add Headers dialog opens.
 -
In the System Headers section, in the Header Name field, select the headers you need.
-
In the Custom Headers, section:
-
In Header Name field, type the name of header you want to add.
-
In the Data Type list, select one of the following data types:
-
String—A alphanumeric value that can be up to 255 characters in length.
-
Boolean—A value of True for False.
-
Integer—A numeric value.
-
-
Repeat the preceding steps to add more custom headers.
-
-
Click Add.
To edit or delete an existing custom header, click the custom header to select it, then click either Edit Header to make changes, or Delete
to delete the header.
Constants
Optionally, you can create static values called constants. Constants allow you to include unchanging values in the mappings between fields, which may be useful for testing or for including as part of a transformation on an incoming value.
Perform the following steps to create a constant:
-
If you haven't already, open your Micro-Integration, open or create a Flow, and then select the Mappings step.
-
In the Source panel beside Constants, click the plus sign
. -
In the Data Type list, select one of the following data types:
-
String—A alphanumeric value that can be up to 255 characters in length.
-
Boolean—A value of True for False.
-
Integer—A numeric value.
-
-
In the Constant Value field, enter the value for the constant.
-
Click Add.
To edit or delete an existing constant, click the constant to select it, then click either Edit Constant to make changes, or Delete
to delete the constant.
Dynamic Values
You can add dynamic values, which are system-generated values like the current date or time. You map dynamic values directly to headers or payload fields. You can then optionally manipulate the resulting mapping with transformations.
Perform the following steps to add a dynamic value:
-
If you haven't already, open your Micro-Integration, open or create a Flow, and then select the Mappings step.
-
In the Source panel beside Dynamic Values, click the plus sign
. -
In the Value list, select one of the functions.
-
Click Add.
To delete an existing dynamic value, click the dynamic value to select it, then click Delete ![]() to delete it.
to delete it.
Payloads
You can import a sample of your message payload to allow you to map payload fields. If you don't map any payload fields, the payload passes through unchanged from source to target. If you map payload fields, any unmapped fields are dropped.
Your sample payload must be well-formed JSON (with a .json suffix) or XML (with a .xml suffix) file comprising a single record.
The following example shows a valid JSON payload:
{
    "orderId": "DC-78901",
    "orderDate": "2025-10-30T13:35:00Z",
    "status": "Ready for Pickup",
    "item": {
            "sku": "WH-001",
            "name": "Wireless Headphones",
            "quantity": 2,
            "location": "A3-B12"
    },
    "shippingAddress": {
        "name": "Jane Smith",
        "street": "789 Pine Lane",
        "city": "Warehouse City",
        "state": "WH",
        "zip": "54321"
    },
    "shippingMethod": "Ground",
    "priority": "Standard",
    "estimatedShipDate": "2025-10-31",
    "notes": "Fragile items. Handle with care."
}
The following example shows a valid XML payload:
<order>
    <orderId>DC-78901</orderId>
    <orderDate>2025-10-30T13:35:00Z</orderDate>
    <status>Ready for Pickup</status>
    <item>
        <sku>WH-001</sku>
        <name>Wireless Headphones</name>
        <quantity>2</quantity>
        <location>A3-B12</location>
    </item>
    <shippingAddress>
        <name>Jane Smith</name>
        <street>789 Pine Lane</street>
        <city>Warehouse City</city>
        <state>WH</state>
        <zip>54321</zip>
    </shippingAddress>
    <shippingMethod>Ground</shippingMethod>
    <priority>Standard</priority>
    <estimatedShipDate>2025-10-31</estimatedShipDate>
    <notes>Fragile items. Handle with care.</notes>
</order>
When you import XML with attributes, those attributes are labeled as @<attribute_name>. For example, when you import the following XML payload:
<order status="Ready">
    <orderId>DC-78901</orderId>
    <orderDate>2025-10-30T13:35:00Z</orderDate>
    <item>
        <itemName>Wireless Headphones</itemName>
        <sku>WH-001</sku>
        <quantity>2</quantity>
        <location>A3-B12</location>
    </item>
    <shippingAddress method="Ground" priority="Standard">
        <name>Jane Smith</name>
        <street>789 Pine Lane</street>
        <city>Warehouse City</city>
        <state>WH</state>
        <zip>54321</zip>
    </shippingAddress>
    <estimatedShipDate>2025-10-31</estimatedShipDate>
    <notes>Fragile items. Handle with care.</notes>
</order>
You will see the following fields (among others):
-
@status
-
orderId
-
orderDate
-
item
-
shippingAddress.@method
-
shippingAddress.@priority
-
Not all external systems associated with Micro-Integrations support XML for transformations. For example:
-
Salesforce as a target requires JSON payloads.
-
Salesforce as a source produces only JSON payloads.
-
All CDC Micro-Integrations require JSON payloads.
-
-
XML comments, processing instructions, and namespaces are dropped if any mappings are present. These elements are preserved only in pass-through scenarios where you do not add any mappings.
-
Mixed-content XML (that is, XML with elements that contain both text and child elements) is not supported.
-
Element ordering is not preserved in transformations from XML when you use payload transformation expressions.
-
XML namespace resolution is not supported. You cannot set XML namespaces on output documents, regardless of the transformation expressions you use.
-
JSON arrays do not have a direct XML equivalent. When you transform from JSON to XML, arrays are represented as repeated elements. This can cause unexpected results.
-
Array fields are passed through in their entirety. You cannot map individual array elements.
-
JSON arrays and repeating XML elements may not be interpreted the same way, even if they logically represent the same data.
-
In JSON to XML mappings, if the incoming JSON has no root node, a root node named
<ObjectNode>is automatically added to the XML payload to satisfy XML's requirement for a single root element. -
JSON property names with special characters may not be valid XML element names. Additionally, naming convention differences between JSON (which typically uses camelCase) and XML may require you to perform additional field transformations.
-
XML parsing and generation is slower than JSON processing, which may impact performance in high-throughput scenarios.
Importing Payloads
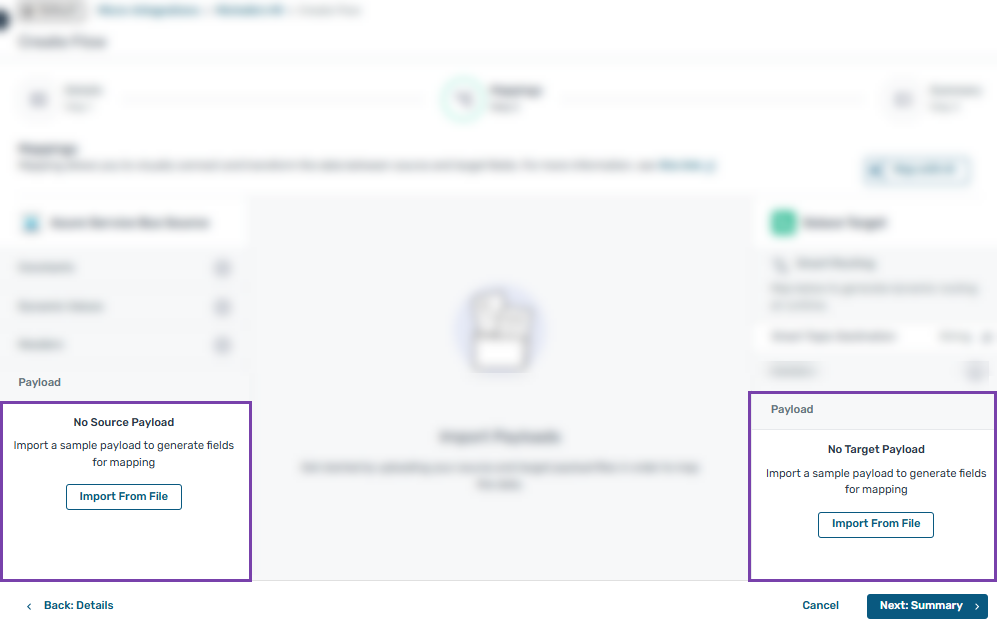
You can import payloads for your source system, target system, or both.
Perform the following steps to import a sample of your payload:
-
If you haven't already, open your Micro-Integration, open or create a Flow, and then select the Mappings step.
-
In the source or target Payload panel, click Import From File. The Import Source Payload dialog opens:
-
In the Import Source Payload dialog, either drag and drop a file or click Upload File to select a file from your computer.
-
Click Import. The payload fields appear in the Payload panel.
-
If required, repeat these steps in the other (Source or Target) panel.
To make changes or to import a different file, in the source or target Payload panel, click Re-Import.
Transformations
Transformations allow you to modify the message headers and payloads as they flow through your Micro-Integration. You can use transformations to make simple changes such as converting a String value to uppercase, or to perform more complex operations, such as combining several values together, or extensively altering the incoming payload to conform to a target schema.
For more information about the functions that are available to use in transformations, see the Transformation Function Reference.
Adding a Transformation
Perform the following steps to add a transformation:
-
If you haven't already, open your Micro-Integration, open or create a Flow, and then select the Mappings step.
-
Create a new mapping or select an existing one.
-
Click Add Transformation.
-
In the Transformation Details dialog, in the Transformation list, select the function you want to use.
If required, you can chain multiple functions to perform complex operations on your data. For more information, see Chaining Functions in a Transformation and Smart Topic Destinations.
-
Verify that the fields and functions you want to use are shown correctly, and make any changes you need to.
-
Click Apply. The mapping now shows that there is a transformation associated with it.
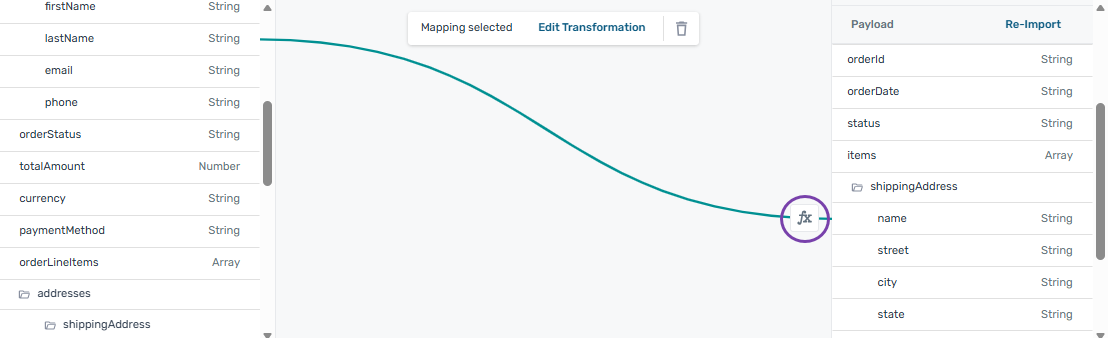
To edit a transformation, click its mapping to select it, then click Edit Transformation. To delete a transformation, you must delete the mapping and recreate it.
Chaining Functions in a Transformation
You can perform multiple chained operations on a field to get the format you want. In this scenario, the output from one function becomes the input for the next.
For example, we want to map both the firstName and lastName source fields to the name target field. In addition, we want to capitalize the last name and have it appear first, followed by a comma and a space, followed by the first name. Supposing the firstName field contains "Solly" and the lastName field contains "Admin", the result in the name field would be "ADMIN, Solly".
To chain functions:
-
Map one source field and one target field for your transformation. You can add more fields later.
First, we map just
lastNametoname.
-
If it's not already selected, click the mapping to select it.
-
Click Add Transformation.
-
In the Transformation Details panel, add the first function you need.
In this example, we choose to apply the Upper Case function to the
lastNamefield.
-
At the appropriate step in your transformation, click the plus sign to add another function.
Here we want to add another function that takes as its input the result of the Upper Case function.

-
Select the function you need from the list.
Here, we choose the Join function.

-
Provide any additional parameters required.
In this example, we add
firstNameand our delimiter (comma and space) as parameters to the Join function.
-
Repeat steps 5 to 7 as required to add all the functions and parameters you need.
-
Click Apply. The resulting transformation is shown in the Mappings step.
In our example, both
firstNameandlastNameare now mapped to thenamefield.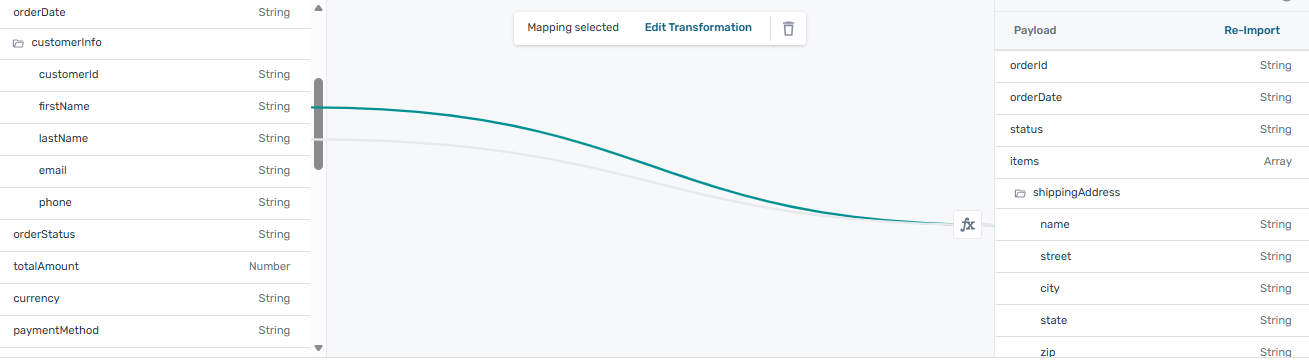
Smart Topic Destinations
A Smart Topic is a destination (queue, topic, or other third-party specific destination) that is dynamically determined based on data coming from your source. You can map any constant, header, or payload field to a Smart Topic Destination. You can also use transformations to build expressions for Smart Topic Destinations. For example, you could assemble a topic from a number of fields and constants. The destination must already exist on the target system.
Setting a Smart Topic Destination on the Mappings step overrides the target destination field set on the Details step.
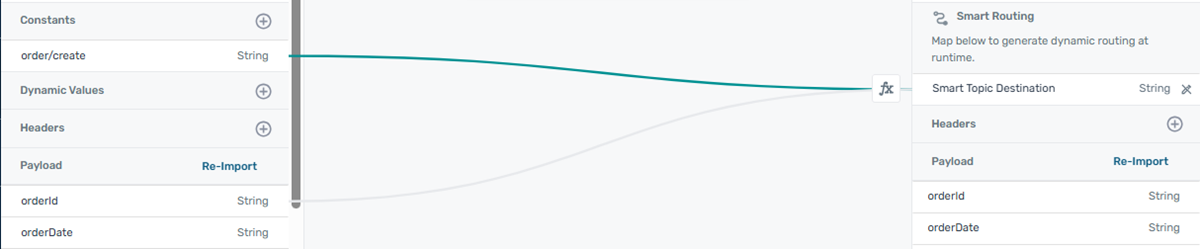
Example: Build a Smart Topic Destination
In this example, we'll build a topic for order creation using a constant and a payload field.
We start with a source Micro-Integration where we have imported the format of our payloads, in this case, order data. Our order payload data includes an orderId field. We want to use this field to build a topic that has the form order/create/{orderId}.
To create our mapping, we do the following:
-
Add a constant that represents the beginning portion of our topic. In this case, we create a String constant with the value
order/create/. -
Map this new constant to the Smart Topic Destination.

-
Click Add Transformation to build the topic expression by completing the following steps:
-
From the function list, choose the Concatenate function.
-
Select the new constant,
order/create/, and theorderIdfield as inputs, ensuring that the constant is selected as Input 1, andorderIdis selected as Input 2.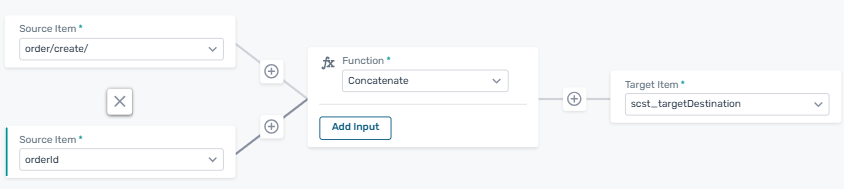
-
Click Apply.
The new transformation appears in the mapping area.
-