Step 5: Create a Workflow
You've completed Step 4: Add a Connector.
In the previous step, the Orchestrator decided which agent to call based on the content of each request. A workflow takes a different approach. It's a deterministic, multi-step recipe: you lay out the steps in advance, and the same input always follows the same path, in the same order, every time.
A workflow is made up of nodes: individual steps that each do one thing, like calling an agent or checking a condition to decide which path to take next. Each node runs in order, passing its output into the next node. Because the path is fixed ahead of time instead of decided by a large language model (LLM), workflows are a good fit for business processes that need to run the same way every time, such as compliance checks, audits, or any other repeatable multi-step operation.
Dynamic Orchestration Versus Deterministic Workflows
The following table recaps the difference between the two approaches:
| Dynamic Orchestration (Step 3) | Deterministic Workflow (Step 5) |
|---|---|
| LLM decides which agents to call | Flow is prescribed in advance |
| Path varies based on context | Same input always produces the same execution path |
| Good for adaptable, exploratory tasks | Good for standard operating procedures (SOPs), compliance, automation |
| Probabilistic (LLM reasoning) | Deterministic (code logic) |
Create the Workflow Configuration
You can create workflows using Quick Build or define workflows as YAML files and deploy with the Solace Agent Mesh CLI. This tutorial uses the YAML approach, which provides version-controllable configuration and is recommended for production.
The workflow you'll create monitors inventory levels for Solly's Coffee. When triggered with an item name and quantity, it checks whether stock is low (below 10 units) and routes to the appropriate response: generating a purchase order or confirming stock is adequate.
Set Up the Project Directory
A declarative workflow deployment is just a folder of YAML files: one file defining the workflow itself, and a manifest file that tells the CLI what to deploy and where. Create that folder structure now:
-
Create a folder named
solly-coffee-workflowanywhere on your system, for example in your Documents folder. -
Inside
solly-coffee-workflow, create a subfolder namedworkflows.
Create the Workflow File
Before you create the file, check what Quick Build actually named your Purchase Order agent: in the navigation bar, select Builder > Agent Management and note the exact name. Quick Build may have named it differently than the PurchaseOrderGenerator example used below (for example, with spaces, as Purchase Order Generator).
The workflow file you're about to create defines:
-
an input schema that specifies the expected
itemandquantityfields -
a switch node (
check_threshold) that checks whether quantity is below 10 and routes to the matching branch -
an agent node (
generate_po) that calls your purchase order agent when stock is low -
an agent node (
stock_adequate) that also calls your purchase order agent, but with astatus: "adequate"input so it responds accordingly -
a coalesce output mapping that returns the result from whichever branch executed
In the solly-coffee-workflow/workflows folder, create a file named inventory-alert.yaml and paste the following content. If your agent's name is different from PurchaseOrderGenerator, search and replace every occurrence of PurchaseOrderGenerator in the YAML with your agent's exact name before saving.
kind: workflow
name: inventory-alert
description: Checks inventory levels and generates purchase orders when stock is low.
spec:
  appConfig:
    description: Low stock alert workflow for Solly's Coffee.
    input_schema:
      type: object
      properties:
        item:
          type: string
          description: "The inventory item name"
        quantity:
          type: number
          description: "The current quantity in stock"
      required: [item, quantity]
    output_mapping:
      result:
        coalesce:
          - "{{generate_po.output}}"
          - "{{stock_adequate.output}}"
    nodes:
      - id: check_threshold
        type: switch
        cases:
          - condition: "{{workflow.input.quantity}} < 10"
            node: generate_po
          - condition: "{{workflow.input.quantity}} >= 10"
            node: stock_adequate
      - id: generate_po
        type: agent
        agent_name: PurchaseOrderGenerator
        depends_on:
          - check_threshold
        input:
          item: "{{workflow.input.item}}"
          current_quantity: "{{workflow.input.quantity}}"
          reorder_threshold: 10
      - id: stock_adequate
        type: agent
        agent_name: PurchaseOrderGenerator
        depends_on:
          - check_threshold
        input:
          item: "{{workflow.input.item}}"
          current_quantity: "{{workflow.input.quantity}}"
          status: "adequate"
Create the Manifest File
The manifest file tells the CLI two things: which Agent Mesh instance to deploy to, and which resources to deploy. Unlike the workflow file, which goes in the workflows subfolder, this file goes in the solly-coffee-workflow root directory itself. Create a file there named manifest.yaml and paste the following content:
kind: manifest
name: solly-coffee-workflow
description: Inventory alert workflow for Solly's Coffee tutorial.
target:
  url: http://127.0.0.1:8800
resources:
  workflows:
    - inventory-alert
The target.url points to your local Solace Agent Mesh Desktop instance, which exposes an API on port 8800 when running. The resources.workflows list names the workflow to deploy, matching the name field in your workflow file.
Your project folder should now look like this:
solly-coffee-workflow/
├── manifest.yaml
└── workflows/
    └── inventory-alert.yaml
Set Up the CLI
The Solace Agent Mesh CLI was installed with Desktop, but you need to add it to your system PATH before you can run sam commands from any terminal. You'll use the CLI in the next section to deploy the files you just created.
Windows:
-
Open the Start menu and search for Environment Variables. Select Edit the system environment variables.
-
Click Environment Variables.
-
Under User variables, select Path and click Edit.
-
Click New and add the following path:
%LOCALAPPDATA%\Programs\Solace Agent Mesh\cli
-
Click OK to close each dialog.
-
Close and reopen any terminal windows for the change to take effect.
macOS:
-
Open Terminal and run the following command to create a symlink to the CLI:
sudo ln -s "/Applications/Solace Agent Mesh.app/Contents/MacOS/sam-desktop" /usr/local/bin/sam
-
Enter your password when prompted.
After completing either the Windows or macOS steps above, verify the CLI is available by running:
sam --version
Deploy the Workflow
Deploy the workflow using the Solace Agent Mesh CLI:
-
Open a terminal (PowerShell or Command Prompt on Windows; Terminal on macOS/Linux).
-
Navigate to your
solly-coffee-workflowfolder:cd path/to/solly-coffee-workflow
-
Apply the configuration:
sam config apply -m manifest.yaml
-
Verify the deployment succeeded. The CLI displays:
Applied workflows:
  + inventory-alert  created
Deployments:
  * inventory-alert  deploy completed
-
In Agent Mesh Desktop, in the navigation bar, select Builder > Workflows and verify the workflow shows status Running.
Workflows support additional node types for more complex scenarios: tool nodes that invoke a single tool directly, without an LLM in the loop, loop nodes that repeat a step until a condition becomes false, map nodes that fan a step out across a list of items (optionally in parallel), and nested workflow nodes that call another workflow as a step. For the full reference, see Building Workflows.
Test the Workflow
You can trigger workflows directly through the Orchestrator using natural language. The Orchestrator recognizes deployed workflows and invokes them when requested.
-
In the navigation bar, select New Chat. Ensure Orchestrator is selected in the Agent drop-down list.
-
In the Chat Input field, enter the following text to trigger the workflow with a low-stock scenario:
Run the inventory-alert workflow with item "coffee beans" and quantity 5
The Orchestrator invokes the workflow. The
check_thresholdswitch node checks whether the quantity (5) is below the 10-unit threshold. Since it is, the workflow routes to thegenerate_ponode, which calls your Purchase Order agent to generate a purchase order. -
In the Chat Input field, enter the following text to try an adequate-stock scenario:
Run the inventory-alert workflow with item "milk" and quantity 20
This time, the quantity (20) is not below the threshold, so the workflow routes to the
stock_adequatenode instead, returning a message that stock levels are sufficient.
Both scenarios ran through the exact same check_threshold switch node. Only the branch it picked changed, based on the quantity you provided, not on anything the Orchestrator decided. Run either scenario again and it always takes the same path for the same input. That's the deterministic guarantee a workflow gives you.
View Workflow Execution
You can view a visual trace of each node the workflow activated to confirm it ran the deterministic path you just read about:
-
In the navigation bar, click Activities.
-
Select the most recent run of the
inventory-alertworkflow to open its execution trace.
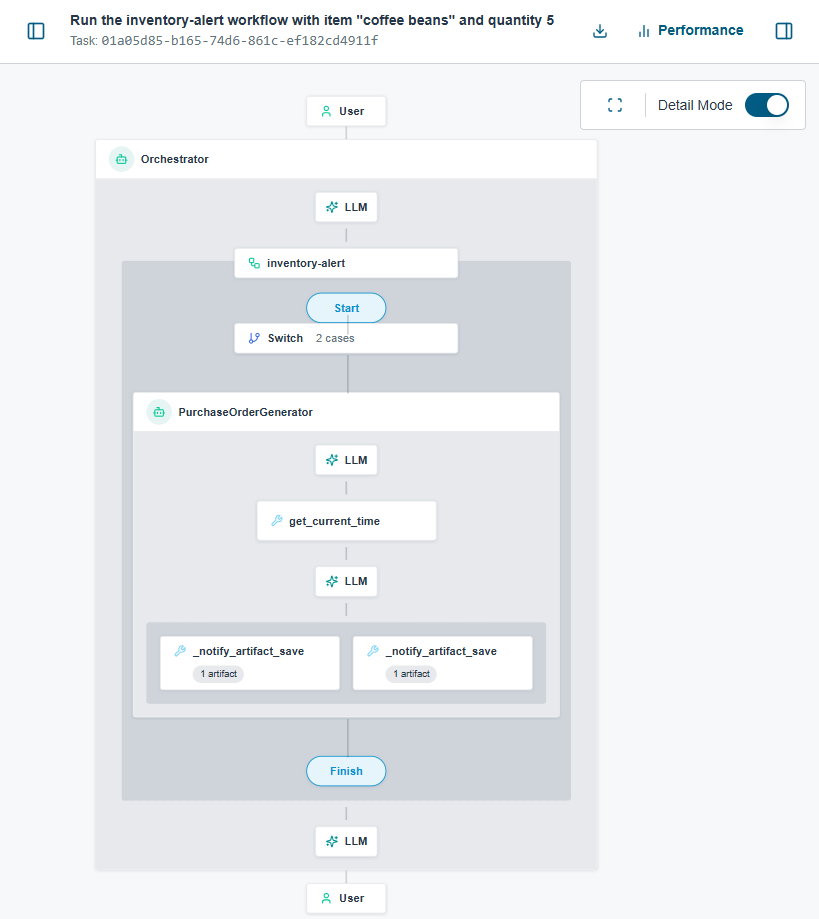
The trace reads left to right as Start > Switch > (Agent) > End. Start marks when the workflow received your request. Switch is the check_threshold node evaluating the quantity you sent. (Agent) shows whichever agent node the switch routed to, either generate_po or stock_adequate. End marks when the workflow returned its result. Run the workflow again with a different quantity, and the trace always shows the same four stages, just routed through a different agent node.
In this step, you replaced an LLM's judgment with a fixed set of rules: the same input always takes the same path. Next, you'll verify that your agents behave correctly and consistently with automated evaluations.
Tutorial Steps
You've completed step 5 of the tutorial. Click Next Lesson to continue.
| Step | Description |
|---|---|
|
|
Install Solace Agent Mesh - Complete |
|
|
Configure Your LLM Provider - Complete |
|
|
Build Multi-Agent Orchestration - Complete |
|
|
Add a Connector - Complete |
|
|
Create a Workflow - Complete |
|
|
Test Agent Competence with Evaluations - Next Lesson |
|
|
Add an Entrypoint |
|
|
Next Steps |


You can return to the main Tutorial page at any time.