Step 4: Add a Connector
You've completed Step 3: Build Multi-Agent Orchestration.
Connectors allow agents to access external data sources and services, for example, databases, REST APIs, and Model Context Protocol (MCP) servers. You configure a connector with connection details and credentials, then assign it to agents that need access. Once assigned, the connector's operations become tools the agent can invoke using natural language.
Solace Agent Mesh supports multiple connector types including OpenAPI (REST APIs), MCP, SQL databases, and others. For the complete list, see Configuring Connectors.
A connector works in one direction: your agent reaches out to pull in data or take an action on an external system while it's already handling a request. Later, in Step 7: Add an Entrypoint, you see the opposite direction, where an entrypoint lets an external system reach in and start a request with your agents.
The Scenario: Supplier Product Catalog
Solly's Coffee needs to look up product information from their supplier's catalog when creating purchase orders. The supplier provides a REST API with product details, pricing, and availability.
In this step, you:
-
create an OpenAPI connector that connects to the supplier's product catalog API
-
create a Supplier Catalog Agent that uses the connector to look up products
-
test the integration by querying product information
This tutorial uses the Fake Store API, a free public API that requires no authentication. The products it returns (backpacks, jewelry, electronics) have nothing to do with coffee. That's fine; you're here to learn connectors, not source espresso beans.
Create the OpenAPI Specification
An OpenAPI connector requires a specification file that describes the API's endpoints. The file you're about to create defines three operations that become tools for your agent:
-
listing all available products
-
getting a product's details by ID
-
listing all product categories
Anywhere on your computer, create a JSON file named supplier-catalog.json. You upload this file to Solace Agent Mesh Desktop in the next section. Paste the following content into supplier-catalog.json:
{
  "openapi": "3.0.3",
  "info": {
    "title": "Supplier Product Catalog",
    "version": "1.0.0",
    "description": "Product catalog API for coffee shop supplies"
  },
  "servers": [{ "url": "https://fakestoreapi.com" }],
  "paths": {
    "/products": {
      "get": {
        "operationId": "listProducts",
        "summary": "List all available products",
        "responses": {
          "200": {
            "description": "Array of products",
            "content": {
              "application/json": {
                "schema": { "type": "array", "items": { "$ref": "#/components/schemas/Product" } }
              }
            }
          }
        }
      }
    },
    "/products/{id}": {
      "get": {
        "operationId": "getProduct",
        "summary": "Get product details by ID",
        "parameters": [
          { "name": "id", "in": "path", "required": true, "schema": { "type": "integer" } }
        ],
        "responses": {
          "200": {
            "description": "Product details",
            "content": {
              "application/json": {
                "schema": { "$ref": "#/components/schemas/Product" }
              }
            }
          }
        }
      }
    },
    "/products/categories": {
      "get": {
        "operationId": "listCategories",
        "summary": "List all product categories",
        "responses": {
          "200": {
            "description": "Array of category names",
            "content": {
              "application/json": {
                "schema": { "type": "array", "items": { "type": "string" } }
              }
            }
          }
        }
      }
    }
  },
  "components": {
    "schemas": {
      "Product": {
        "type": "object",
        "properties": {
          "id": { "type": "integer" },
          "title": { "type": "string" },
          "price": { "type": "number" },
          "description": { "type": "string" },
          "category": { "type": "string" }
        }
      }
    }
  }
}
Create the OpenAPI Connector
Now you'll create a connector that uses the specification you just created:
-
In Agent Mesh Desktop, in the navigation bar, select Builder > Connectors.
-
Click Create Connector, select the Custom tab, and then click OpenAPI.
-
In the Configure Connector step, enter the specified values for the following fields:
-
Connector Name — Supplier Product Catalog
-
Description — REST API for looking up supplier product information including prices and availability.
-
Base Server URL —
https://fakestoreapi.com -
Authentication Type — No Authentication
-
-
For the OpenAPI Specification, click Upload File, select the
supplier-catalog.jsonfile you created, and click Open to confirm. -
Click Next: Select Tools.
-
In the Select Tools step, review the API operations discovered from the specification. Each operation becomes a tool that agents can invoke. Leave all three tools enabled and click Next: Review Summary.
-
In the Review Summary step, verify the configuration, and then click Create to save the connector.
Create the Supplier Catalog Agent
Now you'll create an agent that uses the connector to look up product information:
-
In the navigation bar, select Builder > Quick Build.
-
In the Chat Input field, paste the following text:
I want to create an agent that looks up product information from our supplier's catalog. It should be able to list available products, get product details by ID, and search for products by category. It helps the coffee shop team find products and pricing when creating purchase orders.
-
Quick Build may ask clarifying questions to refine the agent. Because large language models (LLMs) are non-deterministic, the exact questions can vary each time, and Quick Build may ask more of them than shown in this tutorial. No single correct answer exists: use your own judgment based on what you want the agent to do. For example, if Quick Build asks whether the agent should be conversational or task-focused, select Task-focused, since this agent answers product queries directly rather than engaging in extended dialogue.
-
Review the build plan and select Build & Activate. A confirmation window appears with the same Build & Activate option. Select it again to start the build.
Creating the agent takes several minutes. Wait for the build to finish before continuing to the next section. When it's finished, the response may show a Switch to Test Mode prompt. Skip this prompt for now. You verify the connector assignment next, and then you test the agent in a new chat.
Verify the Connector Assignment
Quick Build often detects available connectors and assigns them automatically based on your description. You can verify the connector is assigned to your agent:
-
In the navigation bar, select Builder > Agent Management.
-
Select your Supplier Catalog agent, click its More menu, and select Edit.
-
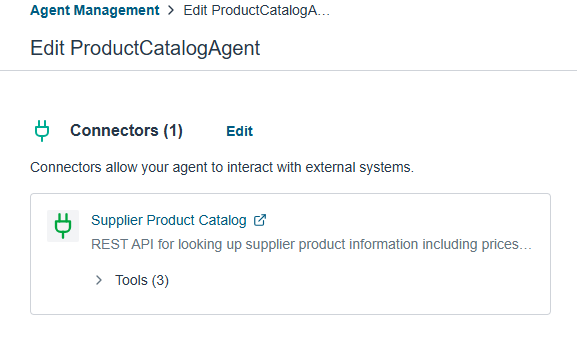
Navigate to the Connectors section and confirm that Supplier Product Catalog appears in the list.
-
Select Discard Changes to exit without saving, since you haven't changed anything.
If the Connector Isn't Listed
If Quick Build didn't automatically assign the connector, add it manually:
-
In the Connectors section, click Add Connector.
-
Select Supplier Product Catalog, then click Close.
-
Click Apply, then click Save to save the agent with the connector assigned.
Test the Connector
Now verify the agent can access the supplier catalog:
-
In the navigation bar, select New Chat. Ensure Orchestrator is selected in the Agent drop-down list.
-
In the Chat Input field, enter the following text to ask about available products:
What products are available from our supplier catalog?
The Orchestrator delegates the request to your Supplier Catalog agent, which calls the product catalog API and returns a list of available products with names and prices.
-
In the Chat Input field, enter the following text to try a specific product lookup:
Get details for product ID 1 from the supplier catalog.
The agent retrieves product details directly from the external API through the connector and includes them in its response.
In this step, you created an OpenAPI connector, built an agent that uses it, and verified it can retrieve live data from an external API. Next, you create a deterministic workflow that automates this kind of request end to end.
Tutorial Steps
You've completed step 4 of the tutorial. Click Next Lesson to continue.
| Step | Description |
|---|---|
|
|
Install Solace Agent Mesh - Complete |
|
|
Configure Your LLM Provider - Complete |
|
|
Build Multi-Agent Orchestration - Complete |
|
|
Add a Connector - Complete |
|
|
Create a Workflow - Next Lesson |
|
|
Test Agent Competence with Evaluations |
|
|
Add an Entrypoint |
|
|
Next Steps |


You can return to the main Tutorial page at any time.