Step 3: Build Multi-Agent Orchestration
You've completed Step 2: Configure Your LLM Provider.
An agent is a worker powered by a large language model (LLM) that performs a specific task. You give it instructions, connect it to tools and data sources, and it reasons through requests using natural language. Instead of writing code for every scenario, you describe what the agent should do and it figures out how.
In this step, you create two agents: one that checks inventory levels and one that generates purchase orders. Then you see how the Orchestrator, a built-in agent that coordinates other agents, can delegate a multi-step request across both of them. This delegation is dynamic orchestration, where an LLM analyzes what you need and decides which agents to call.
LLMs are non-deterministic. The exact agent names, follow-up questions, and responses you see may differ from this tutorial depending on your LLM provider, model version, and Solace Agent Mesh release.
The Scenario: Solly's Coffee
Imagine you run a coffee business, Solly's Coffee, and you want to automate inventory management. When stock runs low, you need to check current levels and generate purchase orders. This two-step process benefits from coordination between specialized agents.
To set up this process, you'll create two agents:
-
Inventory Checker — An agent that reports current stock levels for coffee shop supplies.
-
Purchase Order — An agent that generates restock orders when inventory is low.
The Orchestrator coordinates them to handle requests like "check our coffee bean inventory and reorder if we're low."
The Orchestrator isn't a special system component. It's a regular Agent Mesh agent, included by default, that's configured to delegate tasks instead of completing them itself. Like any agent, it reasons with an LLM: it reads each available agent's description, tools, and skills, then uses the planning model (configured in Step 2: Configure Your LLM Provider) to decide which agent should handle a request. Any agent can be configured to delegate work this way. The Orchestrator is the one Solace Agent Mesh provides by default.
Create the Agents
Solace Agent Mesh provides several ways to create agents, including manual configuration, CLI, and AI-assisted generation. This tutorial uses Quick Build, a guided conversational experience that's great for quickly prototyping and iterating on an agent's design. Once you're happy with an agent, you can also define it as version-controlled YAML for production deployment, the same way you'll do for workflows in Step 5.
Quick Build may ask a few clarifying questions as it works through your request. For example, it might ask about file formats, what to name the agent, or whether the agent should be available for interactive chat or only for workflows. Analyzing your request and responses and presenting a build plan typically takes a few moments per agent.
We can create both agents in a single Quick Build conversation:
-
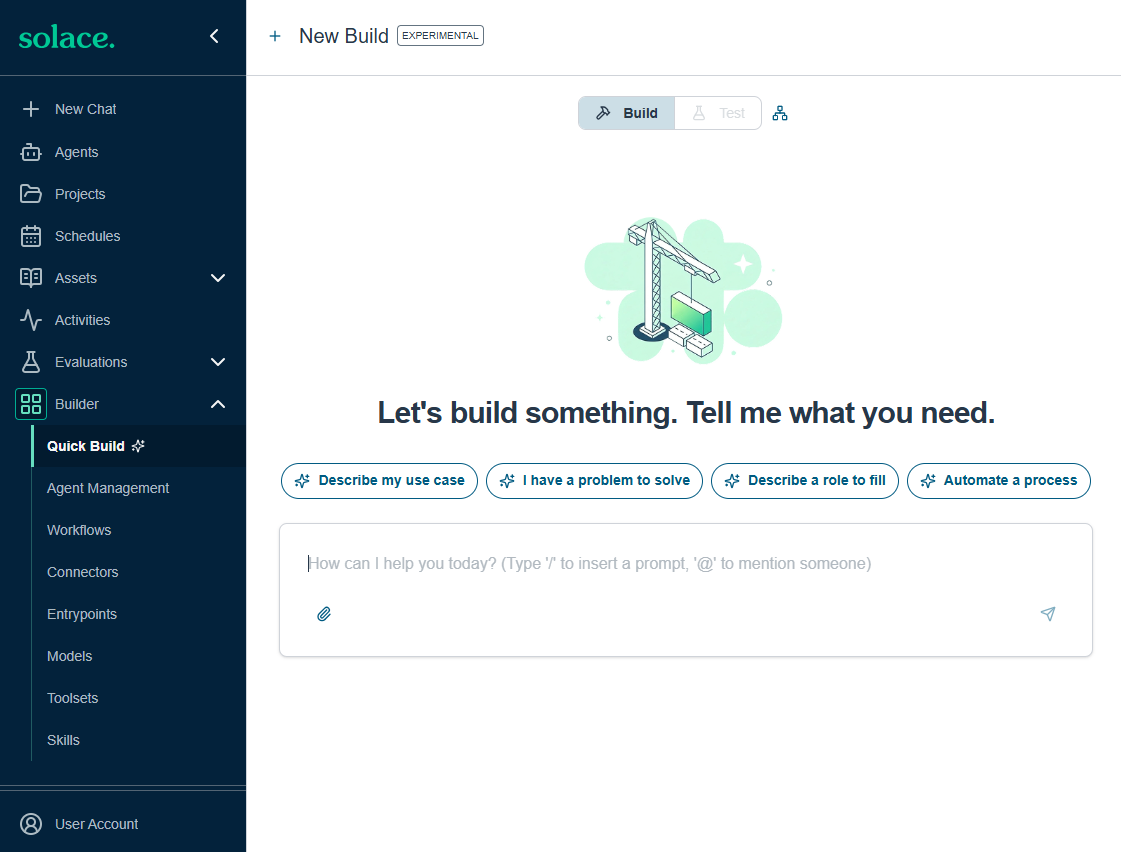
In the navigation bar, select Builder > Quick Build.
-
In the Chat Input field, paste the following text to describe the first agent:
I want to create an agent that checks inventory levels for a single coffee shop. It should read from inventory CSV files shared in the conversation and report current quantities when asked. It should provide clear, factual reports including item names, current quantities, and units of measurement. If asked about an item not in inventory, it should inform the user that item is not tracked. It only reports quantities. It does not flag low stock or make recommendations.
-
Review the build plan. Quick Build proposes an agent configuration with a name, instructions, and tools suited to the task. Select Build & Activate to deploy the agent.
Quick Build takes a few moments to create and deploy the agent. When it's finished, it may ask if you want to Switch to Test Mode. Skip this for now. You'll build the second agent first, then test both together.
-
After the first agent is complete, in the same conversation, paste the following text to describe the second agent:
I want to create an agent that generates purchase orders for a coffee shop chain. When given an item name, current quantity, and reorder threshold, it should generate a structured purchase order including: PO number (auto-generated), date, item details, and reorder quantity (typically 2-3x the threshold, used as a general guideline). It should output the PO as a formatted text file that can be sent to suppliers. Supplier information should be built into the agent.
-
Quick Build may ask a few clarifying questions again before presenting the plan. Review the build plan and select Build & Activate.
When the second agent finishes building, Quick Build may again ask if you want to Switch to Test Mode. Skip this too. First you'll confirm both agents are deployed, then test them together in a new chat.
Verify the Agents
You can confirm both agents are deployed and running:
-
In the navigation bar, select Builder > Agent Management.
-
Verify both agents appear in the list with status Running.
The following image shows both agents running:
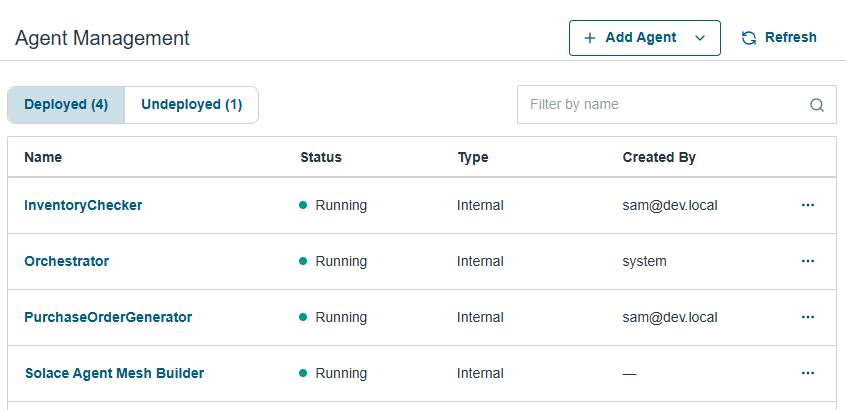
Quick Build generates agent names based on your description. Your agents may have slightly different names (for example, InventoryChecker versus Inventory-Checker). Note the exact names because you'll need them in later steps.
Test Dynamic Multi-Agent Orchestration
Now we'll test how the Orchestrator dynamically coordinates your two agents:
-
In the navigation bar, select New Chat.
-
Ensure Orchestrator is selected as the active agent.
-
In the Chat Input field, enter the following text to create some inventory data:
Create a coffee shop inventory file with these items:
- Coffee beans: 8 lbs
- Whole milk: 15 gallons
- Paper cups (16 oz): 120 units
- Cup lids: 85 units
- Vanilla syrup: 4 bottles

Save it as inventory.csv
The file is saved to the conversation, and your agents can access it. You can also download it from the chat interface if needed.
-
In the Chat Input field, enter the following text to test multi-agent coordination:
Check our current coffee bean inventory and if we have less than 10 lbs, generate a purchase order to restock.
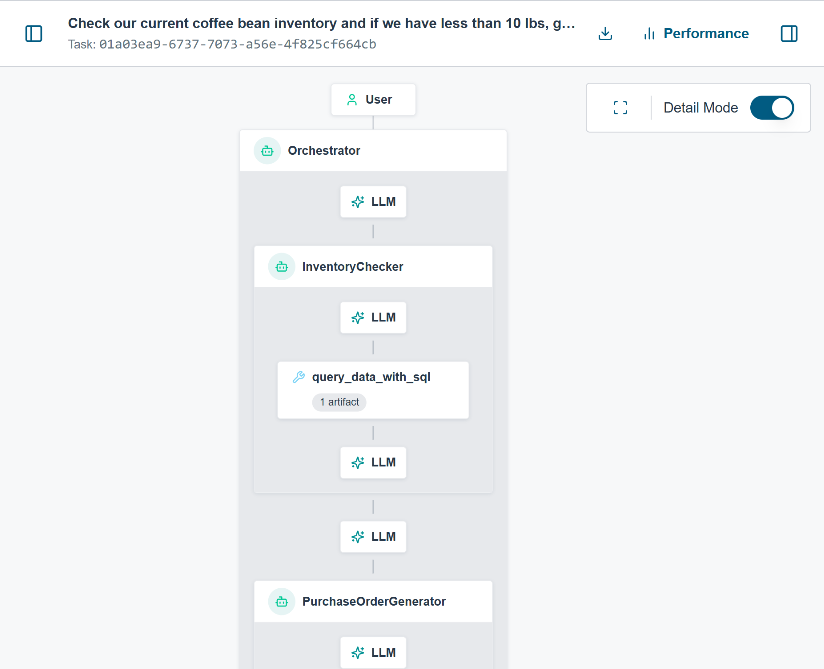
Watch the response. The Orchestrator coordinates both agents to fulfill your request:
-
Plans the approach — The Orchestrator announces it will first check inventory, then conditionally generate a PO.
-
Calls Inventory Checker — Delegates to your inventory checking agent to read the current stock level.
-
Evaluates the result — Sees that 8 lbs is below the 10 lb threshold.
-
Calls Purchase Order — Delegates to your Purchase Order agent to generate a restock order.
-
Returns unified response — Combines results from both agents into a comprehensive answer.
You can review what happened in two different views:
-
Activities — Select Activities in the navigation bar to see the sequence of agent calls for your request.
-
Agents (Hierarchical layout) — Select Agents in the navigation bar, then select the Hierarchical layout in the top right, to see a visual representation of the agent hierarchy.
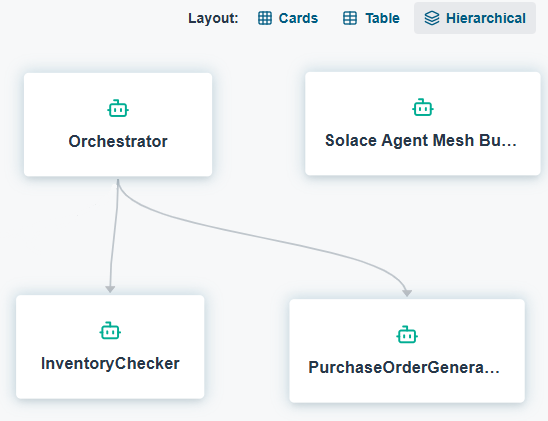
Any agent can be configured this way. For example, your inventory checking agent could have its own subagents for different warehouse locations or inventory categories, orchestrating inventory tasks across them.
Now that you have agents ready to work, you'll connect them to an external data source to get data they need to complete tasks.
Tutorial Steps
You've completed step 3 of the tutorial. Click Next Lesson to continue.
| Step | Description |
|---|---|
|
|
Install Solace Agent Mesh - Complete |
|
|
Configure Your LLM Provider - Complete |
|
|
Build Multi-Agent Orchestration - Complete |
|
|
Add a Connector - Next Lesson |
|
|
Create a Workflow |
|
|
Test Agent Competence with Evaluations |
|
|
Add an Entrypoint |
|
|
Next Steps |


You can return to the main Tutorial page at any time.