Step 7: Add an Entrypoint
You've completed Step 6: Test Agent Competence with Evaluations.
So far, you've interacted with agents through the Solace Agent Mesh Desktop chat interface. In production, agents often need to respond to events from external systems, for example, a low-stock alert from an inventory system or an order notification from an e-commerce platform.
Entrypoints connect Solace Agent Mesh to these external systems, whether the system is a human or another service that initiates a stimulus. An entrypoint listens for incoming triggers, translates them into agent requests with the right prompts, and publishes the agent's response back to the source. Solace Agent Mesh supports several entrypoint types: Slack, Microsoft Teams, Model Context Protocol (MCP), Event Mesh, and Webhook. For the complete list, see Configuring Entrypoints.
This is the opposite direction from the connector you added in Step 4: Add a Connector. A connector lets an agent retrieve data from an external system while it's already handling a request. An entrypoint lets an external system initiate that request in the first place.
This step demonstrates the Event Mesh entrypoint, which subscribes to topics on an event broker. When a message arrives on a subscribed topic, the entrypoint forwards it to your agents for processing, enabling event-driven automation without manual interaction.
Before You Begin
An Event Mesh entrypoint requires a Solace event broker to subscribe to. This tutorial uses a local event broker running in Docker.
If you don't already have an event broker running, you can start one with Docker or Podman:
Docker:
docker run -d -p 8008:8008 -p 55555:55555 -p 8080:8080 -p 1883:1883 -p 5672:5672 -p 9000:9000 --shm-size=2g --name=solace solace/solace-pubsub-standard
Podman:
podman run -d -p 8008:8008 -p 55555:55555 -p 8080:8080 -p 1883:1883 -p 5672:5672 -p 9000:9000 --shm-size=2g --name=solace solace/solace-pubsub-standard
Podman users may need to run podman machine init and podman machine start first if no machine exists.
This command starts an event broker with the following connection parameters:
-
Event broker URL —
ws://localhost:8008 -
Message VPN —
default -
Client Username —
default -
Client Password — (empty)
-
Web Console — http://localhost:8080 (for publishing test messages)
Configure the Entrypoint
You can create entrypoints using Quick Build, the Create Entrypoint option in the Entrypoints tab, or as YAML files deployed via the Solace Agent Mesh CLI. This tutorial uses the CLI approach, which is recommended for production deployments. You'll create two files:
-
an entrypoint resource file that defines how to connect to the event broker and what to do with incoming messages
-
a manifest file that tells the CLI which resources to deploy and where
Just like the workflow deployment you built in Step 5: Create a Workflow, a declarative entrypoint deployment is a folder of YAML files: one file defining the entrypoint and a manifest file that tells the CLI what to deploy and where. Create that folder structure now:
solly-coffee-entrypoint/
└── entrypoints/
Create an Entrypoint Resource File
The entrypoint resource file defines how Solace Agent Mesh connects to the event broker. It specifies which topics to subscribe to, which agent handles incoming messages, and where to publish responses. The broker connection values below (broker_url, broker_vpn, broker_username, broker_password) match the connection parameters listed earlier in Before You Begin.
Create a file named inventory-alerts.yaml inside the entrypoints folder and paste the following content:
kind: entrypoint
name: inventory-alerts
description: Listens for low-stock events and triggers purchase order generation.
spec:
  type: event_mesh
  deploy: true
  values:
    broker_url: "ws://localhost:8008"
    broker_vpn: default
    broker_username: default
    broker_password: ""
    event_rules:
      - name: low_stock_alerts
        subscriptions:
          - topic: "sollys/inventory/alerts/>"
        messageFormat: json
        targetAgent: Orchestrator
        promptTemplate: "Process this inventory alert: {payload}"
        defaultUserIdentity: sam_dev_user
        successOutput:
          enabled: true
          topic: "sollys/inventory/processed"
The following table describes what each section does.
| Field | Purpose |
|---|---|
kind: entrypoint
|
Specifies the resource type as an entrypoint |
spec.type: event_mesh
|
Specifies this entrypoint connects to a Solace event broker |
broker_url, broker_vpn |
Specifies the connection details for the event broker |
subscriptions
|
Specifies the topics to listen for. The > wildcard matches any subtopic (for example, coffee-beans, milk) |
targetAgent
|
Specifies the agent that receives incoming messages. The Orchestrator analyzes the incoming message and decides which agents to invoke |
promptTemplate
|
Specifies how to format the message for the agent, where {payload} expands to the full JSON message |
defaultUserIdentity
|
Specifies a static identity string attached to every event this rule processes |
successOutput
|
Specifies the topic to publish the agent's response to (here, sollys/inventory/processed). Subscribing to it lets you see the results |
Create a Manifest File
The manifest is the entry point for the sam config apply command. It tells the CLI which Solace Agent Mesh instance to deploy to and lists the resources to include. The CLI looks for resource files in conventional folders (entrypoints/, workflows/, agents/) and matches them by their name field. This manifest follows the same shape as the one you created in Step 5: Create a Workflow, just pointing at a different resource type.
Create a file named manifest.yaml in the root of your project folder (next to the entrypoints folder) and paste the following content:
kind: manifest
name: solly-coffee-entrypoint
description: Event Mesh entrypoint for Solly's Coffee tutorial.
target:
  url: http://127.0.0.1:8800
resources:
  entrypoints:
    - inventory-alerts
The target.url points to your local Solace Agent Mesh instance. The resources.entrypoints list references the entrypoint by its name field (inventory-alerts), and the CLI finds the corresponding file at entrypoints/inventory-alerts.yaml.
Your final project structure looks like this:
solly-coffee-entrypoint/
├── manifest.yaml
└── entrypoints/
    └── inventory-alerts.yaml
Deploy the Entrypoint
With the configuration files in place, you can now deploy the entrypoint using the CLI. The CLI reads the manifest, finds the referenced entrypoint file, and deploys it to Solace Agent Mesh. To deploy the entrypoint, do the following:
-
Open a terminal (PowerShell or Command Prompt on Windows; Terminal on macOS/Linux).
-
Navigate to your project folder:
cd path/to/solly-coffee-entrypoint
-
Apply the configuration:
sam config apply -m manifest.yaml
-
Verify the deployment succeeded. You see:
Applied entrypoints:
  + inventory-alerts  created
Deployments:
  * inventory-alerts  deploy completed
-
In Solace Agent Mesh Desktop, in the navigation bar, select Builder > Entrypoints and verify the entrypoint shows status Running.
Test the Entrypoint
Test the entrypoint by publishing a message to the event broker and observing the agent's response. You'll use the event broker's built-in Try Me! tool, which lets you publish and subscribe to topics directly from your browser.
Subscribe to the Response Topic
First, set up a subscriber so you can see the agent's response when it arrives:
-
Open the event broker's web console at http://localhost:8080.
-
Log in with username
adminand passwordadmin. -
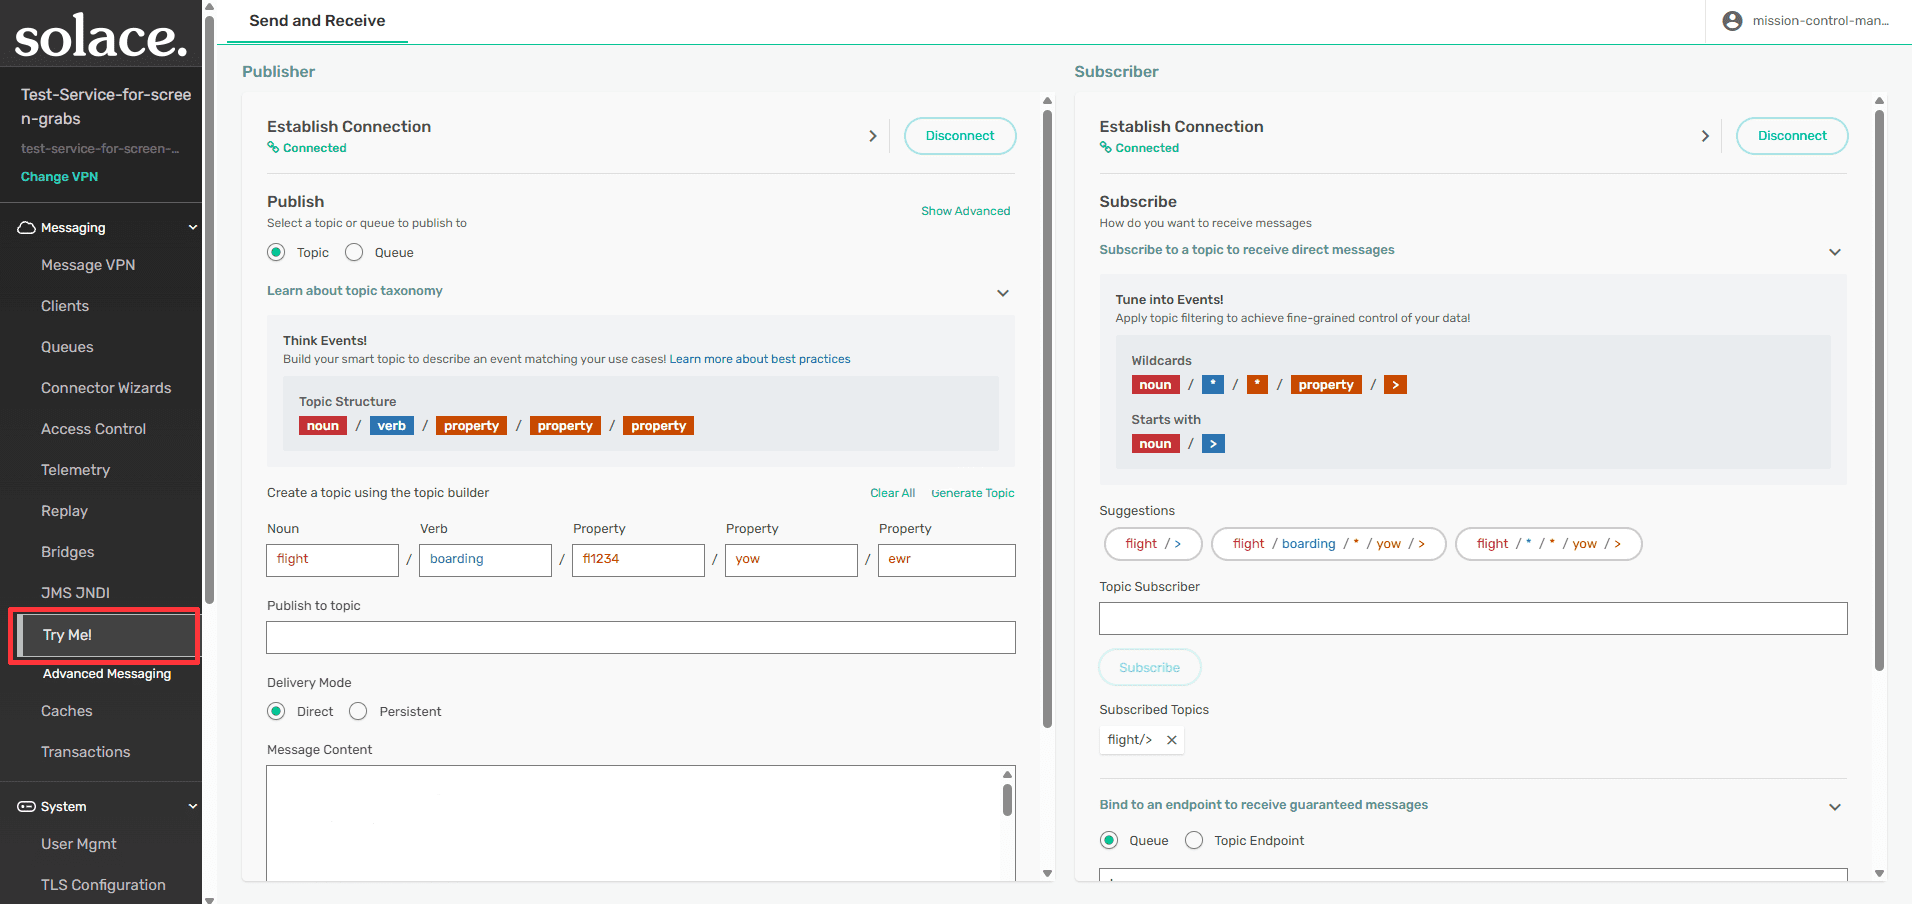
On the navigation bar, select Try Me!. The Try Me! tool opens a split view with a Subscriber panel on the left and a Publisher panel on the right.
-
In the Subscriber panel, click Connect. Leave the default connection settings (Client Username set to
default, no password). -
In the topic subscriber field, enter
sollys/inventory/processedand click Subscribe. This is the topic where the entrypoint publishes agent responses.
Publish a Low-Stock Alert
Now simulate an inventory system sending a low-stock alert:
-
In the Publisher panel, click Connect. Leave the default connection settings.
-
In the publish to topic field, enter
sollys/inventory/alerts/coffee-beans. This topic matches the entrypoint's subscription pattern. -
In the message body, paste the following JSON:
{ "item": "coffee beans", "current_quantity": 5, "threshold": 10, "location": "Main Store" } -
Click Publish to send the message to the event broker.
-
Watch the Subscriber panel. Within a few seconds, a response appears containing a generated purchase order from your agent.
Understanding What Occurred
When you published the message, these events occurred:
-
The Event Mesh entrypoint received the message on topic
sollys/inventory/alerts/coffee-beans, which matched its subscription patternsollys/inventory/alerts/>. -
The entrypoint rendered the prompt template, replacing
{payload}with the JSON message. -
It sent the formatted prompt to the Orchestrator.
-
The Orchestrator analyzed the alert, recognized the low-stock condition (5 < 10), and invoked your purchase order agent.
-
The agent generated a purchase order and returned the result.
-
The entrypoint published the response to
sollys/inventory/processed.
This sequence is event-driven automation: an external system published an event, and your agents responded automatically.
Tutorial Summary
With the Event Mesh entrypoint deployed, your agents can respond to business events from any system that can publish to an event broker. This pattern scales to real-world integrations: inventory systems, order platforms, IoT sensors, and more.
This completes the core Agent Development Lifecycle (ADLC):
-
Build — Created agents using Quick Build, connected to external data via connectors, and coordinated agents with workflows and orchestration.
-
Test — Validated agent competence with evaluations.
-
Deploy — Deployed workflows and entrypoints using the CLI.
-
Observe — Monitored agent interactions through the Activities view.
-
Improve — Refined agents based on observability data, evaluation results, and user feedback.
Tutorial Steps
You've completed step 7 of the tutorial. Click Next Steps to continue.
| Step | Description |
|---|---|
|
|
Install Solace Agent Mesh - Complete |
|
|
Configure Your LLM Provider - Complete |
|
|
Build Multi-Agent Orchestration - Complete |
|
|
Add a Connector - Complete |
|
|
Create a Workflow - Complete |
|
|
Test Agent Competence with Evaluations - Complete |
|
|
Add an Entrypoint - Complete |
|
|


You can return to the main Tutorial page at any time.