Managing API Tokens
Information about using API tokens is also available in the Solace Cloud v2 REST API documentation.
To use the Solace Cloud REST API, you need an API token to authenticate and authorize REST requests. You assign permissions to tokens to permit applications that have the token to perform various actions and access various features. You include the API token in the Authorization Bearer header when you make a REST call.
It is best practice to create different tokens for different applications and provide only the minimum number of permissions that the application requires to ensure that an application can make only the necessary changes, access only the necessary features, or access only the required data to function correctly. Each user in the account can create up to 50 API tokens.
This section includes the following tasks:
- Creating an API Token
- Creating an API Token for Resource Access
- Creating an API Token for Connector Wizards
- Regenerating an API Token
- Deleting an API Token
- Using an API Token with Postman
Considerations for Using API Tokens
Be aware of the following considerations for API tokens:
- You cannot create API tokens with permissions or access to resources beyond your assigned role. The permissions you can see and set for the token and the resources you can access depend on your assigned role. If you don't see some permissions that you need, you may not have the required permissions for your account.
- If your role changes, whether directly or due to changes in how users are authenticated and authorized, and you lose one or more of the permissions you had when you created the tokens, tokens with permissions that you no longer have are invalidated.
- If you are a user with elevated access to specific environments, application domains, or event broker services, and want to create a token with your elevated permissions to those resources, you can create a token that allows an API to generate additional tokens with your resource permissions. For more information, see Creating an API Token for Resource Access.
- The REST API URL to use depends on the regional site where you have your account. All REST API examples use the URL for the United States. The REST API to use for each regional site is listed below.
- Solace Cloud offers both dynamic and static IP addresses for the REST API base URL. Use the REST API base URL that best meets your network security requirements.
-
75.2.73.33
-
99.83.180.246
-
166.117.38.44
-
166.117.193.202
-
166.117.70.61
-
166.117.255.218
-
166.117.74.25
-
166.117.239.208
| REST API URLs | |||
|---|---|---|---|
| Regional Site | Dynamic Base URL | Static Base URL | Static IPs |
| United States | https://api.solace.cloud/ | https://static-ip-api.solace.cloud |
|
| Australia | https://api.solacecloud.com.au/ | https://static-ip-api.solacecloud.com.au |
|
| European Union | https://api.solacecloud.eu/ | https://static-ip-api.solacecloud.eu |
|
| Singapore | https://api.solacecloud.sg/ | https://static-ip-api.solacecloud.sg |
|
Creating an API Token
When you create tokens for production, use the fewest permissions necessary for the application to work as expected. After you create an API token, you can't modify the token permissions. If you require updated permissions, you must create another token.
To create an API token, perform these steps:
- Log in to the Solace Cloud Console if you have not done so yet. The URL to access the Cloud Console differs based on your
- On the navigation bar, select User & Account
 , and then select Token Management.
 - Click Create Token.
- Enter a Token Name.
- In the Selected Permissions section, select the permissions that you want to enable. You can select read or write permissions for an entire category and you can enable or disable individual permissions.
On the API Token Management page, the URLs do not appear beside the permissions that align with the Solace Cloud
v2REST APIs. For more information, see Solace Cloud v2 REST API Reference. - Click Create Token.
-
Click Copy to copy the token to your clipboard.
For security reasons, this dialog does not appear again after you close it. If you lose the token you must regenerate it or create a new one.
- Click Close.
-
To use the token, put the value that you copied in the following REST header for any calls to your account:
Authorization: Bearer <Your New Token>
Alternatively, you can use development tools (such as Postman or curl) to learn about how to use the Solace Cloud REST API . Our subsequent tutorials use Postman. For more information, see Using an API Token with Postman.
Creating an API Token for Resource Access
API tokens created in the Cloud Console provide only the permissions available to the user's assigned roles and allow access only to the data for resources that the user role provides access to. If you have elevated resource access to specific environments, application domains, or event broker services, tokens you create in the Cloud Console do not include your elevated permissions for those resources. For example, if you have the Event Portal User role, tokens you create in the Cloud Console do not allow you to get application domain data, even if you have been given Manager level access to one or more application domains.
To obtain a token that provides access to the data that you have elevated permissions for, you can create a token that allows the Create an API token REST API to generate a token with resource-specific permissions. For example, if you have the Event Portal User role, tokens you create using the Create an API token API allow you to get application domain data for application domains that you have Viewer or Manager level access to. Using the token to call the Get a list of the application domains API returns a list of the application domains you have access to. For more information about the Create an API token API, see the Solace Cloud v2 REST API documentation.
To create an API token to use for creating tokens with resource-specific permissions:
- On the navigation bar, click User & Account , and then select Token Management.
- Click Create Token.
- Enter a Token Name.
- In the Account Management section, select Create API Token.
- Click Create Token.
- Click Copy to copy the token to your clipboard.
- Provide the token to the Platform > API Tokens > Create an API token REST API
Creating an API Token for Connector Wizards
You can use an API token for authorization with Connector Wizards and the Click to Connect Wizards for Bridges in Broker Manager. The Connector Wizards help you create REST Delivery Points (RDPs), and the Click to Connect Wizards help you create Message VPN bridges, Kafka bridges, and configure clusters for Dynamic Message Routing (DMR).
The API token that you create to use with the wizards must have at least one of the following permissions:
- Get Services with Management Credentials allows you to see all services within your organization.
- Get My Services with Management Credentials allows you to see only services that you've created within your organization.
The wizards use the API token once to retrieve the service details, and do not store the API token. You can remove or regenerate an API token after the wizard uses it.
To create an API token to use for connection wizards in Broker Manager, perform these steps:
- On the navigation bar, click User & Account , and then select Token Management.
- Click Create Token.
- Enter a Token Name.
- In the Mission Control section, select one of the following permissions:
- Under My Service, select Get My Services with Management Credentials.
- Under Organization Services, select Get Services with Management Credentials.
- Click Create Token.
- Click Copy to copy the token to your clipboard.
You can now use the token in Broker Manager to create a VPN bridge or clustering link. For more information, see Creating a Message VPN Bridge Using Broker Manager.
Regenerating an API Token
You cannot retrieve lost API tokens, but you can regenerate them. Regenerating a token creates a new token with the same permissions. If you regenerate an API token, you must update all applications and scripts that use the token to allow them to continue accessing the REST API for Solace Cloud.
If your permissions have changed since you created the token and you no longer have a permission that is included in the token, you cannot regenerate it.
To regenerate an API token, perform these steps:
- Log in to the Solace Cloud Console if you have not done so yet. The URL to access the Cloud Console differs based on your
- On the navigation bar, click User & Account , and then select Token Management.
- Click More Actions
 for the token that you want to replace and select Regenerate Token.
 - Click Regenerate.
- Click Copy to copy the token to your clipboard.
- Click Close.
You can paste the API token from your clipboard into your application code for use with the REST API or use it with the Click-to-Connect wizard.
Deleting an API Token
It's a security best practice to remove outdated API tokens and ones that you no longer use. You cannot restore an API token after you delete it, and applications can no longer use that API token to make API calls.
To delete a token, perform these steps:
-
Log in to the Solace Cloud Console if you have not done so yet. The URL to access the Cloud Console differs based on your
- On the navigation bar, click User & Account , and then select Token Management.
- Click More Actionsfor the token that you want to delete and select Delete Token.
Using an API Token with Postman
Generally, you use an API token in the code for your applications; however, you can make REST API messages from your development environment using development tools such as curl or Postman. Our tutorials show how to use the REST APIs using Postman (versions 6.1.3 or greater) as a visual REST API development tool. Before you can complete the steps in this section, you must first create an API token.
To use the API token, you must include it in the Authorization header, which is by default set to use Bearer authentication. To set up Postman to make REST API calls, we recommend that you set up an environment variable to configure the API token using these steps:
- To authorize REST requests from Postman to Solace Cloud, you must set the Postman
apiTokento the API that you've created. For more information, see Creating an API Token.- Set the Postman Environment to
- Click the Environment Quick Look
 button located next to the Environment drop-down list.
 - In the dialog box, click Edit.
- Paste the API token in the value field of the
apiTokenkey into the field. If theapiTokenfield doesn't exist, create it.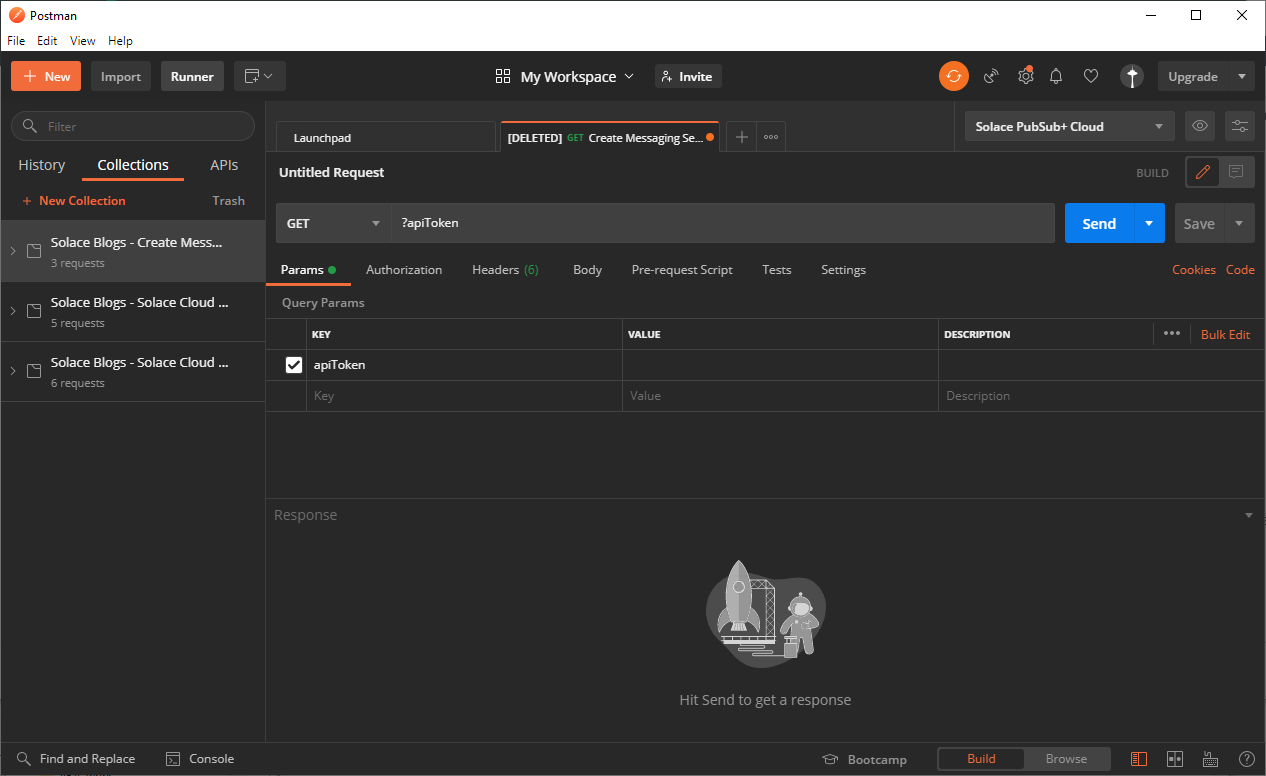
- If you are modifying a service, it's also useful to add a
serviceIdvariable so you don't need to specify it in the URL for each REST API call. You must do this step after you've created a event broker service. Alternatively, you can fill the variable in the REST API calls. An easy way to find yourserviceIdis to open the service details on the Solace Cloud Console and find the identifier at end of the URL for your service. - Click Update.
- Set the Postman Environment to
Now you have an API token and have set up Postman to use it. You can now use Postman to learn how to use the Solace Cloud REST API.
Next Steps
After you have created an API token and configured Postman (or your application) to use the token, you can learn how to perform some tasks with the Solace Cloud REST API such as:
- Manage services. For more information, see Managing Services with the Solace Cloud REST API.
- Manage users. For more information, see Managing Users with the Solace Cloud REST API.
- Manage client profiles. For more information, see Managing Client Profiles with the Solace Cloud REST API.