Step 1: Set Up Your First Event Broker
To try out a Solace event broker for free and learn the basics of event-driven architecture (EDA), you'll start by setting up an event broker. Solace offers two options, and you can try them both out in a free trial.
What Do You Want to Try First?
You have two options for setting up an event broker:
-
Set up a free software event broker locally
-
Start a free trial in Solace Cloud
Choose which one you want to try:


Download and Launch a Software Event Broker
You can download the software event broker image, create a container, and configure the necessary ports with just one command.
To download and start up a software event broker, perform these steps:
- If you don't already have it, install Docker.
- Open a command-line terminal.
- Run the appropriate command for your operating system to open secure ports to access your event broker:
- For Windows and Linux users:
docker run -d -p 8080:8080 -p 55555:55555 -p 8008:8008 -p 1883:1883 -p 8000:8000 -p 5672:5672 -p 9000:9000 -p 2222:2222 --shm-size=1g --env username_admin_globalaccesslevel=admin --env username_admin_password=admin --name=solace solace/solace-pubsub-standard
- For macOS users:
- In Docker Desktop, run the container for the software event broker.
- In the container, click Show all ports.
- Click port 8080:8080 to connect on Broker Manager (or use a browser and enter
https://localhost:8080). - To log in, enter the username and password. The default value for both fields is
admin. Depending on your Docker setup, the password may be necessary.
docker run -d -p 8080:8080 -p 55554:55555 -p 8008:8008 -p 1883:1883 -p 8000:8000 -p 5672:5672 -p 9000:9000 -p 2222:2222 --shm-size=1g --env username_admin_globalaccesslevel=admin --env username_admin_password=admin --name=solace solace/solace-pubsub-standard
For macOS users, you must use 55554 since 55555 is blocked by default on macOS.
The commands above expose additional ports for multiple messaging protocols. These additional ports make it easier for you to start using the event broker in a development or non-production environment. For production deployments, we recommend that you expose only the ports required for your use case and ensure that you set the appropriate scaling parameters. For example:
docker run -d -p 1943:1943 -p 55443:55443\
  --shm-size=1g \
  --env username_admin_globalaccesslevel=admin \
  --env username_admin_password=<password> \
  --env system_scaling_maxconnectioncount=1000 \
  --env system_scaling_maxqueuemessagecount=240 \
  --name=solace solace/solace-pubsub-standard
To determine the appropriate ports and scaling parameters for your deployment, see the Resource Calculator and Default Configuration for Software Event Brokers on Virtual Machines. For more information about configuration keys, see Initializing a Software Event Broker Container.
Now that you have installed a software event broker, you can jump to the next lesson to learn about EDA basics.
Create an Event Broker Service in Solace Cloud
You can create a free Solace Cloud account and then create your first event broker service from the Cloud Console.
To create an event broker service, perform these steps:
- In your browser, visit the Solace Cloud login page and perform one of these steps:
- If you don't already have a free trial Solace Cloud account, click Sign Up. Enter the requested information, to log in to Solace Cloud.
- If you already have a trial account, enter the email address and password that you used when you signed up and click Sign in.
After you log in to the Cloud Console, you'll see a welcome page with a navigation bar on the left-hand side of the page:
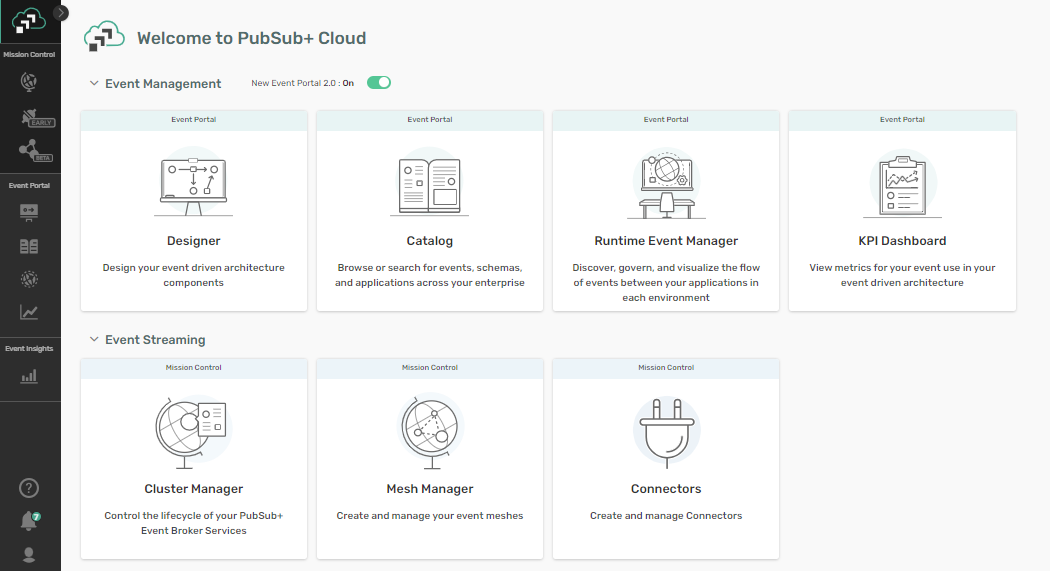
- In the Cloud Console, on the navigation bar, select Cluster Manager
 .
. - On the Services page, in the top-left, select the Default environment to create the event broker service in.
- Click Create Service located on the top right corner of the page or click the Create Service
 card.
card. - In the Service Name field, type
MyFirstService. -
In the Cloud list, select one of the following cloud providers:
- Amazon Web Services
- Google Cloud
- Microsoft Azure
- In the Region list, select the region (or location) to use. A pin appears on the map indicating the geographic location you selected.
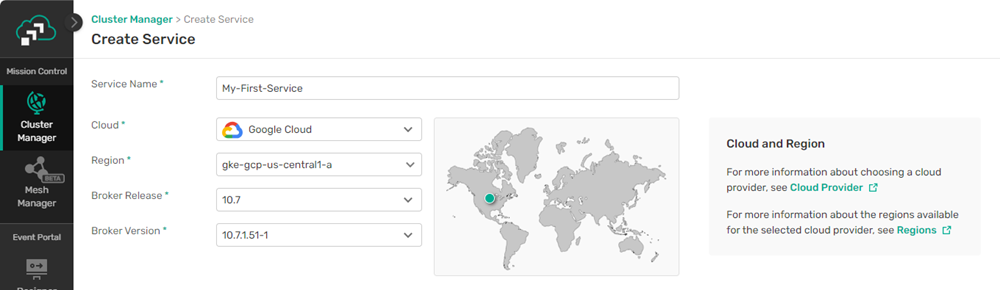
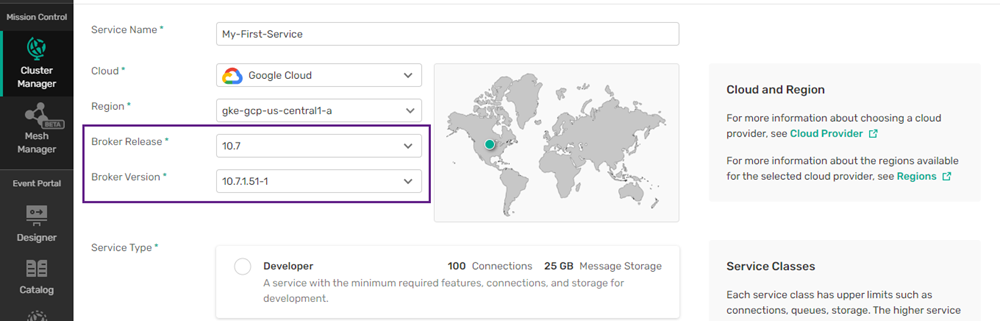
- Leave the Broker Release field set to the default, giving you the most recent Long Term Support release. Leave the Specify Version checkbox unselected.
- In the Service Type list select Enterprise-100 Standalone.
- Click Create Service. Solace Cloud begins creating the service. The process takes a few minutes.
For additional tutorials to learn how to create and manage your EDA in the Cloud Console, see: Getting Started with Solace Cloud .
Tutorial Steps
You've completed the first step in the tutorial. Click the link to the next lesson to continue.
| Step | Description |
|---|---|
|
|
Set Up Your First Event Broker - Complete |
|
|
Solace EDA Basics - Next Lesson |
|
|
Set Up the Solace Try-Me CLI Tool |
|
|
Try a Publish-Subscribe Message Exchange Pattern |
|
|
Try a Request-Reply Message Exchange Pattern |
|
|
Explore Consumer Scaling Patterns |
|
|
Next Steps |
You can return to the main Tutorial page at any time.