Creating and Managing Environments
Environments in Solace Cloud represent the operational environments within your organization. Every organization is provided with an environment, named Default. The Default environment is set as the default environment for activities such as event broker service and modeled event mesh creation. You can change the name of the Default environment, move its default status to another environment, and even delete the environment named Default after moving the default status to another environment. You may choose to use only the Default environment, or you may decide to have multiple environments, such as a development environment, a testing environment, a staging environment, and a production environment.
Deployments in Customer-Controlled Clusters and Dedicated Clusters can assign their private regions (Datacenters) to environments. Assigning private regions to environments allows you to separate the infrastructure you deploy event broker services to. Environments can be used to separate infrastructure based on use case, for example a private region for staging, and another for production. For more information about deploying Solace Cloud with environments in private regions, see Environment Architecture for Dedicated Cluster and Customer-Controlled Cluster Deployments.
Considerations for Using Environments
Be aware of these considerations when creating and managing environments:
-
You create environments at the Solace Cloud account level.
-
You must have the Administrator role to create, modify, set the default, or delete environments.
-
Each Solace Cloud account must have one default environment, and can have up to 50 environments.
-
Each environment must have a unique name.
Environment Considerations for Using Event Portal
When you use environments with Event Portal, be aware of the following considerations:
-
For each environment, you can specify whether or when Event Portal pushes runtime configuration details in applications to the operational event brokers represented in the modeled event meshes in the environment. For more information, see Setting Event Portal Runtime Configuration Options.
-
You can require Event Portal applications promoted to an environment to use templates when developers set queue configurations or client profile names. If a template is required for an environment, you must use an allowed template to be able to promote the application to the environment. For more information about associating templates in Event Portal with environments, see Runtime Configuration Templates.
-
Users with the Event Portal User role must have additional access permissions for an environment to open modeled event meshes and promote applications to them. For more information, see Setting User Access to Environments.
Environment Considerations for Using Micro-Integrations
When you use environments with Micro-Integrations, be aware of the following considerations:
- A Micro-Integration cannot connect to an event broker service in a different environment. Event broker services and Micro-Integrations must be in the same environment.
- If you have a Micro-Integration configured to connect to an event broker service that is no longer available in the same environment, the Micro-Integration is automatically undeployed, and the Micro-Integration shows the Unable to Deploy state. The error condition indicates that the event broker service is not accessible to the Micro-Integration.
You can perform the following tasks for environments:
- Creating an Environment
- Setting an Environment as Default
- Updating Environment Settings
- Setting User Access to Environments
- Selecting Environments
- Disabling Event Broker Service Creation in Public Clusters for an Environment
- Deleting an Environment
Creating an Environment
You must be an Administrator to create environments. To create an environment, perform these steps:
- Log in to the Solace Cloud Console if you have not done so yet. The URL to access the Cloud Console differs based on your
- On the navigation bar, select User & Account
 > Environments.
 - Click Create Environment.
- In the Create Environment dialog, enter an Environment Name.
- (Optional) Enter a Description for the environment.
- Select whether the Environment Type is Production or Non-Production. You can't change this setting after you create the environment. Production environments are intended to host live resources. Non-production environments are intended for development and testing.
- (Optional) In the Appearance section:
- Click the Color menu to open the color picker where you can select a color for the environment badge.
- Click the Icon menu to open the icon picker where you can select an icon to represent the environment.
- Click Create.
You can now assign resources to the environment. You assign datacenters to an environment using the Private Regions tab of the Cloud Console. For more information, see Private Regions.
Setting an Environment as Default
You must have one environment set as the default environment. Users with the Administrator role can set any environment as the default.
If you create an event broker service using the REST API in a Public Cluster without specifying the environment, you create it in the default environment.
To set an environment as default, perform these steps:
- On the navigation bar, select User & Account > Environments.
-
In the list of environments, click More Actions
 for the environment that you want to set as the default and select Set As Default.
The Default indicator appears beside the name of the environment.

Updating Environment Settings
If you have the Administrator role, you can change the name, description, color, and icons of any environment. You can also enable runtime configuration for environments to allow the configuration of event brokers from Event Portal and require developers to use configuration templates for applications in an environment.
For more information about working with modeled event meshes in an environment, see Modeled Event Meshes.
Moving the datacenters associated with an environment is performed on the Private Regions tab. For more information, see Private Regions.
To update the environment settings, perform these steps:
- On the navigation bar, select User & Account > Environments.
- To change the environment name, description, or appearance:
- In the list of environments, click More Actions for the environment you want to update, and select Edit.
- Change the Environment Name, Description, or Appearance as required, and click Save.
- In the list of environments, click More Actions
- To specify whether developers must use configuration templates in Event Portal for applications in the environment:
- In the list of environments, click More Actions for the environment you want to update, and select Manage Configuration Templates.
- Select the types of templates required for the environment or clear the option for template types that you no longer want to require.
- Click Apply.
- In the list of environments, click More Actions
Setting Event Portal Runtime Configuration Options
For each environment, you can specify when Event Portal pushes runtime configuration updates to the operational event brokers represented in the modeled event meshes in the environment. You can select from these options:
- Automatic on Promotion
- Select this option to send runtime configuration to operational event brokers whenever you promote an application update to an environment in Event Portal. Use this option when you want to manage the deployment from Event Portal.
- On Demand
- Select this option to create a runtime configuration job when you promote an application to an environment in Event Portal but not push the configuration to operational event brokers. You can trigger the push to operational event brokers using the Run a configuration push job API. Use this option when you need more control over the deployment and want to manually trigger configuration updates.
- Self-Managed
- Select this option to create a runtime configuration job when you promote an application that Event Portal does not push to your operational event brokers. Use this option if you want to update your event brokers using your organization's existing CI/CD pipelines and software development workflows. For more information, see Pushing Runtime Configuration with Event Portal REST APIs.
- Disabled
- Select this option to promote applications to modeled event meshes in the environment without pushing configuration to operational event brokers. Use this option if your modeled event meshes are not connected to operational event brokers in this environment or if your implementation doesn't support runtime configuration.
For more information about setting up runtime configuration from Event Portal, see Configuring Event Brokers in Event Portal.
For more information about using APIs for runtime configuration, see Pushing Runtime Configuration with Event Portal REST APIs.
To set runtime configuration for the environment, perform these steps:
- On the navigation bar, select User & Account > Environments.
- In the list of environments, click More Actions for the environment you want to update, and select Runtime Configuration Settings.
- Select the appropriate setting for the environment. You can select from:
- Automatic on Promotion
- On Demand
- Self-Managed
- Disabled
- Click Save.
Setting User Access to Environments
The level of access that users have to the resources in Solace Cloud depends on the role they are assigned and the permissions granted to that role. Roles can be assigned directly to users or to user groups. For more information, see Managing Users, Groups, Roles, and Permissions. In some cases, resource access can also be controlled at the environment level.
- Event Portal
- Administrators and Event Portal Managers can control Event Portal User access to modeled event meshes in Runtime Event Manager at the environment level. For more information, see Configuring Environment Access for Event Portal Users.
- Mission Control
- Access to Mission Control is based only on the user role. It has no environment-based access restrictions. For more information, see Mission Control Roles and Permissions.
- Micro-Integrations
- Access to create and manage Micro-Integrations is based only on the user role. It has no environment-based access restrictions. For more information, see Roles and Permissions.
- Agent Meshes
- Access to create and manage agent meshes in Agent Mesh Manager is based only on the user role. It has no environment-based access restrictions. For more information, see Agent Mesh Manager Roles and Permissions.
Configuring Environment Access for Event Portal Users
Users with the Administrator and Event Portal Manager roles have access to all modeled event meshes in all environments in Runtime Event Manager. Users with the Event Portal User role have limited capabilities. They can't view a modeled event mesh unless they are granted access to the environment containing the modeled event mesh by an Administrator or Event Portal Manager. Event Portal Users can also be given additional access levels to application domains. For more information, see Managing User Access to Event Portal.
The following environment-based access levels can be granted to Event Portal Users:
- EP Runtime Viewer
- Event Portal Users with EP Runtime Viewer access to an environment can use Runtime Event Manager to view the objects in all modeled event meshes that are part of the environment. To open objects in Designer from the modeled event mesh, Event Portal Users must also have Application Domain Viewer access for the application domain.
- Users with EP Runtime Viewer access can request application promotion (including application updates and removals) to Solace modeled event meshes in an environment, provided that they also have at least Application Domain Editor access to the application domain containing the application. The promotion must be approved by an Administrator, Event Portal Manager, or a user with EP Runtime Approver access to the environment. For more information, see Reviewing Promotions to Event Brokers.
- EP Runtime Viewers cannot promote applications to Kafka modeled event meshes.
- EP Runtime Editor
- Event Portal Users with EP Runtime Editor access to an environment can perform the same functions as users with EP Runtime Viewer access. They can also perform these functions:
- promote applications (including application updates and removals) to the environment without requiring approval, provided that they also have at least Application Domain Editor access to the application domain containing the application.
- rearrange the graph layout
- EP Runtime Approver
- Event Portal Users with EP Runtime Approver access to an environment can perform the same functions as users with EP Runtime Editor access. They can also approve application promotion requests to Solace modeled event meshes from other users.
For more information about the permissions associated with these access levels, see Managing User Access to Event Portal.
Providing Event Portal Users Access to an Environment
Administrators and Event Portal Managers can give Event Portal Users access to environments. To give Event Portal Users access, perform these steps:
- On the navigation bar, select User & Account > Environments.
- In the list of environments, click More Actions for the environment that you want to update and select Set User Access.
- Perform one of the following actions:
- If your organization doesn't have user groups enabled, click Add User.
- If your organization has user groups enabled, click Add and select either Add User Group or Add User.
- In the Name list, type or select the name of the user or user group you want to give access to. Only users and user groups with the Event Portal User role whom you have not already set an access level for appear in the list.
- In the Access Level list, select one of the following access levels to assign:
- EP Runtime Viewer
- EP Runtime Editor
- EP Runtime Approver
- Repeat steps 3-5 to give access to another user or user group.
- To remove access, click Remove
 in the row for the user or user group.
 - Click Save.
Selecting Environments
If your organization has multiple environments, anytime you use tools, such as Cluster Manager and Runtime Event Managers, that use environments, you must have an environment selected. You can change to another environment at any time using the Environment button in the top-left corner of those tools.
Selecting an Environment for the First Time
When you open tools, such as Cluster Manager and Runtime Event Managers that use environments, if the Cloud Console can't determine the environment used in your last session you are prompted to select an environment for this and future Cloud Console sessions.
To select an environment for the first time, perform these steps:
- Log in to the Solace Cloud Console if you have not done so yet. The URL to access the Cloud Console differs based on your
- On the navigation bar, select Cluster Manager

 , Agent Mesh Manager
  ,
, .
. - In the Environments dialog that opens, choose your starting environment and click Select.
Changing Environments
You can change environments as required. To change environments, perform these steps:
- Log in to the Solace Cloud Console if you have not done so yet. The URL to access the Cloud Console differs based on your
- On the navigation bar, select Cluster Manager , Agent Mesh Manager ,.
- Click the Environment button in the top-left corner of the Cloud Console and select an environment from the list.
-
(Optional) Click Show resources in all environments if you want to see all event broker services and modeled event meshes in all environments.
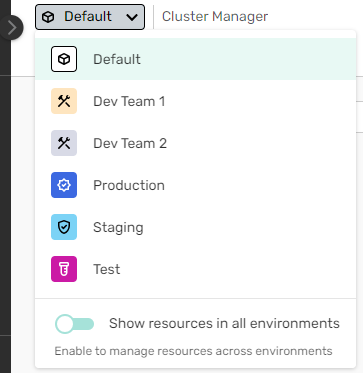
All environment labels in the user interface change to those of the selected environment. The displayed list of available event broker services and modeled event meshes shows only the resources that are part of the environment unless you selected Show resources in all environments.
Disabling Event Broker Service Creation in Public Clusters for an Environment
By default, users can create event broker services in Public Clusters. Users with the Administrator role can disable the ability to create event broker services in Public Clusters for specific environments.
To disable event broker service creation in Public Clusters, perform these steps:
- On the navigation bar, select User & Account > Environments.
- In the list of environments, click More Actions for the environment that you want to disallow creation of event broker services in Public Clusters and select Advanced Settings.
- On the Advanced Settings dialog, clear the Allow service creation in all public regions checkbox, and then click Save.
Deleting an Environment
Deleting an environment may fail if:
-
You recently deleted an event broker service. Deleting an event broker service takes time. If the deletion of the event broker service has not completed, you can't delete the environment.
-
The environment contains an event broker service that failed deletion.
Attempt to delete the environment again at a later time. If you can’t delete the environment, contact Solace.
If you have the Administrator role, you can delete environments. Before deleting an environment, you must remove any datacenters and event broker services. The default environment can't be deleted. When you delete an environment, you also delete all of the modeled event meshes in the environment in Event Portal. However, application versions and associated objects in the modeled event mesh are not deleted from their application domains.
To delete an environment, perform these steps:
- On the navigation bar, select User & Account > Environments.
- In the list of environments, click More Actions for the environment that you want to delete and select Delete.
- Confirm that you want to delete the environment and all of the modeled event meshes it contains.
- Click Delete.