Creating Event Broker Services
You can create event broker services in Cluster Manager. To create a service, your user account must be assigned the Mission Control Manager or Administrator role. When you create an event broker service, you choose the broker version. We recommend, when possible, that you use the most recent broker version available to ensure that you have the latest security updates and most modern features. You also select a service type, either Enterprise or Developer and the service class. You can't change the service class or the event broker version after you've created the service, but you can upscale the service class at a later time. For more information, see Upscaling Event Broker Services.
The number of services that you can create in your account are based on your service limits. If you require more services or have reached your service limits, see Requesting Additional Event Broker Services.
The configuration options for your event broker service differ based on these factors:
- whether you choose a Developer or Enterprise service type
- whether standalone event broker services have been added to your service limits
- the broker release and version you select
- the create service options permitted in your account in Solace Cloud
If your organization uses multiple environments, you create event broker services in the environment you currently have selected. For organizations with one environment, your event broker services are created in that environment. This is reflected by the read-only Environment field on the Create Service page. Your environment affects the options available in the Cloud and Region fields. For more information, see Creating and Managing Environments.
You should be aware of default configurations and settings that may impact connectivity and security when creating your event broker service. For more information, see Considerations When Creating Event Broker Services.
If you just want to learn the basics of creating an event broker service, see the Creating Your First Event Broker Service tutorial.
You can also clone an existing service. This creates a new event broker service based on an existing source event broker service, including most of its configurations. For more information, see Cloning an Event Broker Service.
To create an event broker service, perform these steps:
- Log in to the Solace Cloud Console if you have not done so yet. The URL to access the Cloud Console differs based on your
- Select Cluster Manager
 on the navigation bar.
 -
Select the environment where you want to create the event broker service. For more information, see Selecting Environments.
If you intend to model the service in an existing modeled event mesh in Event Portal, create the service in the same environment as the modeled event mesh.
- On the Services page, click Create Service at the top right corner of the page, or, click the Create Service
 card.
card. - In the Service Name field, enter a unique name to identify the event broker service in the console. The name can be up to 50 characters in length, and may include alphanumeric characters, dashes, and underscores.
- In the Cloud list, select a cloud provider:
- Select one of the following to use a Public Cluster.
- Amazon Web Services
- Google Cloud
- Microsoft Azure
- Select Private Cloud only if you are using a Customer-Controlled Cluster or Dedicated Cluster. This region can have one or more data centers. The event broker service is created in the selected data center.
For more information, see Choosing the Right Cloud Provider.
- Select one of the following to use a Public Cluster.
-
In the Region list, select the region (or location) to use and then click OK. A pin appears on the map indicating the geographic location you selected. For more information, see Choosing the Right Cloud Region. You can filter the list by entering text in the field.
- If you don't see a region that you require, Contact Solace.
- You can’t create a service in a region that is "Under Maintenance". You can try to create a service in this region at a later time.
-
In the Broker Release list, select the event broker service release you want use. For more information about release and version numbering, see Release and Versioning Scheme for Event Broker Services.
-
(Optional) Select the Specify Version checkbox to enable the Broker Version field and select a version of the event broker release to create the event broker service with. The default version is the most recent event broker version that Solace Cloud supports and is a subset of the event broker release you selected in the Broker Release field. For more information, see Selecting the Event Broker Release and Version.
- For Service Type, select Developer or Enterprise.
If you selected Enterprise, choose the
If you require a larger message spool size, services with more connections have larger message spool sizes. The message spool size is the amount of persistent storage in gigabytes (GB), used for Guaranteed messaging and other features.
Alternatively, if you have message spool size expansion limits, you can click Customize to open the Customize Message Spool Size dialog where you can enter a New Message Spool Size (GB). For more information, see Configuring Message Spool Sizes.
- If you selected an Enterprise service, select whether the service is a High Availability (HA) Group or a Standalone service (if available). The Standalone option is available when you have at least one standalone service added as part of your Service Limits. For more information about standalone services, see Standalone Event Broker Service Considerations and High Availability in Solace Cloud.
- (Optional) Expand Advanced Connection Options to configure any of the following settings:
- Customize the Message VPN name. The default is the same value that you entered in the Service Name field but truncated if the name is longer than 26 characters. For more information, see Setting the Message VPN Name.
- You can set the cluster name to create a DMR cluster. For more information, see Setting the Cluster Name.
- For Enterprise services only, enable or disable high availability (HA) mate-link encryption. For more information, see Configuring High Availability Mate-Link Encryption.
- Configure the messaging and management ports for your service. For more information, see Configuring Client and Management Ports.
-
Click Create Service.
Configuration of your event broker service takes a few minutes. When configuration is complete, your event broker service starts. You can view your created service in Cluster Manager on the Services page.
For information about the defaults created for your event broker service, see Considerations When Creating Event Broker Services.
Considerations When Creating Event Broker Services
You may want to evaluate the following general and broker version-specific considerations before you create an event broker service.
Service Creation Default Considerations
Be aware of the following service creation defaults:
- For Enterprise service types, high availability (HA) mate-link encryption is enabled by default. You can configure this at service creation or afterwards. HA mate-link encryption isn't used for Enterprise-100 Standalone
- The Message VPN is created with these defaults:
- One Message VPN with the name of your service is created, which is only configurable at service creation time. The Message VPN name can't be changed. There is only one Message VPN per event broker service in Solace Cloud.
- A management account with a generated password is created for the service as
<message_vpnname>-admin where<message_vpn>is the name of the Message VPN.
-
When the event broker service is created, its initial, generated hostname is assigned the Default status indicator as shown below.
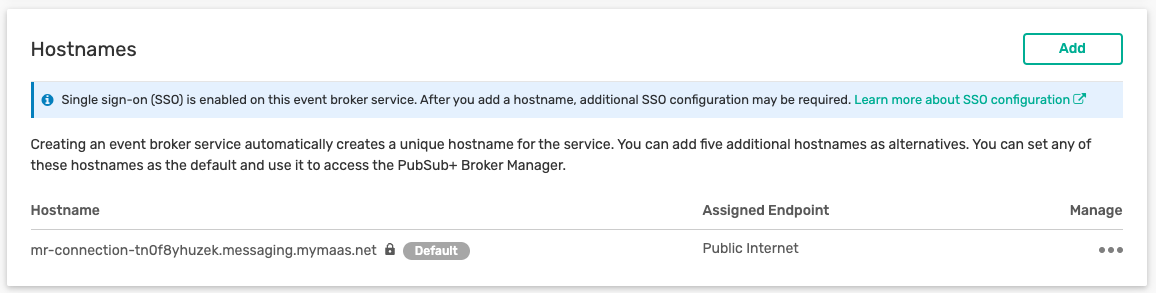
The hostname that is set with the Default status becomes the primary URL that is used to access Broker Manager and shown in the URLs to access the service in the Cloud Console
Standalone Event Broker Service Considerations
For event broker versions 10.0 and later, you have the option to deploy the event broker service as a standalone service or as a high availability (HA) group when you create an Enterprise service. Standalone event broker services are available after you have added them as a service class to your Service Limits. To use standalone event broker services, contact Solace
Standalone event broker services have a lower cost than HA services, and may be preferable to using HA or Developer services in some situations such as:
- The event broker service is part of a non-production environment that mirrors your production environment but does not require the same level of fault tolerance.
- The event broker service is part of a development environment and requires higher service-level limits, such as client connections or larger message sizes for development/testing than available in the Developer service. For example, Developer services are limited to only 100 connections.
- The broker is used by client applications that can tolerate longer downtime and potential message loss during service interruptions. This may be a consideration when you choose to use standalone services as there isn't HA redundancy and as such, an outage of 15-30 minutes occurs during restarts and upgrades.
Standalone event broker services cannot be changed to HA after they are created. If you require event broker service that have less downtime, consider creating the service with HA. For more information about HA, see High Availability in Solace Cloud.
Event Broker Service Access Considerations
The following default security settings are configured for the event broker service. You can change the settings after the service is created to adhere to your security requirements:
- A client profile named default is created and enabled. This client profile can't be removed, but you can configure it after service creation.
- Basic Authentication is enabled for the event broker service. You can change the configuration after service creation to match your requirements. These settings are configured for you:
- The default ACL profile and #acl-profile are created with the Allow default action for the Client Connect, Publish, and Subscribe. These cannot be removed, but you can configure them after service creation
- The following client usernames are created with mappings to
- #client-username (enabled) with a default client profile and default ACL profile
- default (disabled) is mapped to the default client and default ACL profile
- solace-cloud-client (enabled) is mapped to the default client and default ACL profiles
For more information, see the following sections:
Port Configuration Considerations
You can configure the event broker service to use a set of protocols and ports that permit applications to connect using connection endpoints. A connection endpoint can be public or private IP addresses. The type of connectivity, public or private are referred to as public endpoints and private endpoints, respectively. You can configure a public, private, or both types of endpoints for an event broker service provided the deployment is Kubernetes-based and deployed in a private region that has networking (or networking policies) configured to use public Internet and private IP addresses.
-
For Customer-Controlled Clusters and Dedicated Clusters, a private endpoint to access private IP addresses is created by default. Optionally, you can create a public endpoint or create both a public and private endpoint instead.
-
For Public Clusters, a public endpoint is created by default. You cannot create private endpoints in Public Clusters.
-
For each public or private endpoint these port configurations are created by default:
-
The secure protocols and ports for Solace Messaging, Solace Web Messaging, AMQP, MQTT, and REST are all enabled.
-
Plain text for all non-secure ports is disabled, while all secure ports are enabled. For more information about editing the ports after service creation time, see Changing the Port Configuration for Event Broker Services.
-
Plain text is disabled for the SEMP (Solace Element Management Protocol version 2) port. This is the recommended setting but can be changed. For more information, see Enabling SEMP Over the Message Bus.
-
The management for secured broker management is enabled and set to 943. CLI access is disabled by default. Both are configurable.
-
- Be aware of the following port configuration considerations:
- Port values can range from 0 to 65534.
- You can use ports 22 and 943 as custom ports.
- If you are using NodePort as part of your deployment for Customer-Controlled Clusters, the port numbers are generated and therefore can't be changed. For NodePort deployments, only private endpoints can be used.
Public endpoints are not available for deployments that use NodePort.
Connection Endpoint Considerations
You can configure connection endpoints of an event broker service. A connection endpoints allows you to have different sets of public or private IP address connections, which are referred to as public endpoints and private endpoints, respectively. For more information about endpoints, see Configuring Connection Endpoints and Ports for Event Broker Services.
- Customer-Controlled Clusters and Dedicated Clusters can have private endpoints, public endpoints, or both (hybrid). For more information, see Configuring Client and Management Ports.
If you have upgraded your event broker service, depending on your deployment and its connectivity, you may only be able to create public or private endpoints. For example, if your deployment previously didn't permit public Internet connectivity, you won't be able create public endpoints.
Using different endpoints for public Internet and private IP address connectivity allows you specify the protocols and ports used to connect to your event broker service to match the security requirements of your organization. In addition, you can configure endpoints to permit use of specific messaging protocols and port numbers between client applications and the event broker service based on whether they connect using public Internet or private IP addresses.
For example, you may want to expose an event broker service so that client applications can only connect from the public Internet using only MQTT ports through port 1122, while clients within your private network using private IP addresses can connect with all other messaging protocols using the default ports. Another example for hybrid connectivity usage is to limit access to the SEMP management port so that only client applications using private IP addresses can connect to your event broker services.
You can configure a public endpoint, a private endpoint, or both at the same time for an event broker service. Both endpoints can only be configured when event broker services are deployed in Kubernetes and in a private region that has networking configured to use public Internet and private IP addresses. These are some key considerations:
- You must have at least one endpoint and have a maximum of one public and one private endpoint per event broker service.
- One endpoint must have the Secured SMF port enabled, which is required for messaging with client applications and for inter-broker communication in an event mesh.
- One endpoint must have the Secured Broker Management Host (SEMP) port; the SEMP port is required to manage your event broker service.
- If you have both private and public endpoints, you don't need to enable the Secured SMF and SEMP ports on the same endpoint, but we recommend that you choose the private endpoint for the SEMP port.
- When you have both public and private endpoints configured, Broker Manager defaults to use the public endpoint. If only a private endpoint is available, you must have connectivity to the same private network as where your event broker services are deployed to connect to Broker Manager from the Cloud Console. For more information about Broker Manager, see Using Broker Manager with Event Broker Services.
Selecting the Event Broker Release and Version
You can select both the event broker release and version when you create an event broker service.
Solace recommends using the most recent maintenance version of the Long Term Support (LTS) release. Maintenance releases are released every two weeks for the LTS release and contain vulnerability and security fixes. You can choose to use an earlier maintenance version of the LTS release, or alternatively, select a Rolling release. The Rolling release introduces new features intended for later LTS release adoption, but does not get maintenance releases. For more information about release types, see Version Adoption in Solace Cloud.
You may want to select earlier LTS maintenance release or a Rolling release for the following reasons:
- Your business requirements need specific behaviors from an earlier LTS maintenance release, or you prefer to use earlier releases rather than the most recent broker versions.
- You have existing event broker services
- You may want may want access to specific features intended for release in a later LTS release, or want to test the newest features, so you select a Rolling release.
For more information about the available releases and versions, see Release and Versioning Scheme for Event Broker Services.
You can't change the event broker version after the event broker service is created. However, you can upgrade your event broker service at a later time. For more information, see Upgrading Event Broker Services in Solace Cloud.
When you create an event broker service, perform these steps to select the event broker release and version:
- When you create your event broker service, select the broker release from the Broker Release drop-down list.
-
(Optional) Select the Specify Version checkbox and then select the broker version using the Broker Version drop-down list.
The default broker version depends on the release type you selected in the Broker Release field:
-
LTS: The latest maintenance release.
-
Rolling: the latest rolling release.
Event broker version availability varies based on the cloud provider and the deployment option. You may see different release and versions available in your account based on the cloud provider and deployment environment you've chosen.
-
Setting the Message VPN Name
Each event broker service has one Message VPN. You can configure the Message VPN name when you create the event broker service. The Message VPN name that you specify is also used to create an account with the role of Mission Control Manager to configure your event broker service. The Message VPN name cannot be changed after you create the service. You can see the name on the Status tab when you view your service in Cluster Manager.
When you create your event broker service, perform these steps to edit the system-generated VPN name:
- When you create your event broker service, expand Advanced Connection Options.
- Click Edit
 beside the Message VPN Name field and then enter a valid name. The name can be up to 26 characters and can include alphanumeric characters, dashes, and underscores.
Setting the Cluster Name
If you want to create a DMR cluster with multiple event broker services in it, the cluster name for each service must have the same cluster name. Event broker services in a DMR cluster are aware of each other through the DMR internal links that connect them. The DMR cluster seamlessly routes every event published to it to the consuming applications connected to any event broker service in the same cluster.
Creating an event broker service places it in its own cluster with a generated cluster name. You can set the same cluster name for multiple event broker services so that they belong to the same DMR cluster.
Use these steps to set the cluster name:
- When you create your event broker service, expand Advanced Connection Options.
- Click the Cluster Name drop-down list, and do one of the following:
- Select an existing cluster from the drop-down list. Note that if you start typing the first few letters of the cluster name, the list filters the existing cluster names.
- Type a new cluster name and then click Select to create a new cluster name. Ensure that your cluster name is 1 to 64 characters in length, and includes only alphanumeric characters, dashes, or underscores.

After you have configured your event broker services with the appropriate cluster names and you're ready to create your DMR cluster, contact Solace for assistance. The ability to create the DMR cluster in the Solace Cloud Console is not yet available.
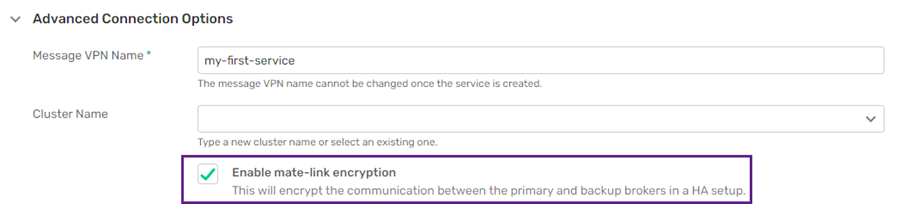
Configuring High Availability Mate-Link Encryption
Enterprise event broker services in an HA group encrypt the mate-links between the services in the HA group. The HA mate-link is encrypted by default. You can disable encryption so that the communication is in plain text between the primary and backup event brokers.
To configure whether to use HA mate-link encryption when you create an Enterprise event broker service, perform these steps:
- When you create your event broker service, expand Advanced Connection Options.
- Select or clear the Enable mate-link encryption check box.
For more information about HA, see High Availability in Solace Cloud
Configuring Client and Management Ports
You can configure the client and management ports used to connect to your event broker services.
For all event broker services, no matter the event broker version, only secure ports are enabled by default and non-secure ports are disabled. You can customize the secure (HTTPS) and non-secure (HTTP) ports for Solace Messaging, Solace Web Messaging, AMQP, MQTT, and REST. Configuring the ports gives you the ability to modify port numbers if the provided default ports are unavailable in your network or to align with your organization's requirements. Some configuration settings depend on the event broker version you choose.
For more information about configuring ports, see the following sections:
- Configuring Connection Endpoints and Ports for Event Broker Services.
- For additional information about port configuration, see Details for Port Configuration.
Configuring Connection Endpoints and Ports for Event Broker Services
For Kubernetes-based deployments, you can configure whether client applications connect to an event broker service using a connection endpoint. These connection endpoints can use either public or private IP addresses, which are referred to as public endpoints and private endpoints, respectively. You can view a connection endpoint as a set of ports and protocols that you can access based on the type of connection of the client application or user. These endpoints can help you to better manage access. For both private and public endpoints, you can:
-
enable/disable messaging connections
-
configure the aspects of the messaging protocols that are used (for example secure verses plain-text)
-
configure the port numbers that are used for the event broker service
-
configure the management port connections.
At least one endpoint must have the SEMP management port enabled.
You can choose one of the following connection endpoints and port configurations:
- Private IP addresses (or private endpoints)
- This type of configuration allows connections to the event broker service using private IP addresses that are part of a private region [virtual private cloud or virtual private network (VPC/VNet)]. It creates a private endpoint with management via SEMP to the event broker service. The default name for the private endpoint is private endpoint. This type of configuration is available only when you choose Private Cloud as the cloud type when you create the service. Private Clouds are for Customer-Controlled Clusters and Dedicated Clusters. You can later choose to add a public endpoint.
- Public Internet (or public endpoint)
- This type of configuration allows connections to the event broker services from public Internet IP addresses. It creates a public endpoint with management via SEMP to the event broker service using the public Internet. The default name for the public endpoint is public endpoint and it is the only option available in Public Clusters.
- Hybrid
- This type of configuration allows messaging and management connections to the event broker service from both private IP addresses and the public Internet. It creates both a private and a public endpoint with management via SEMP to the event broker service enabled. The default names for the private and public endpoints are private endpoint and public endpoint. This type of configuration is available only when you choose Private Cloud as the cloud type when you create the service. Private Clouds are for Customer-Controlled Clusters and Dedicated Clusters.
- Before you configure the endpoints, protocols, and ports, we recommend that you review the considerations Configuring Connection Endpoints and Ports for Event Broker Services and Connection Endpoint Considerations.
- After you create the event broker service, you can change the ports numbers and choose the protocols to enable. For more information, see Changing the Port Configuration for Event Broker Services.
Perform the following steps:
- When you create your event broker service, click Advanced Connection Options.
- Under the Port Configuration section, the options available depend on the how your event broker services are deployed:
For Public Clusters, public Internet is only available and therefore, you only have the Public Endpoint available.
For Customer-Controlled Clusters or Dedicated Clusters, you can select Public Internet, Private Addresses, or Hybrid: Private IP and Public Internet options, which permit you to configure public, private, or both endpoints, respectively.
- Expand Private Endpoint or Public Endpoint to configure the messaging and management protocols to use as well as the ports. You can configure different settings for the ports and disable different protocols on the endpoints.
Select the messaging protocol to configure, modify the port numbers, and enable ports as required.
Click Disable Protocol to disable a particular protocol for use with your service. If you want to enable a protocol again, click Reset to default and re-select the protocols that you want to enable.
For more information about the protocols and ports, see Details for Port Configuration.
The example below shows the public endpoint being configured in a Public Cluster (only on regions deployed on Kubernetes):

Details for Port Configuration
You can configure the ports for your event broker service. You can configure the connections as sets of ports called public and private endpoints.
To configure the protocols and their hosts and ports, expand the endpoint in the Port Configuration section to display a list of protocols.
Select a protocol to expand its list of available hosts and ports. You can perform one or more of the following actions:
-
Select a host checkbox to enable it and populate the Port field with its default value.
-
(Optional) Enter a new value into the Port field if you don't want to use the default value.
-
Clear the checkbox for a host to disable it. Disabling a host grays out the Port field.
- Secure hosts are enabled by default for each protocol and use TLS.
The following list describes each protocol and their hosts:
- Solace Messaging—Use (SMF) to connect and exchange messages with the event broker service over TCP.
- Enable SMF Host—Use SMF Host (plain-text) over TCP to connect and exchange messages with the event broker service.
- Enable Compressed SMF Host—Use SMF (plain-text) in a compressed format over TCP to connect and exchange messages with the event broker service.
- Enable Secured SMF Host—Use secure SMF using TLS over TCP.
- Solace Web Messaging—Use SMF over WebSockets over HTTP to connect and exchange messages with the event broker service.
- Enable Web Host—Use WebSocket over HTTP (plain-text). Disabled by default.
- Enable Secured Web Messaging Host—Use WebSocket over secured HTTP. Enabled by default.
- AMQP—Use Advanced Message Queuing Protocol 1.0 to connect and exchange messages with the event broker service.
- Enable AMQP Host—Use AMQP (plain-text). Disabled by default.
- Enable Secured AMQP Host: Use AMQP over a secure TCP connection. Enabled by default.
- MQTT—Use MQ Telemetry Transport to connect and exchange messages with the event broker service.
- Enable MQTT Host: Use MQTT (plain-text). Disabled by default.
- Enable WebSocket MQTT Host—Use MQTT WebSocket (plain-text). Disabled by default.
- Enable Secured MQTT Host—Use secure MQTT (plain-text). Enabled by default.
- Enable WebSocket Secured MQTT Host—Use WebSocket secured MQTT. Enabled by default.
- REST—Use the Solace Messaging REST API and standards-based HTTP exchange patterns to exchange messages over TCP connections with the event broker service.
- Enable REST Host—Use REST messaging (plain-text).
- Enable Secured REST Host—Use secure REST messaging. Enabled by default.
Management—Use to enable the secure management connections necessary to manage the event broker service. You can configure these options:
Enable Secured Broker Management host (SEMP)—Use the secured management connection, which uses SEMP to manage the event broker. You must always have at least one port enabled on an event broker service. Creating an endpoint enables this by default.
Enabled Secured CLI Host (SSH)—Use a secure port to connect to the event broker service using the Solace Command Line Interface (CLI). This gives you access to a scope-restricted access to the Message VPN on the event broker service that you may find useful for management and configuration. Typically, this access is not required.
Enabling CLI access exposes another mechanism to connect and manage your event broker service. This may expose you to unnecessary security risks. Solace recommends that you disable this port where your services have public Internet connectivity to harden access to your event broker services and when CLI access is not in use or required. This advanced access is for users with an in-depth understanding of event broker configuration and management.
For more information about the default event broker service port configurations, see General Resource Requirements for Kubernetes and Default Port Configuration.