Building a Modeled Event Mesh
You build a modeled event mesh by adding event brokers, application versions, and event versions to it. In a modeled event mesh, an event broker represents a runtime Solace or Kafka event broker. The applications and events that you add represent actual runtime applications and the events that flow through your actual event brokers.
You must add at least one event broker to a modeled event mesh before you can add applications and events.
This section includes the following tasks:
- Adding an Event Broker to a Modeled Event Mesh
- Managing Model Event Brokers
- Promoting Applications and Events to a Modeled Event Mesh
- Removing Applications from a Modeled Event Mesh
- Viewing Object Environment Associations
- Viewing Objects Added to an Event Broker
Adding an Event Broker to a Modeled Event Mesh
An event broker in a modeled event mesh represents an operational event broker in a runtime event flow. In Solace modeled event meshes, you can add multiple model event brokers to represent all of the operational event brokers that are part of your event flow. For Kafka modeled event meshes, you can add only one model event broker to represent the cluster in the event flow.
In a Solace modeled event mesh, you add an event broker to model a Solace Cloud event broker service or a Solace software event broker or appliance event broker. If you want to add an event broker service from the same Solace Cloud account, you can select the service from the list of available event brokers. Each event broker service can be added to only one modeled event mesh.
If you are modeling event broker services in the same Solace Cloud account, it is best practice to create the event broker service and the modeled event mesh in the same environment.
You must have the Administrator or Event Portal Manager role to add event brokers to modeled event meshes. To add an event broker to a modeled event mesh, perform these steps:
- Log in to the Solace Cloud Console if you have not done so yet. The URL to access the Cloud Console differs based on your
- On the navigation bar, select Runtime Event Manager
 .
. - At the top-left, select the environment containing the modeled event mesh that you want to add a model event broker to.
- Click the name of the modeled event mesh.
- Select the Event Broker Connections tab.
- Click Connect Event Broker.
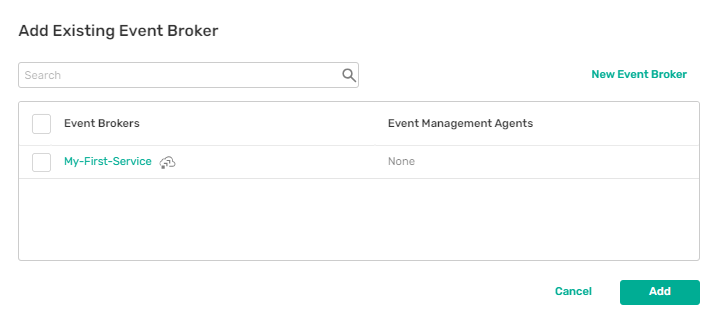
- To add an existing event broker service in an environment in your Solace Cloud account ,select the checkbox next to the event broker service or the model event broker that you want to add. Event broker services display
 next to the name.
 - To create a new event broker in a Solace modeled event mesh, perform these steps:
- Click New Event Broker.
- Enter a Name for the model event broker. If you want to design the event flows for a new modeled event mesh but you aren't ready to add more event broker details, you can create a placeholder event broker with just a name and add the remaining details later.
- Enter the Message VPN name. Event broker services have only one Message VPN. On Solace software event brokers and appliance event brokers, event flows may be segregated to multiple Message VPNs. The model event broker represents a single Message VPN.
On the Management tab, enter the connection details for the event broker:
Setting Details SEMP Username
The username to connect to the event broker.
To avoid storing passwords in Event Portal, you add passwords on the local machine when you install the Event Management Agent.
SEMP URL
The address of the event broker. The address can be an IP address or an FQDN, and may include ports, for example: 123.89.40.72 or https://a1bcd2e3f45.messaging.solace.cloud:943
Select the Messaging tab.
Click Add Protocol to add a communication protocol that the event broker uses. Repeat this step for each protocol that you want to add. You can add protocols more than once with different transport types. You can add the following protocols:
Setting Details SMF
Select a transport type and specify a port. Available transport types include:
- SMF (tcp)
- Secured SMF (tcps)
- Compressed SMF (tcps)
- WebSocket (ws)
- Secure WebSocket (wss)
AMQP
Advanced Message Queuing Protocol
Select a transport type and specify a port. Available transport types include:
- APQP (amqp)
- Secured AMQP (amqps)
MQTT
Message Queuing Telemetry Transport standard
Select a transport type and specify a port. Available transport types include:
- MQTT (tcp)
- Secured MQTT(ssl)
- WebSocket (ws)
- Secure WebSocket (wss)
REST
Representational state transfer
Select a transport type and specify a port. Available transport types include:
- REST (http)
- Secured REST(https)
- Click Connect Event Broker.
- To create an event broker in a Kafka modeled event mesh, perform these steps:
- Select New Event Broker.
Enter the connection details for the event broker:
Setting Details Name
The name of the event broker that displays in the modeled event mesh.
Bootstrap Servers
The bootstrap server addresses for event brokers in the Kafka cluster.
Authentication type
Select the type of authentication used to connect to the Kafka event broker.
- No authentication
- SASL_SCRAM
- SASL_PLAIN
- mTLS
- IAM
Authentication options
Specify the applicable username, trust store location, and TLS options for the authentication type. If a password is required for authentication, in the Password field, select Generate an environment variable for the password to include an environment variable name in the connection details.
To avoid storing passwords in Event Portal, you create an environment variable on the local machine when you install the Event Management Agent and supply the password in the environment variable.
- Click Connect Event Broker.
- Click Add.
Managing Model Event Brokers
Administrators and Event Portal Managers can view information about each event broker in a modeled event mesh, including details about the Event Management Agent connection and the list of associated applications. For Kafka event brokers, you can also view the list of associated events
You can delete an event broker from a modeled event mesh only if it has no objects associated with it. When you delete an event broker, any corresponding runtime discovery data and audit results are also deleted. If you created the event broker from an existing event broker service, it is not affected.
Because a Solace modeled event mesh can have multiple event brokers and a Kafka modeled event mesh has only one event broker, the steps to manage them are slightly different.
To view and manage a model event broker, perform these steps:
- On the navigation bar, select Runtime Event Manager .
- At the top-left, select the environment containing the modeled event mesh that you want to manage the event brokers for.
- Click the name of a modeled event mesh.
- In the modeled event mesh, select the Event Broker Connections tab.
- If you are managing event brokers in a Solace modeled event mesh, perform the following actions:
- In the event broker list, select the event broker you want to view the details for.
- Perform any of the following actions:
- If the model event broker is connected to an Event Management Agent, click Run Discovery Scan to scan for runtime data. For more information, see Running Discovery Scans.
- To view or edit the connection details to connect to an Event Management Agent, click View Connection Details.
- To view the linked event broker service in Cluster Manager, click More Actions
 for the event broker and select View Service in Cluster Manager.
 - To view the linked event broker service in Broker Manager, click More Actionsfor the event broker and select Open in Broker Manager.
- To delete the event broker from the modeled event mesh, click More Actionsfor the event broker and select Delete From Event Portal.
- If you are managing the event broker in a Kafka modeled event mesh, perform any of the following actions:
- If the model event broker is connected to an Event Management Agent, click Run Discovery Scan to scan for runtime data. For more information, see Running Discovery Scans.
- To view or edit the connection details to connect to an Event Management Agent, click View Connection Details.
- To delete the event broker from the modeled event mesh, click More Actionsfor the event broker and select Delete From Event Portal.
Promoting Applications and Events to a Modeled Event Mesh
To add or update applications and event versions in a modeled event mesh, you promote an application version from Designer to an event broker. When you promote an application version you also include runtime configuration details for the application and all associated event versions. For more information, see Promoting Applications to Environments.
Administrators and Event Portal Managers can promote application versions to any environment. Event Portal Users require at least Application Domain Editor access to the application domain to promote applications to an environment. In addition Event Portal User require EP Runtime Editor or EP Runtime Approver access to an environment to promote applications directly to a modeled event mesh. Users with EP Runtime Viewer access to an environment can request approval to promote an application to a Solace event broker but can't promote applications without approval. For more information about promotion approvals, see Reviewing Promotions to Event Brokers.
You can also add a Kafka event version to a modeled event mesh by adding it directly to a model event broker. You must be an Administrator or Event Portal Manager to add a Kafka event to a modeled event mesh. For more information, see Adding a Kafka Event Version to an Environment
Administrators and Event Portal Managers can also add applications and events to a modeled event mesh by importing them from a runtime event broker. For more information, see Importing Runtime Objects into Event Portal.
Removing Applications from a Modeled Event Mesh
If you have at least EP Runtime Editor access to the environment and Application Domain Editor access to the application domain containing the application, you can remove an application version from an event broker in a Solace modeled event mesh using Runtime Event Manager.
If you remove an application version from an event broker with runtime configuration enabled, the runtime configuration for the application is removed from the operational event broker the next time that configuration updates are pushed to it.
You can also remove an application version from a modeled event mesh or replace an application version with a newer one using Designer. For more information, see Removing an Application From an Environment. For Kafka modeled event meshes, you must use Designer to remove an application.
To remove an application from an event broker in a modeled event mesh, perform these steps:
- On the navigation bar, select Runtime Event Manager.
- At the top-left, select the environment containing the modeled event mesh that you want to manage the event brokers for.
- Click the name of the modeled event mesh.
- Select the Architecture tab.
- In the list view, in the Applications list, click More Actionsfor the application and select Remove Application.
- Select the name of the event broker that you want to remove the application from.
- Click Preview Promotion to review the changes that will occur on the event broker.
- Perform one of these steps:
- To remove the application immediately, click Remove.
- Click Send Request to request approval to remove the application from the model event broker, then enter comments about your request and click Send Request.
Another user must approve the request and promote the update to the event broker.
Viewing Object Environment Associations
You can view the environments, modeled event meshes, and event brokers that applications are associated with in Runtime Event Manager. You can also view associations for Kafka events added to an environment.
To view the environment associations for an object version, perform these steps:
- On the navigation bar, select Runtime Event Manager .
- At the top-left, select the environment containing the modeled event mesh that contains the application or the Kafka event.
- Click the name of the modeled event mesh.
- Select the Architecture tab.
- In the list view, in the Applications list or Events list, click More Actionsfor the object and select View Environment Associations.
Viewing Objects Added to an Event Broker
You can view the list of applications and Event API Products that have been added to a specific event broker in the modeled event mesh.
To view the associated objects for a specific event broker, perform these steps:
- On the navigation bar, select Runtime Event Manager.
- At the top-left, select the environment containing the modeled event mesh.
- Click the name of the modeled event mesh.
- Select the Event Broker Connections tab.
- Select the event broker that you want to view the associated objects for.
- In the event broker details, under Associated objects, select the Applications or Event API Products tab.