Events
Within Event Portal, an event is an object that defines the properties that describe and categorize actual event instances. Each event in Designer defines an event type that represents event instances produced in an event-driven architecture (EDA). An event instance is a single occurrence of an event message that is produced.
You create events in Designer. You can also add Kafka events to Designer by importing Kafka topics from your runtime data in Runtime Event Manager. For more information, see Importing Kafka Objects.
This section includes the following tasks:
- Creating an Event
- Updating and Adding Event Versions
- Changing the State of an Event Version
- Adding a Kafka Event Version to an Environment
You can create custom attributes for events. For more information, see Using Custom Attributes.
You can move events to a different application domain. For more information, see Moving Objects Between Application Domains.
Creating an Event
You can create an event in any application domain where you have Editor or Manager level access. When you create an event, you specify several attributes:
- name
- broker type (Solace or Kafka)
- whether the event can be shared to be used by applications in other application domains and by event APIs
- whether applications in other application domains require approval to publish or consume an event. For more information see Managing Event Data Access.
- version description, display name, number, and state
- topic addresses
- schemas
- any custom attributes that have been set up in your organization
You can create an event from the graph view or the component view:
- If you want to create several applications and events and specify their relationships quickly, and then add more details later, you may want to start in the graph view.
- If you want to add topic addresses or schemas when you create the event you may want to start in the component view.
Creating an Event in the Graph View
To create an event in the graph view, perform these steps:
- Log in to the Solace Cloud Console if you have not done so yet. The URL to access the Cloud Console differs based on your
- On the navigation bar, select Designer
 .
. - On the Application Domains page, click the application domain that you want to add the event to.
-
In the graph view, click Add Objects.
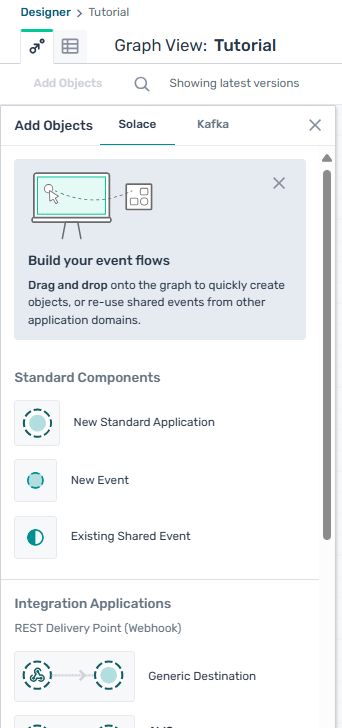
- Select the Solace or Kafka tab to select the event broker type for the event.
- Click New Event and then click on the graph where you want to position the event.
- (Optional) If you want to change the appearance of the icon, click
 below the application name and select a color and an icon or logo, then click Apply. For more information see Customizing Object Appearance.
 - Enter a name for the event.
-
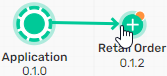
(Optional) If you want to specify that an application version displayed in the graph subscribes to the event, hover over the event and drag the arrow that appears to the application.
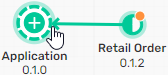
-
(Optional) If you want to specify that an application version displayed in the graph publishes the event, hover over the application and drag the arrow that appears to the event.
- Click the event to open the details panel.
- To update the event name, version, description, sharing, or custom attributes:
- In the Details panel click
 .
. - On the Version Details tab, update the name, version, description, and sharing as necessary.
- On the Custom Attributes tab, select This Version or Event to display the appropriate custom attributes and set them as necessary.
- Click Save.
- In the Details panel click
- To set topic addresses or schemas:
- In the Details panel, click Open Full Event Details to open the event version in the Component View.
- Click Edit This Version.
- Enter a Topic Address. The topic address field displays suggestions based on the broker type, topic domain and existing topic addresses for other events in the application domain. The address must meet the following conditions. For more information, see Topic Addresses.
- The application domain may require the topic address to be unique within the application domain or begin with its topic domain. You can select from existing topic domains to start the topic address.
- For Solace topic addresses, don't use the *, >, or ! characters in a topic address.
- To include a variable, surround it with braces
{ }. To use an enumeration as a variable, type the opening brace
{, click Configure Variable, and select an enumeration and version.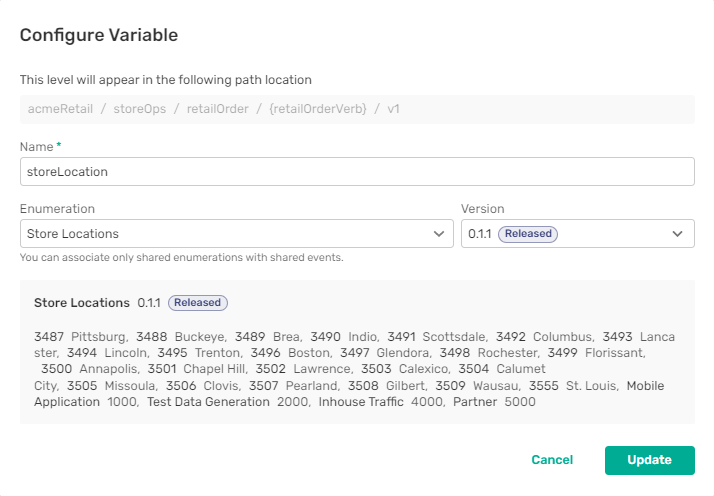
Enumerations are supported only in Solace topic addresses. If the event is shared, you can select only a shared enumeration.
- (Optional) Click Select Schema for a Solace event, or for the Value or Key schema in a Kafka event and perform these steps:
- Select whether the schema is Complex or Primitive. Primitive schemas specify a single data type within the event. Complex schemas are separate objects in Designer. For more information, see Schemas.
- If you selected a Complex schema, click Select next to the schema version that you want to reference. The schema list shows schemas in the same application domain and shared schemas from other application domains that you have access to. You can filter the list by application domain. If you selected Allow Event to be shared across application domains, only shared schemas appear in the list.
- If you selected a Complex schema and the schema object doesn’t exist in Event Portal, click Quick Create Schema and enter the schema attributes, then click Create and Select. For more information about the attributes, see Creating a Schema.
- If you selected a Primitive schema, select the data type from the list and click Select Primitive.
- Click Close
 to close the Schema panel.
- Click Save Event
- To require applications to request approval to publish or consume the event:
- Select the event and click Open Full Event Details.
- Click Edit Details. Approval settings apply at the event level rather than the version level.
- In the Access Approval list, select Requires Approval.
- Click Save Event.
Creating an Event in the Component View
To create an event in the component view, perform these steps:
- On the navigation bar, select Designer .
- On the Application Domains page, click the application domain that you want add the event to.
- Click Components
 to switch to the component view.
 -
Select the Events tab then click Create Event.
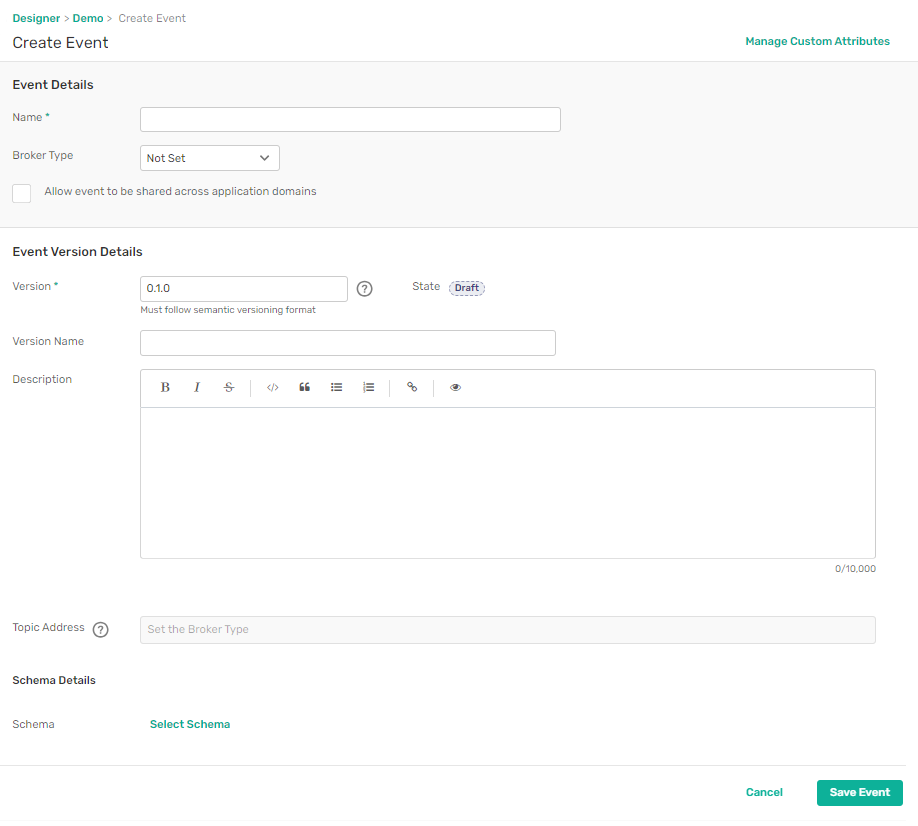
- Enter a Name for the event.
- Select the Broker Type for the event. All versions of the event have the same broker type.
You can select Kafka only if a Kafka delimiter is set for the account.For more information, see Setting the Kafka Delimiter.
- If you want to require applications in other application domains to request approval to publish or consume an event, in the Access Approval list, select Requires Approval.
- If you want the event to be available to applications in other application domains and to event APIs, select Allow event to be shared across application domains.
- (Optional) Add values for any event custom attributes that have been set up in your organization.
- (Optional) If you want to change the color of the event icon in the graph view, expand the Appearance section and select a color. The default is the color set for the application domain. For more information see Customizing Object Appearance.
- In the Version field, specify the semantic version value for the first version of the event in the format major.minor.patch. The default is 0.1.0.
- (Optional) Enter a Version Name for the first version of the event.
- (Optional) Enter a version description. The Description field supports Markdown. Click toggle preview
 to preview the rendered text.
 - Enter a Topic Address. The topic address field displays suggestions based on the broker type, topic domain and existing topic addresses for other events in the application domain. The address must meet the following conditions. For more information, see Topic Addresses.
- The application domain may require the topic address to be unique within the application domain or begin with its topic domain. You can select from existing topic domains to start the topic address.
- For Solace topic addresses, don't use the *, >, or ! characters in a topic address.
- To include a variable, surround it with braces
{ }. To use an enumeration as a variable, type the opening brace
{, click Configure Variable, and select an enumeration and version.Enumerations are supported only in Solace topic addresses. If the event is shared, you can select only a shared enumeration.
- (Optional) Click Select Schema for a Solace event, or for the Value or Key schema in a Kafka event and perform these steps:
- Select whether the schema is Complex or Primitive. Primitive schemas specify a single data type within the event. Complex schemas are separate objects in Designer. For more information, see Schemas.
- If you selected a Complex schema, click Select next to the schema version that you want to reference. The schema list shows schemas in the same application domain and shared schemas from other application domains that you have access to. You can filter the list by application domain. If you selected Allow Event to be shared across application domains, only shared schemas appear in the list.
- If you selected a Complex schema and the schema object doesn’t exist in Event Portal, click Quick Create Schema and enter the schema attributes, then click Create and Select. For more information about the attributes, see Creating a Schema.
- If you selected a Primitive schema, select the data type from the list and click Select Primitive.
- Click Close to close the Schema panel.
- (Optional) Add values for any event version custom attributes that have been set up in your organization.
- Click Save Event.
Considerations for Kafka Events
In Kafka EDAs, an event represents a unique relationship between a topic and a schema. An event can't have multiple topic addresses or reference different value schemas across its versions. Designer has additional validation restrictions for Kafka events to ensure your designs accurately represent your Kafka clusters. In addition to requiring all versions of an event to have the same broker type, Designer enforces these restrictions for events with Kafka broker types:
-
All versions of a Kafka event must have the same topic address.
-
Kafka brokers don't recognize level delimiters in topics. You can specify a delimiter that Event Portal recognizes in Kafka topics. All Kafka topic addresses in your organization's account must use the same delimiter.
-
Kafka topic addresses don't support enumerations or wildcards.
-
You can't create a second version of a Kafka event unless you've set a topic address for the first version.
-
If more than one version of a Kafka event exists, you can't change the topic address.
-
All versions of a Kafka event must reference the same schema object for the Value schema, and each event version must reference a different version of that schema object.
-
Two separate Kafka events in Designer can have the same topic address but if the topic addresses for two event match, they can't both reference the same schema for the value schema.
Updating and Adding Event Versions
When you update an event, you can update an existing version or create a new version of the event. Versions allow you to work on updates and test new versions in development and staging environments while the latest stable version remains in the production environment. Each version also has a lifecycle state. You can only edit versions that are in Draft state. For more information, see Object Versions and Lifecycle States.
Object version numbers use semantic versioning in the format major.minor.patch. You can update object versions only when they are in draft state. If you want to update a version that is in Released, Deprecated, or Retired state, it is best practice to duplicate the version to create a new Draft version rather than returning the existing version to Draft state.
When you reference an object (for example, when you specify the schema that an event uses or an event that an application publishes), you select the version of the object that you want to reference. If a new version of a referenced object is created, the reference does not update automatically. You can choose when to update references to the new version.
The graph view displays the most recent non-retired version of an event. If you create a new version to update an object, the new version takes the place of the previous version in the graph and the displayed event flows change if the new event version is not associated with the same application versions.
If allowed for objects in the application domain, the description of an event version can be edited at any lifecycle state. This option allows you to add information to the description such as deprecation and retirement dates and notes about the object's functionality or runtime behavior.
To update an event from the graph view, perform these steps:
- On the navigation bar, select Designer .
- On the Application Domains page, click the application domain that contains the event you want to update.
- If you need to create a new draft version with the same properties as the existing version, right-click the event and select Duplicate.
- To update the draft version displayed in the graph view:
- Right-click on the event and select View Details.
- Click Open Application.
- Click Edit This Version.
- Update the event version as necessary.
- Click Save & Close.
To update an event, perform these steps:
- On the Application Domains page, click the application domain that contains the event you want to update.
- Click Components to switch to the component view.
- Select the Events tab.
- In the list of events, click More Actions
 for the event that you want to update and select Open Event.
 - Perform one of the following actions:
- In the Versions list, click More Actions for the version that you want to update and select Edit. Any changes you make update that version of the event. You can edit an event version only if it is in Draft state.
- In the Versions list, click More Actions for the version that you want to update and select Duplicate. All properties of the existing version are copied into a new version. By default, the new version number is incremented by 0.0.1. You can change the version number to any number not already in use.
- Above the Versions list, click Add
 to create a new version of the event without duplicating an existing version. By default, the new version number is the next unused major version. You can change the version number to any number not already in use.
 - Update the event version as necessary.
- Click Save Version or Save & Close.
Changing the State of an Event Version
When you create a new version of an event, the version is in Draft state. When the version is ready, you can change the version state to Released. When you release a new version of an event, you may also want to change older versions of the event to Deprecated or Retired. You must have at least Manager level access to the application domain to change the version state. For more information, see Object Versions and Lifecycle States
You can only change an event version from Draft to Released state after the schema and any enumerations that the event references have been changed out of Draft state. If you want to retire an event version, you must first retire all application and event API versions that reference it.
You can change the state of the most recent version in the graph view. If you change the state to Retired, the version disappears from the graph, and is replaced by the latest non-retired version if one exists.
To change the state of an event version from the graph view, perform these steps:
- On the Application Domains page, click the application domain that contains the event you want to update.
- Right-click the event and select Change State.
- Select the new state and click Change State.
To change the state of an event version from the component view, perform these steps:
- On the navigation bar, select Designer .
- On the Application Domains page, click the application domain that contains the event you want to update.
- Click Components to switch to the component view.
- Select the Events tab.
- In the list of events, click More Actions for the event that you want to update and select Open Event.
- Select the version that you want to change the state of, then click Manage Lifecycle.
- Select the new state.
- (Optional) If you set the State to Deprecated or Retired, set the End of Life date. If you set a planned or actual End of Life date, the date displays in the version details.
- Click Save.
Adding a Kafka Event Version to an Environment
How you add event versions from Designer to an environment depends on the event type. To add a Solace event version to an environment, you add an application that publishes the event. For more information, see: Promoting Applications to Environments. You can add a Kafka event version in the same way or by adding it directly to an environment. If you add a Kafka event directly, you associate a version of the event with a model event broker in a Kafka modeled event mesh. You must be an Administrator or Event Portal Manager to add Kafka events to a modeled event mesh.
When you import a Kafka event into Event Portal using Runtime Event Manager, you select the environment, modeled event mesh, and event broker. You can add the imported event to additional environments from Designer.
To add a Kafka event version to a modeled event mesh within an environment, perform these steps:
- On the navigation bar, select Designer .
- On the Application Domains page, click the application domain that contains the event.
- Click Components to switch to component view.
- Select the Events tab.
- Select the event.
- In the Versions list, select the version that you want to add to an environment.
- In the Event Details pane, click More Actions next to the version that you want to add to an environment, then select Add to Environment.
- Select the Environment that contains the modeled event mesh that you want to add the event version to.
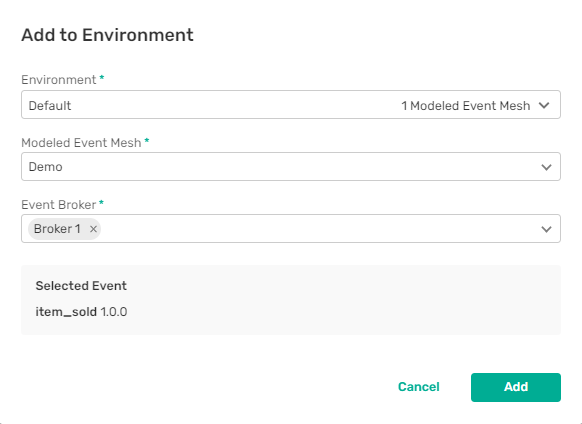
- Select a modeled event mesh from the Modeled Event Mesh list. You can only select Kafka modeled event meshes.
- Select the Event Broker. Kafka modeled event meshes can have only one event broker.
- Click Add.
After you add the event version, you can view it in the modeled event mesh in Runtime Event Manager.