Designer
Designer enables you to design and view all of the objects in your event-driven architecture (EDA). You can use Designer to create events, associate payload schemas, specify the events that applications publish and subscribe to, and create event APIs and Event API Products to share events.
If you're just getting started designing an EDA, you can
This section includes the following tasks:
- Opening Designer
- Using the Graph View
- Creating and Updating Objects in the Graph View
- Associating Shared Events in the Graph View
- Object Versions and Lifecycle States
- Using Custom Attributes
- Setting the Kafka Delimiter
Opening Designer
If you have at least the Event Portal User role, you can view the list of application domains on the Designer homepage, and open all of the application domains that you have at least Viewer level access to. For more information, see Application Domains.
To open Designer, perform these steps:
- Log in to the Solace Cloud Console if you have not done so yet. The URL to access the Cloud Console differs based on your
- On the navigation bar, select Designer
 .
.
When you open Designer, you see a list of Application Domains. You work within application domains to create and manage these objects:
Using the Graph View
The graph view displays the latest non-retired version of all applications and events in the application domain and shows the subscribe and publish relationships between them. The graph view helps you add applications and events to the application domain quickly, and then later fine tune them if necessary in the component view
You can drag objects around the graph. If you drag an object to a new location, the view changes for all users who have access to the application domain. To select multiple objects to move at the same time, press CTRL while clicking objects or press SHIFT while dragging over objects.
The graph view provides the following tools:
| Tool | Description |
|---|---|
|
|
Opens the Find on Graph panel where you can search for objects shown in graph view that contain text matching a search term. You can click the row for the object to highlight it in the graph and center the object or click the name of the object to display the object version details. |
|
|
Refreshes the graph with any updates to objects and layout changes made by other users, without recalculating the layout. |
|
|
Opens the Settings menu, which has these options:
|
|
|
Opens the Legend to display information to help you use the graph. |
|
|
Centers the graph on the page and, if necessary, zooms out to display all objects or zooms in to full size. If you want a specific object to display in the center of the page, right-click on the object and select Center on Graph. |
|
|
Zooms in and out. |
The graph view uses icons to represent objects in your modeled event mesh.You can set the default color for the icons in each application domain and change individual event and application icons. For more information, see Customizing Object Appearance. The graph view uses these icons:
| Icon | Description |
|---|---|
|
|
Application domain If any applications or events in the current application domain have a relationship with an event or application in a different application domain, the other application domain displays in the graph with a link to the event. Click the icon to display more information about the application domain and the applications that reference the event. The application domain icon displays using the default color that has been set for it. |
|
|
Application domain (no access) Designer displays a lock to Event Portal Users who do not have access to open an application domain that contains related objects. For more information about access levels, see Managing User Access to Event Portal. The application domain icon displays using the default color that has been set for it. |
|
|
Application in released or deprecated state in the current application domain Applications from other application domains do not display in the graph. |
|
|
Application in draft state in the current application domain |
|
|
Application that has a publish or subscribe relationship not shown on the graph because the relationship is with an event version other than the latest non-retired version To display the indicator, enable Show New Event Version Indicator in the graph Settings menu. |
|
|
Event in released or deprecated state in the current application domain |
|
|
Event in draft state in the current application domain |
|
|
Shared event in released or deprecated state from another application domain.The event icon displays using the color of its own application domain. |
|
|
Shared event in draft state from another application domain. The event icon displays using the color of its own application domain. |
|
|
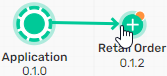
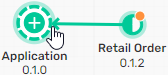
Event path Event paths connect applications and associated events. The arrow indicates the direction of the association. If the arrow points away from an application, the application publishes the event. If the arrow points toward an application, the application subscribes to or consumes the event. Links to other application domains can be in both directions. |
|
|
Linked application path A linked application path shows a link defined between two applications. You can create a link between a source and destination application if you want to show a relationship other than publish and subscribe between two applications. If you add a REST Delivery Point (RDP) to the graph, the relationship between the source RDP (webhook) and the destination application that represents the REST endpoint displays as a linked application path. |
Creating and Updating Objects in the Graph View
If you have at least Editor level access to the application domain, you can create and update applications and events in the graph view. You can perform the following actions in the graph view:
| Action | Instructions |
|---|---|
|
Create a new application |
Click Add Objects and select a type of application to add to the application domain. For more information see Creating a Standard Solace Application, Creating an RDP, or Creating a Kafka Application. |
|
Create a new event |
Click Add Objects and select a new Solace or Kafka event to add to the application domain. For more information see Creating an Event in the Graph View. |
|
Link a shared event to an application |
Click Add Objects and select an existing Solace or Kafka event to display in the graph view. For more information see Associating Shared Events in the Graph View. |
|
View details for an object version |
Click the object. Version details display in a side panel. Click |
|
Change the lifecycle state of the displayed version |
Right-click the object and select Manage Lifecycle. For more information about version states, see Object Versions and Lifecycle States. You must have Manager level access to the application domain to change version states. |
|
Delete the latest version of the object |
Right-click the object and select Delete Version. If the object has at least one other non-retired version, the latest non-retired version displays in the graph. You can't delete objects shared from other application domains. |
|
Add a publish event flow to an application |
Hover over the application and drag the arrow that appears to an event of the same type (Solace or Kafka). The application must be in draft state. |
|
Add a subscribe event flow to an application |
Hover over the event and drag the arrow that appears to an application of the same type (Solace or Kafka). The application must be in draft state. |
|
Remove relationships between objects |
Right-click the line connecting an application with another object. If you are stopping an application from publishing or subscribing to an event, the application must be in draft state. You can remove links between two applications at any lifecycle state. |
For more detailed information, see the following topics:
- Creating a Standard Solace Application
- Creating an RDP
- Creating a Kafka Application
- Creating an Event in the Graph View.
Customizing Object Appearance
You can set the color of the objects that appear in the graph view. You select the default color for new objects in the application domain.
For events and applications, you can select different colors for individual objects. For applications, you can also choose an icon or logo to appear in the center of the object. The available application icons represent a variety of application types. You can also select a third-party logo.
Any appearance changes you make also show in the Runtime Event Manager graph panel; however, you can only customize the appearance in Designer.You can customize the appearance of an object at any lifecycle state.
To customize the appearance of an application or event in the graph view, perform these steps:
- In Designer, click the name of the application domain to open it and display the graph view.
- Right-click an application or event and select Edit Appearance. This option is not available for events shared from other application domains.
- Select the color for the icon.
- (Optional) To change the circle at the center of an application to an image, select Icons or Logos and then select the image you want to use. If you select an icon, it displays using the same color as the outer circle of the application.
- Click Apply.
For a demonstration of customizing icons, watch this video:

Associating Shared Events in the Graph View
Applications can publish and subscribe to events from other application domains provided that the event is allowed to be shared. When you add a shared event to the graph view and associate it with an application, you associate the latest non-retired version. To associate a different version of the event to an application, you must add the association using the component view.
When you add a shared event to the graph, it is not added to the current application domain. If you don't specify an application that publishes or subscribes to the event before leaving the graph, the shared event does not reappear the next time you open the graph for that application domain. The shared event displays using the color set in its own application domain.
To add a shared event to the graph view and associate it with an application, perform these steps:
- On the Application Domains page, click the application domain that contains the application that you want to associate with shared events.
- In the graph view, click Add Objects.
- Select the Solace or Kafka tab to select the event broker type for the event.
- Click Existing Shared Event and then click on the graph where you want to position the shared event.
- Select the event that you want to add. You can filter the list by application domain and type text in the search field to display only the events that contain matching content.
- Click Add.
-
To specify that an application publishes the shared event, hover over the application and drag the arrow that appears to the event.
-
To specify that an application version subscribes to the shared event, hover over the event and drag the arrow that appears to an application.
Object Versions and Lifecycle States
You can define multiple versions of applications, events, schemas, enumerations, event APIs, and Event API Products. Object versioning allows you to update objects and test updated objects in a development environment while the previous version remains in production. Each object version can be assigned a lifecycle state to help you track the lifecycle stage for each version. Each object version can have one of these states:
-
Draft—The object version is still in development and subject to change.
-
Released—The object version will no longer be modified, can be added to new designs without concern over changes, and is ready to be added to a modeled event mesh or promoted to another modeled event mesh in an environment that is at a more advanced stage of production.
-
Deprecated—The object version is still supported but it will be phased out and it should not be used in new designs. A newer version of the object is, or will soon be, released and objects that reference this version should be updated to reference the new version. When you deprecate an object version, you can set the planned End of Life date.
-
Retired—The object version is no longer supported and no other active object versions can reference it. When you retire an object version, you can set the End of Life date.
When you create or update an object, you define the version using semantic versioning in the format major.minor.patch. For more information about semantic versioning and best practices for using it, refer to the Semantic Versioning Specification. You also have the option to specify a version name to help identify the version or align with your organization's version naming conventions.
All new object versions are created in Draft state. Only versions in Draft state can be edited. If you need to update a Released object, it is best-practice to create a new version of the object. When you create a new version, you can duplicate an existing version and increment the version number or create a completely new version from scratch.
When you add a reference to one object from another, for example, you specify a schema or enumeration that an event depends on or specify an event that an application publishes, you select the object version that you want to reference. Designer enforces lifecycle state restrictions when you add a reference or change the state of an object to avoid disallowed combinations and ensure that referenced and referencing object versions are in appropriate states. Designer enforces these state relationships for events:
| Event version state | Referenced schema and enumeration version states | Referencing application and event API version states |
|---|---|---|
|
Draft |
Referenced schema and enumeration versions must be in Draft, Released, or Deprecated state. |
Referencing application and event API versions must also be in Draft state. Referenced event versions must be changed out of Draft state before any application or event API version that references it can change to Released state. |
|
Released |
Referenced schema and enumeration versions must be in Released or Deprecated state. An event version can't change from Draft to Released state if a referenced schema or enumeration version is in Draft state. |
Referencing application and event API versions can be in any state. |
|
Deprecated |
Referenced schema and enumeration versions must be in Released or Deprecated state. An event version state can't change to Deprecated state if a referenced schema or enumeration version is in Draft state. |
Referencing application and event API versions can be in any state. |
|
Retired |
Referenced schema and enumeration versions must be in Released, Deprecated, or Retired state. A schema or enumeration version can't be changed to Retired state unless all event versions that reference it are in Retired state. |
Referencing application and event API versions must also be in Retired state. A referenced event version can't be changed to Retired state unless all application and event API versions that reference it are in Retired state. |
For more information about setting the version and lifecycle state for an object, see the help for each object.
Using Custom Attributes
You can add custom attributes to application domains and objects to include any additional data in Event Portal that's useful for your EDA implementation.
Event Portal Users with Manager access to an application domain can create custom attributes that apply to the application domain, and to the objects within it. Event Portal Managers and Administrators can also create custom attributes that apply to all application domains in Event Portal and the objects within them.
When you add a custom attribute to an application domain, a field for the attribute is added to every new and existing application domain. When you add a custom attribute to an object type, a field for the attribute is added to every new and existing instance of the object in either the current application domain or in all application domains.
If you move an object that has one or more set custom attributes to another application domain where the custom attributes don’t already exist, they are automatically added to the new application domain.
Users can set a value in the custom attribute field when they create or edit an application domain or object, just as they would enter a value for any other setting.
Custom attributes can have one of three types:
- Text
- Text custom attributes can be up to 250 characters, including alphanumeric characters, period [
.], hyphen [-], en dash [–], underscore [_], at [@], slash [/], and parentheses [( )]. You can use simple custom attributes as filters in Catalog. - Long Text
- Long text custom attributes allow values up to 10,000 characters, including special characters, but can't be used as filters or search terms in Catalog.
- Multi-Value
- Multi-value custom attributes allow users to enter more than one value. Each value can be up to 100 characters, including alphanumeric characters, period [
.], hyphen [-], en dash [–], underscore [_], at [@], slash [/], and parentheses [( )]. Users can add up to 50 different values in the field. You can use each value as a filter in Catalog.
Creating Custom Attributes for Application Domains
Event Portal Managers can create custom attributes that apply to all application domains or to only the current application domain.
Event Portal Users with Manager access to an application domain can only create custom attributes that apply to the current application domain.
More than one application domain can have a current-scoped custom attribute with the same name as long as they both also have the same attribute type.
To create a custom attribute for an application domain, perform these steps:
- On the Application Domains page, click More Actions
 for the application domain and select Edit.
- Click More Actions in the top-right corner, and then select Manage Custom Attributes.
- Click Add.
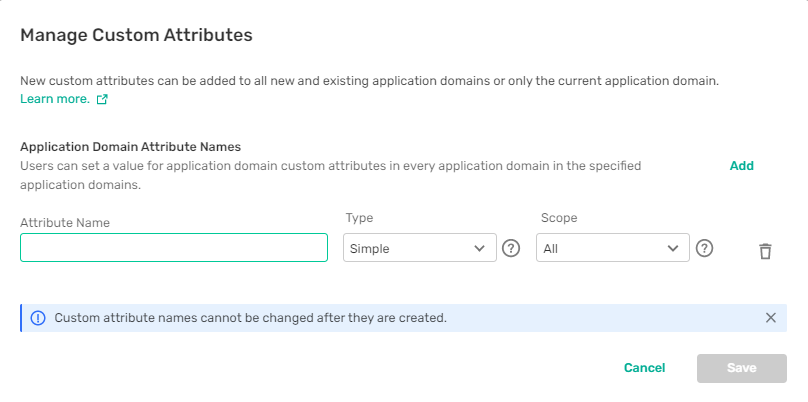
- Enter a name for the custom attribute.
- Select whether the custom attribute Type is Text, Long Text, or Multi-Value.
- Select whether the custom attribute applies to All application domains or only the Current application domain.
- Repeat steps 3 to 6 for each custom attribute that you want to add.
- Click Save.
After you save the custom attributes, you can save any other changes to the application domain or you can close the application domain and discard any changes. A field for the custom attribute displays the next time a user edits the application domain. If the custom attribute is scoped to all application domains, a field for the custom attribute displays whenever a user creates or edits any application domain.
Creating Custom Attributes for Objects
Event Portal Managers and Administrators can create custom attributes that apply to objects or object versions in all application domains or only to the current application domain.
Event Portal Users with Manager access to an application domain can only create custom attributes that apply to objects or object versions in the current application domain.
A custom attribute scoped to all application domains can't have the same name as a custom attribute scoped to one or more specific application domains. Custom attributes with the same name for more than one object type are treated as the same custom attribute. For example, if you have a custom attribute for applications and add a custom attribute with the same name for events, the custom attributes for both object types must have the same scope and attribute type.
To create a custom attribute for an object, perform these steps:
- In any application domain, open an existing object of the type that you want to set custom attributes for.
- Click More Actions in the top-right corner, and then select Manage Custom Attributes.
- Perform one of the following actions:
- If you want the custom attribute value to be the same for all versions of an object, click Add next to <Object-type> Attribute Names.
- If you want users to be able to set a different value for different versions of the object, click Add next to <Object-type> Version Attribute Names.
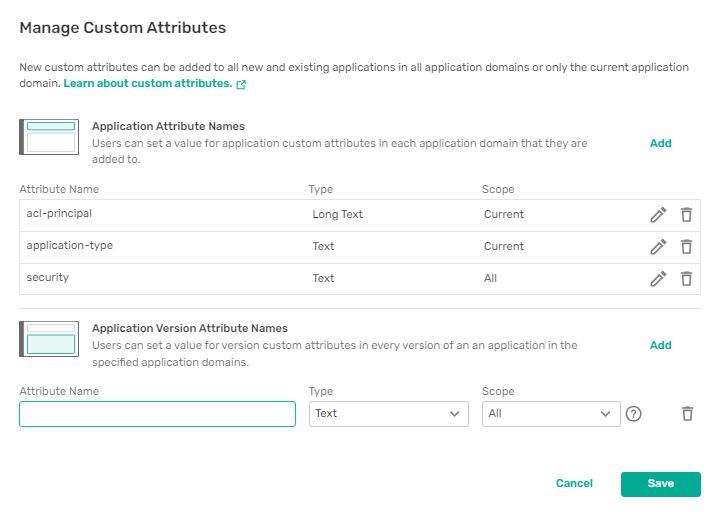
- Enter a name for the custom attribute.
- Select whether the custom attribute Type is Text, Long Text, or Multi-Value.
- Select whether the custom attribute applies to objects of the same type in All application domains or only the Current application domain.
- Repeat steps 3 to 6 for each custom attribute you want to add.
- Click Save.
After you save the custom attributes you can save any changes to the object or you can close the object and discard any changes. A field for the custom attribute displays when a user creates or edits an object of the same type in the application domain. If the custom attribute is scoped to all application domains, a field for the custom attribute displays whenever a user creates or edits an object of the same type in all application domains.
Managing Custom Attributes
You can rename and delete custom attributes. When you rename a custom attribute for an object, the custom attribute is renamed for all object types.
When you delete custom attributes:
-
Deleting an application domain custom attribute scoped to all application domains removes the attribute and value from all application domain.
-
Deleting an application domain custom attribute scoped to the current application domain removes the attribute and value from the current application domain. If the same custom attribute was added to a different application domain, it is not removed from the other application domain.
-
Deleting a custom attribute for an object scoped to all application domains removes the attribute and value from all objects of the same type in all application domains.
-
Deleting a custom attribute that is scoped to the current application domain deletes it only from objects of the same type in that application domain. If the same custom attribute was added to a different object type, it is not deleted from that object type.
To manage custom attributes, perform these steps:
- Perform one of the following tasks:
- To manage custom attributes for an application domain, on the Application Domains page, click More Actions for the application domain and select Edit.
- To manage custom attributes for an object, in any application domain, open an existing object of the type that you want to set custom attributes for.
- To manage custom attributes for an application domain, on the Application Domains page, click More Actions
- Click More Actions in the top-right corner, then select Manage Custom Attributes.
- (Optional) To rename a custom attribute, click Edit
 for the custom attribute that you want to rename and enter a new name for the custom attribute.
 - (Optional) To delete a custom attribute, click Delete
 for the custom attribute that you want to delete.
 - Click Save.
Custom Attributes Video
For a demonstration of using custom attributes, watch this video:

Setting the Kafka Delimiter
Kafka event brokers don't recognize level delimiters in topics. If you want to include Kafka events in your EDA, you can specify a delimiter that Event Portal recognizes in Kafka topics. All Kafka topic domains and topic addresses in your organization's account must use the same delimiter.
If the Kafka delimiter is not set, when a user tries to add a Kafka topic domain or topic address, they are notified that a Kafka delimiter must first be set for your organization's account before they can set the topic domain or address. If the user has a role with sufficient access, the notification includes a link to set the delimiter. You must be an Administrator or Event Portal Manager to set the delimiter. The Kafka delimiter can't be changed if it is currently in use for a Kafka topic domain or Kafka topic address.
To set the Kafka delimiter for your organization, perform these steps:
- On the Application Domains page, click More Actions.
- Select Kafka Settings.
- In the Kafka Delimiter List, select Dot ., Underscore _, or Dash -.
- Click Save.