Event API Products
An Event API Product is a collection of Event APIs that are packaged together and made available to application developers, allowing you to expose important event assets to other development teams, external partners, and customers. You create Event API Products by bundling one or more event APIs, with service plan details that specify message delivery options.
You can add an Event API Product to a Solace event broker and then expose it to third-party API management systems and developer portals, similar to the way REST APIs are exposed. External developers can then browse and register to use your Event API Products, similar to how they would use REST-based API products.
This page includes the following information:
- Providing Event API Products to Developers
- Creating an Event API Product
- Updating and Adding Event API Product Versions
- Changing the State of an Event API Product Version
- Adding an Event API Product to an Environment
- Making an Event API Product Publicly Available
- Event API Products
- Deleting an Event API Product
You can also create custom attributes for Event API Products. For more information, see Using Custom Attributes
Providing Event API Products to Developers
To provide Event API Products you must complete several tasks, both inside and outside of the Solace Cloud Console.
- Make sure that you have an event broker for your Event API Product.
- If necessary, create a new event broker service. Solace recommends having the event broker service and the modeled event mesh in Event Portal in the same environment and enabling runtime configuration for the environment. For more information, see Setting Event Portal Runtime Configuration Options.
- If the event broker is not yet connected to Event Portal, add an event broker that represents the operational event broker to a modeled event mesh using Runtime Event Manager. For more information, see Adding an Event Broker to a Modeled Event Mesh.
- Ensure the connection is enabled. For more information, see Connecting Event Portal to Runtime Event Brokers.
- Create event APIs to package the events that you want to make available. For more information, see Event APIs.
- Create an Event API Product that groups one or more event APIs with one or more service plans. For more information, see Creating an Event API Product.
- When your Event API Product version is complete, add it to the event broker. For more information, see Adding an Event API Product to an Environment.
- Set the version state to Released. For more information, see Changing the State of an Event API Product Version.
- Make the Event API Product publicly available so it can be published to third-party API management systems and developer portals. You cannot undo this. After you make the version publicly available, it can't be returned to Draft state. For more information, see Making an Event API Product Publicly Available.
- Configure the operational event broker for API management. This step involves obtaining connection details for the operational event broker and using a provided Declarative SEMP terraform project to set up a pool of client profiles on the event broker. For more information, see Getting Started with API Management Dev Portal.
- Get an API token from the Cloud Console to allow the APIM/DevPortal API to authenticate with Solace Cloud. For more information, see Getting Started with API Management Dev Portal.
- After you've completed the Event Portal, event broker, and API configuration, you can use the APIM/DevPortal API to finish implementing integration with a third-party API management system or developer portals. For more information, see API Walkthrough of the APIM/DevPortal.
Creating an Event API Product
When you create an Event API Product, you can specify several options:
- name
- broker type
- whether the Event API Product can be shared for use in other application domains
- custom attributes for the object and for object versions
- version display name, number, and state for each version
- approval type for requests to use the Event API Product. You can allow external developer requests to be approved automatically, or, if you have an approval process in your API management system or developer portal, you can require requests to receive approval.
- service plans that specify the message delivery options available when external developers use your Event API Product to publish or consume events
- included Event APIs
- filters on topic address variables to restrict the events that can be captured by the Event API Product. For example, if an event in an included event API has a topic address with a variable that specifies a location, you can limit the locations captured by the Event API Product.
To create an Event API Product, perform these steps:
- Log in to the Solace Cloud Console if you have not done so yet. The URL to access the Cloud Console differs based on your
- On the navigation bar, select Designer
 .
. - On the Application Domains page, select the application domain that you want to add the Event API Product to.
- Click Components
 to switch to the component view.
 -
Select the Event API Products tab, then click Create Event API Product.
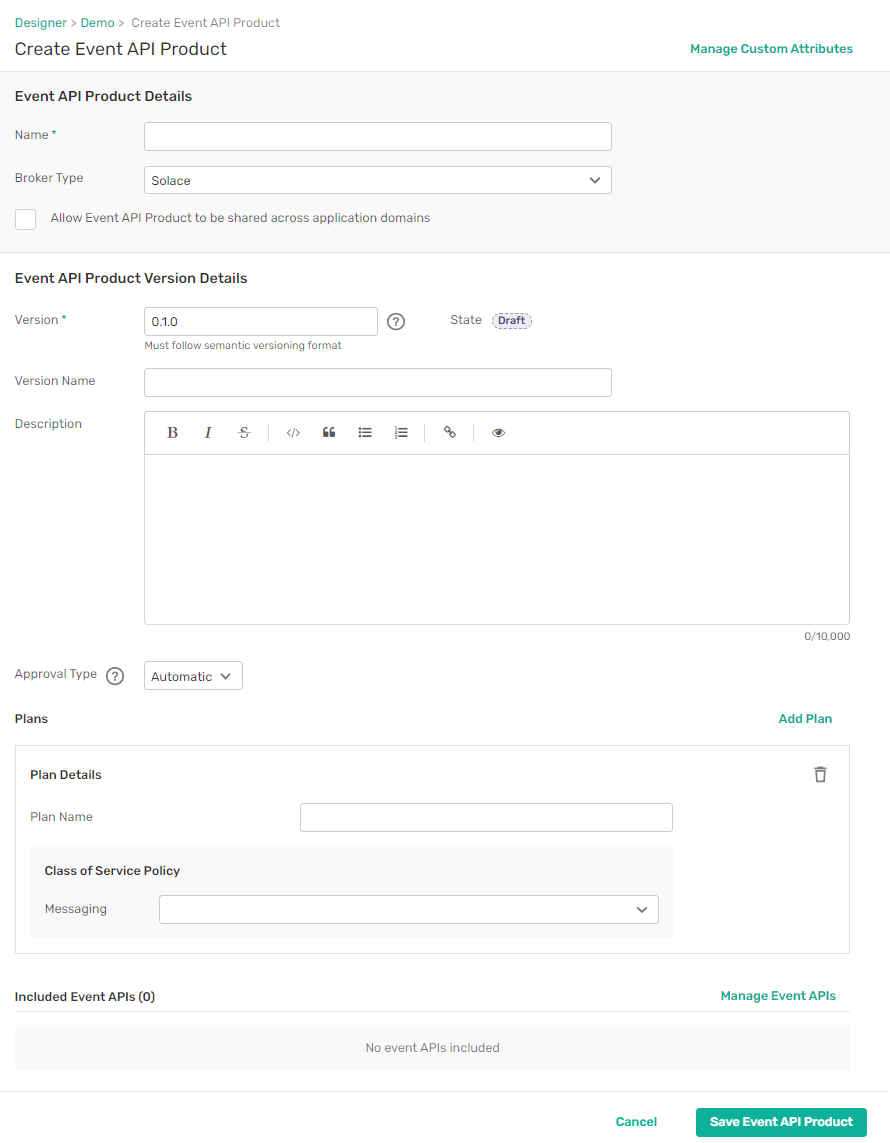
- Enter a Name for the Event API Product.
- If you want the Event API Product to be available in other application domains, select Allow Event API Product to be shared across application domains.
- (Optional) Add values for any object custom attributes that have been set up in your organization.
- In the Version field, specify a semantic version value for the Event API Product in the format major.minor.patch. The default is 0.1.0.
- (Optional) Enter a Version Name for the initial version of the Event API Product.
- (Optional) Enter a Description for the Event API Product. The Description field supports Markdown. Click toggle preview
 to preview the rendered text.
 - In the Approval Type list, select Automatic if you don't require approval, or External if you have an approval process in your API management system or developer portal and requests to use the Event API Product need to be approved.
-
Specify one or more service plans for customers to consume the events in the Event API Product. Click Add Plan to set the details for an additional plan. You can set the following options for each plan:
Option Description Plan Name
A descriptive name for the plan. For example, if you have three plans, you may want to use Bronze, Silver, and Gold
Messaging
Select whether the plan offers Direct or Guaranteed messaging. For more information about the messaging types, see Direct Messages and Guaranteed Messages. The remaining options are available only if you select Guaranteed.
Access Type
For Guaranteed messaging, select whether the messages are stored in an Exclusive or Non-Exclusive queue. For more information, see Creating a Queue.
Queue Type
For Guaranteed messaging, specify whether consumers have a Combined Queue for all Event APIs or a Single Queue for each Event API. If the Event API Product contains more than one event API, this option specifies whether each event API publishes events to a dedicated queue, or if all event APIs publish events to the same queue.
Maximum TTL
Specify the maximum number of seconds that an event remains in the queue.
Spool Size
Specify the size of the queue in MB.
- Select one or more event APIs to include in the Event API Product:
- Click Manage Event APIs.
- In the Application Domain list, select the application domain for the event API that you want to include. By default, the list shows event APIs from the current application domain. If you select a different application domain, the list shows shared event APIs in the selected application domain. If you remove the filter, the list shows shared event APIs in all application domains that you have access to.
- Expand an event API to see the list of versions.
- Select a version of the event API.
- When you are finished selecting events, click Close
 .
.
- (Optional) If any events in the included event APIs have topic addresses that include variables, add filters to limit the events that can be captured.
- Click Expand
 for the event API to display the list of events.
 Click Filter

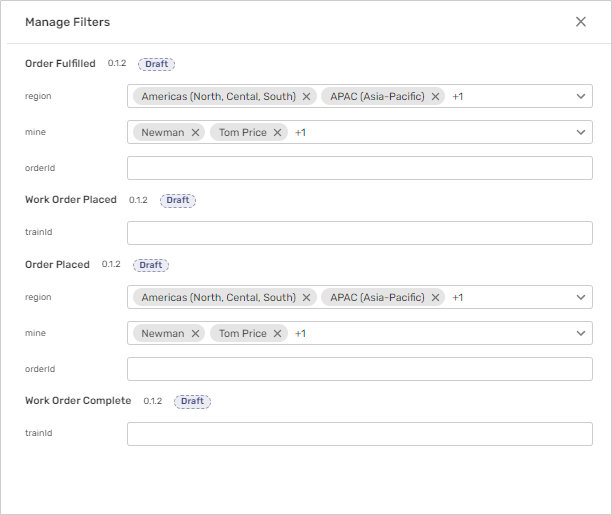
- To filter enumeration variables, in the field for the variable, click Remove
 for the items you don't want the Event API Product to include.
 - To filter unbounded variables, in the field for the variable, type the values that you want the Event API Product to capture.
- Use commas to separate values.
- Use
*to capture all values. - Append
*to the end of a text string to specify a wildcard match.
- When you are finished setting filters, click Close.
- Click Expand
- (Optional) Add values for any version custom attributes that have been set up in your organization.
- Click Save Event API Product.
Updating and Adding Event API Product Versions
When you update an Event API Product, you can update an existing version or create a new version. Versions allow you to work on updates and test new versions while the stable version remains in production. Each version also has a lifecycle state. You can only edit versions that are in Draft state. For more information, see Object Versions and Lifecycle States.
The version number uses semantic versioning in the format major.minor.patch. When you update an Event API Product, you have three options:
- If the Event API Product version is in Draft state, you can update an existing version and retain the version number.
- If the Event API Product version is in Released, Deprecated, or Retired state, you can duplicate a version and increment the version number to create a new Draft version.
- If the Event API Product version is in Released, Deprecated, or Retired state, you can create a new version from scratch.
If you want to update a version that is not in Draft state it is best practice to create a new version rather than returning the version to Draft state.
When you include an event API in an Event API Product, you select the version of the event API that you want to include. If a new version of an event API is created, you can choose when to update the Event API Product to include the new version.
To update an Event API Product, perform these steps:
- On the navigation bar, select Designer .
- On the Application Domains page, click the application domain that contains the Event API Product you want to update.
- Click Components to switch to the component view.
- Select the Event API Products tab.
- Click the name of the Event API Product.
- Perform one of the following actions:
- In the Versions list, click More Actions
 for the version that you want to update and select Edit. Any changes you make update that version of the Event API Product. You can edit an Event API Product version only if it is in Draft state.
 - In the Versions list, click More Actionsfor the version that you want to update and select Duplicate. All properties of the existing version are copied into a new version. By default, the new version number is incremented by 0.0.1. You can change the version number to any number not already in use.
- Above the Versions list, click Add
 to create a new version of the Event API Product without duplicating an existing version. By default, the new version number is the next unused major version. You can change the version number to any number not already in use.
 - Update the Event API Product version as necessary.
- Click Save Version or Save & Close.
Changing the State of an Event API Product Version
When you create a new version of an Event API Product, the version is in Draft state. When the version is ready, you can change the version state to Released. When you release a new version of an Event API Product, you may also want to change older versions of the Event API Product to Deprecated or Retired. You must have at least the Event Portal User role with Manager level access to the application domain to change the version state. For more information about version states, see Object Versions and Lifecycle States
You can change an Event API Product version from Draft to Released state only if the Event API Product includes at least one service plan, references at least one event API version, and no referenced event API versions are in draft state.
If a Released version of an Event API Product is publicly available, it can be deprecated or retired but it can't be returned to Draft state.
To change the state of an Event API Product version, perform these steps:
- On the navigation bar, select Designer .
- On the Application Domains page, click the application domain that contains the Event API Product you want to update.
- Click Components to switch to the component view.
- Select the Event API Products tab.
- Click the name of the Event API Product.
- Select the version that you want to change the state of, then click Manage Lifecycle.
- Select the new state.
- (Optional) If you set the State to Deprecated or Retired, set the End of Life date. If you set a planned or actual End of Life date, the date displays in the version details.
- Click Save.
Adding an Event API Product to an Environment
You add Event API Product versions to one or more modeled event meshes within an environment to model the deployment of an Event API Product. Before you can make the Event API Product publicly available, you must add it to at least one modeled event mesh. You can add Event API Products to a modeled event mesh, only if the modeled event mesh includes at least one event broker and the event broker has at least one message protocol specified. For more information, see Building a Modeled Event Mesh
To add an Event API Product version to an event broker, perform these steps:
- On the navigation bar, select Designer .
- On the Application Domains page, click the application domain that contains the Event API Product you want to add to an environment.
- Click Components to switch to the component view.
- Select the Event API Products tab.
- Click the name of the Event API Product.
- In the Versions list, select the version that you want to add to a modeled event mesh.
- In the Event API Product Details pane, click More Actions, then select Add to Environment.
- Select the Environment that contains the modeled event mesh that you want to add the Event API Product version to.
- Select a Modeled Event Mesh. The list identifies modeled event meshes that the Event API Product version is already in.
- Select the Event Broker to add the Event API Product to.
- Select the Protocols that the event broker uses for connections and exchanging event messages.
- Click Add.
If runtime configuration is enabled for the environment, Event Portal pushes the Event API Product to the event broker according to your settings. For more information, see Setting Event Portal Runtime Configuration Options.
Event API Products do not appear on the Architecture tab for the modeled event mesh in Runtime Event Manager. You can see the list of Event API Products that have been added to an event broker in a modeled event mesh on the Event Broker Connections tab. For more information, see Viewing Objects Added to an Event Broker.
Making an Event API Product Publicly Available
If you are publishing Event API Products to a third-party API management system or developer portal, you can make an Event API Product version publicly available to publish it.
Before you make the Event API Product version publicly available, you must:
- add the Event API Product to at least one event brokerr in a modeled event mesh
- change the state of the version to Released
Making an Event API Product version Publicly Available can't be undone. The version can be Deprecated or Retired but it can’t be returned to Draft state.
To make an Event API Product version publicly available, perform these steps:
- On the navigation bar, select Designer .
- On the Application Domains page, click the application domain that contains the Event API Product.
- Click Components to switch to the component view.
- Select the Event API Products tab.
- Click the name of the Event API Product.
- In the Versions list, select the version that you want to make publicly available.
- In the version details, click Make Publicly Available. The option is enabled only if the version state is Released and the version has been added to a modeled event mesh.
Deleting an Event API Product
You can delete an Event API Product version from Designer. When you delete an Event API Product version, it is removed from Designer and from any environments that it has been added to. Any event APIs in the Event API Product remain in Designer.
If you have made the Event API Product publicly available, you must change the version state to Retired before you can delete the version. You can delete an Event API Product with all of its versions only if all publicly available versions are Retired.
To delete an Event API Product, perform these steps:
- On the navigation bar, select Designer .
- On the Application Domains page, click the application domain that contains the Event API Product.
- Click Components to switch to the component view.
- Select the Event API Products tab.
- Click the name of the Event API Product that you want to delete a version from.
- In the Versions list, click More Actionsfor the version that you want to delete and select Delete.
- Click Delete Version.