Configuring Event Brokers in Event Portal
You can configure client application details, queues, and REST Delivery Points (RDPs) for Solace event brokers within applications in Designer and use the configuration to add, update, and delete client credentials, queues, ACL profiles, and RDPs on Solace event brokers.
This page includes the following information:
- Setting Up Event Broker Configuration
- How Application Settings are Applied to Event Brokers
- Queue Configuration
- REST Consumer and Queue Binding Configuration
Setting Up Event Broker Configuration
To manage runtime event broker configuration from Event Portal, you must complete several setup steps.
-
Make sure that your operational event brokers support configuration management from Event Portal.
The event brokers must be Solace Cloud event broker services, Solace Appliance Event Brokers, or Solace Software Event Brokers running version 10.5 or later. For more information about creating an event broker service in Solace Cloud, see Creating Event Broker Services.
-
Configure a connection between your operational event brokers in the runtime and Event Portal using one of the following options:
-
If you have event broker services in a Public Cluster in the same Solace Cloud account, the connection is set up automatically when you add the event broker to a modeled event mesh. For more information, see Connecting Event Portal to Runtime Event Brokers.
-
If you have event broker services in a Customer-Controlled Cluster or Dedicated Cluster in the same Solace Cloud account, you can enable a connection between the event broker services in the region and Event Portal. For more information see Connecting Event Broker Services to Event Portal Through Solace Cloud.
-
For all other supported event brokers, set up an Event Management Agent in Connected mode. For more information see Connecting External Event Brokers to Event Portal.
-
-
Create modeled event meshes in Runtime Event Manager and add model event brokers that represent the operational event brokers you want to configure using Event Portal. If you want to configure event broker services in the same Solace Cloud account, we recommend putting the modeled event mesh and event broker services in the same environment.
-
Set the appropriate runtime configuration option for the environments containing the modeled event meshes. For more information, see Setting Event Portal Runtime Configuration Options.
Event Portal can send runtime configuration updates to operational event brokers automatically, or you can use Event Portal REST APIs to send runtime configuration updates on demand or using your organization's CI/CD pipeline to push configuration updates. For more information, see Pushing Runtime Configuration with Event Portal REST APIs.
-
(Optional) Create Solace queue templates to define the queue configuration values you require on your event brokers. You can require using templates in an environment and specify which templates are allowed in each environment.
-
(Optional) If client profiles are configured on the operational event broker, create client profile name templates so developers can select the correct client profile for the application in Designer. For more information about client profiles in Solace Cloud, see Creating a Client Profile. You can require using templates in an environment and specify which templates are allowed in each environment.
For more information about connecting Event Portal to your event brokers, see Connecting Event Portal to Runtime Event Brokers.
For a demonstration of setting up runtime configuration, watch this video:

How Application Settings are Applied to Event Brokers
The following diagram shows how the subscriptions, consumers, and client details you add to a standard application in Designer relate to your runtime environment when you set up Solace Cloud to configure event broker services from Event Portal.
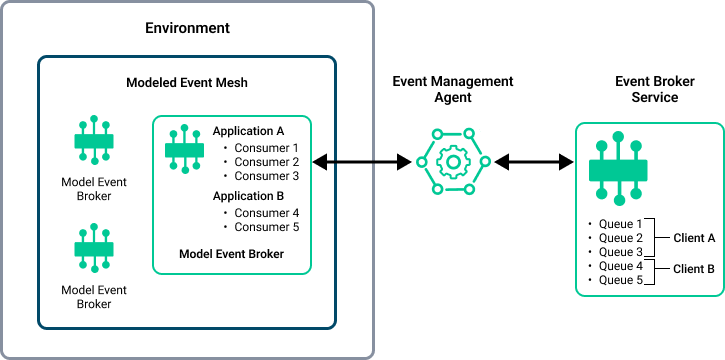
-
In an application in Event Portal, you specify events that the application publishes and consumers that subscribe to events published by other applications.
-
You can specify the name of the client profile that applies to the runtime application on the event broker. The client profile defines various settings that apply to the runtime client application when it connects to the event broker. For more information about client profiles, see Using Client Profiles and Client Usernames.
-
If the application subscribes to events, create a consumer in the application and specify one or more topic subscriptions to allow the client application to receive messages for the topic. Specifying a topic subscription creates a subscribe topic exception in an ACL profile to allow the client application to receive messages for the topic. For more information about ACL profiles, see Managing Client Access with ACL Profiles.
-
If the application publishes events, the event topic creates a publish topic exception in an ACL profile to allow the client application to publish messages to the topic.
-
-
When you promote the application to an environment in Event Portal, you specify the client username and the authentication credentials that the runtime application uses to connect to the event broker. Optionally, you can download an AsyncAPI document from the application in Designer that includes the event broker connection and authentication details required by the runtime client application to help the developer configure the application.
-
When the runtime configuration is deployed to the operational event broker, the following updates can occur on the event broker:
-
The event broker is configured to apply the specified client profile for the client application when it connects to the event broker using the specified username and credentials. If no client profile name is set, the application uses the default client profile on the event broker.
Runtime configuration does not create or update client profiles; it only assigns an existing profile on an event broker to a client application.
-
A queue is created or updated on the event broker for each queue consumer with the properties and topic subscriptions specified by the queue configuration in Designer. If a queue with the same queue name already exists, the updates are applied to the existing queue.
-
ACL profiles with subscribe topic exceptions or publish topic subscriptions are created to allow the application to publish to the topic or receive messages for the topic.
-
-
An application developer creates or updates a runtime client application to use the authentication credentials specified in Event Portal. When the client application authenticates with the operational event broker:
-
It is assigned the client profile specified in Designer.
-
It can bind to queues that were configured in Designer and consume any event messages attracted by the topic subscriptions for the queue.
-
It can subscribe to topics with a Direct messaging event flow if a Solace Direct Client consumer was configured for the application.
-
It can publish to topics that were configured in Designer.
-
Queue Configuration
If you intend to push application and queue configurations from Event Portal to your operational event brokers, you should be aware of the following considerations:
-
Each event queue consumer you create in an application configures a queue on the event broker.
-
You must provide the client username and authentication credentials for the event broker when you add the application to an environment.
-
You can specify the queue configuration in JSON format in the consumer. Users with the Event Portal Manager role can create Solace queue templates in Runtime Event Manager to help users quickly configure the appropriate queue settings.
Queue Configuration Properties
The JSON queue configuration for the consumer can include the following properties. Some of these properties are not supported by earlier event broker versions. For more information, see SEMP API queue parameters.
| Property | Description |
|---|---|
|
Access Type (included in default configuration) |
Specifies how messages are delivered when multiple consumer flows are bound to the queue. The default value is
|
|
Consumer Acknowledgment Propagation |
Enables or disables the propagation of consumer acknowledgments (ACKs) received on the active replication Message VPN to the standby replication Message VPN. The default value is |
|
DMQ Name |
Specifies the name of the dead message queue (DMQ) used by this queue. The default is We recommend using a separate DMQ for each queue and topic endpoint that needs one and setting the DMQ name to the name of the queue, followed by "_dmq". For example if a queue named A DMQ collects undelivered messages that would otherwise be discarded from the queue because the Maximum TTL or Maximum Redelivery Count has been reached. |
|
Enable Client Delivery Count |
Enables or disables the ability for client applications to query the message delivery count of messages received from the queue. This is a Controlled Availability feature. Contact support to find out if this feature is supported for your use case. The default value is |
|
Delivery Delay |
Specifies the delay, in seconds, to apply to messages arriving on the queue before the messages are eligible for delivery. The default value is |
|
Maximum Consumer Count Alert Thresholds |
Specifies event bind count thresholds for the queue:
|
|
Messages Queued Quota Alert Thresholds |
Specifies message spool usage thresholds for the queue:
|
|
Reject Low Priority Messages Alert Thresholds |
Specifies message spool usage thresholds for the queue:
|
|
Maximum Consumer Count |
Specifies the maximum number of consumer flows that can bind to the queue. The default value is |
|
Maximum Delivered Unacknowledged Messages per Flow |
Specifies the maximum number of messages delivered but not acknowledged per flow for the queue. The default value is |
|
Maximum Message Size |
Specifies the maximum message size allowed in the queue, in bytes. The default value is |
|
(included in default configuration) |
Specifies the maximum message spool usage allowed by the queue, in megabytes. A value of |
|
Maximum Redelivery Count |
Specifies the maximum number of times the queue attempts redelivery of a message prior to it being discarded or moved to the DMQ. A value of |
|
Maximum TTL |
Specifies the maximum time, in seconds, a message can stay in the queue when |
|
|
Specifies the name of the Message VPN hosting the queue. This property is not necessary for event broker services. Software event brokers and appliance event brokers can have multiple Message VPNs. |
|
|
Specifies the client username that owns the queue. Use this parameter to give ownership to the client application. The queue owner has full unlimited permissions to consume, delete, or modify topics in the queue. |
|
Count |
Specifies the count of partitions of the queue. This setting is only relevant for queues with an access type of non-exclusive. When set to |
|
Rebalance Delay |
Specifies the delay, in seconds, before a partition rebalance is started once needed. The default value is |
|
Rebalance Max Handoff Time |
Specifies the maximum time, in seconds to wait before handing off a partition while rebalancing. The default value is |
|
Non-Owner Permission |
Specifies the access level given to client applications other than the queue owner. The default value for queues created in Event Portal is |
|
Queue Name (included in default configuration) |
Specifies the name of the queue. This property is required. |
|
Delayed Redelivery |
Enables or disables message redelivery. When enabled, the number of redelivery attempts is controlled by |
|
Initial Delay |
Specifies the delay to be used between the first two redelivery attempts, in milliseconds. The default value is |
|
Maximum Delay |
Specifies the maximum delay to be used between any two redelivery attempts, in milliseconds. The default value is |
|
Multiplier |
Specifies the amount each delay interval is multiplied by after each failed delivery attempt. This number is in a fixed-point decimal format in which you must divide by 100 to get the floating point value. For example, a value of |
|
Redelivery |
Enables or disables message redelivery. When enabled, the number of redelivery attempts is controlled by |
|
Reject Low Priority Messages |
Enables or disables the checking of low priority messages against the |
|
Reject Low Priority Messages Limit |
Specifies the number of messages of any priority in the queue above which low priority messages are not admitted but higher priority messages are allowed. The default value is |
|
Reject Messages to Sender on Discard |
Specifies when to return negative acknowledgments (NACKs) to sending clients on message discards. Note that NACKs cause the message to not be delivered to any destination and Transacted Session commits to fail. The default value is
|
|
Respect DMQ Eligible |
Specifies whether the queue respects or ignores the publisher specified DMQ-eligible flags on messages.
The Message VPN must have the Allow DMQ Eligible Endpoint Override setting enabled for this setting to take effect. See Configuring Message VPN Settings for more information. This setting is available only for event broker versions 10.25.10 and later. The default value is |
|
Respect Message Priority |
Enables or disables the respecting of message priority. When enabled, messages contained in the queue are delivered in priority order. The default value is |
|
Respect TTL |
Enables or disables the respecting of the time-to-live (TTL) for messages in the queue. When enabled, expired messages are discarded or moved to the DMQ. The default value is |
Queue Configuration Example
The following JSON queue configuration example creates a queue on the event broker named samplequeue with default values for all properties.
{
    "queueName" : "samplequeue",
    "accessType" : "exclusive",
    "consumerAckPropagationEnabled" : true,
    "deadMsgQueue" : "#DEAD_MSG_QUEUE",
    "deliveryCountEnabled" : false,
    "deliveryDelay" : 0,
    "eventBindCountThreshold": {
        "clearPercent": 60,
        "setPercent": 80
    },
    "eventMsgSpoolUsageThreshold": {
        "clearPercent": 18,
        "setPercent": 25
    },
    "eventRejectLowPriorityMsgLimitThreshold": {
        "clearPercent": 60,
        "setPercent": 80
    },
    "maxBindCount": 1000,
    "maxDeliveredUnackedMsgsPerFlow": 10000,
    "maxMsgSize": 10000000,
    "maxMsgSpoolUsage": 5000,
    "maxRedeliveryCount": 0,
    "maxTtl": 0,
    "partitionCount": 0,
    "partitionRebalanceDelay": 5,
    "partitionRebalanceMaxHandoffTime": 3,
    "redeliveryDelayEnabled": false,
    "redeliveryDelayInitialInterval": 1000,
    "redeliveryDelayMaxInterval": 64000,
    "redeliveryDelayMultiplier": 200,
    "redeliveryEnabled": true,
    "rejectLowPriorityMsgEnabled": false,
    "rejectLowPriorityMsgLimit": 0,
    "rejectMsgToSenderOnDiscardBehavior": "when-queue-enabled",
    "respectDmqEligibleEnabled": false,
    "respectMsgPriorityEnabled": false,
    "respectTtlEnabled": false
}
Adding a Dead Message Queue to an Application
You can configure a dead message queue (DMQ) to receive messages that are discarded from a queue when they can't be delivered to the subscribing client. By default, messages are discarded from a queue in the following circumstances:
-
the maximum TTL value for the message has been reached and the queue is configured to respect message TTL expiry times.
-
the number of redelivery attempts to the consumer for a message has reached the max redelivery count value for the original endpoint.
You can configure an event queue in Designer to act as a DMQ for another event queue by setting the appropriate attribute values for both queues.
To configure a DMQ for another event queue, perform these steps:
- Configure an event queue according to the instructions for Updating Standard Solace Applications in the Component View.
-
In the configuration for your queue, set the following values:
Attribute Description deadMsgQueueSpecify the
queueNamefor the DMQ to send expired messages to. You can have one DMQ shared by multiple queues; however, we recommend using a separate DMQ for each queue that requires one and setting the DMQ name to the name of the queue, followed by "_dmq", for exampleMyQueue_dmq.maxRedeliveryCountSet this value if you want to specify the maximum number of times the queue attempts to deliver the message before the message expires. If you want to specify the maximum redelivery count, you must also set
redeliveryEnabledtotrue.respectDmqEligibleEnabledSpecify whether the queue respects or ignores the publisher specified DMQ-eligible flags on messages.
-
When
false, all messages are moved to the DMQ rather than discarded, regardless of the DMQ-eligible flag specified by the publisher. -
When
true, only messages flagged as DMQ-eligible by the publisher are moved to the DMQ rather than discarded.
This setting is valid only for event broker versions 10.25.10 and later and requires the Allow DMQ Eligible Endpoint Override setting to be enabled for the Message VPN. See Configuring Message VPN Settings for more information.
maxTtlSet this value if you want to specify the TTL in seconds that the queue applies to messages when the message arrives in the queue. If you specify the maximum TTL, you must also set
respectTtlEnabledtotrue.respectTtlEnabledSet this value to
trueif you want messages that have not been delivered to expire at the end of the message TTL. If a message is not consumed and its TTL time is reached, the message is discarded or moved to a DMQ. -
-
If it does not already exist, create a second Solace event queue to act as the DMQ for the first queue and set the
queueNameto match thedeadMsgQueuevalue you set for the first queue.The DMQ does not need to subscribe to events. It receives only the expired messages from the first queue.
For instructions to configure DMQs directly on the event broker, see Configuring Dead Message Queues.
REST Consumer and Queue Binding Configuration
When you configure an RDP (webhook) in Event Portal, in addition to configuring the queue that attracts the messages sent to the REST endpoint, you must also configure a REST consumer object on the event broker to specify the connection settings for the remote REST endpoint.
You need to configure queue bindings for RDPs to send messages to the REST endpoint. You can also configure the message request headers to add message topics and other metadata into the message header or configure the event broker to send specific headers that are required for cloud services such as Azure Storage and AWS Eventbridge.
For more information about configuring RDPs, see Creating and Managing RDPs (Webhooks).
RDP Destination Types
RDPs can have one of these destination types:
- Generic
- AWS S3
- AWS API Gateway
- Azure Data Lake Storage Gen2
- Azure Event Hubs
- Azure Functions
- Azure Service Bus
- Google Cloud Functions
- Google Cloud Run
- Google Cloud Storage
REST Endpoint Connection Settings
The available connection settings depend on the destination type.
| Setting | Description |
|---|---|
|
Authentication Scheme |
Specifies the authentication scheme that the event broker uses to connect to the remote REST endpoint. You can select any option for the Generic Destination Type. All other destination types support only one option.
|
|
Remote Host |
Specifies the IP address or DNS name of the remote REST endpoint. A host value must be configured. |
|
Remote Port |
Specifies the port associated with the host for the remote REST endpoint. This option is editable only for the Generic Destination type. |
|
TLS Enabled |
Enables TLS for connections to the remote REST endpoint. This option can be disabled only for the Generic Destination type. |
|
HTTP Method |
Specifies the HTTP method to use when delivering messages to the remote REST endpoint. The default is Post. You can instead select Put to connect the event broker to remote endpoints that don't support the POST method, such as certain cloud native data lake products. This option is editable only for the Generic Destination type. Select Show Advanced Properties to display this setting. |
|
Local Interface |
This setting is valid only for Solace Appliance Event Brokers. If your environment requires a fixed IP interface, this setting specifies the IP interface to use for connections to the remote REST endpoint. For more information, see Creating an RDP Client. Select Show Advanced Properties to display this setting. |
|
Max Post Wait Time |
Specifies the maximum amount of time, in seconds, that the event broker waits for a response from the remote REST endpoint. If an operation is outstanding for more than the configured maximum wait time, the TCP connection is reset and message delivery is re-attempted through another available outgoing connection for the RDP, up to the maximum delivery count on the queue. If the maximum delivery count is exceeded and the message is eligible, then the message is moved to the DMQ, otherwise it is discarded. The valid range is from 1 to 300 seconds. The default value is 30 seconds. Select Show Advanced Properties to display this setting. |
|
Outgoing Connection Count |
Specifies the maximum number of concurrent outgoing connections to the remote REST endpoint that the event broker can initiate. The valid range is from 1 to 50 connections. The default is 3. Select Show Advanced Properties to display this setting. |
|
Proxy Name |
Specifies the forward proxy to use if one is required for the connection to the remote REST endpoint. Select a proxy from the list of proxies that have been configured on the Message VPN. For more information, see Configuring a Forward Proxy. Select Show Advanced Properties to display this setting. |
|
Retry Delay |
Specifies the amount of time, in seconds, to wait before retrying a connection attempt. The valid range is from 1 to 300 seconds. The default value is 3 seconds. Select Show Advanced Properties to display this setting. |
Queue Binding Request Targets
When you configure queue bindings for RDPs, you enter the POST request target resource for message delivery on the REST endpoint. The expected path format for each destination type includes:
| Destination Type | Format |
|---|---|
|
Generic |
|
|
AWS S3 |
|
|
AWS API Gateway |
|
|
Azure Data Lake Storage Gen2 |
|
|
Azure Event Hubs |
|
|
Azure Functions |
|
|
Azure Service Bus |
|
|
Google Cloud Functions |
|
|
Google Cloud Run |
|
|
Google Cloud Storage |
|