Creating and Managing Standard Solace Applications
Standard Solace applications in Event Portal represent any client application that connects to a Solace event broker to publish or subscribe to events.
For general information about working with applications, see Applications.
You can create applications in any application domain where you have Editor or Manager level access. When you create a standard Solace application, you can specify several attributes:
- name
- version display name, and number for the first version
- any application or version custom attributes
- event flows and consumer subscriptions
You can also specify runtime configuration for event brokers, including:
- the client profile
- queue configuration properties
- connection details for the client application
After configuring the application, you may want to:
- promote the application to one or more environments
- download an AsyncAPI document for the application
This page includes the following sections:
- Creating a Standard Solace Application
- Updating Standard Solace Applications in the Component View
- Adding Runtime Configuration to a Standard Application
- Promoting a Standard Application to an Environment
- Downloading an AsyncAPI Document for an Application
- Publishing and Subscribing Application Demonstration Videos
Creating a Standard Solace Application
You can create and update applications using the graph view or the component view. Solace recommends starting in the graph view and using the component view for updates and more advanced configuration. The graph view lets you work with the latest non-retired version of all events and applications in an application domain. For more information about working in the graph view, see Using the Graph View.
To create
- Log in to the Solace Cloud Console if you have not done so yet. The URL to access the Cloud Console differs based on your
- On the navigation bar, select Designer
 .
. - On the Application Domains page, click the application domain that you want to add the application to.
- In the graph view, click Add Objects and select the Solace tab.
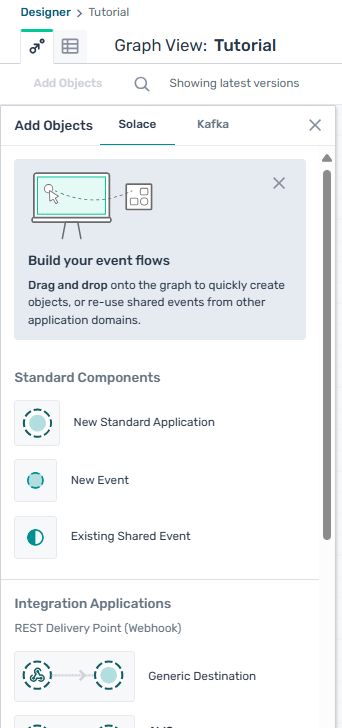
- Click New Standard Application and then click the graph where you want to position the application.
- (Optional) If you want to change the appearance of the icon, click
 below the application name and select a color and an icon or logo, then click Apply. For more information see Customizing Object Appearance.
 - Enter a name for the application.
-
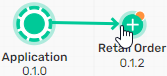
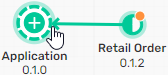
(Optional) If you want the application to publish an event version that shows in the graph, hover over the application and drag the arrow that appears to the event.
-
If you want to associate the application with a shared event from another application domain that does not appear in the graph, see Associating Shared Events in the Graph View.
If you want to associate the application with an older version of an event, for example, if you want to link to the latest released version and there is a newer draft version, use the component view.
-
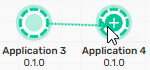
(Optional) If you want to show a link between two applications without specifying an event flow, hover over the application you want to designate as a source and drag the arrow that appears to the application that you want to specify as a destination.
- Click the application to display its information in the Details panel.
- To update the application name, version, description, or custom attributes:
- In the Details panel, click
 .
. - On the Version Details tab, update the application details as necessary.
- On the Custom Attributes tab, select This Version or Application to display version or application custom attribute and update them as necessary. The Custom Attributes tab appears only if custom attributes are available for the application.
- Click Save.
- In the Details panel, click
- (Optional) If you have the Show Guidance option enabled in the graph view, and have set the event flow, click Configure to add runtime configuration to the application. For more information, see Adding Runtime Configuration to a Standard Application
- (Optional) To open the application in component view to add consumers and runtime configuration details:
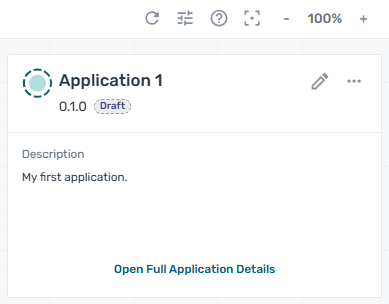
- In the Details panel, click Open Full Application Details.
- Update the application version as necessary. For more information, see Updating Standard Solace Applications in the Component View.
- Click Save & Close.
Updating Standard Solace Applications in the Component View
The component view allows you to create and edit applications and allows you to manage event flows involving older versions of events.
To update an application version in the component view, perform these steps:
- On the navigation bar, select Designer .
- On the Application Domains page, click the application domain that contains the application you want to update.
- Click Components
 to switch to the component view.
 - Select the Applications tab and then click the name of the application you want to update.
- Perform one of the following actions:
- In the Versions list, select an application version in draft state to edit.
- In the Versions list, select an application version that you want to base a new version on and click Duplicate Version
 . All properties of the selected version are copied into a new version. By default, the new version number is incremented by 0.0.1. You can change the version number to any number not already in use.
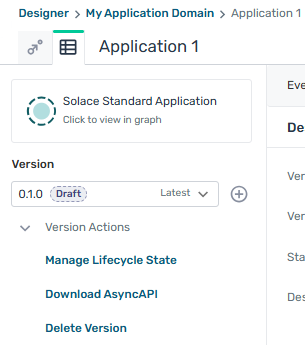
- (Optional) To update the application or version details
- Click Edit Details.
- Update the Name and Appearance on Graph as necessary.
- Select the Version Details tab and update the Version number, Version Name and Description as necessary.
- Select the Custom Attributes tab. The tab is visible only if custom attributes are available for the application.
- Select This Version or Application to display version or application custom attributes and update the custom attributes as necessary.
- Click Save.
- To select events that the application
- In the Events section, select the Events tab.
- Click Add Events.
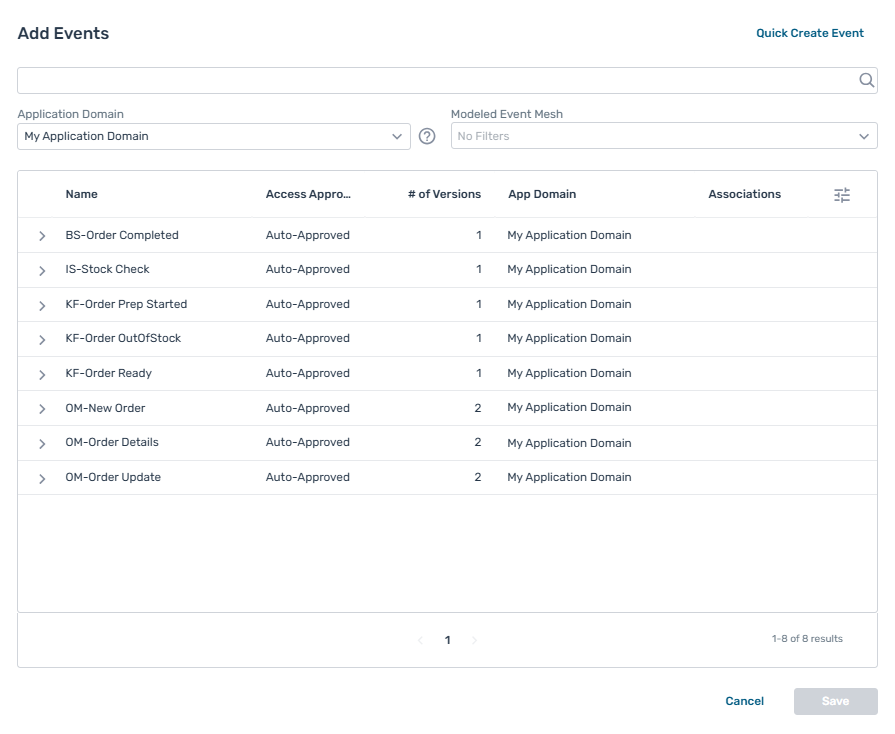
- In the Application Domain list, select the application domain that contains the event to
- (Optional) In the Modeled Event Mesh list, select a modeled event mesh and environment to list only event versions published in the selected modeled event mesh.
- Expand an event to see the list of event versions.
- Click Sub for the event version that you want the application to subscribe to.
- To publish the event, click Pub for the event version that you want the application to publish.
- When you are finished selecting events, click Save.
- If a consumer for the subscription already exists, in the list of Subscribed Events, click Setup Subscription for an event to select the consumer to add the subscription to.
- To remove an event from those that the application intends to subscribe to, click
 for the event.
 - To create a consumer, perform these steps:
- In the Events section, select the Advanced Subscription Setup tab.
- Click Create Consumer.
- Enter a name.
- Select a consumer type:
- Event Queue—Represents a queue endpoint on an event broker that attracts Guaranteed messages with topic subscriptions. If you have runtime configuration enabled, when you configure a queue consumer in a standard application, the queue is created or updated on the event broker.
- Direct Client—Represents a direct connection to an event broker that attracts Direct messages with topic subscriptions.
- Click Save.
- In the Events section, select the Advanced Subscription Setup tab.
-
To add subscriptions to a consumer, perform these steps:
- On the Advanced Subscription Setup tab, click Add Subscription for a consumer. Event Portal suggests subscriptions for any declared subscribed events that are not already attracted by a consumer.
- Modify any of the topic subscriptions as necessary. If the topic address uses variables you can subscribe to one or more of the options. You can use
*and>as wildcard characters to subscribe to a group of related topics. For more information, see Topic Subscriptions. - Click Duplicate for a subscription to create a copy of it, for example if you want several subscriptions that are the same except for a variable.
- To see which events the subscription attracts, click Preview Attracted Events and select whether you want to see a preview for the designed event flow or a specific modeled event mesh.
If you have runtime configuration enabled, topic subscriptions for consumers create subscribe topic exceptions in the ACL for the application.
- On the Advanced Subscription Setup tab, click Add Subscription
-
If you want to customize the allowed publish topics and your organization has this Controlled Availability feature, you can do so on the Advanced Topic Setup tab.
This tab is named Advanced Subscription Setup when the ACL profile customization feature is not enabled. For more information, see Customizing Allowed Publish Topics.
- If your application references a shared event from another application domain that requires approval, send a request to use the event. All event access requests must be approved before the application can be promoted to an environment. For more information, see Requesting Event Access.
- Add runtime configuration details for the application. For more information, see Adding Runtime Configuration to a Standard Application.
Adding Runtime Configuration to a Standard Application
Before you add runtime configurations to your application, Solace recommends that you first complete the steps to create a standard application, including defining your event flows and creating consumers. You must also ensure that the model event broker you want to promote the application to has already been added to the appropriate modeled event mesh. For more information, see Adding an Event Broker to a Modeled Event Mesh.
If you have the Show Guidance option enabled in the graph view, the Guidance panel displays the next steps required to complete the runtime configuration and promote the application to an event broker. You can also complete the configuration by opening the full application details.
To add runtime configuration to an application, perform these steps:
- On the Application Domains page, click the application domain that contains the application.
- In the graph view, click the application.
- Perform one of the following steps:
- If you want to configure the version displayed in the graph view and the Guidance panel shows the Configure button, click Configure. The Use Defaults option is available only if you have not configured event flows.
- In the Details panel, click Open Full Application Details, and perform these steps.
- In the Version list, select the application version you want to configure.
- Select Configurations.
- Click Create Configurations.
- In the Configure Application dialog, in the Set Context step, click the environment containing the event broker you want to configure the application for, and then select the Event Broker from the list that appears.
- (Optional) If you have already added the application to another event broker and want to use the same settings, select the event broker you want to use the settings for from the Reuse Existing Configuration list.
- Click Next: Define Event Handling. If the application subscribes to events, the dialog displays the consumers that are part of the application and the events they attract. If you need to leave the dialog, for example to create another consumer, you can click Save & Close and return later.
- (Optional) If you want to set a client profile name for the application, click Show Advanced Options and type or select a Client Profile Name. The default behavior is to use the default client profile on the event broker. The environment may require you to select a template.
- (Optional) If the application subscribes to events and you want to customize the configuration of a Solace queue, with Show Advanced Options selected, customize the displayed Queue Configuration or click Switch to Template to select a queue configuration template. The environment may require you to select a template and set values required by the template. For more information about queue configuration, see Queue Configuration.
- Click Next: Define Access Control. If you need to leave the dialog, for example to get the access requirements for the event broker, you can click Save & Close and return later.
- Enter the client credentials for the application. These credentials allow the client application in the runtime to connect to the event broker. To enter the credential information:
- Select the Access Type. You can select Basic, Authorization Group, Client Certificate, or Reference Existing Client Username.
- If you selected Basic, specify a Client Username and Password.
- The Client Username can be a maximum of 189 characters and can't include the following characters:
? *. - The Password can be a maximum of 128 characters and can't include the following characters:
: ( ) " ; ' < > , ` \ & |
- The Client Username can be a maximum of 189 characters and can't include the following characters:
- If you selected Authorization Group, specify the Authorization Group Name and Client Username.
The Authorization Group Name is the name for the LDAP or OAuth authorization group configured on the event broker.
- If you selected Client Certificate authentication, specify the Client Username.
The Client Username must match the certificate Common Name for the application's certificate. You must upload certificates to the event broker directly. For more information, see Configuring User Authentication to Event Broker Services.
- If you selected Reference Existing Client Username, specify the Existing Client Username.
The Existing Client Username must match a client username that has been configured on the event broker. This application uses the authentication method and credentials already configured for that client username.
- If you want to customize the ACL profile that Event Portal creates for the application, click Show Advanced Options
In the Access Control List (ACL) Profile section, set the Client Connection Default Action and any Client IP Address Exceptions. The default is Allow. For more information, see Customizing the Client Connection Default Action and Exceptions .
- If you want to block specific applications from connecting to the event broker, set the Client Connection Default Action to Allow and add the IPv4 or IPv6 addresses in CIDR format for the applications you want to block to the Client IP Address Exceptions field.
- If you want to allow only specific applications to connect to the event broker, set the Client Connection Default Action to Disallow and add the allowed IPv4 or IPv6 addresses in CIDR format to the Client IP Address Exceptions field.
- If your organization has the ACL Profile Customization Controlled Availability feature, and you want to update the ACL Profile name, click Customize Profile Name. For more information, see Customizing an ACL Profile Name.
- Click Next: Review.
- Perform one of the following steps:
- If you're ready to promote the application to an environment, click Start Promotion.
- If you're not ready to promote the application, click Save & Promote Later. You can start promotion later from the Guidance panel or the component view.
When you're ready, complete the promotion according to the steps for Promoting a Standard Application to an Environment.
- If you want to add the same application version to another event broker, in the Guidance panel, click Configure for Another Event Broker to repeat this task and select a different event broker, or create additional configurations by repeating these steps from the Application Details page.
Promoting a Standard Application to an Environment
Environments in Solace Cloud represent the operational environments within your organization. In Event Portal you create modeled event meshes within environments and add model event brokers to the modeled event meshes to represent event flows through one or more operational event brokers.
Administrators and Event Portal Managers can promote application versions to any environment. Event Portal Users require at least Application Domain Editor access to the application domain to promote applications to an environment. In addition Event Portal Users require EP Runtime Editor or EP Runtime Approver access to an environment to promote applications to a modeled event mesh without approval. Application Domain Editors with EP Runtime Viewer access to an environment can request approval to promote an application but cannot promote applications without approval. For more information, see Reviewing Promotions to Event Brokers.
If you update an application version that has already been promoted to an event broker, you promote the update using the same steps. If you have a newer version of an application, you can simply promote the new version and the previous version is automatically removed.
For considerations related to promoting applications to event brokers, see Promoting Applications to Environments.
To promote an application, perform these steps:
- On the Application Domains page, click the application domain that contains the application.
- In the graph view, click the application.
- Perform one of the following steps:
- If you want to promote the version displaying in the graph view and the Guidance panel shows the Promote button, click Promote.
- In the Details Panel, click Open Full Application Details, and perform these steps.
- In the Version list, select the application version you want to promote.
- Select Promotions.
- Click Promote Version.
- Click the environment containing the event broker you want to promote the application to, and then select the Event Broker from the list that appears.
-
Event Portal displays any errors it detects and any suggested improvements. If any errors exist, such as queue name or client username conflicts, correct them before promoting the application.
If any Suggested Changes appear, you can make the changes before promoting the application, or you can promote the application and fix any issues later. The suggested changes can include fixing the following mismatches:
Mismatch Description Resolutions Subscription Attracts a Different Event Version
A consumer subscription in the application attracts a different version of an event than the declared event version that the application intends to subscribe to.
Verify which version of the event the consumer needs to subscribe to and perform one of the following actions:
- Update the consumer subscription.
- Update the version of the declared event that the application version references.
- Add an application that publishes the event version to the modeled event mesh.
Event Not Published in Modeled Event Mesh
The application has a declared event version that it intends to subscribe to but no application in the modeled event mesh publishes that event.
Add an application that publishes the event version to the same modeled event mesh.
Event Has No Matching Subscription
The application has a declared event version that it intends to subscribe to, but does not have a consumer with a matching subscription to attract the event version.
Perform any of the following actions:
- Subscribe to the event version with an existing consumer.
- Add a new consumer to the application that subscribes to the event version.
- Remove the event version from the list of events the application intends to subscribe to.
Subscription Attracts Additional Events
The application has a consumer subscription that attracts an event that is not one of the declared event versions that the application intends to subscribe to.
Perform one of the following actions:
- Update the application version to declare the intent to subscribe to the additional event version
- Update the consumer subscription if it is attracting an unintended event.
When an application has one or more consumers that attract events without a declared intent, a list of the additional consumed events displays below the consumers on the application page.
Event Has No Topic Address
A declared event version that the application intends to subscribe to does not have a topic address.
Add a topic address to the declared event version.
-
After you have addressed any issues, click Preview Promotion and review the details.
- Perform one of the following steps:
- If you have at least EP Runtime Editor access to the environment and you don't need another user to review the change before it is promoted, click Promote.
- If you have EP Runtime Viewer access to the environment or you want another user to review the change before it is promoted, click Send Request to request approval, then enter comments about your request and click Send Request.
Another user must approve the request before you can promote the update to the event broker.
- If you sent a promotion request, you will receive a notification when the request has been approved or declined. When a request is approved, anyone with at least EP Runtime Editor access to the environment and Application Domain Editor access to the application domain can complete the promotion from the request in Runtime Event Manager or from the application in Designer.
Removing an Application From an Environment
You can remove an application version from a modeled event broker. Alternatively, if you want to replace it with an updated version, you can just promote the new version and the previously associated version is automatically removed.
If you remove an application version from an event broker without adding a new version in an environment with runtime configuration enabled, the runtime configuration for the application is removed from the operational event broker the next time that configuration updates are pushed to it.
You can also remove an application version from a modeled event mesh in Runtime Event Manager. For more information, see Removing Applications from a Modeled Event Mesh.
To remove an application from a modeled event broker, perform these steps:
- On the Application Domains page, click the application domain that contains the application.
- In the graph view, click the application.
- In the Details Panel, click Open Full Application Details, and perform these steps.
- Select Promotions.
- In the list of event brokers that the application has been promoted to, click More Actions
 for the event broker you want to remove the application from.
 - Click Remove Application.
- Click Preview Promotion and review the details.
- Perform one of the following steps:
- If you have at least EP Runtime Editor access to the environment and you don't need another user to review the change before it is promoted, click Remove.
- If you have EP Runtime Viewer access to the environment or you want another user to review the change before it is promoted, click Send Request to request approval, then enter comments about your request and click Send Request.
Another user must approve the request and promote the update to the event broker.
Downloading an AsyncAPI Document for an Application
An AsyncAPI document is a JSON or YAML file generated according to the AsyncAPI Specification. For more information, see the AsyncAPI Initiative. You can give the AsyncAPI document to application developers to help them create the actual applications that are part of your event-driven architecture (EDA).
You can download an AsyncAPI document for an application with or without server details and operation bindings for an event broker that the application is associated with.
To download an AsyncAPI document for an application, perform these steps:
- On the Application Domains page, click the name of the application domain that contains the application.
- In the graph view, click the application that you want to download the AsyncAPI document for.
- In the Details panel, click Open Full Application Details.
- In the Version list, select the version that you want to download the AsyncAPI document for.
-
Click Download Async API.
Alternatively, select Promotions and click More Actions
for an associated event broker and then select Download Async API. -
If you opened the Download Async API dialog from the left panel and want to include server details and operation bindings for an event broker that you have added the application to, select the event broker from the Event Broker Context list.
If you opened the Download Async API dialog from the Promotions panel, you have already selected the event broker.
-
(Optional) To specify the details to include in the AsyncAPI document, click Advanced Options and select one or more of the following options:
Option Description Declared subscribed events
Events that the application has a declared intent to subscribe to in the application event flow.
This option is selected by default if you do not select an event broker.
This option is not selected by default if you select an event broker.
Operation bindings on declared subscribed events
Protocol-specific information for the declared subscribed events. For more information about bindings, see the AsyncAPI Documentation.
This option is selected by default if you do not select an event broker.
This option is available only if Declared subscribed events is selected.
Attracted events
Events attracted to the application by a consumer topic subscription.
This option is selected by default if you select an event broker.
This option is not available if you do not select an event broker.
Operation bindings on attracted events
Protocol-specific information for attracted events.
This option is selected by default if you select an event broker.
This option is available only if Attracted events is selected.
Servers
Connection information for the event broker.
This option is selected by default if you select an event broker.
This option is not available if you don't select an event broker.
Server bindings
Protocol-specific information related to the event broker connection.
This option is selected by default if you select an event broker.
This option is available only if Servers is selected.
- Select JSON or YAML file format.
- If you want to exclude any Event Portal extensions from the AsyncAPI document, in the Document Extensions list, select the extensions that you want to exclude:
- Event Portal version ID extensions for all objects
- Event Portal parent ID extensions for all objects
- all Event Portal extensions
- (Optional) Select at least one naming strategy to apply to prevent naming conflicts. All objects are renamed with the chosen naming strategy to ensure objects with the same name can be differentiated in the file:
- Prepend application domain names—use this option when the file contains events or schemas with the same name.
- Append major version number—use this option when the file contains more than one object version of the same name.
Applying a naming strategy does not update the names of referenced schemas within the schema content. If a schema is renamed, you need to update the references to that schema name in any other schemas that reference it. You can update the reference in Designer and regenerate the AsyncAPI document or update the references in the AsyncAPI document each time you generate it.
-
Click Download.
If any naming conflicts exist that are not resolved by a selected naming strategy, a dialog describes the conflict to help you resolve it.
Publishing and Subscribing Application Demonstration Videos
These video demonstrations show you how to create applications that publish and subscribe to events.
Publishing Application Demonstration
For a demonstration of creating a publishing application, watch this video:

Subscribing Application Demonstration
For a demonstration of creating a subscribing application, watch this video:
