Step 3: Set Up the Solace Try-Me CLI Tool
You've completed Step 2: Solace EDA Basics.
In step 3, you'll set up the Solace Try-Me CLI tool so you can use it to complete the exercises in subsequent steps.
The Solace Try-Me CLI tool lets you do more than the TryMe! you just used in Broker Manager. It includes a wide range of capabilities for both newcomers and experienced users. It uses default settings for various parameters, such as event topics, message content, and subscriptions, mirroring the defaults documented in the Solace JavaScript API. This setup allows you to start experimenting without significant initial configuration.
After setting up the Solace Try-Me CLI tool, we'll introduce you to the use case that we'll use the tool with.
Downloading the Solace Try-Me CLI Tool
To use the Solace Try-Me CLI tool, you need to download it and connect it to your event broker. For more information about the Solace Try-Me CLI tool and detailed instructions, see the Solace Try-Me CLI README file.
You have three options to download and install the Solace Try-Me CLI tool:
macOS Using Homebrew
To install Solace Try-Me CLI on macOS, use Homebrew with the following commands:
brew tap SolaceLabs/stm
brew install stm
Linux or WSL on Windows Using apt-get
You can use the following steps to install Solace Try-Me CLI on a Linux or Windows Subsystem for Linux (WSL) on Windows:
-
Run the following command to add the Solace Labs repository to apt:
echo "deb [arch=amd64 trusted=yes] https://raw.githubusercontent.com/SolaceLabs/apt-stm/master stm main" | sudo tee /etc/apt/sources.list.d/solace-stm-test.list
-
Install the latest version of Solace Try-Me CLI using the following commands:
sudo apt-get update
sudo apt-get install stm
Manual Download Option (Windows, macOS, or Linux)
You can also manually download the latest version of the tool by performing the following steps:
- Download the latest version of the Solace Try-Me CLI tool for your operating system from Solace Try-Me CLI releases.
- Extract the ZIP file.
- Follow the instructions in the Solace Try-Me CLI README file to install it on your operating system.
Running the Solace Try-Me CLI Tool
You can run the Solace Try-Me CLI using the following steps:
- Open a Command Prompt or terminal.
- Start by running the version command to verify that you've installed the latest version:
stm -v
The version number returned should match the version you downloaded.
-
Run the help command to see a list of available commands:
stm -help
The results returned show the command structure:
stm
├── -v, --version                   /* output the version number        */
├── -h, --help                      /* display help for command         */
├── -he, --help-examples            /* display examples                 */
├── send                            /* execute a send command           */
├── receive                         /* execute a receive command        */
├── request                         /* execute a request command        */
├── reply                           /* execute a reply command          */
├── config                          /* manage command configurations    */
│   ├── -h, --help                  /* display help for command         */
│   ├── -he, --help-examples        /* display examples                 */
│   ├── init                        /* initialize command configuration */
│   ├── list                        /* list command configurations      */
│   └── delete                      /* delete command configuration     */
└── manage                          /* manage connection and resources  */
     ├── -h, --help                 /* display help for command         */
     ├── -he, --help-examples       /* display examples                 */
     ├── connection                 /* manage VPN connection            */
     ├── semp-connection            /* manage VPN SEMP connection       */
     ├── queue                      /* manage queue                     */
     ├── client-profile             /* manage client-profile            */
     ├── acl-profile                /* manage acl-profile               */
     └── client-username            /* manage client-username           */
To use the Solace Try-Me CLI with Solace Cloud, jump down to Connect the Solace Try-Me CLI Tool to an Event Broker Service.
Connect the Solace Try-Me CLI Tool to Your Software Event Broker
You can use the Solace Try-Me CLI tool to communicate with the trial software event broker you set up in Step 1: Set Up Your First Event Broker. Software event brokers have default settings for messaging and management.
Messaging settings include:
- event broker URL for WebSocket connections (localhost and port 8008)
- message VPN (default)
- client username (default)
- password (default).
Management settings include:
- event broker SEMP URL (localhost and 8080)
- message VPN (default)
- SEMP username (admin)
- SEMP password (admin)
Running an stm command without a configuration reference automatically creates a default configuration in the following location:
-
On Windows, the configuration files are stored in the
%USERPROFILE%\.stmfolder. -
On Linux and macOS, the configuration files are stored in the
$HOME\.stmor~\.stmfolder.
You can review a sample default configuration for more information about the default settings.
To configure your software event broker with stm, perform these steps:
- In a command prompt or terminal, initialize configuration with the following command:
stm config init
You should see the following result:
✔ success success: initialized configuration with default command settings on 'stm-cli-configuration.json' successfully
The connection configuration is initialized using the default settings of your local software event broker:
Event Broker Connection Event Broker SEMP Connection Event broker URL: ws://localhost:8008
Event broker SEMP URL: http://localhost:8080/SEMP/v2/config
VPN Name: default
VPN Name: default
Username: default
SEMP Username: default
Password: default
SEMP Password: default
- To update the connection settings for messaging commands, run the following command:
stm manage connection --url ws://localhost:8008 --vpn default --username default --password default
You should see the following result:
ℹ  info      info: loading 'connection' command from configuration 'local-broker'
ℹ  info      info: loading configuration 'local-broker'
ℹ  info      info: checking settings for operation - connection
✔  success   success: updated command settings 'connection' on configuration file 'local-broker.json' successfully
- To update the SEMP connection settings for managing queues, ACL profiles, client profiles, and client usernames, run the following command:
stm manage semp-connection --semp-url http://localhost:8080/SEMP/v2/config --semp-vpn default --semp-username admin --semp-password admin
You should see the following result:
ℹ  info      info: loading 'sempconnection' command from configuration 'stm-cli-config.json'
ℹ  info      info: loading configuration 'stm-cli-config.json'
ℹ  info      info: checking settings for operation - sempconnection
✔  success   success: updated command settings 'sempconnection' on configuration file 'stm-cli-config.json' successfully
If you want to create additional configurations for a different event broker, you can create a new configuration by executing the previous commands with an additional parameter of --config <CONFIG_NAME>. You can refer to a named configuration by specifying it in any of the messaging and management commands
Unless you also want to try the Solace Try-Me CLI tool with an event broker service, you can skip to the use case.
Connect the Solace Try-Me CLI Tool to an Event Broker Service
Unlike a local software event broker, event broker services require explicit initialization because the parameters vary from instance to instance.
To use the Solace Try-Me CLI tool with the event broker service you created in Step 1: Set Up Your First Event Broker, you start by collecting the required settings from the event broker service in the Cloud Console.
To configure your event broker service with stm, perform these steps:
- In your browser, visit the Solace Cloud login page and sign in using the email address and password that you used when you signed up.
- From the navigation bar, select Cluster Manager
 .
. - Select your event broker service.
- Copy the event broker connection information.
- On the Service Details page, select the Connect tab.
- In the Connect with JavaScript section, click Expand
 to view the connection types.
 - Click Solace JavaScript API to view the connection information, which appears in a pane to the right.
- In the panel on the right, under Connection Details copy the following information:
- Username
- Password
- Message VPN
- Secured Web Messaging URI
- Copy the SEMP connection information.
- On the Service Details page, select the Connect tab.
- In the SEMP - REST API section, click Expand to view the SEMP connection URLs. Connection information appears in the pane on the right.
- Under SEMP - REST API, in the Manage with SEMP section, copy the Secured SEMP Config URI.
- From the SEMP - REST API pane on the right, copy the following information:
- Message VPN Name
- Username
- Password
- In a command prompt or terminal, initialize configuration with the following command:
stm config init
You should see the following result:
✔ success success: initialized configuration with default command settings on 'stm-cli-configuration.json' successfully
- Update the connection settings for messaging commands by running the following command, using the details you copied in step 4:
stm manage connection --url wss://mr-connection-xxxx.messaging.solace.cloud:443 --vpn xxxxxxxx --username solace-cloud-client --password xxxxx
You should see the following result:
ℹ  info      info: loading 'connection' command from configuration 'stm-cli-configuration.json'
ℹ  info      info: loading configuration 'cloud-broker'
ℹ  info      info: checking settings for operation - connection
ℹ  info      info: [1] url of connection changed: ws://localhost:8008 => wss://mr-connection-xxxx.messaging.solace.cloud:443
ℹ  info      info: [2] vpn of connection changed: default => xxxxxxxx
ℹ  info      info: [3] username of connection changed: default => solace-cloud-client
ℹ  info      info: [4] password of connection changed: default => xxxxx
⚠  warning   warn: VPN Connection settings changed, this would impact all the messaging commands on the configuration
Changes detected in the settings, do you want to overwrite (y/n): y
✔  success   success: updated command settings 'connection' on configuration file 'stm-cli-configuration.json' successfully
- Update the SEMP connection settings managing queue, acl-profile, client-profile and client-username by running the following command, using the details you copied in step 5:
stm manage semp-connection --semp-url https://mr-connection-xxxx.messaging.solace.cloud:943/SEMP/v2/config --semp-vpn xxxxxxxx --semp-username xxx-admin --semp-password xxxxx
You should see the following result:
ℹ  info      info: loading 'sempconnection' command from configuration 'cloud-broker'
ℹ  info      info: loading configuration 'stm-cli-configuration'
ℹ  info      info: checking settings for operation - sempconnection
ℹ  info      info: [1] sempUrl of sempconnection changed: http://localhost:8080 => https://mr-connection-xxxx.messaging.solace.cloud:943/semp/v2/config
ℹ  info      info: [2] sempVpn of sempconnection changed: default => my-broker
ℹ  info      info: [3] sempUsername of sempconnection changed: admin => xxx-admin
ℹ  info      info: [4] sempPassword of sempconnection changed: admin => xxxxx
⚠  warning   warn: VPN SEMP Connection settings changed, this would impact all the management commands on the configuration
Changes detected in the settings, do you want to overwrite (y/n): y
✔  success   success: updated command settings 'sempconnection' on configuration file 'stm-cli-configuration.json' successfully
If you want to create additional configurations for a different event broker, you can create a new configuration by executing the previous commands with an additional parameter of --config <CONFIG_NAME>. You can refer to a named configuration by specifying it in any of the messaging and management commands.
Coffee Shop Use Case
Now that you have your tools set up, let's head to our favorite coffee shop where we'll take a closer look at its order management system (OMS) to see how a basic event-driven architecture (EDA) can be organized.
Solly's Coffee OMS is designed to handle and process orders placed by customers through third-party vendor applications that are accessible through mobile and web platforms. This setup requires the deployment of sophisticated message exchange patterns to ensure seamless communication between the OMS, its various components, and third-party applications.
The following applications are part of the EDA for Solly's Coffee:
-
Third-Party Apps integrate with the OMS and submit new orders from customer-facing apps directly to the OMS.
-
Order Management is the central hub for receiving new orders and orchestrating the fulfillment process.
-
Inventory System provides insights into ingredient and stock levels, to help ensure availability.
-
Kitchen Floor assesses inventory and proceeds with the actual preparation of orders.
-
Barista System provides the customer-facing interface at the front desk, enabling order pickups and providing updates on order status.
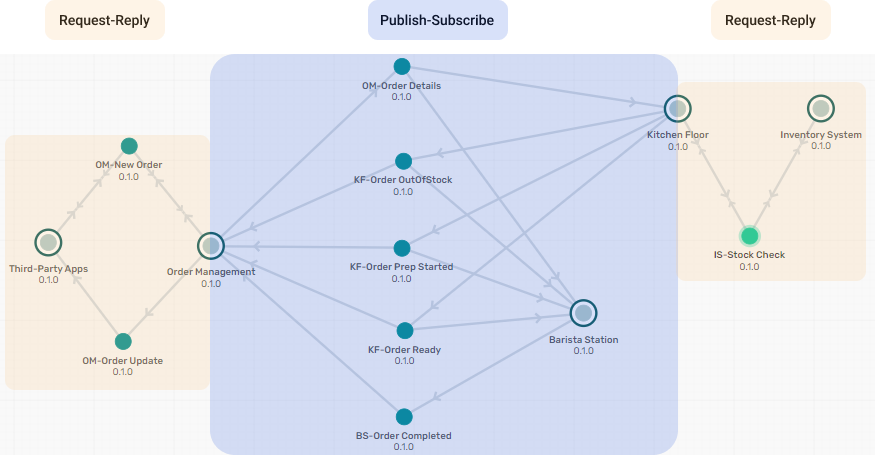
The following events facilitate interactions between the applications:
-
OM-New Order is sent by a Third-Party App to the Order Management application when receiving a new order. The event contains details of the order.
-
OM-Order Details is sent by the Order Management application to other applications to provide details of an order.
-
OM-Order Update is sent by the Order Management application to provide real-time updates on the order status to reflect progress through the fulfillment process.
-
KF-Order Prep Started is sent by the Kitchen Floor application to mark the initiation of the order preparation in the kitchen.
-
KF-Order OutOfStock is sent by the Kitchen Floor application when an out-of-stock scenario occurs during order preparation that affects the kitchen's ability to fulfill the order.
-
KF-Order Ready is sent by the Kitchen Floor application when the order has been successfully prepared and is available for pickup at the Barista station.
-
IS-Stock Check is sent by the Kitchen Floor application to the Inventory System application to check the availability of items needed to fulfill an order.
-
BS-Order Completed is sent by the Barista Station application when the order is picked up to mark the completion of order processing and the end of the cycle for a specific order.
The event flows between the applications are illustrated in the following diagram:
In the following steps of the tutorial, you're going to set up message exchanges using these applications and events.
Tutorial Steps
You've completed the third step in the tutorial. Click the link to the next lesson to continue.
| Step | Description |
|---|---|
|
|
Set Up Your First Event Broker - Complete |
|
|
Solace EDA Basics - Complete |
|
|
Set Up the Solace Try-Me CLI Tool - Complete |
|
|
Try a Publish-Subscribe Message Exchange Pattern - Next Lesson |
|
|
Try a Request-Reply Message Exchange Pattern |
|
|
Explore Consumer Scaling Patterns |
|
|
Next Steps |
You can return to the main Tutorial page at any time.