Docker with Amazon Linux on AWS
This section walks you through the steps to set up a single Solace Software Event Broker container with Docker on an Amazon Linux AMI instance in AWS Elastic Compute Cloud (EC2).
- Before You Begin
- Step 1: Launch a Host & Install Docker
- Step 2: Get a Solace Software Event Broker
- Step 3: Set the Docker Create Options
- Step 4: Create the Container
- Step 5: Manage the Solace Software Event Broker
- Next Steps
Before You Begin
It's assumed that you have:
- An Amazon EC2 account.
- A stable version of Docker Engine installed.
System Requirements
The number of CPUs and system memory allocations that your event broker requires depends on the number of client connections that you need to support. By default, fresh installations of the event broker allow up to 100 client connections.
To achieve desired stability and performance, the infrastructure that hosts the software event broker must provide a minimum set of system resources. System resources broadly include requirements that are related to processors, memory, and storage. For details about the types of system resources that are required and their characteristics, see System Resource Requirements.
You can increase certain system limits by using System Scaling Parameters. Increasing these system limits also increases the system resources that are required. For more information, see Using System Scaling Parameters.
Information about configuring storage is at Managing Storage for Container Images.
The example on this page is suitable for use for up to 1,000 connections, and is appropriately configured for testing and proof-of-concept activities. If you plan to use your event broker in a production environment, or scale your system above 1,000 connections, make sure to consult the sections above and provision your system appropriately.
For ARM processors, there is a version of the Solace container that is compatible with AWS Graviton instances.
Step 1: Launch a Host & Install Docker
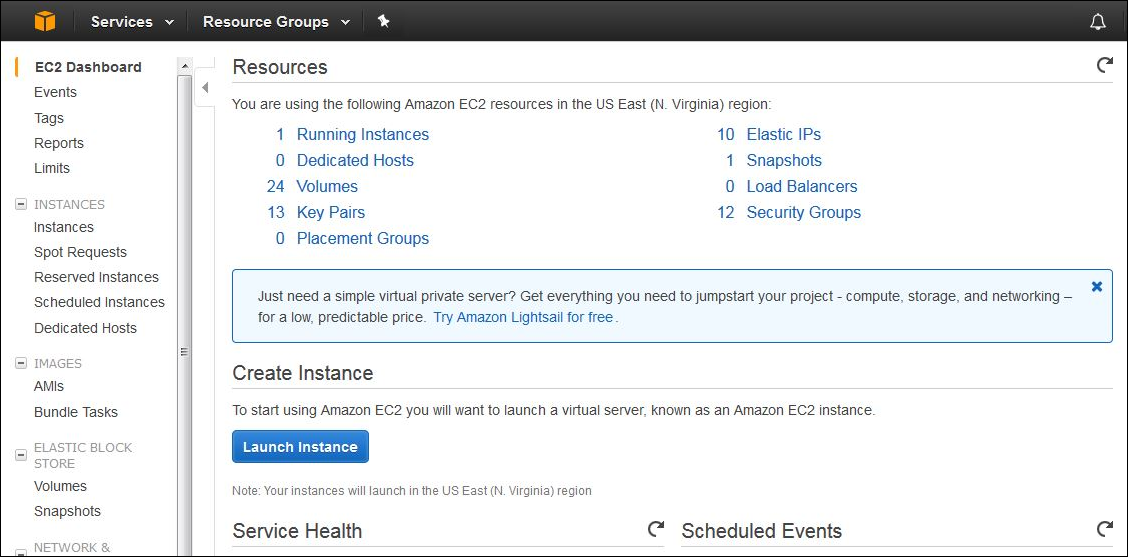
Use the EC2 Dashboard’s Launch Instance wizard to create an Amazon Machine Image that you can use to run an event broker.
- On the main page of the EC2 Dashboard, select the Launch Instance button.
Follow the setup wizard and accept the recommended default settings except as noted in the following steps.
- In the Choose AMI step, choose an Amazon Machine Image (AMI) from the AWS Marketplace for the host.
- In the Choose an Instance Type step, select an Instance Type according to the System Requirements section above.
- In the Configure Instance Details step, set Subnet to your availability zone.
-
In the Add Storage step, set the instance’s storage size and volume type.
The amount of storage to attach to the instance depends on your application. Both SSD volume types, General Purpose and Provisioned IOPS, are supported.
For test deployments, a minimum of 30 GB and Provisioned IOPS SSD are recommended.
-
In the Name and Tags step, assign a name to your instance.
You can add as many tags as required by your application.
-
At a minimum, it is recommended that the security group include the following inbound rules.
Type Protocol Port Range Source Custom TCP Rule TCP 8080 0.0.0.0/0 Custom TCP Rule TCP 55555 0.0.0.0/0 SSH TCP 22 0.0.0.0/0 These port numbers are used for the following services:
- 22—Host SSH
- 8080—SEMP /Broker Manager / SolAdmin
- 55555—SMF/non-compressed message data connections
Other ports can be opened as required. For a list of ports associated with event broker services, see Default Configuration for Software Event Brokers on Virtual Machines.
- After you have completed the launch wizard steps and logged into your host, install and configure Docker. Instructions can be found on the AWS Docker Basics Web page.
- If you are using a t2.medium or t4g.medium instance type, you must create a swap file after the host is up. Enter the following commands:
>sudo mkdir /var/lib/solace
>sudo dd if=/dev/zero of=/var/lib/solace/swap count=3072 bs=1MiB
>sudo mkswap -f /var/lib/solace/swap
>sudo chmod 0600 /var/lib/solace/swap
>sudo swapon -f /var/lib/solace/swap
>sudo grep -q 'solace\/swap' /etc/fstab || sudo sh -c 'echo "/var/lib/solace/swap  none swap sw  0  0" >> /etc/fstab'
Step 2: Get a Solace Software Event Broker
To get the event broker image:
-
Start Docker.
>sudo service docker start
You can use the
statuscommand to check the status of Docker.>sudo service docker status
- Pull the image:
>sudo docker pull solace/solace-pubsub-standard
When loading is finished, you can check the image with the
imagescommand.>sudo docker images REPOSITORY TAG IMAGE ID CREATED SIZE solace/solace-pubsub-standard latest b8a61124d92f 10 days ago 1.11GB
This example assumes that you are using Solace Standard Edition. If you want to use another edition, you need to obtain the appropriate event broker package:
- Go to the Solace downloads page.
- Scroll to the Docker section, and select the edition of the software event broker.
- Fill in your details, and then click Get The Downloads.
You will be able to download a compressed archive file called solace-pubsub-<edition>-<version>-docker.tar.gz.
Once you've obtained the package, start Docker and load the image.
For example:
>sudo docker load -i /tmp/solace-pubsub-enterprise-<version>-docker.tar.gz
Step 3: Set the Docker Create Options
There are many options that you can set with the docker create command that is used to build the event broker container. In this example, we will show one that sets up a simple configuration suitable for a test deployment that can be used to help you become familiar with Solace Software Event Brokers.
In this example:
- the
adminSolace Event Broker CLI user and an associated password are defined at container creation through theusername_admin_globalaccesslevelandusername_admin_passwordconfiguration keys. By default, in an event broker container, no Solace Event Broker CLI users are defined, so setting these configuration keys allows the container to be administered through the SolAdmin management tool without first entering the Solace Event Broker CLI to create anadminuser. - the
storage-group(mapped to/var/lib/solacein the container) is bind mounted to/mnt/solaceon the host. You must create the/mnt/solacedirectory on the host before creating the container. Thestorage-grouprequires at least 5.1 GB of storage space. See System Resource Requirements and Managing Storage for Container Images for more information. - the values of
<repository>and<tag>are dependent on the event broker Docker image you previously loaded. For example, if you pulled thelatestSolace Standard Edition image from Docker, the<repository>issolace/solace-pubsub-standardand the<tag>islatest. If you loaded version 10.8.1.265 of Solace Enterprise Edition, the value of<repository>issolace-pubsub-enterpriseand<tag>is10.8.1.265.
- Create the
docker-createscript.>sudo tee /root/docker-create <<-EOF #!/bin/bash sudo docker create \ --network=host \ --uts=host \ --shm-size=1g \ --ulimit core=-1 \ --ulimit memlock=-1 \ --ulimit nofile=2448:1048576 \ --env 'username_admin_globalaccesslevel=admin' \ --env 'username_admin_password=admin' \ --name=solace \ --mount type=bind,source=/mnt/solace,destination=/var/lib/solace,ro=false <repository>:<tag> EOF
For production deployments, there are use-case dependent factors that will impact the options and configuration key settings in the
docker createcommand. For more information, see System Resource Requirements and the Docker documentation. - Make the
docker-createscript executable:>sudo chmod +x /root/docker-create
Step 4: Create the Container
Create and run the event broker container on your host.
- Create the container:
>/root/docker-create
Once it’s done running, a long identifier will be displayed that looks something like this:
1cb8dba3c07b6970b1e22c1067fde76010259e50a8548c3f2f202a6e9ce4e345
This is the ID for the event broker container you have just created.
- Start the event broker:
>sudo docker start solace
You can use the
docker pscommand to check on the status of the event broker once it’s running.>sudo docker ps
The
STATUScolumn associated with the event broker will display if the container is running and for how long.
Step 5: Manage the Solace Software Event Broker
To start issuing configuration or monitoring commands on the event broker, you can access Broker Manager or the Solace Event Broker CLI
To access Broker Manager:
- Open a browser and enter
http://localhost:8080. - Log in as user
adminwith passwordadmin.
To access the Solace Event Broker CLI:
-
Enter the following
docker execcommand:>sudo docker exec -it <container_name> /usr/sw/loads/currentload/bin/cli -A
-
Type the following commands to enter configuration mode:
solace> enable
solace# config
solace(configure)#
For a list of Solace Event Broker CLI commands currently supported on the software event broker,see Software Event Broker CLI Commands.
Next Steps
You now have a software event broker container with a basic configuration that is ready for messaging tasks.
There are additional configuration tasks that you can make use of in the following topics:
- Default Configuration for Software Event Brokers on Virtual Machines—Review the default port numbers for the services that run on the event broker.
- System Resource Requirements—Learn about resource requirements for software event brokers.
- Security Overview—Apply security features to secure your event broker, systems, and data.
When you are comfortable with your event broker, you can test messaging using the SDKPerf application. You can download SDKPerf from the Other Software section in the Downloads page.
For more information about working with your event brokers, see the following: