Configuring DMR Internal Links
Dynamic Message Routing (DMR) internal links can be configured to connect two event brokers (nodes) in the same cluster. Internal links allow messages published in a node to be delivered to consumers connected to another node.
To configure an internal link, the event brokers must belong to the same cluster (have the same cluster name). If you create an internal link between a node that belongs to a cluster and a node that does not belong to a cluster, the joining node automatically becomes a part of the first node's cluster. You can create an internal link for a node that does not belong to a cluster yet by adding the node to a cluster. For more information, see Creating a Cluster and Enabling DMR.
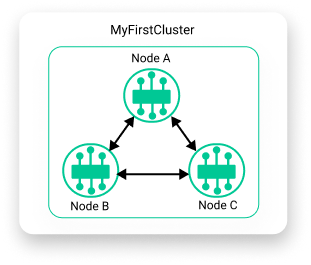
Nodes in a cluster must have internal links with every other node to create a full mesh within the cluster. Each node can communicate only with the nodes it is directly connected to. Failing to connect every node within a cluster with every other node will result in a topology issue and nodes will not receive all the information available to the cluster.

This topic includes the following tasks:
Adding a Node to a Cluster
You can add a node to a cluster by creating an internal link between a node in the cluster and the new node. In the following example, Node A and Node B are a part of MyFirstCluster. Node C is not part of a cluster and cannot communicate with the other nodes. We can add Node C to the cluster by configuring an internal link.

Configuring an internal link sets the cluster name of the node that doesn't have a cluster to the cluster name of the remote node, which means both nodes are part of the same cluster. When an internal link is configured between Node C and Node A, Node C is added to MyFirstCluster.

To configure an internal link between nodes in different clusters, perform these steps:
- If you haven't already, open Broker Manager. For instructions, see Using Broker Manager with Self-Managed Event Brokers.
- If you don't already have a cluster configured in a remote event broker, see Create a Cluster.
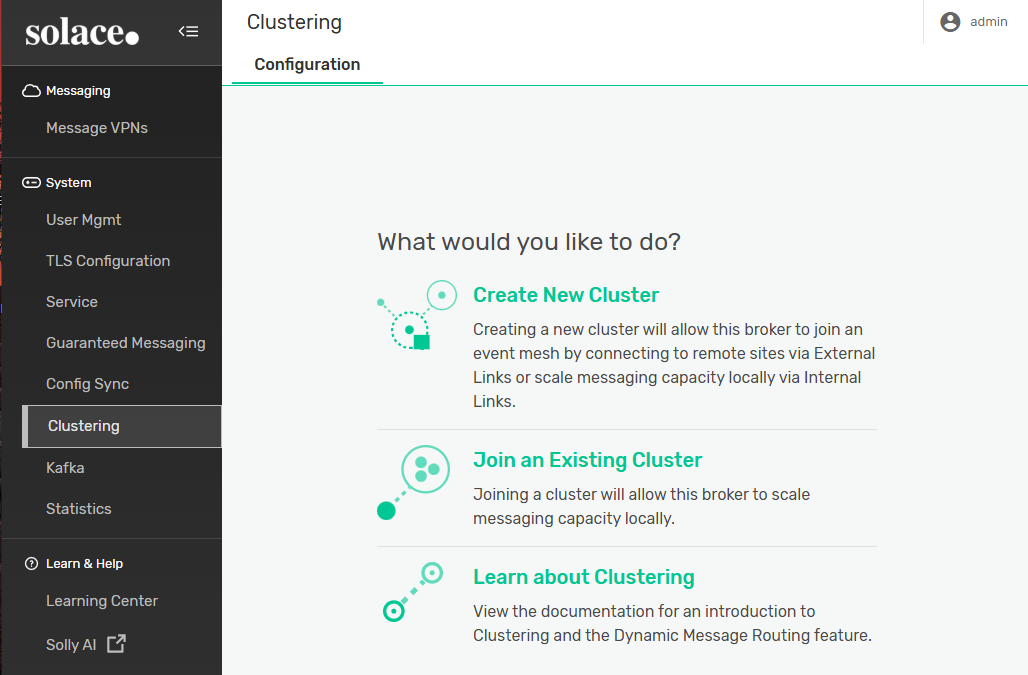
- On the navigation bar, select Clustering.
- Click Join an Existing Cluster.
- In the URL field, enter the remote event broker URL. Only fully qualified domain names (FQDNs) are supported.
- In the Username and Password fields, enter the username and password used to connect to the remote event broker.

- Click Cluster Setup.
- Enter a password for the cluster.
- (Optional) Edit the following settings as required for the cluster:
Setting Description Type
Specifies the type of basic authentication the cluster uses for DMR links. - Internal Database — The cluster uses the locally configured password.
- None — The cluster does not use authentication.
Content Specifies the Privacy-Enhanced Mail (PEM)-formatted content for the client certificate used to log in to the remote node. It must consist of a private key and between one and three certificates comprising the certificate trust chain. Validate Server Name
Specifies whether the TLS authentication mechanism of verifying the name is used to connect to the bridge. If enabled, the name used to connect to the bridge is checked against the names specified in the certificate returned by the remote event broker.
Maximum Chain Depth Specifies the maximum number of signing certificate authority (CA) certificates that are present in the chain back to a trusted self-signed root CA certificate. Validate Certificate Dates Specifies whether certificate "Not Before" and "Not After" validity dates are used. - Click Configure Remote Nodes.
You may get a warning about the spool size being too small. Unless you are moving large amounts of data between event brokers, you can click Continue. For information about changing the maximum amount of spool usage, see
- If another node is detected in the cluster, enter the URL and credentials for that node.
- Click Configure Message VPNs.
- In the Remote Message VPN list, select the name of a Message VPN that exists in both the local and remote event brokers to configure a VPN channel.
- Click Remote Connection Setup.

-
(Optional) Click Add New to add another VPN channel between other Message VPNs on each event broker. Each Message VPN can be used by only one channel at a time and must have the same name on both event brokers.
You may get a second warning about the spool size being too small. Unless you are moving large amounts of data between event brokers, you can select the checkbox next to each message and then click Continue to bypass the warning.
- In the Remote Broker Connection section, select the Local or Remote tab to determine if the local or remote event broker initiates the link.
- Enter the remote cluster password in the Remote Cluster Password and Confirm Password fields, and your local cluster password in the Local Cluster Password and Confirm Password fields.

- If you are connecting to multiple targets, click the name of each node in the Target section and enter the cluster passwords for those nodes as well.
- Click Create Link and Test Connection. The event broker attempts to establish a link with the specified DMR link mate. After the link is configured (this normally takes a few minutes), a confirmation message appears.

- Click Exit. You can see the link from one node to the other node in the Summary tab.

You have now created an internal DMR link between two nodes. To see the link working, select a Message VPN and use the Try Me! tab to create a subscription in one event broker, publish from another event broker in the mesh, and see your message dynamically forward from one to the other.
Creating an Internal Link Between Nodes in the Same Cluster
You can share information between every node in a cluster by configuring internal links between every pair of nodes. In the following example, Node A, Node B, and Node C are all a part of MyFirstCluster. Node C cannot share information with Node B because they do not have an internal link between them. We can create a full mesh and share information between all the nodes in the cluster by creating an internal link between Node B and Node C.
To configure an internal link between two nodes in the same cluster, perform these steps:
- If you haven't already, open Broker Manager. For instructions, see Using Broker Manager with Self-Managed Event Brokers.
- On the navigation bar, select Clustering.
- Select Links on the navigation bar, and select the Internal Links tab.
- Click +Click to Connect.

- Select Remote Broker.
- In the URL field, enter the remote event broker URL. Only fully qualified domain names (FQDNs) are supported.
- In the Username and Password fields, enter the username and password used to connect to the remote event broker.
- Click Configure Message VPNs.

- In the Remote Message VPN list, select the name of a Message VPN that exists in both the local and remote event brokers to configure a VPN channel.
- Click Remote Connection Setup.

- (Optional) Click Add New to add another VPN channel between other Message VPNs on each event broker. Each Message VPN can be used by only one channel at a time and must have the same name on both event brokers.
You may get a warning about the spool size being too small. Unless you are moving large amounts of data between event brokers, you can select the checkbox next to each message and then click Continue to bypass the warning. For information about changing the maximum amount of spool usage, see
- Select the Local or Remote tab to determine if the local or remote event broker initiates the link.
- Enter the remote cluster password in the Remote Cluster Password and Confirm Password fields, and your local cluster password in the Local Cluster Password and Confirm Password fields.

- Click Create Link and Test Connection. The event broker attempts to establish a link with the specified DMR link mate. After the link is configured (this normally takes a few minutes), a confirmation message appears.
-
Click Exit. You can see the link from one node to the other node in the Summary tab.
You have now created an internal DMR link between two nodes. Repeat the steps in this section to configure internal links between other event brokers that you want to be part of your event mesh.
After you create the link between Node B and Node C, the example cluster is fully meshed, as shown in the following diagram:
To see the link working, select a Message VPN and use the Try Me! tab to create a subscription in one event broker, publish from another event broker in the mesh, and see your message dynamically forward from one to the other.