Viewing Event Mesh Details
You can view the details of an event mesh you've created in Mesh Manager. To view the details of an event mesh, you require the Mission Control Viewer role. For more information about the roles required for event mesh, see Considerations for Working with Event Meshes.
To view information about an event mesh, you can perform the following tasks:
- Checking the Progress of Event Mesh Updates
- Discovering New Event Meshes
- Refreshing the View for an Event Mesh
- Viewing the Event Mesh and Event Broker Service Details
- Viewing the Status of a Health Check and Links in an Event Mesh
- Finding Information About an Event Broker Service
- Getting Information From Event Mesh Map View
Before viewing an event mesh, see Considerations for Working with Event Meshes.
Checking the Progress of Event Mesh Updates
The process of creating, updating, or deleting an event mesh can take up to five minutes. The time varies based on various factors (e.g., size of the event mesh, the cloud providers and regions of your event broker service, network connectivity speeds, etc.).
You can view the progress of event mesh creation from the Mesh Manager: Event Mesh page. Tiles for newly created event meshes appear grayed out, with a status of Creating and a progress bar at the bottom of the tile.
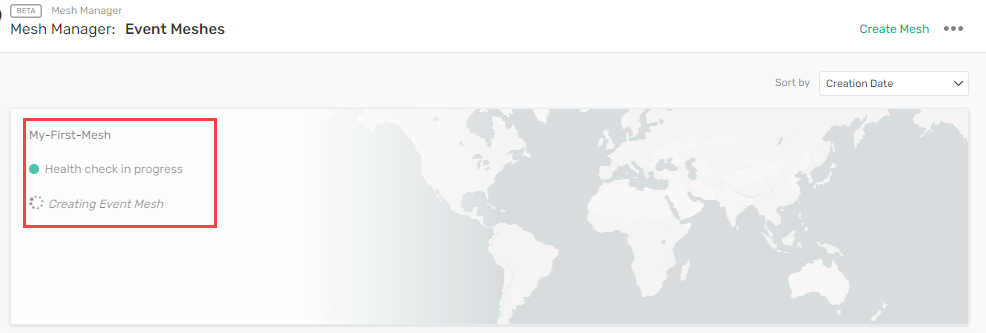
When the event mesh is created, the tile becomes active, and the status updates to Running. In some cases, you may need to refresh the view or discover the event mesh if you've just created it. For more information, see Discovering New Event Meshes and Refreshing the View for an Event Mesh.
Discovering New Event Meshes
You may have manually created an event mesh or have existing event meshes that you've created that aren't shown in Mesh Manager. You can discover these event meshes by performing a scan that refreshes the view of event meshes in your account. To scan for event meshes, perform these steps:
-
Log in to the Solace Cloud Console if you have not done so yet. The URL to access the Cloud Console differs based on your
- On the navigation bar, select Mesh Manager
 .
. -
On the Mesh Manager: Event Meshes page, click Mesh Actions
 beside the Create Event Mesh link and select Scan for Event Meshes.
After a few minutes, the cards representing the event meshes refresh. If an event mesh is in the process of being created, updated, or deleted, you can see its progress. For more information, see Checking the Progress of Event Mesh Updates.
Refreshing the View for an Event Mesh
After you create, add, or remove links from an event mesh, you can refresh the visual representation of the event mesh to see any link or topology changes. Only a single scan can occur at a time. To refresh the view for your event mesh, perform these steps:
-
Log in to the Solace Cloud Console if you have not done so yet. The URL to access the Cloud Console differs based on your
-
On the navigation bar, select Mesh Manager
. -
On the Mesh Manager: Event Meshes page, select the tile for the event mesh you want to refresh.
-
On the Event Mesh Details page, click Mesh Actions
, and then click Scan Event Mesh.
As the scan occurs, updates to the visual representation of your mesh appear. An <Event mesh name> scanned successfully notification appears on the bottom of the page. If the your expected changes don't appear, refresh your web page.
Viewing the Event Mesh and Event Broker Service Details
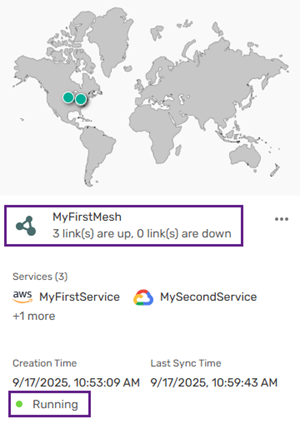
There are a number of views that you can use to find out information about your event mesh and services in Mesh Manager. Event meshes that are available appear in Mesh Manager on the Mesh Manager: Event Meshes page. You can see a summary of the status and details of an event mesh including the event broker services that are part of the event mesh. For example, on the event mesh tile, you can see the event mesh is running and the number of links that are up or down:
Viewing the Status of a Health Check and Links in an Event Mesh
You can view the status of the most recent health check for an event mesh on the Event Mesh Details page, including the a health summary, when the last health check was run, and the status of links within the event mesh. To see the health check status of an event mesh, perform these steps:
-
Log in to the Solace Cloud Console if you have not done so yet. The URL to access the Cloud Console differs based on your
- Select Mesh Manager from the navigation bar.
-
On the tile for an event mesh, click Mesh Actions
and select Open Event Mesh. - On the Event Mesh Details page you can see:
- a health summary of the event mesh
- information about the last health check, including a status, summary, and when the health check was run.
- Click View Health Check to open the Event Mesh Health Check dialog to see the health of the links for each event broker service in the event mesh.
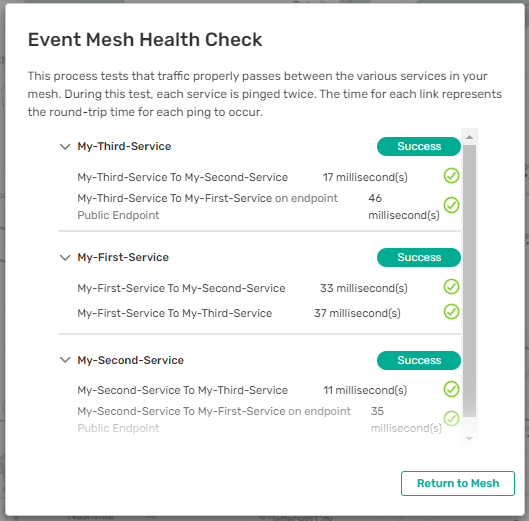
From the Event Mesh Health Check dialog, you can:
- click an event broker service to see the time, in milliseconds, that an event takes to travel between the two event broker services.
- click Run Health Check to validate the health of the event mesh. For more information about running a health check on the event mesh, see Running Health Checks.
- Click View Health Check to open the Event Mesh Health Check dialog to see the health of the links for each event broker service in the event mesh.
- the last time the event mesh synced
- the event broker services in the event mesh. Click an event broker service to see information about the service.
- the links between the event broker services, and their health status. Click a link to see information about the link.
Finding Information About an Event Broker Service
To see information about the event broker services in the event mesh, performing these steps:
-
Log in to the Solace Cloud Console if you have not done so yet. The URL to access the Cloud Console differs based on your
- Select Mesh Manager from the navigation bar.
- On the tile for an event mesh, click Mesh Actions and select Open Event Mesh.
- Either:
- under Services on the Event Mesh Details panel, select an event broker service
- on the map, click the icon representing the event broker service you want to see information about
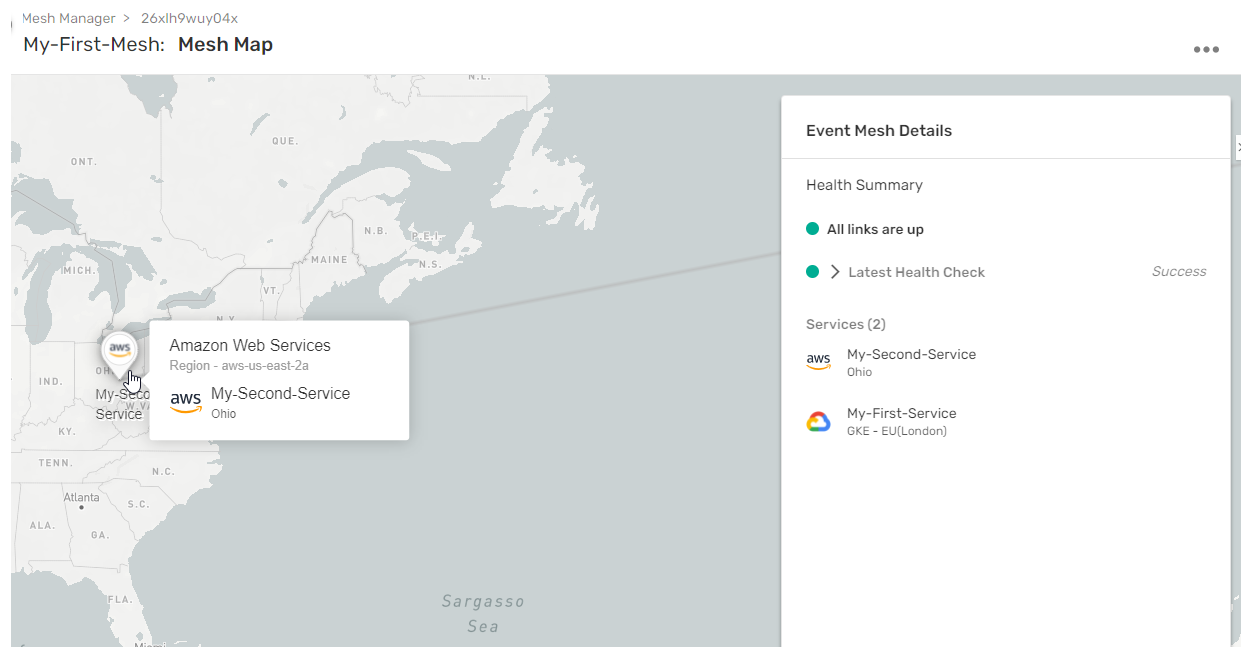
Getting Information From Event Mesh Map View
You can see a geographical representation of an event mesh you created from the Mesh Map.
-
Log in to the Solace Cloud Console if you have not done so yet. The URL to access the Cloud Console differs based on your
- Select Mesh Manager from the navigation bar.
- On the tile for an event mesh, click Mesh Actions and select Open Event Mesh.
-
You can interact with the Mesh Map page in the following ways:
- zoom in and zoom out (use the scroll button your mouse, or pinch and expand on touch-enabled devices)
- navigate the map (drag with your mouse, or tap and drag on touch-enabled devices)
- hover on an event broker service to see information about the node
- click on an event broker service in your event mesh to update the focus on in the right panel