Running Event Mesh Health Checks
An event mesh health check validates that events can be exchanged between the links in an event mesh. To run the health check on an event mesh, you require the Mission Control Viewer role. For more information about the role requirements, see Considerations for Working with Event Meshes.
For a health check to run, the operational status of a link must be Up. If the operational status is Down, you won't be able to run a heath check and may need to troubleshoot the issue on the event broker service. For more information, see:
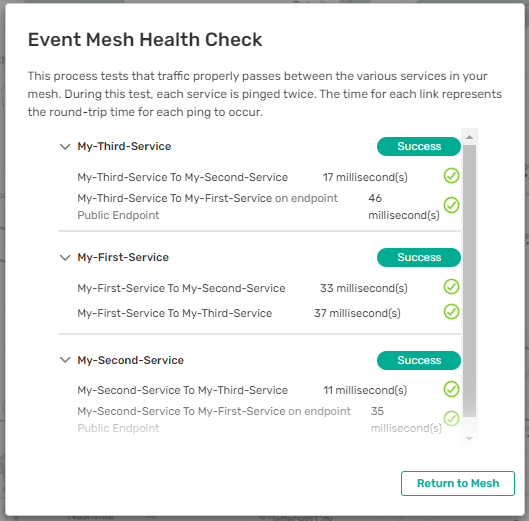
The health check uses an advanced pinger to check the connectivity between event broker services. A health check validates the following in an event mesh using one secure SMF connection on each event broker service:
- Link status—Each direction for a link between two event broker services is pinged. This validates connectivity and the time of the ping is recorded. This process checks all links by sending a ping from each event broker service (or event broker) to the other event broker services in the event mesh.
- Event status—The health check uses a reserved
#insights/pinger/pingtopic to check topic propagation using the request-reply pattern to ensure that topics can be subscribed and published to. The health check creates a temporarymesh-validation-<session-id>username, where<session-id>is a string value representing the health check session. The health check deletes the client username after the check completes.
Solace recommends running a health check if you make manual changes to an event broker service or are experiencing issues with your event mesh.
For more information, see:
Running Health Checks
To run a health check in Mesh Manager, perform these steps:
-
Log in to the Solace Cloud Console if you have not done so yet. The URL to access the Cloud Console differs based on your
-
On the navigation bar, select Mesh Manager
 .
. -
On the Mesh Manager: Event Meshes page, click the tile for an event mesh you want to run a Health Check on.
-
Click View Health Check to open the Event Mesh Health Check dialog.
-
Click Run Health Check.
-
As the health check runs, the progress appears in the Event Mesh Health Check dialog. If you keep the dialog open, it shows the results for each test as they complete. You can expand the entry for each event broker service to see the details of the test.
If you click Close before the health check completes, the following happens:
-
If you stay on the Event Mesh Details page, In Progress appears with a progress spinner under the Latest Health Check in the Event Mesh Details panel. The status changes to Success when the health check completes.
-
If you return to the Mesh Manager: Event Meshes page, the tile for the event mesh turns gray, and a progress bar appears at the bottom of the tile while the health check runs.
-
If you go to another part of the Cloud Console (for example Cluster Manager), the health check runs in the background, but you are not notified of its completion. Return to Mesh Manager, and select the event mesh to see the results.
For information, see Viewing the Status of a Health Check and Links in an Event Mesh.
-
Handling Failed Health Checks
An event mesh is considered unhealthy if at least one link between any of the event broker services fails the health check test. It's important to note that the health check test reflects the health of the event mesh itself and not the individual services. To understand how to view the status of a health check, see Viewing the Status of a Health Check and Links in an Event Mesh.
You can identify the failed link and useful information to identify the issue with the link.
Note that if the health check is not successful, some artifacts created for the health check may not clean up as expected. After a health check you may need to:
- Delete the temporary
mesh-validation-<session-id>username from each event broker service within your event mesh.
Certain properties in the ACL Profile for your event broker service must be set to Allow. If you have configured these properties to Disallow, the health check will fail. See Configuring ACL Profile Properties When Using the Event Mesh.
Troubleshooting Operational Links
You can run a health check if the operational status of any of its links is down. To help in identifying the cause of the problem, use Broker Manager to identify and resolve the operational status of a link.
To open Broker Manager and troubleshoot the operational status of a link for an event broker service, perform these steps:
-
Log in to the Solace Cloud Console if you have not done so yet. The URL to access the Cloud Console differs based on your
- On the navigation bar, select Cluster Manager

- Click the event broker service that you want to troubleshoot.
-
In the top-right corner of the page, click Open Broker Manager. The Broker Manager web interface opens in another tab in your browser.
-
In Broker Manager, click Clustering and then troubleshoot the links from there. For example, you could select the External Links tab to check if a link is down.
- Linking to an event broker service that previously existed
- If you deleted the service that was the second-last event broker service in an event mesh, links can remain, and you may need to manually remove the previous external links using Broker Manager.
- One of the event broker services is in a Virtual Private Cloud/Virtual Network (VPC/VNet) or one uses a private endpoint
- If one of the event broker services has a public endpoint while the other has a private endpoint, the initiating event broker service must be the service with the private endpoint. Switch the initiator so that the initiator is the private endpoint or the event broker service that's connecting from a private region to resolve this issue.
- For more information, see Switch the Initiator for a Link on the Event Mesh.
- Can't validate server certificates
- If you are using a custom TLS server certificates instead of the default Solace server certificates, you must ensure that those server certificates are uploaded to each of the event broker services in your event mesh.
- For more information, see Managing Custom TLS Server Certificates for an Event Broker Service.
- Links between event broker services fail when both services are in a different regions or both use private endpoints in different regions
- The IP connectivity between private regions (for example, Customer-Controlled Clusters) are the responsibility of your organization. Verify the connectivity between regions, to ensure event mesh creation is possible.
For more information, see Using Broker Manager with Event Broker Services. Some common problems that may occur:
Configuring ACL Profile Properties When Using the Event Mesh
To successfully use Mesh Manager, you must set the following access control list (ACL) profile properties for event broker services in the event mesh to Allow:
-
Client Connect Default -
Publish Default Action -
Subscribe Default Action
These properties are set to Allow when the ACL profiles are generated during service creation. If you set these properties to Disallow, the health checks you perform on your event mesh will fail. You can configure the ACL profiles in Broker Manager on the Access Control tab.
-
Log in to the Solace Cloud Console if you have not done so yet. The URL to access the Cloud Console differs based on your
- On the navigation bar, click Cluster Manager .
- On the Services page, select the card for the event broker service you want to configure and then click Open Broker Manager.
- In Broker Manager, select Access Control.
- On the Access Control page, click the ACL Profiles tab.
You can review the configuration of each property in an ACL profile in the table. If you see the
Client Connect Default,Publish Default Action, orSubscribe Default Actionproperties set todisallow, you must change them toallow.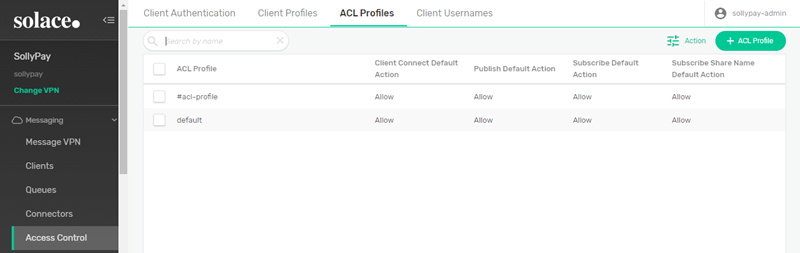
-
Click the ACL profile you want to change. Note that you cannot change the properties for the #acl-profile profile.
-
On the ACL Profiles page, click the tab for the property you want to change. For example, click Publish Topic to change the
Publish Default Actionproperty.
- Click Edit.
- Click in the property field and select Allow and then click Apply.
- Repeat steps 7 through 9 until you have set all the required properties to Allow.
- Click the Back
 to return to the ACL Profiles page.