Modifying an Event Mesh
To modify an event mesh, you require the Mission Control Manager role. For more information about the role requirements, see Considerations for Working with Event Meshes.
You can perform any of the following tasks to modify an existing event mesh:
- add an additional event broker service
- change the link initiator for each event broker service
- remove a an event broker service
- change the event mesh name
As part of the changes you make, the event mesh is validated to ensure that it's healthy.
Before you modify an event mesh, we recommend that you review the Considerations for Working with Event Meshes.
Adding an Event Broker Service to an Existing Event Mesh
You can add an existing event broker service to an event mesh. After you specify the event broker service to add, the event mesh is recreated. As a result, events stop traveling across the event mesh while the mesh is reestablished. The event broker services themselves keep running with no service impact.
To add an event broker services to an existing mesh, follow these steps:
-
Log in to the Solace Cloud Console if you have not done so yet. The URL to access the Cloud Console differs based on your
- Select Mesh Manager
 from the navigation bar.
 -
On the Mesh Manager: Event Meshes page, on the tile of an event mesh, click Mesh Actions
 , and then select Edit Event Mesh.
 -
On the Edit Event Mesh page, click Add Service.
-
In the Add Service: Full Event Mesh dialog, select the event broker service to add to the event mesh using one of the following methods:
- Enter the first few letters of the name of the event broker service you want to add to the event mesh in the Destination Service field to filter the list, when you see your event broker service appear, select it.
- Click in the Destination Service field and then scroll and select the name of your event broker service in the drop-down menu.
-
(Optional) Click the Remote Service Endpoint and select the an endpoint. Connectivity between your private endpoints is your responsibility (or your organization's) if the services are deployed in a Customer-Controlled Clusters.
-
(Optional) Click the Switch Initiator
 to set which event broker service initiates the creation of the link before you click Add Service. In most cases, you can accept the suggested initiating links. These are the situations where you may be required to change the initiating link:
-
If the one of the event broker services has a private endpoint and the other service has a public endpoint, you must change the initiating service to be the one with the private endpoint.
-
If the one of the event broker services is a private endpoint and the other service is a public endpoint, you must change the initiating service to be the one with the private endpoint.
-
On the remote endpoint of the event broker service, if you have more than one endpoint available, otherwise the one that is configured appears.
-
-
Click Add Service.
-
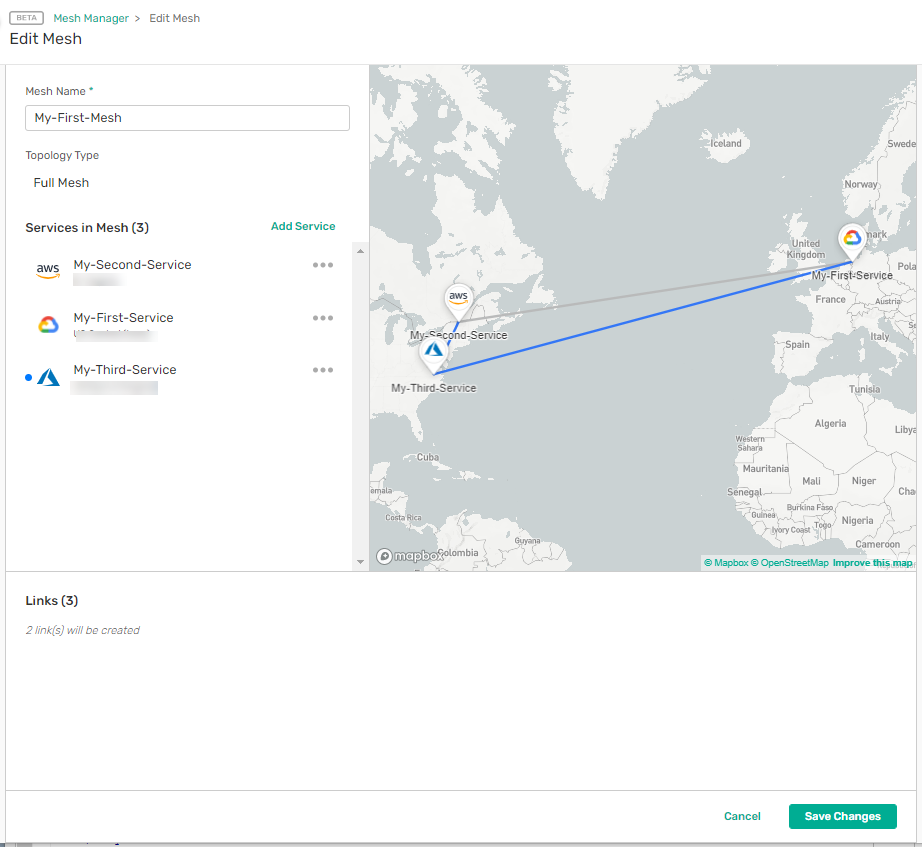
Repeat the steps 4-6 until you have added all event broker services you want to add to the event mesh. When you return to the Edit Event Mesh page, the event broker services you added appear in the Services in Event Mesh list. Newly added services display a blue left-edge.
You can review the changes to the event mesh in the Links and Map panes. For example, here we've added an additional event broker service and the blue links on the Map pane show the new links created in the event mesh. The Links pane summarizes that two new links will be created:
-
(Optional) Click Mesh Actions
beside the name of the event broker service (including the ones you just added), and select:- Edit Links to edit the link initiator. For more information, see Switch the Initiator for a Link on the Event Mesh.
- Remove Service to remove an event broker service from the event mesh. For more information, see Removing an Event Broker Service from an Event Mesh.
-
After you add all the event broker services you want to the event mesh, click Update Event Mesh.
A Traffic Disruption Across the Event Mesh May Occur dialog opens.
-
Click Confirm Changes.
You return to the Mesh Manager: Event Meshes page and the tile for the event mesh appears gray and shows a status of Updating. When the changes complete, the tile becomes colored and the status updates to Running. For more information, see Checking the Progress of Event Mesh Updates.
Switch the Initiator for a Link on the Event Mesh
You can specify which event broker service (called the initiator) starts the process to create the external DMR link to the other event broker service. While messages are exchanged in both directions over the link, the underlying TCP connection is only established by the side that is the initiator for the link.
If you have event broker services in private regions, or Customer-Controlled Clusters, they must be the initiator when:
-
the event broker service connects to the public internet (Public Clusters)
-
the event broker service to connect has Secured Broker Management (SEMP) port enabled on the public endpoint
Connectivity between private networks (Customer-Controlled Clusters) is the responsibility of the customer.
To switch the link initiator, perform the following steps.
-
Log in to the Solace Cloud Console if you have not done so yet. The URL to access the Cloud Console differs based on your
- On the navigation bar, select Mesh Manager .
-
On the tile for an event mesh, click Mesh Actions
and select Edit Event Mesh. -
On the Edit Event Mesh page, beside the name of an event broker service, click Mesh Actions
and select Edit Links. -
On the Edit Links dialog, click Switch Initiator
to switch the initiator for any event broker service. 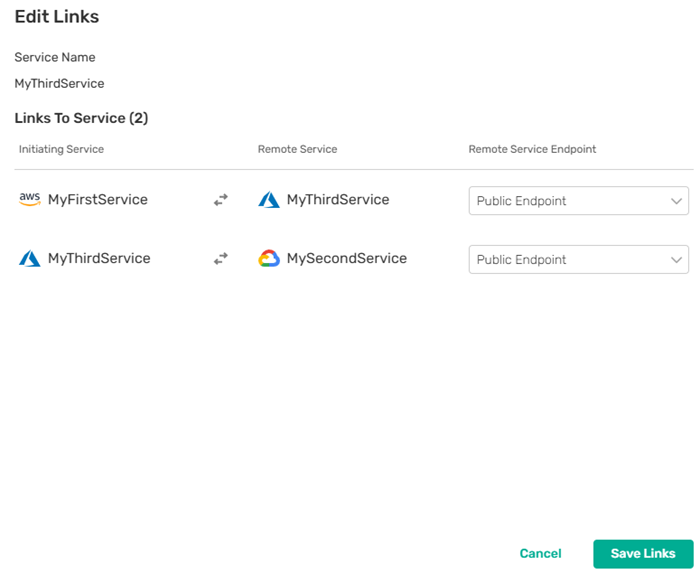
-
Click Save Links.
-
Review the summary of changes in the Edit Event Mesh page and then click Update Event Mesh.
A Traffic Disruption Across the Event Mesh May Occur dialog opens.
-
Click Confirm Changes.
You return to the Mesh Manager: Event Meshes page and the tile for the event mesh appears gray and shows a status of Updating. When the changes complete, the tile becomes colored and the status updates to Running. For more information, see Checking the Progress of Event Mesh Updates.
Removing an Event Broker Service from an Event Mesh
You must remove an event broker service from an event mesh if is part of one before you can delete the event broker service.
You can remove an event broker service from an existing event mesh as long as it isn't the second last one in the event mesh. If you want to delete an event mesh, you must do so explicitly. For more information, see Deleting an Event Mesh.
After you specify the event broker service to remove, the event mesh is re-created if the configuration is valid. A valid mesh must have at least two event broker services. Any event broker services that you removed from the event mesh are not deleted and remain active.
When the event mesh is recreated, events stop traveling across the event mesh while the mesh is reestablished. The event broker services themselves keep running with no service impact.
-
Log in to the Solace Cloud Console if you have not done so yet. The URL to access the Cloud Console differs based on your
- Select Mesh Manager from the navigation bar.
- On the tile for an event mesh, click Mesh Actions and select Edit Event Mesh.
- On the Edit Event Mesh page, beside the name of each event broker service that you want to remove, click Mesh Actions, and select Remove Service.
-
Click Update Event Mesh.
A Traffic Disruption Across the Event Mesh May Occur dialog opens.
-
Click Confirm Changes.
You return to the Mesh Manager: Event Meshes page and the tile for the event mesh appears gray and shows a status of Updating. When the changes complete, the tile becomes colored and the status updates to Running. For more information, see Checking the Progress of Event Mesh Updates.
Changing the Event Mesh Name
You can change the name of your event mesh. The name can be up to 32 characters in length, and can include any alphanumeric characters, dashes, and underscores.
-
Log in to the Solace Cloud Console if you have not done so yet. The URL to access the Cloud Console differs based on your
- Select Mesh Manager from the navigation bar.
- On the tile for an event mesh, click Mesh Actions and select Edit Event Mesh.
- Click in the Event Mesh Name field and change the text in the field.
-
Click Update Event Mesh
A Traffic Disruption Across the Event Mesh May Occur dialog opens.
-
Click Confirm Changes.
You return to the Mesh Manager: Event Meshes page, and you can see the new name of on the tile for your event mesh. For more information, see Checking the Progress of Event Mesh Updates You may need to rescan for changes or refresh your browser after a few minutes to see the name change appear. For more information about rescanning your event mesh, see Refreshing the View for an Event Mesh.