Installing and Configuring Solace PubSub+ for VMware Tanzu
This topic describes how to install and configure Solace PubSub+ for VMware Tanzu. Before installing Solace PubSub+ for VMware Tanzu, you must complete the prerequisites.
Review Resource Requirements
Review the resource and IP requirements for installing the Solace PubSub+ for VMware Tanzu tile.
| Resource | Instances | CPU | Ram (MB) | Ephemeral (MB) | Persistent (MB) | Static IP | Dynamic IP |
|---|---|---|---|---|---|---|---|
| Solace Service Broker | 1 | 1 | 1024 | 1024 | 0 | 0 | 1 |
| Management | 11 | 1 | 2048 | 10240 | 20480 | 1 | 0 |
| Arbitrator | 02 | 1 | 1024 | 10240 | 20480 | 1 | 0 |
| Enterprise Large | 03 | 4 | 12288 | 10240 | 409603 | 1 | 0 |
| Enterprise Shared | 03 | 2 | 4096 | 10240 | 204803 | 1 | 0 |
| Enterprise Medium-HA | 0 3, 4 | 2 | 4096 | 10240 | 204803 | 1 | 0 |
| Enterprise Large-HA | 0 3, 4 | 4 | 12288 | 10240 | 409603 | 1 | 0 |
| Enterprise Plan 5 | 0 3, 4 | 0 | 0 | 0 | 03 | 1 | 0 |
| Enterprise Plan 6 | 0 3, 4 | 0 | 0 | 0 | 03 | 1 | 0 |
| Standard Medium | 03 | 2 | 4096 | 10240 | 204803 | 1 | 0 |
| Standard Medium-HA | 3 3, 4 | 0 | 4096 | 10240 | 204803 | 1 | 0 |
| Standard Plan 3 | 0 3, 4 | 0 | 0 | 0 | 03 | 1 | 0 |
| Standard Plan 4 | 0 3, 4 | 0 | 0 | 0 | 03 | 1 | 0 |
1 Note: The management VM is required to support Solace PubSub+ for VMware Tanzu. Two instances are required for a production setup and must be combined with One arbitrator VM.
2 Note: One arbitrator VM is required for a production setup and must be combined with Two management VM instances. Otherwise set this to zero.
3 Note: You can modify the number of operator allocated instances and persistent disk size when configuring the tile for the Solace PubSub+ Event Broker jobs. For more information, see the Configure Solace PubSub+ for VMware Tanzu tile below.
4 Note: A high availability Solace PubSub+ service instance requires three (3) HA Solace PubSub+ Event Broker job instances to be used. As such, the operator allocated number of HA Solace PubSub+ Event Broker job instances specified for the HA Solace PubSub+ Event Broker instances should be a multiple of 3. If it is not, the remaining job instances go unused.
Prerequisites
Solace PubSub+ for VMware Tanzu requires the following:
- VMware Tanzu version 2.1.x. or later.
- Java buildpack v4.x.x or later.
- MySQL database, which can be made available in one of these methods:
- Internal deployment as part of the Solace PubSub+ for VMware Tanzu on a management VM
- As service from a deployment of VMware Tanzu SQL [MySQL]. Please ensure to configure for a High Availability setup and with service plans offering a minimum of 100 MB. See VMware Tanzu SQL [MySQL].
- External when MySQL is already deployed outside VMware Tanzu, it may be offered as a user provided service instance to Solace PubSub+ for VMware Tanzu, see External MySQL.
- If using TCP Routes: TCP Routes Requirements
Install Solace PubSub+ for VMware Tanzu
To install Solace PubSub+ for VMware Tanzu, do the following:
Download the product file from the Solace Product or Solace downloads page. Note that an account is required to access the Solace Product page.
Upload the product file on the Ops Manager Installation Dashboard.
Click Add next to the uploaded Solace PubSub+ tile in the Ops Manager Available Products view to add it to your staging area.
Click the Solace PubSub+ tile.
Follow the steps in the section below to configure the tile.
Configure Solace PubSub+ for VMware Tanzu
To configure Solace PubSub+ for VMware Tanzu, do the following:
From the Settings tab of the Solace PubSub+ tile:

Configure the Required Settings:
Configure the Optional Settings:
Required Settings
Assign AZs and Networks
From the Settings tab of the Solace PubSub+ tile, click Assign AZs and Networks.

Under AZ and Network Assignments, choose the availability zones and network where the Solace PubSub+ deployment should run. This will include all Operator Allocated Event Brokers. If you are deploying Solace PubSub+ with high availability plans, consider using multiple availability zones for maximum fault tolerance. Also choose the Service Network, this is where On Demand Allocated Event Brokers will be deployed, the Availability Zones for On Demand Allocated Event Brokers are controlled in each plan.
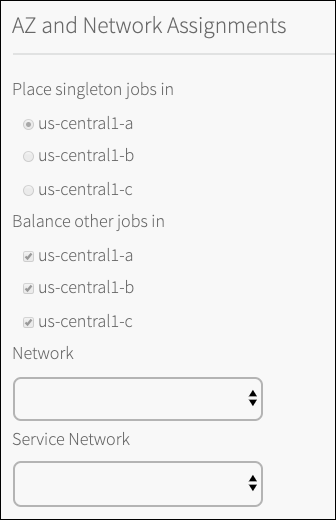
Click Save.
MySQL Configuration
Click MySQL Database.

(Optional) Database columns holding credentials can be encrypted by entering an encryption key in DB Encryption Key. There are no restrictions on the length of the characters for the key.
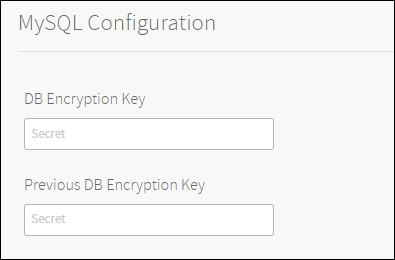
Warning: You cannot recover a lost encryption key. You must safeguard against the loss of encryption keys.
Depending on your use case, do one of the following:
- If you redeploy and do not want to change the encryption, leave the DB Encryption Key with its current value.
- If you want to change the encryption key, enter the new key in DB Encryption Key and enter the old key in Previous DB Encryption Key. The previously encrypted data is decrypted using the old key and re-encrypted using the new key.
- If you want to decrypt the database, enter the last used key in Previous DB Encryption Key and clear DB Encryption Key.
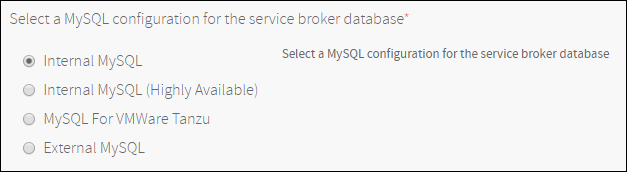
Select one of the supported MySQL configuration for the service broker’s database.
Internal MySQL: The default option is for an ‘Internal MySQL’ deployed to a single management VM. For a production setup please make sure to allocate two management VMs and one arbitrator VM. The arbitrator VM should be located in a different availability zone than the management VMs. Without a load balancer, the service broker relies on MySQL driver for failover functions using up to two management VMs when available.
Internal MySQL (Highly Available): Make sure to allocate two management VMs and one arbitrator VM. The arbitrator VM should be located in a different availability zone than the management VMs. When using a load balancer setup, ensure to point to the two management VMs with health check port
1936. The load balancer setup must be sticky. For more information, see CF MySQL Release - Proxy: Configuring Load Balancer. Without a load balancer, the service broker relies on MySQL driver for failover functions using up to two management VMs when available.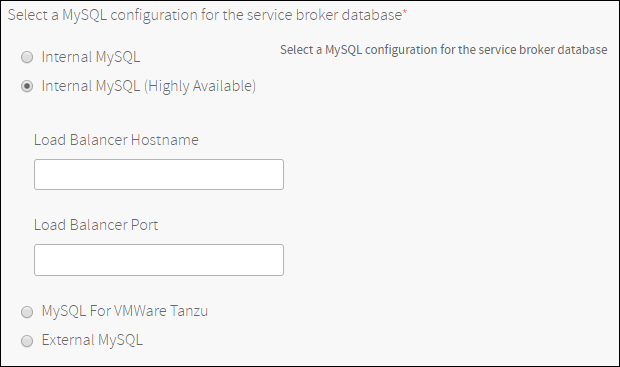
VMware Tanzu SQL [MySQL]: When VMware Tanzu SQL [MySQL] tile is available, select a highly available service plan with a minimum of 100 MB database size.

External MySQL: When MySQL is available as an external service, it may be provided as a user-provided-service to Solace PubSub+ for VMware Tanzu. Ensure you have a highly available deployment with a minimum of 100 MB database size.
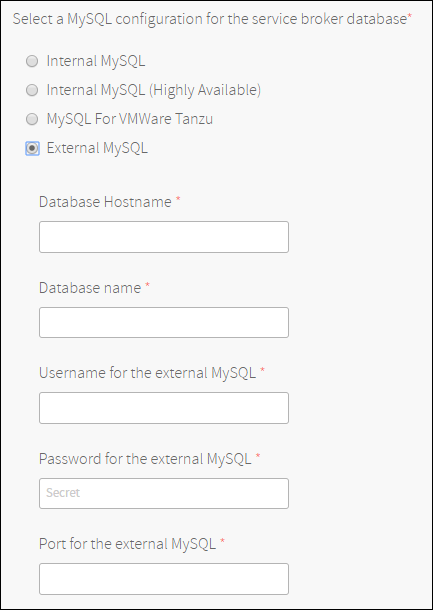
Note: Except for the encryption keys, you cannot modify your MySQL configurations after the deployment has completed. Be sure to select the most appropriate option for your deployment.
Click Save.
Management Access
Click Management Access.

Under Admin user password, pick a password for the Event Broker’s
adminuser.
Note: The password can only contain alphanumeric characters and any of .!@#$%^-_+={}[]/? It cannot contain any of the characters ():“;’<>,`\*&|
(Optional) Follow this procedure if you want to use LDAP.
Click Save.
TCP Routes (Save Required)
Open this pane and click Save even if using the default setting. If you want to enable TCP routes, follow the procedure in (Optional) TCP Routes.
Click TCP Routes.

Default: TCP Routes Disabled.
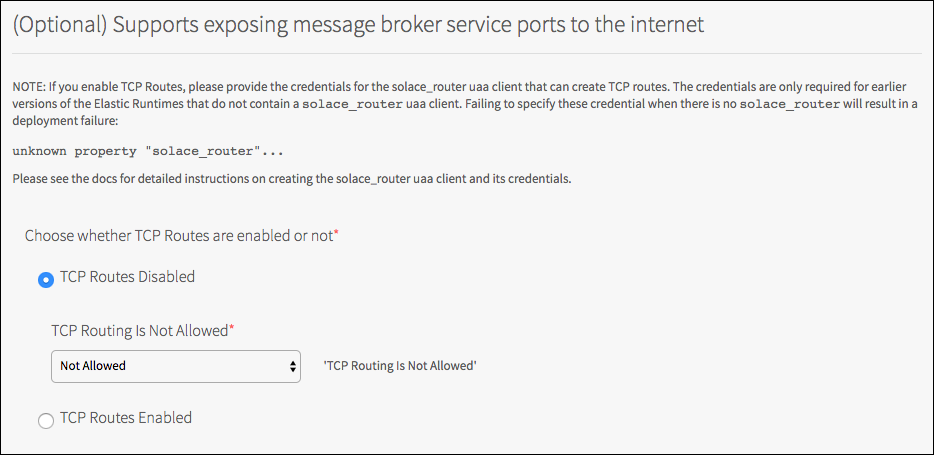
Click Save.
Note: Failing to click Save might result in an unknown property "solace_router" exception when you attempt to Apply Changes.
Standard Plans (Save Required)
Open this pane even if using the default setting. You need to select all the Availability Zones before this can be saved. If you want to customize an plans please see Service Plan Configuration.
Click Standard Plans.

Click Save.
Enterprise Plans (Save Required)
Open this pane even if using the default setting. You need to select all the Availability Zones before this can be saved. If you want to customize an plans please see Service Plan Configuration.
Click Enterprise Plans.

Click Save.
Stemcell
You might need to import a stemcell import if the minimum stemcell required for Solace PubSub+ for VMware Tanzu is not found.
Click Stemcell.

Click Import Stemcell to import the required stemcell for your installation of VMware Tanzu.
Resource Config
Click Resource Config.

Use the drop-down menus to configure the number of Solace PubSub+ Event Broker job instances that are available in each of the service plans mentioned above. These job instances are statically created when the tile is deployed. Service instances are then dynamically allocated at service instance creation time, post-deployment, using these job instances.
Five Enterprise Shared service instances can be hosted on a single Enterprise Shared job instance. As such, the maximum number of Enterprise Shared service instances that can concurrently exist for theEnterprise Sharedservice plan is equal to five times the number ofEnterprise Sharedjob instances. Conversely, three HA Solace PubSub+ Event Broker job instances are required for a single HA Solace PubSub+ Event Broker service instance. As such, the maximum number of HA Solace PubSub+ Event Broker service instances that can concurrently exist for theEnterprise Large-HAandEnterprise Medium-HAservice plans is equal to one-third the number of their corresponding job instances. In order forEnterprise Large-HAandEnterprise Medium-HAservice plans to provide high availability fault tolerance, make use of multiple availability zones for your deployment, with a minimum of 2 and an ideal of 3 or more. If you have only one availability zone, the deployment is not fault tolerant and Solace does not recommend using high-availability service plans under this scenario.
Note: The Automatic number of job instances is kept to the same values found in previous tile releases. This is just to ensure no instances are lost during upgrades.
Note: The number of job instances can be increased after the tile is deployed without impacting already bound apps. However, reducing the number of instances can result in app failure and message loss.
Note: The size of the persistent disk can be changed both before and after deployment. Increasing the size of the persistent disks will impact the service of already bound apps. However, messages will not be lost. Reducing the size of the persistent disk post-deployment is not recommended and can result in message loss, inoperable Solace PubSub+ Event Broker, and/or undefined behaviors.
Note: Unless there are no existing service instances or you are configuring a new plan, Solace recommends keeping the default values for VM Type and ensuring it matches the configurable service plan. A reduction of the RAM or CPU capacity may lead to a deployment failure or service degradation.
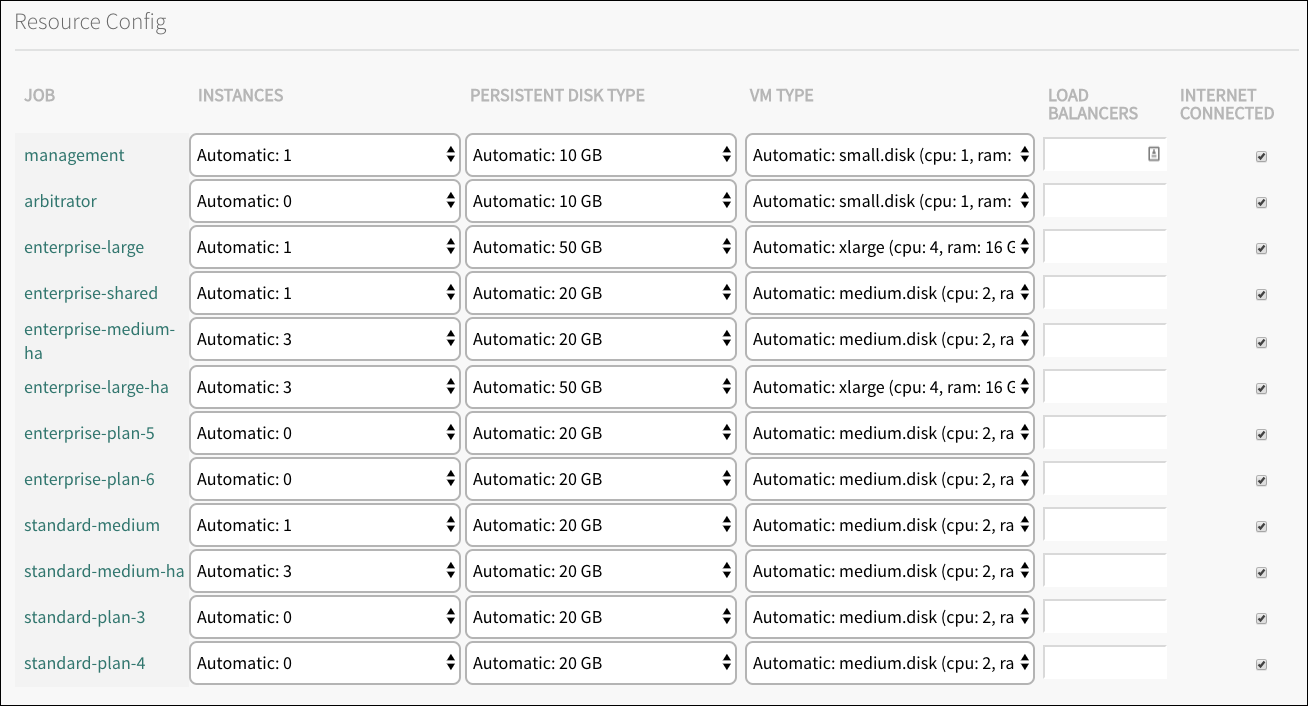
Click Save.
Optional Settings
(Optional) General Settings
Click General Settings.

In Service Name, enter the name you want as the service name in the Marketplace.

Note: If you change the name to something other than
solace-pubsub, any apps that use the Solace PubSub+ Spring Cloud Connectors have to be changed. Clone the project and change any instances of the stringsolace-pubsubto the service name you selected.Check the Enable Service Instance Sharing checkbox to allow service instances to be shared across different Cloud Foundry orgs and spaces.

For more information about this feature see Enabling Service Instance Sharing.
Under Starting Port, enter a port where the messaging services on the Solace PubSub+ Event Brokers (e.g. MQTT, REST, or SMF) will start listening from, for example,
7000. The exact port numbers chosen for each service will be based on this starting port and specified in theVCAP_SERVICESenvironment variable passed to apps. For an example, see Example Environment Variable.
Note: The Starting Port may only be set at tile installation time. Its value may not be changed later.

Under Default Orphaned Resource Policy, choose a default policy for your deployment. This default policy is used when a service does not have its own policy. See Service Orphaned Resource Policy for more details about the options.

Under User Controlled Upgrades for On Demand Instances, configure whether or not users can control when their services are upgraded.
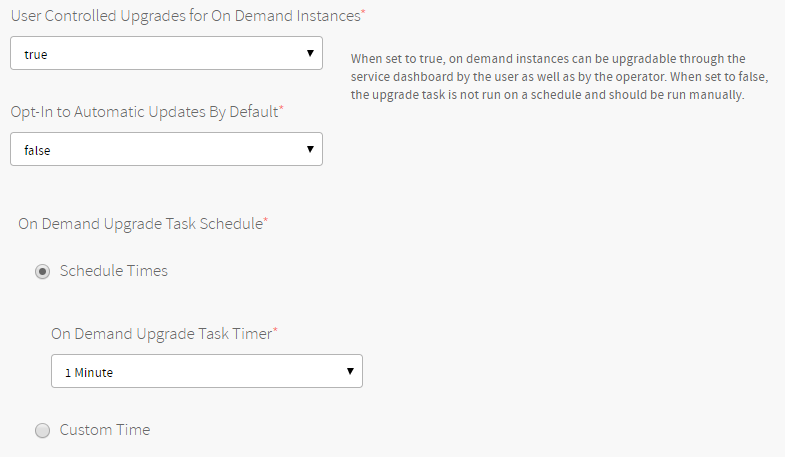
To enable user-controlled upgrades, select true from the dropdown.
When eligible, on-demand services users can indicate through their service dashboard if they want to upgrade. A task runs periodically to check for pending upgrade requests and perform them as required.
In addition, the default value for 'opt-in to automatic upgrades’ with newly created services can be changed. When a service opts-in to automatic upgrades, the service will be automatically enrolled into upgrades when they become available instead of awaiting an indication from the user to enroll. The service owner can opt-in or opt-out on the Service Dashboard.
Note: When upgrading to 2.7.0 from a previous version, existing services will be migrated with a value of false for the automatic opt-in to upgrades option, ignoring the default value specified in the tile’s form.
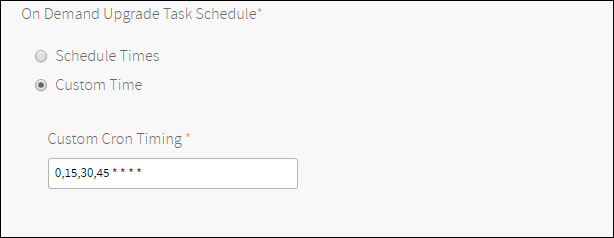
To set how often the upgrade task runs, do one of the following:
Select a preconfigured interval in On Demand Upgrade Task Timer. Select Custom Time and enter an interval in Cron format.
When an update is available, the service dashboard looks like this:
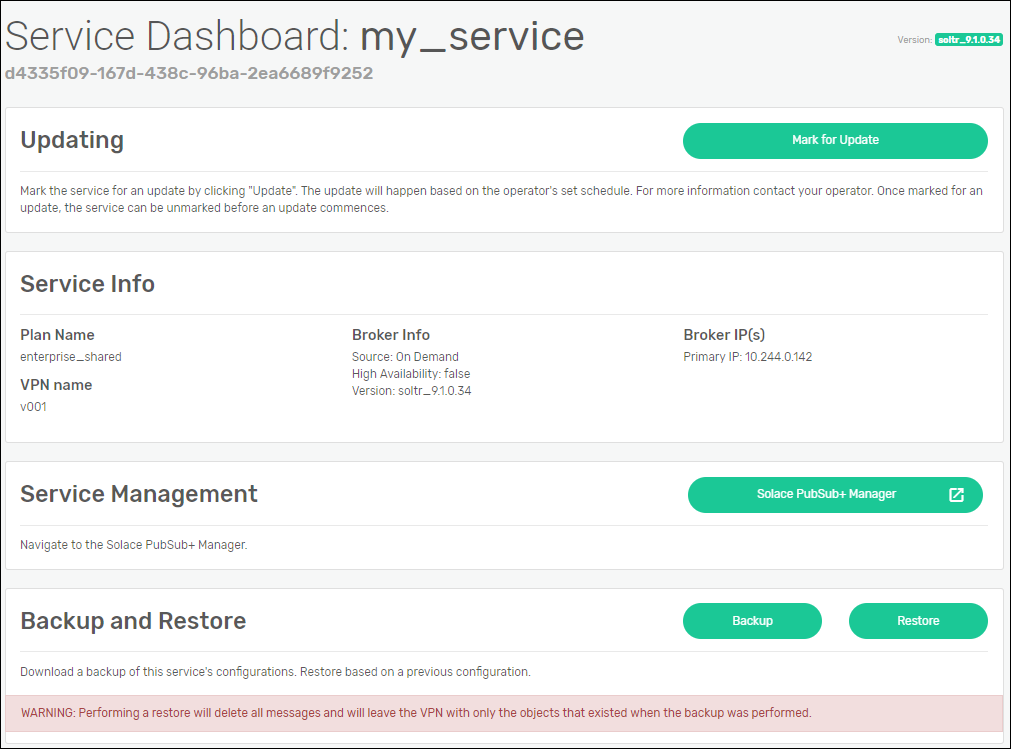
If the user clicks Mark for Update, then the service is updated at the next scheduled time. Alternatively, the automatically opt-in to updates option can be toggled at any point. When on, the user does not need to click Mark for Update when an update is available as it will automatically opt in.
The Mark for Update button will appear if the service broker detects that there has been a change in configuration, including:
**
- PubSub+ for VMware Tanzu Version
- A change to the the disk size or availability zone attributes of the Service Plan associated with the service instance
- Application access authentication scheme
- Management access authentication scheme
- PubSub+ Admin password
- Starting port
- TLS configuration
- LDAP configuration
- Syslog configuration
- TCP Routes configuration
Note: For Shared service plans, every service on a broker must be marked for upgrade before the upgrade can happen. This prevents one tenant from upgrading a router before the other tenants are ready. The operator can mark the services for upgrade on behalf of the tenants.
Maximum In-Flight Canaries and Updates
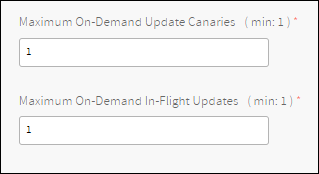
These fields control how many on-demand services can be updated at once.
The Maximum On-Demand Update Canaries field specifies how many services will initially be updated. If those updates are successful, then the rest of the services will be updated. It is recommended to leave that setting with the value 1.
The Maximum On-Demand In-Flight Upgrades field specifies how many services can be updated in parallel after the canaries have been updated.
Note: within each HA service, each node will still be updated one at a time to avoid service disruption.
Note: The number of upgrades that can run at once is also constrained by the number of Director Workers configured in the Bosh Director tile on the Director Config page. Bosh reserves one worker for status related tasks, and so no more than that number of workers minus one, will be available to perform upgrades simultaneously. For example, if there are 3 Director Workers, no more than 2 upgrades will be performed at once regardless of what you enter in the Maximum On-Demand fields in the Solace tile.
See Configuring Bosh Director for details on how to set the number of Director Workers.
Under Web Hook, you can choose to Enable or Disable.
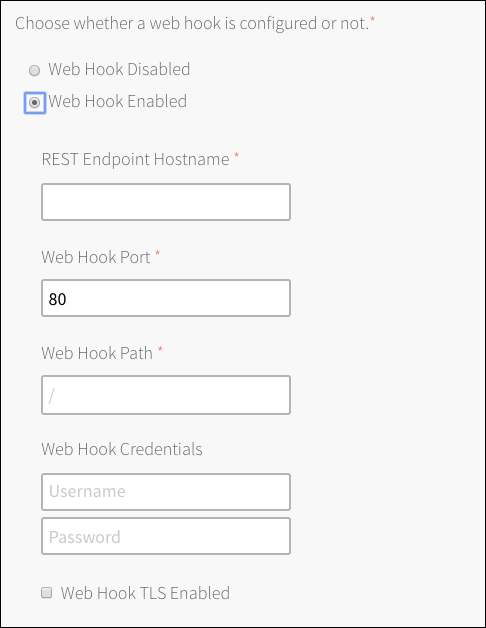
Web Hook enables an endpoint to receive POST requests for service create, delete, and update events.
The
operationfield describes the service event. The possible values arecreate,update, ordelete. The message has service identifying information with network information for all messaging services.
The following sample message is for a service create event. Many lines in the services section of this sample have been removed for brevity:{ "timestamp" : "2019-01-29T14:39Z", "nodes" : [ { "role" : "primary", "ip" : "192.168.16.19" } ], "operation" : "create", "planId" : "68bc18fa-3b06-41a1-bd66-bc6ff2281b75", "planName" : "enterprise_shared", "services" : { "webMessagingUris" : [ "http://192.168.16.19:7005" ] "publicWebMessagingUris" : [ "http://tcp.YOUR-DOMAIN:49551" ], "managementHostnames" : [ "enterprise-shared-0.sys.YOUR-DOMAIN" ], "smfHosts" : [ "tcp://192.168.16.19:7001" ] }, "serviceId" : "1fcdef72-58a4-4e48-a8fc-29a290c0fde9" }The REST endpoint must return the HTTP status code 200. Otherwise the message will remain on a queue and delivery will be reattempted repeatedly. Please see REST Consumers and Solace REST Status Codes for requirements regarding the REST endpoint.
Also see Managing REST Messaging for more information about Solace REST Delivery Points.
Adjust service broker related settings.
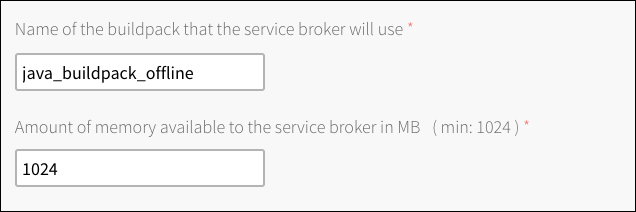
An operator has a chance to confirm the buildpack and the amount of memory used for the Service Broker installation in CF.
Adjust Monitor VM Type and Disk Type.
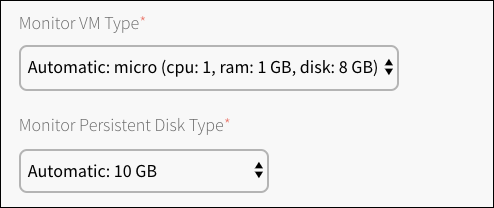
The Monitor VM Type and Disk Type settings apply to all on-demand plans with High Availability enabled. A Monitor node requires 1 CPU and 1 GB of RAM.
Enable REST Messaging through HTTP Routes.

Check the Enable REST Messaging HTTP Routes box to enable HTTP routes registered under the Tanzu Application Service (TAS) system domain for all services for REST messaging capabilities and accessible with the externalRestUris and externalRestTlsUris VCAP entry. This route maps the ports from restUris to externally accessible HTTP/HTTPS ports on a route registered under the TAS system domain. When using HTTPS, the server certificate used will be that of the TAS tile’s configuration and not that of the Solace PubSub TLS configuration. See Solace PubSub+ Credentials for more information.
Under Broker Log File Retention Policy, configure the broker to retain logs based on the size of the log files themselves or for a specified number of days.
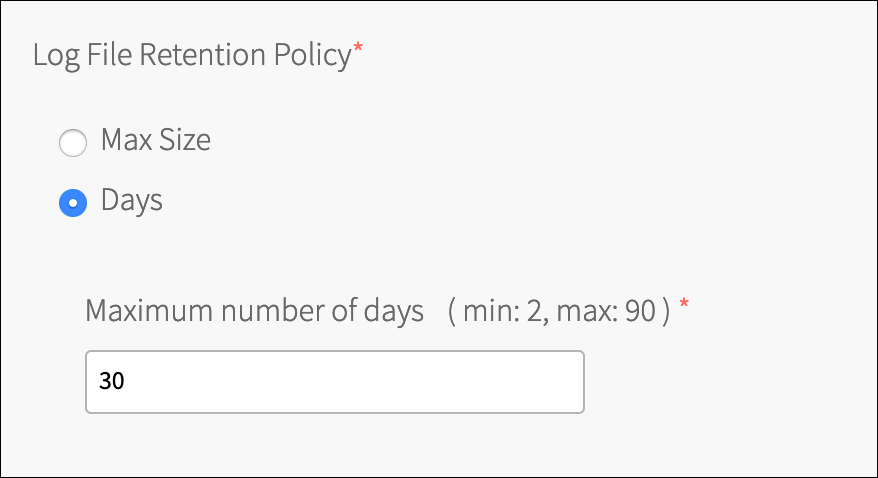
When you change the retention policy to day based, logged messages that may be older than what the new retention policy specifies are not automatically deleted. If this is a requirement, you must manually delete the older log files. This setting only affects broker logs and not other Bosh VM logs.
Restore Primary Node as Active On Upgrade.

Check the Restore Primary Node as Active On Upgrade box to restore the Primary node as active after upgrading High Availability On Demand instances. Operator Allocated instance ordering will not be affected by this property. When not enabled, the upgrade will minimize application reconnections.
Click Save.
(Optional) Bosh DNS Aliases
Click Bosh DNS Aliases

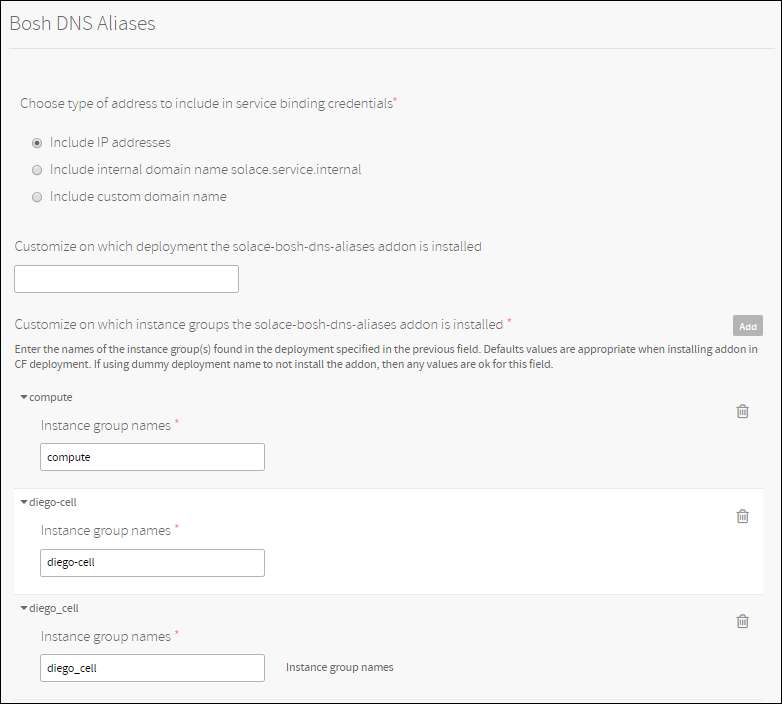
This feature allows you to configure the tile so that DNS addresses are included in binding credentials rather than IP addresses. This allows client applications to perform certificate hostname validation.
You have three options in terms of address types to include in binding credentials. This is configurable from the General Settings tab in Ops Manager.
Option 1: Include IP Addresses
Binding credentials look exactly as before. IP addresses are included.
Option 2: Include internal domain name
Binding credentials include internal domain name which have the following format
<instance_uuid>.solace.service.internalwhere instance_uuid is the instance id of the vm running the Solace PubSub broker.You can use this option combined with an internal CA to perform certificate hostname validation.
Option 3: Include custom domain name
Binding credentials include the domain name configured by the operator. The address format is
<instance_uuid>.<domain_name>where instance_uuid is the instance id of the vm running the Solace PubSub broker and domain_name is the domain name configured by the operator.You can use this option combined with a public CA to perform certificate hostname validation.
Notes:
- If you select option 2 or 3 the TAS for VMs tile must be redeployed so that the settings get propogated to the TAS for VMs.
- Upon enabling this feature with option 2 or option 3 described above, old bindings containing IPs will remain valid but won’’t be automatically updated to include the new address type. New bindings will have the new address type.
Before reconfiguring the tile with a new option, note that:
- Moving from option 1 to another option is OK. Bindings created with option 1 will remain valid.
- Moving from option 2 to another option is OK. Bindings created with option 2 will remain valid.
- Moving from option 3 to another option is possible but breaks existing bindings. Bindings created with option 3 will stop working.
The solace-bosh-dns-aliases addon needs to be applied using a runtime-configuration. The operator can control to which deployment the runtime-configuration will be applied, including the selection of instance groups within the deployment.
By default the runtime-configuration will be applied to the CF deployment. An operator is free to adjust the deployment and selection of instance groups. By entering a deployment name that does not exist, you can prevent Bosh from DNS-resolving your custom domain name.
(Optional) TLS Config
Click TLS Config.

TLS is disabled by default.
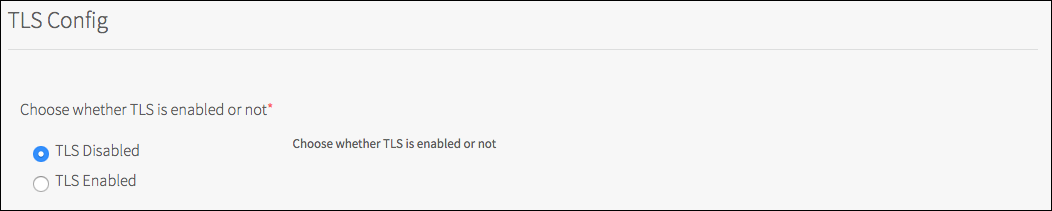
Click TLS Enabled.
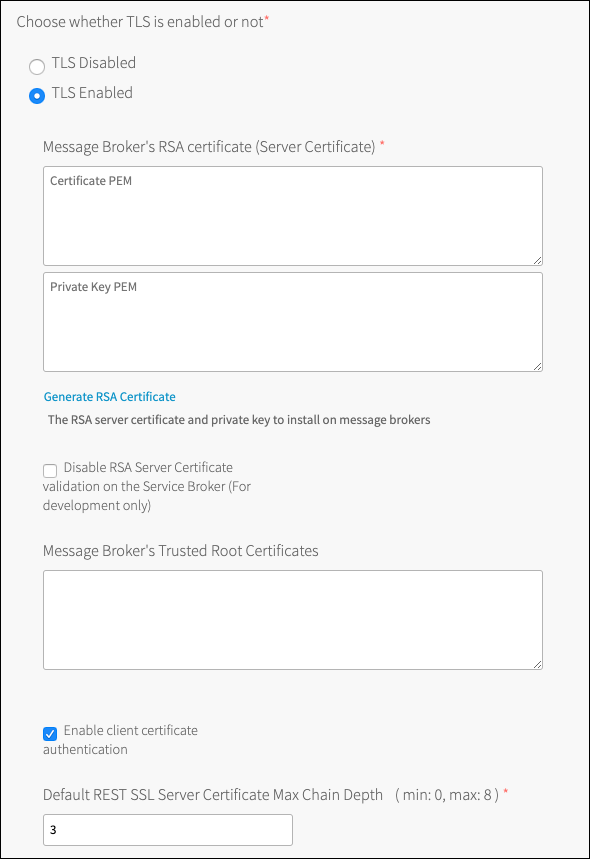
By enabling and configuring TLS, you allow messaging between apps and the Solace PubSub+ Event Broker to be encrypted. Apps requiring encryption would then need to use the TLS-specific URLs passed in the
VCAP_SERVICESenvironment variable. For more information about theVCAP_SERVICESenvironment variable, see Example Environment Variable. If TLS is not configured, the TLS specific URLs continue to be passed in theVCAP_SERVICESenvironment variable but fail to connect to a PubSub+ Event Broker if used.Configure Event Broker’’s RSA certificate (Server Certificate) either by pasting in a certificate and private key in PEM format or clicking Generate RSA Certificate. Generated certificates are equivalent to self-signed certificates.

Note: The server certificate configured is used by all Solace PubSub+ Event Brokers deployed. As such, all Solace PubSub+ Event Brokers deployed in a VMware Tanzu instances have the same identification.

Note: Communication between the Solace PubSub+ Service Broker and Solace PubSub+ Event Broker is also encrypted if a TLS certificate is configured. The Service Broker uses the Container Certificate Trust Store Framework to validate the server certificate returned by Solace PubSub+ Event Brokers. If the framework is not operational when the tile is deployed, the Service Broker is unable to validate server certificates sent by the Solace PubSub+ Event Brokers and the tile fails to deploy. In development environments, it may be acceptable to not require server certificate validation, in which case the Disable RSA Server Certificate validation on the Service Broker (For development only) check box can be selected. This check box should never be selected in production deployments. Instead, the framework should be made operational.
(Optional) Configure Event Broker Trusted Root Certificates. These certificates are stored in the trust store on the Solace PubSub+ Event Brokers. They are required if you choose to use LDAP with TLS or if you want to use Client Certificate Authentication.

Enable Client Certificate Authentication. Enabled by default, this will configure the router to enable client authentication by certificate.

Set the Default REST SSL Server Certificate Max Chain Depth for newly created service instances. Set to 3 by default and can be any number between 0 and 8. The REST SSL Server Certificate Max Chain Depth can be changed by the service owner through the Solace PubSub+ Broker Manager or CLI. Changes to this property do not impact existing service instances.

Click Save.
(Optional) Service Access
Click Service Access.

Check the Enable global access to plans of service solace_pubsub option.

Note: To control access to Solace PubSub+ service plans on a case-by-case basis, do not enable this option. Once this is enabled, it cannot be disabled from this form. It must be revoked by the operator manually.
Click Save.
(Optional) Security
Click Security.

Check the Secure service instance credentials option.

Note: This enables credentials storage on CredHub capable deployments.
Check the Automatic application security group management option.

Note: This allows for application security groups to be created for each service binding and deleted on unbind. The created application security groups grants an app’s space access to the Solace PubSub+ Service Instance IP and service ports only.
Click Save.
(Optional) Management Access
Click Management Access.
If you configured LDAP, you may choose to have the LDAP Server provide the authentication and authorization for the management roles on a Solace service instance.
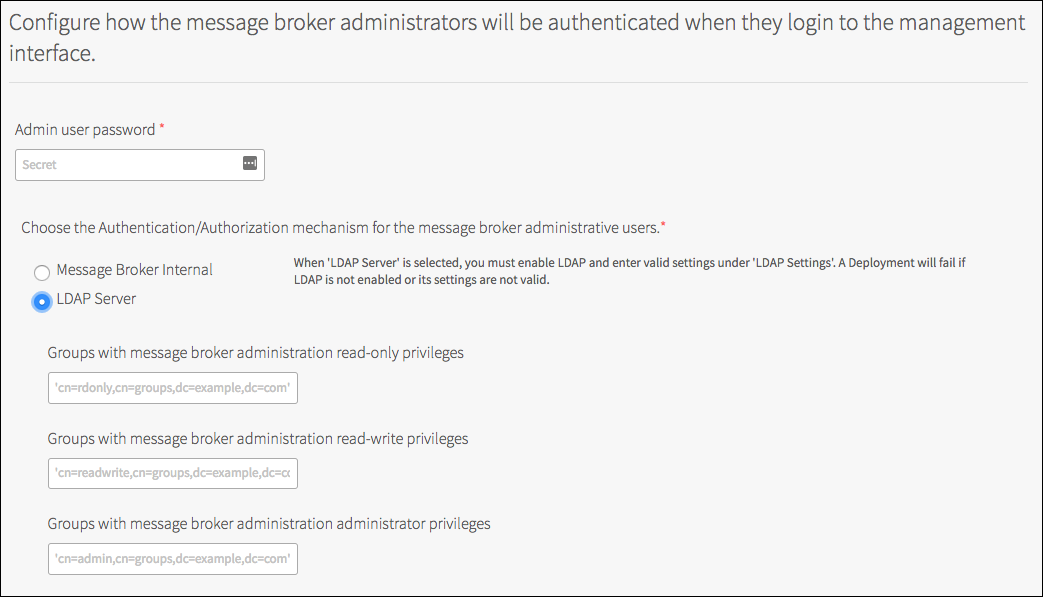
(Optional) Configure Groups with Solace PubSub+ Event Brokers administration read-only privilege.

(Optional) Configure Groups with Solace PubSub+ Event Brokers administration read-write privileges.

(Optional) Configure Groups with Solace PubSub+ Event Brokers administration administrator privileges.

Note: Cloud Operators need to have global access to the Solace PubSub+ Event Brokers deployed by the tile. This allows them to administer the Solace PubSub+ Event Brokers with SolAdmin, CLI, or SEMP-based tools. Cloud operators might have different roles. Each role requires one of the three types of access-level: administrator, read-write, and read-only. When using "Event Broker Internal”, the cloud operators access to a single administrator level role using the admin password. With “LDAP Server”, users can be assigned to groups in LDAP mapping to their respective roles.
(Optional) Configure a Monitor User.
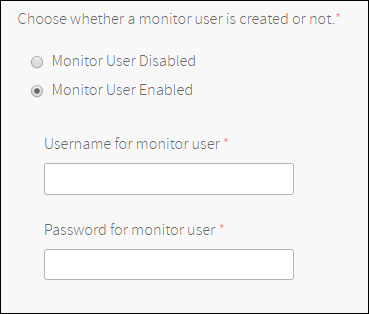
You can create a management interface user with read-only access both to the global configuration and the VPN-level configuration. Please see CLI User Access Levels for details about the access levels.
Click Save.
(Optional) Application Access
Click Application Access.

Using the defaults, the Solace PubSub+ Event Broker uses its internal database for user credentials per service instance. If you configured LDAP, you may request the Solace PubSub+ Event Broker to use the LDAP Server for authentication and authorization of when a client attempts to access a Solace PubSub+ service instance.
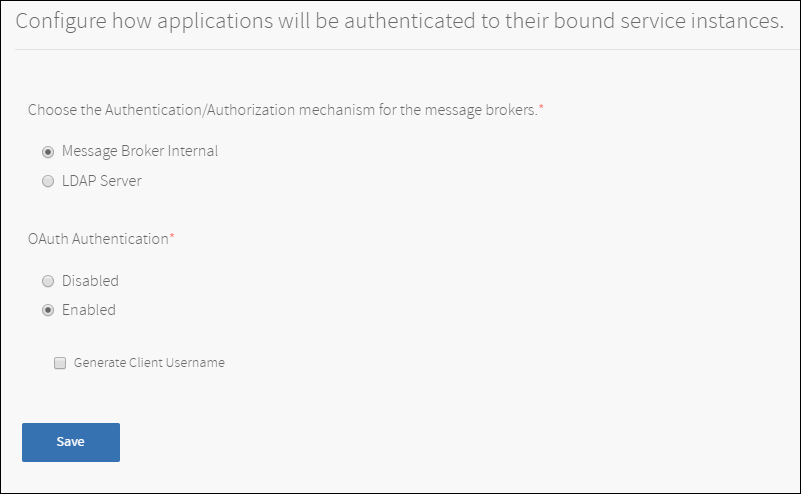
You can also enable OAuth Authentication for new service instances. Changing this setting does not update pre-existing service instances. If you select to generate client usernames, our service broker will create a client username at bind time and return it in VCAP services. Client applications can optionally use the client username in OAuth tokens. Please see the section on OAuth Configuration below to see how to configure a default OAuth provider.
Click Save.
(Optional) LDAP Settings
Click LDAP Settings.

LDAP is disabled by default.
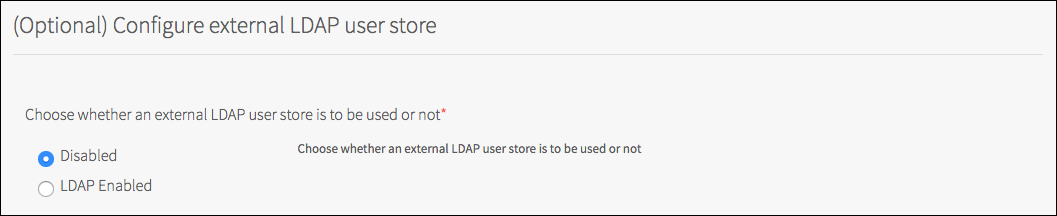
Note: Using the default LDAP Disabled, the Solace PubSub+ Event Broker uses its internal database for management and user credentials per service instance. To use an LDAP store, you must select LDAP Enabled and provide all the required settings for your LDAP server.
Click LDAP Enabled.
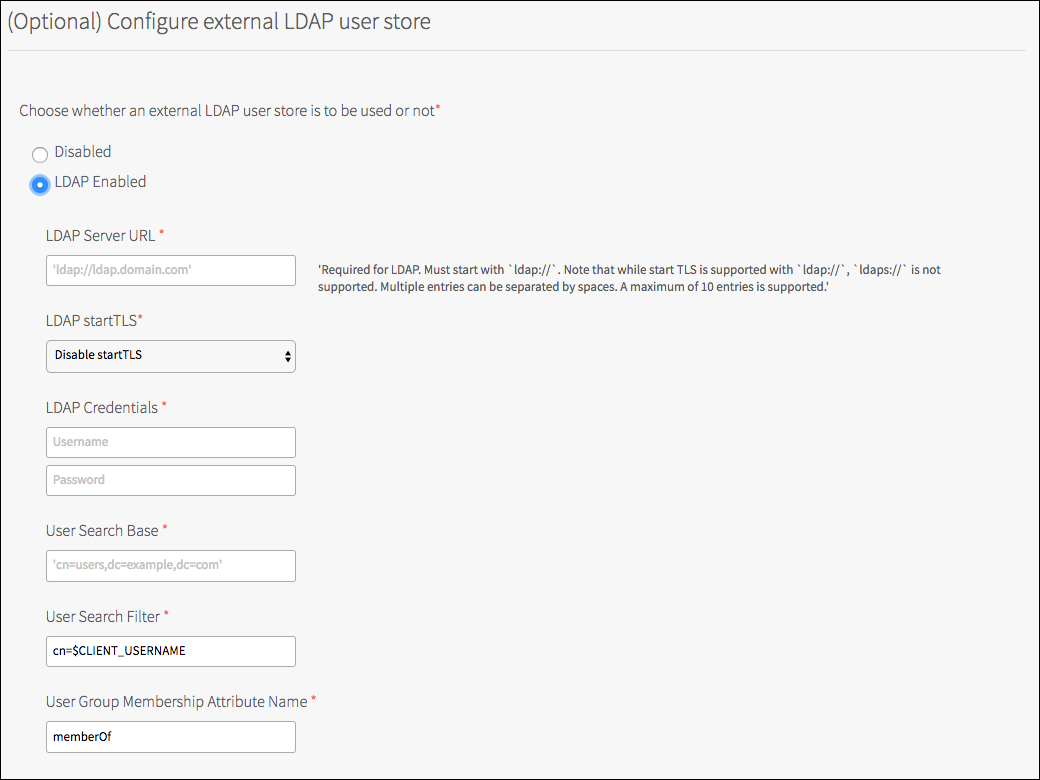
Set LDAP Server URL.

Note: Consider the network accessibility of the provided LDAP server. You may need to check the Internet Connected option in Resource Config.
Set LDAP TLS Preference.

Set LDAP Credentials to use with the LDAP Server.

Set User Search Base.

Set User Search Filter.

Set User Group Membership Attribute Name.

Click Save.
In order to have an effective LDAP configuration, configure LDAP for Management Access and Application Access.
If neither Management Access nor Application Access are configured for LDAP, the Solace PubSub+ Event Broker continues to use its internal database for management and user credentials.
(Optional) OAuth Provider Settings
Click OAuth Provider Settings.

This page allows you to configure a default OAuth Provider that is configured on new message VPNs.
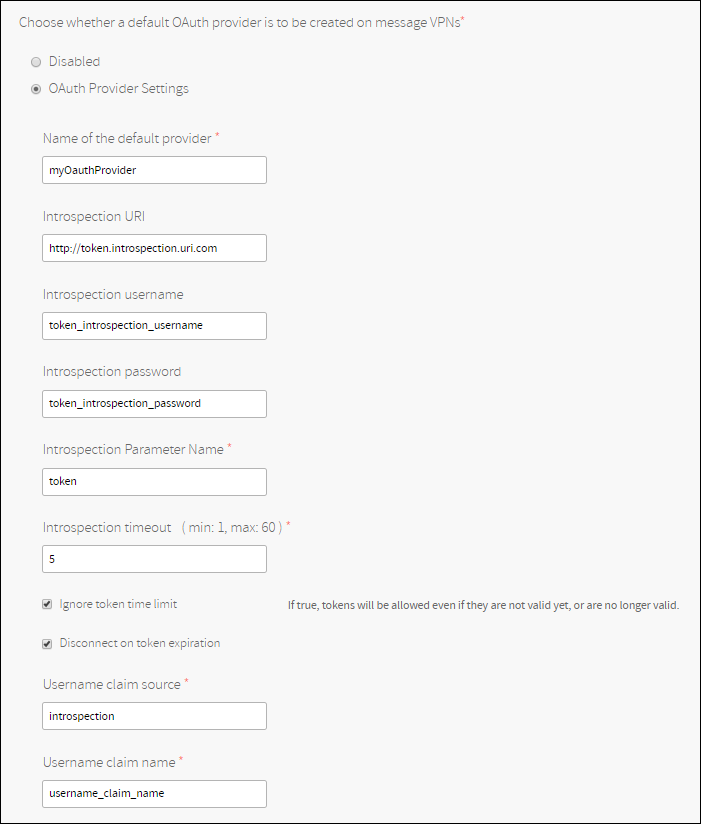

Please refer to the Client Authentication Overview page for field documentation.
Changing the above configuration does not update pre-existing message VPNs. The default OAuth provider is only created on new message VPNs.
A user is free to modify any OAuth configuration manually by logging into the PubSub+ broker and using the command line interface. User customizations won’t be lost.
Note: OAuth Authentication is disabled on message VPNs by default and can be enabled on the Application Access page.
(Optional) System Logging
Click System Logging.

System logging is disabled by default.
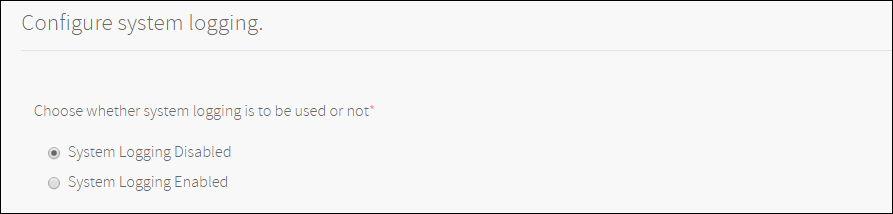
Click System Logging Enabled.
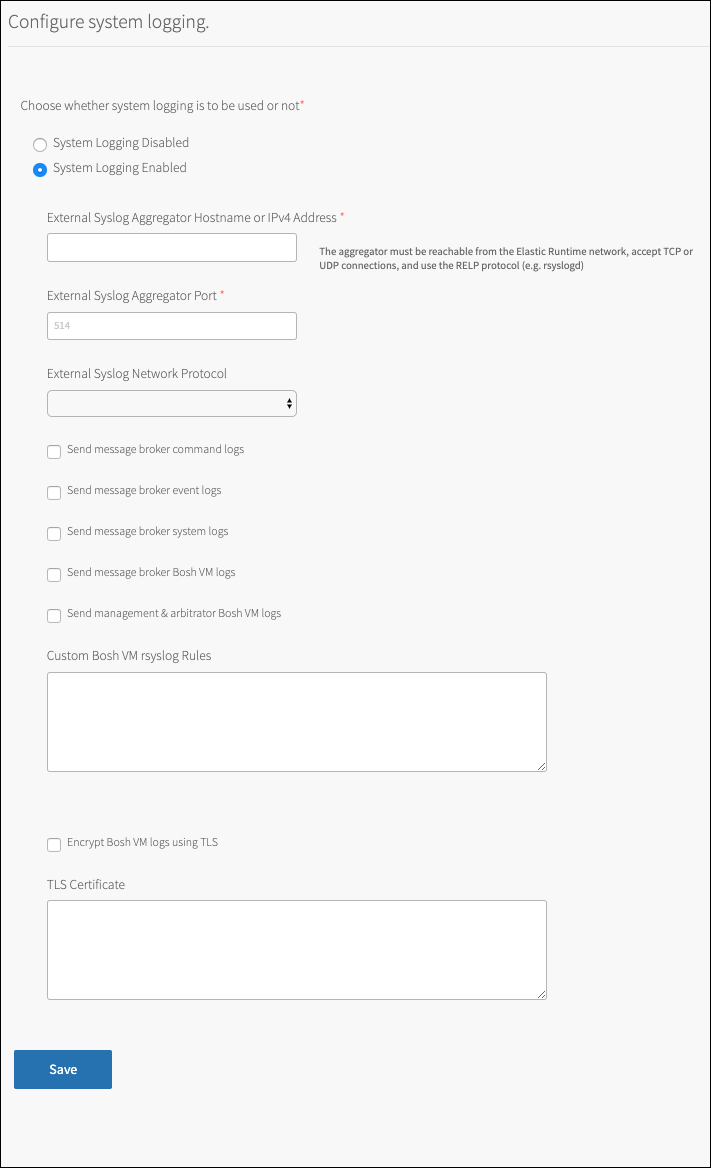
Set the external syslog hostname.

Note: Consider the network accessibility of the provided syslog server. You may need to check the Internet Connected option in [Resource Config](#required_resource_config).
Set the external syslog port.

Set the external syslog network protocol.

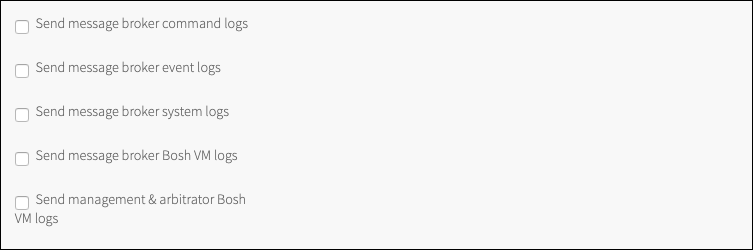
Select what logs to send to the external syslog server.
Set custom rules to control log forwarding per job.

When no rules are provided, all jobs forward their logs.
Some rule examples:
if ($app-name != "solace-broker-logs") then stop

if ($app-name == "broker_agent") then stop
Note that if your custom rule is invalid, it will be ignored and won’t fail the deployment.
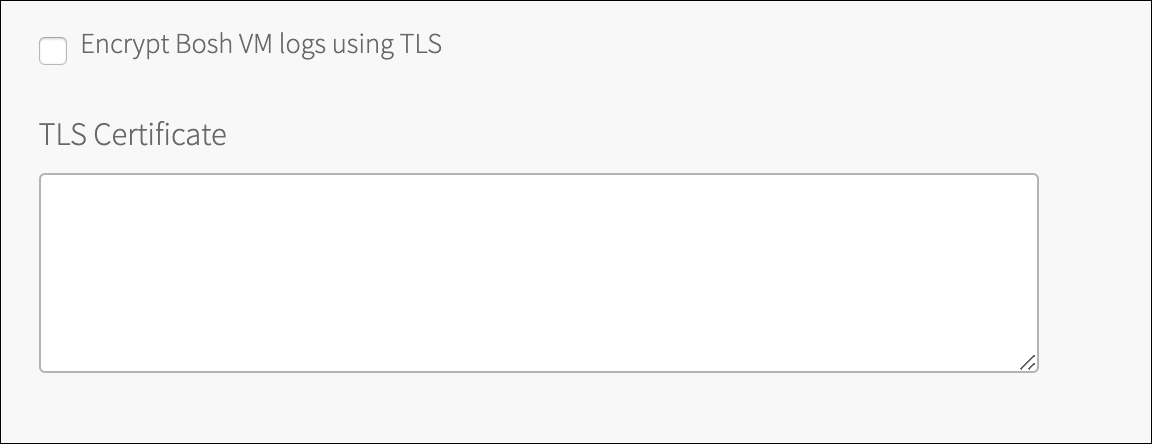
Set TLS encryption.
Click Save.
(Optional) Enable TCP Routes
Click TCP Routes.
TCP routes are disabled by default.
Click TCP Routes Enabled.
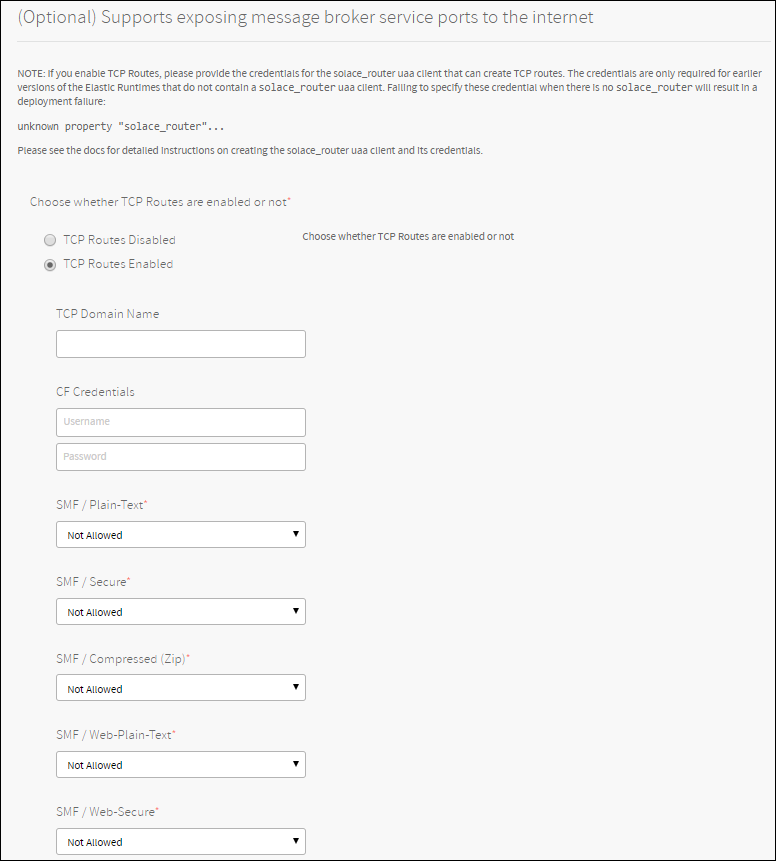
(Optional) Enter a domain into the Custom TCP Domain Name field. If a domain is entered here, it will be the domain used for TCP routes, otherwise the first discovered TCP domain will be used.
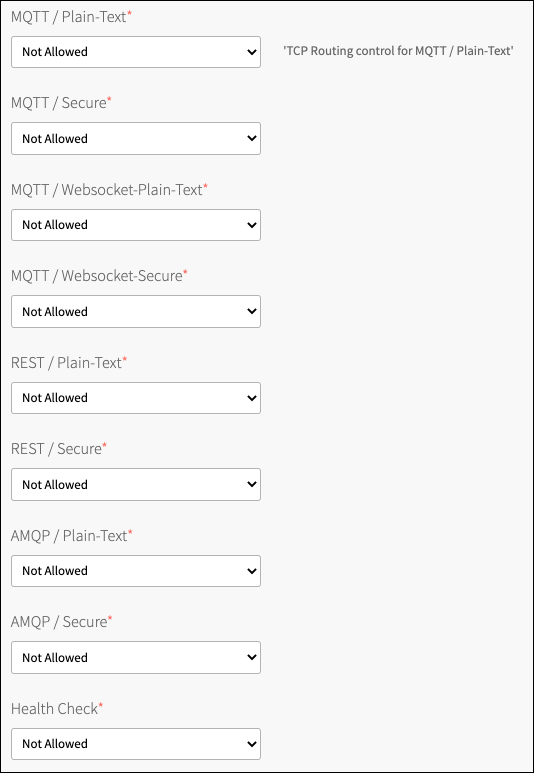
Select which protocols will have TCP routes.
Note: Fine-grained control is available by protocol. If you choose Not Allowed, a TCP route is never created for this protocol, even if requested at service creation time. If you choose Disabled by default, at service creation time, a TCP route is not created for this protocol unless a user-provided parameter overrides it with a
truesetting. If you choose Enabled by default, a TCP route is created for this protocol at service creation time, unless a user-provided parameter overrides it withfalsesetting.Check the TCP Routes Requirements and Click Save.
(Optional) Configure Static IPs
It is possible to allocate ranges of IP addresses to some or all of the pre-provisioned plans. Each plan can be assigned one range, or several ranges separated by commas.
For example, you can specify that all Enterprise Large instances are within the range 10.0.4.20-10.0.4.29, and that Enterprise Shared instances are within the ranges 10.0.4.30-39,10.0.4.90-10.0.4.99.
The IPs must belong to the network assigned to your deployment and must not be in the reserved IP range. To see what IPs belong to your network, go to the Bosh Director tile and look at the Create Networks tab, and select the network corresponding to the one you selected in the Assign AZs and Networks page in the Solace tile.
Click Static IPs.

Enter the range, or comma-separated ranges, or IP addresses, for any plans for which you want to specify IP ranges:
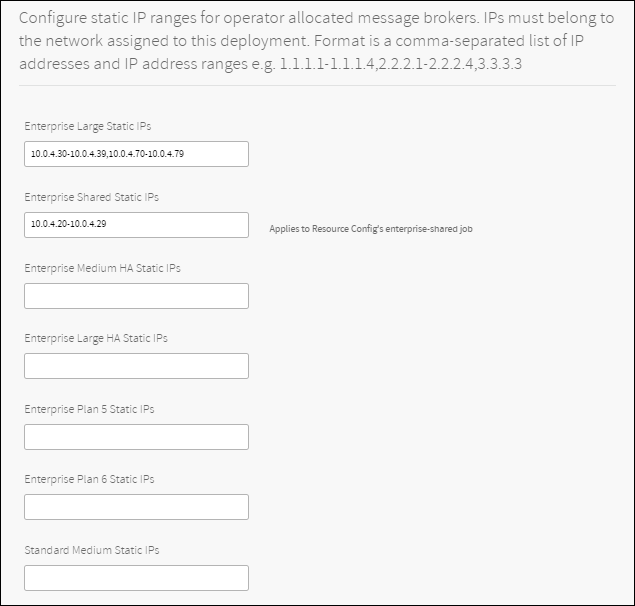
Click Save.
(Optional) Configure Errands
Errands are scripts that are run when a tile is installed, updated or removed. The errands page lists them and lets you choose whether to run them.
Unless otherwise stated in this documentation you should not modify these settings, otherwise the tile may not get installed properly. The only time you would change them would be if you were trying to remove a tile and one of the errands was preventing you to do this because the errand itself was failing.
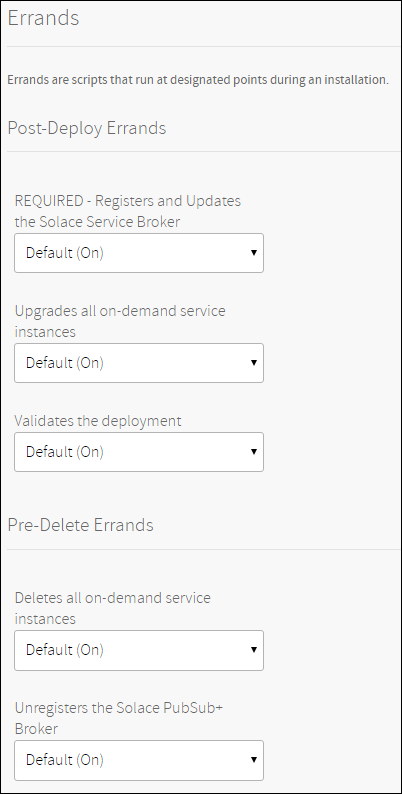
- Registers and Updates the Solace Service Broker: This errand ensures that the Solace service broker is installed/updated and configured according to the tile configuration. This errand also registers the Solace service broker on Cloud Foundry. This errand is mandatory and needs to run on every deploy.
- Upgrades all on-demand service instances: This errand upgrades all on-demand service instances. You may want to disable this errand when “User Controlled Upgrades for On Demand Instances” is enabled.
- Validates the deployment: This errand validates that brokers were successfully deployed and configured. This errand should be ran on every deploy to ensure the system is ready and running as expected by the end of the deployment.
- Deletes all on-demand service instances: This errand deletes all on-demand service instances. If on-demand service instances exist at the time the tile is deleted, this errand frees resources by automatically deleting associated bosh deployments.
- Unregisters the Solace PubSub+ Broker: This errand deletes the Solace service broker and unregisters it from Cloud Foundry. This errand should always be ran when the tile is deleted, otherwise, manual cleanup is required.
Apply Changes
In order to apply changes, all the settings for the Solace tile must be marked with green checkmarks.
Click Installation Dashboard at the top left corner of the screen to leave the tile configuration and go back to dashboard.

Click Apply Changes to deploy the tile.

After the tile has deployed, see Creating and Binding Solace PubSub+ Service Instances for information about creating instances of the Solace PubSub+ service and binding them to apps.
Upgrades
Solace PubSub+ for VMware Tanzu supports upgrades starting with VMware Tanzu v2.0. Future releases can upgrade a deployment if the deployment is v2.0 or higher. In-Service-Upgrades are supported from VMware Tanzu v2.0 for high-availability service plans.
If a v1.x.x tile is currently installed, a direct upgrade path to v2.0.0 is not supported. The v1.x.x tile should be uninstalled before a v2.0.0 tile is installed.
Warning: If you removed an Evaluation version and intend to install an Enterprise version with the same version number, then you must remove the bosh releases for that version first. Log into bosh and execute:
  $ bosh delete-release solace-pubsub/<version>
  $ bosh delete-release solace-pubsub-broker/<version>
  $ bosh delete-release solace-service-adapter/<version>
Note: If some PubSub+ Event Brokers have been upgraded and others have not, it is not possible to create new bindings or service keys with the non-upgraded services. This is because features such as authentication schemes might have changed with the upgrade, and would not be compatible with the services created before the upgrade.
Non-High Availability Upgrades
Upgrades are service-affecting for non-HA service plans Enterprise Shared, Enterprise Large, and Standard Medium.
The messaging service for an application will experience an outage that lasts no longer than the time it takes to upgrade the Solace PubSub+ Event Broker and start it up again.
High Availability Upgrades
Upgrades are non-service-affecting for high-availability plans Enterprise Large-HA, Enterprise Medium-HA and Standard Medium-HA, so there will always be a service available during upgrades. Upgrades will affect each VM providing the HA service one at a time.
An application using an HA service experiences at least one switch-over during an upgrade, and at most two switch-overs.
See our Getting Started Samples with full source code available in GitHub for some examples of how HA connections are used, as well as Configuring-Client-Connections for additional information on client connection setup to allow for switch-overs during upgrades.
The upgrade process is designed to keep services available.
Failures in upgrades are due to either pre-conditions or post-conditions, and are intended to keep services available in case of any failure.
The following pre-conditions must be met before an upgrade can proceed, or the upgrade will abort.
- The version of the tile being upgraded must be v2.0 or higher.
- The redundancy state of HA services must be healthy.
If any failure occurs during an upgrade, services remain available.
For more information, see the Troubleshooting Guide.
Networking
This section describes networking requirements. Read this section if your firewall rules affect network communication within your installation.
Applications deployed in VMware Tanzu that consume PubSub+ services must be able to connect to the VMs hosting the PubSub+ instances. They can connect using the IP address that is provided to the application through the
VCAP_SERVICESenvironment variables. Alternatively, the operator can enable TCP Routing to allow internal and external applications to communicate with the PubSub+ instance through a DNS name.By default PubSub+ services are consumed starting at port 7000. You can configure this value. To see which ports have been allocated for a service, use the Web Hook feature.
The service broker must communicate with any VMs that host PubSub+ instances, whether they are on the same network or a different one. When using On-Demand Services, the service broker must communicate with VMs running in the Services network.
The service broker must communicate with the management and arbitrator VMs.
The service broker must communicate with cf.
The service broker and the VMs hosting the PubSub+ Event Broker must communicate with the CredHub service if the Secure Service Instance feature is enabled.
Solace PubSub+ instances must communicate with cf and the cf nats service when TCP Routing is enabled. The instances use the route registrar which internally uses nats.
Solace PubSub+ instances in HA groups must communicate with each other.
The service broker is provided with a PubSub+ service for its internal use. Determine which ports are required by looking at the service broker’s
VCAP_SERVICESenvironment variable for the service named 'internal-service-broker’.PubSub+ for VMware Tanzu uses bosh dns to communicate with VMware Tanzu services such as Credhub.
Here is a table showing the ports that are required for internal communication between our components. All use TCP (none uses UDP.)
| Source | Destination | Port | Secure Port | Protocol | Purpose |
|---|---|---|---|---|---|
| Service Broker | Event Broker (Internal) | 443 | HTTPS | Used to configure the internal Event Broker through the gorouter. | |
| Service Broker | Event Broker (Service instance) | 2222 | SSH | Used to ssh into the Event Brokers used as service instances. | |
| Service Broker | Internal MySql instance | 3306 | JDBC | Used to connect with the internal MySql instance, unless an external database is used. | |
| Cloud Foundry | On-Demand Service Broker | 7979 | HTTP | Used by cf to send commands to the on-demand service broker (Management vm). | |
| Service Broker | Event Broker (Service instance) | 8080 | 943 | HTTP/S | Used to configure the Event Brokers used as service instances. |
| Event Broker (In any HA group) | Event Broker (In any HA group) | 8300 | TCP | Used for configuration synchronization. | |
| Event Broker (In any HA group) | Event Broker (In any HA group) | 8301 | TCP, UDP | Used for configuration synchronization. | |
| Event Broker (In any HA group) | Event Broker (In any HA group) | 8302 | TCP, UDP | Used for configuration synchronization. | |
| Event Broker (In any HA group) | Event Broker (In any HA group) | 8471 | TCP | Used for the HA mate link. | |
| Event Broker (Service instance) | 9090 | HTTP | PubSub+ health check | ||
| Service Broker | Broker Agent | 18080 | HTTP | Used to communicate with the broker agents running on the service instance VMs. | |
| Service Broker | Event Broker (Internal) | 38080 | 3943 | HTTP/S | Used to configure the internal Event Broker through the gorouter. |
| Service Broker | Event Broker (Internal) | 39090 | HTTP | Used to connect to the health endpoint on the internal Event Broker. |
IP Address Assignment
For operator allocated instances, IP addresses are assigned to VMs during deployment and remain static throughout the life of the deployment. Note: you can specify the range of IPs for operated plans, see Static IPs
For on-demand services, IP addresses are dynamically allocated from the network during the on-demand deployment creation, but once allocated they remain static throughout the life of the on-demand deployment.
TCP Routes Requirements
| Enabled TCP Routing in VMware Tanzu | To use TCP Routes, TCP routing needs to be enabled in VMware Tanzu. To do this, see Enabling TCP Routing. |
|---|---|
| A solace_router UAA agent | A solace_router UAA agent is required to use the TCP Routes feature. If
using a new version of the VMware Tanzu Application Service for VMs (v2.1+), the
solace_router UAA client may be present already, and there is no need to
provide Cloud Foundry credentials. Check your installation for the presence of
the solace_router UAA client, which can be found under Pivotal
Application Service > Credentials > UAA. If a solace_router is not
found, you must to create one. To create a solace_router, do the following:
|
| A TCP Domain |
|