A queue on an event broker acts as both a destination that clients can publish messages to and as an endpoint that clients can consume messages from. Queues may be used in a point-to-point (PTP) messaging environment, and they can have topic subscriptions so that messages published to matching topics are delivered to the queue. For general information about queues, see Topic Endpoints and Queues, and for in-depth information, see Queues.
You can also configure queues in Solace Event Portal and push the updates to an event broker if runtime configuration is enabled. For more information, see Configuring Event Brokers in Event Portal.
You can divide queues into partitions to ensure that messages with similar contexts are always processed by the same consumer in an environment using dynamic microservices. For more information, see Configuring Partitioned Queues.
This topic includes the following tasks:
Creating a Queue
To create a queue using Broker Manager, perform these steps:
- Open Broker Manager. For instructions, see Broker Manager.
- Select a Message VPN.
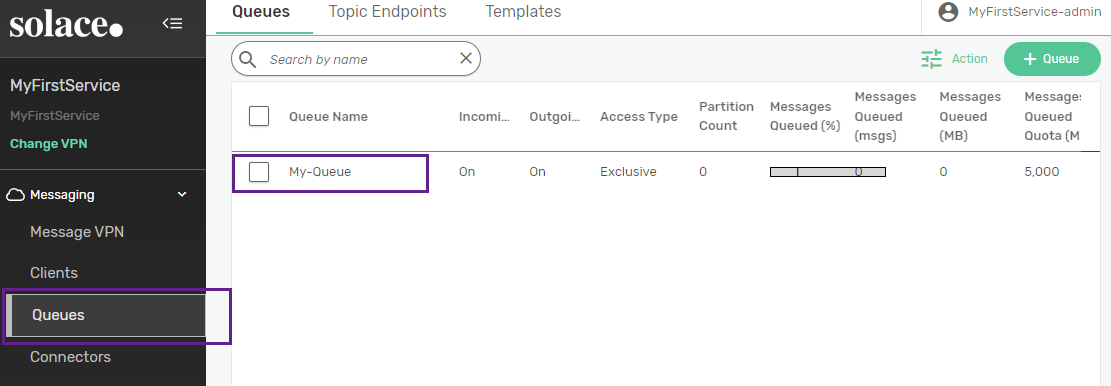
- On the left navigation bar, select Queues
-
Click + Queue.
- Enter a name for the queue and click Create.
-
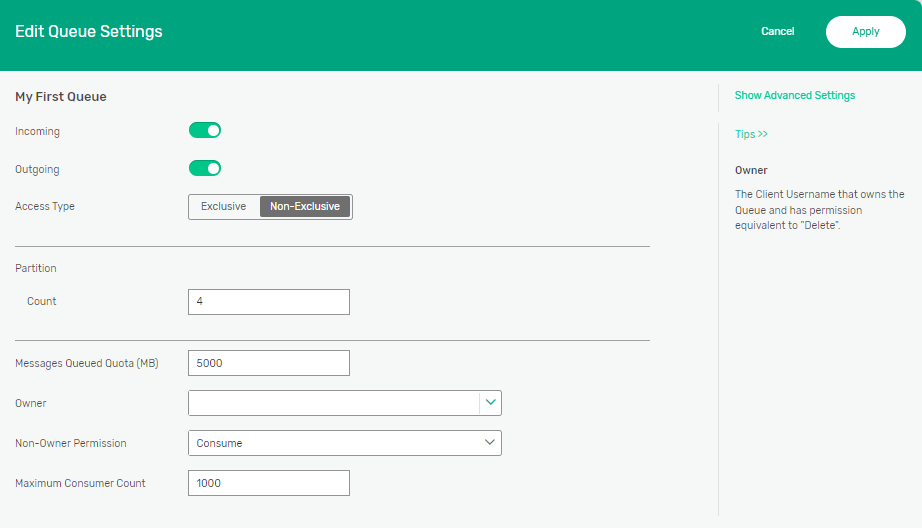
Set the following options for the queue:
Setting Description Incoming
Specifies whether messages can be written to the queue.
Outgoing
Specifies whether messages can be consumed from the queue.
Access Type
Specifies how messages are delivered when multiple consumer flows are bound to the queue.
- Exclusive specifies that only one consumer can be active on the queue. If other consumers attempt to bind and the
Maximum Consumer Countvalue of the queue is not exceeded, they will bind, but remain inactive until the active consumer is unbound and a new active consumer is chosen from the queue's inactive consumers. Exclusive queues always deliver messages in the order they are received. - Non-Exclusive specifies that multiple consumers can bind to the queue, which enables load balancing and consumer auto-scaling. A non-exclusive queue can be non-partitioned or partitioned.
- For a non-partitioned queue (partition count is zero), each consumer is serviced in a round-robin fashion. If a connection fails, unacknowledged messages are delivered to another consumer with the re-delivered flag set. In this way, messages can be delivered to consumers out of order.
- For a partitioned queue (partition count is greater than zero), each consumer is delivered messages from one or more partitions. Messages are mapped to partitions based on a hash of the partition key, which is set by the publishing application. Message order is maintained within a partition, but not between partitions.
Partition Count Specifies the number of partitions for the queue. For more information, see Configuring Partitioned Queues.
This setting is available only for event broker services version 10.4 and later when the Access Type is set to Non-Exclusive.
Messages Queued Quota
Specifies the maximum amount of message spool, in megabytes, that the queue may use. Setting the messages queued quota to 0 enables the last value queue feature and disables endpoint quota checking. A value of 0 only allows spooling of the last message received by deleting older messages from the endpoint upon receiving new messages. If the queue is partitioned, each of its partitions holds the last message spooled to that partition. For more information, see Last Value Queues.
Owner
The queue owner has full unlimited permissions for the queue. The owner can consume, delete, or modify topics in the queue. By default, users with access to Broker Manager have ownership privileges. You can also give ownership to client applications. Client access to the durable message queue must first be disabled before assigning an owner.
Non-Owner Permission
Specifies the access level given to consuming client applications other than the queue owner:
-
No Access—Disallows all access to applications other than the queue owner.
-
Read Only—Clients have read-only access to messages spooled to the queue.
-
Consume—Clients can consume and delete messages from the queue. This is the default.
-
Modify Topic—Clients can consume and delete messages and modify the topic or selector assigned to the queue.
-
Delete—Clients can consume and delete messages, modify the topic or selector assigned to the queue, and delete the queue.
Authorization to publish to the queue is not affected by this setting.
Maximum Consumer Count
Specifies the maximum number of consumer flows that can bind to the queue.
- Exclusive specifies that only one consumer can be active on the queue. If other consumers attempt to bind and the
- (Optional) Click Show Advanced Settings, and set any additional options for your queue. For more information, see Configuring Advanced Queue Options.
- Click Apply.
Adding a Subscription to a Queue
Subscriptions define the topics that queues receive messages for. Queues can have multiple topic subscriptions that attract published events. For more information, see Understanding Topics
Event brokers also support negative subscriptions, which exclude the specified topic from the larger subscription set. You can create a subscription exception by adding an exclamation mark ! to the beginning of the subscription. For more information, see Subscription Exceptions
To add one or more topic subscriptions to a queue, perform these steps:
- Open Broker Manager. For instructions, see Broker Manager.
- Select a Message VPN.
- Select Queues in the left navigation bar.
- Click the name of the queue.
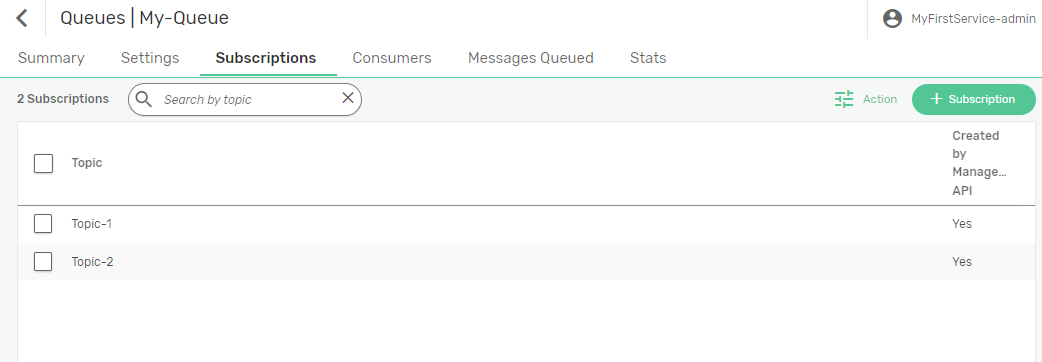
- Click the Subscriptions tab.
- Click + Subscription.
- Enter the topics that you want to add subscriptions for.
- Click Create.
The subscriptions are added to the queue.
Configuring Advanced Queue Options
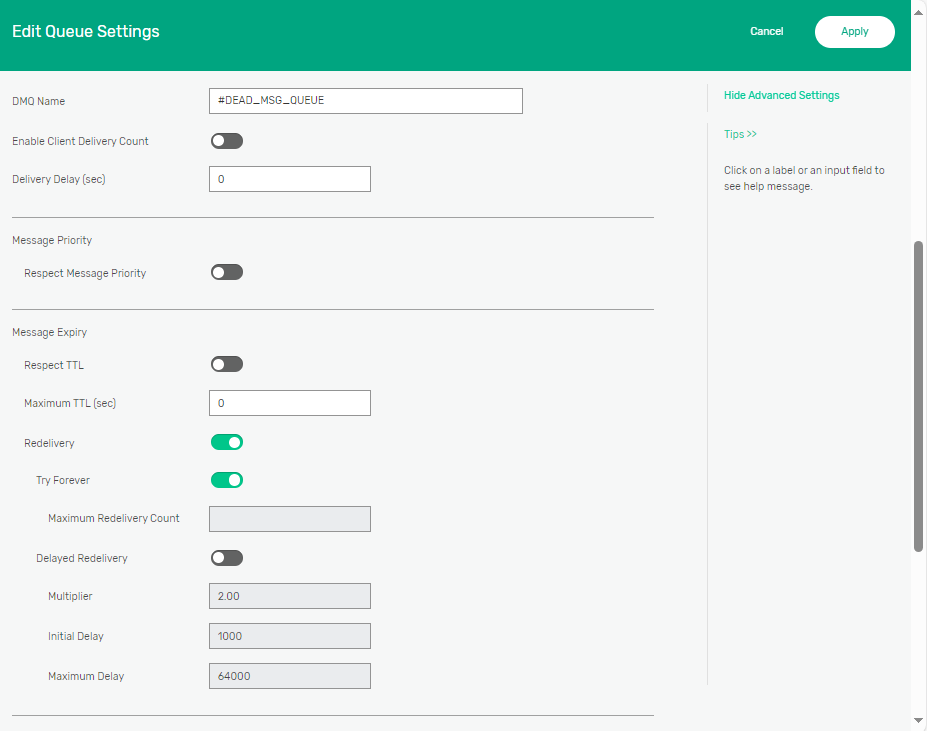
Queues have advanced settings that define how the queue behaves in certain situations. These options include:
| Setting | Description |
|---|---|
|
Messages Queued Quota |
Specifies the maximum amount of message spool, in megabytes, that the queue may use. Setting the messages queued quota to 0 enables the last value queue feature and disables endpoint quota checking. Global quota checking and Message VPN quota checking are unaffected. A value of 0 only allows spooling of the last message received by deleting older messages from the endpoint upon receiving new messages. If the queue is partitioned, each of its partitions holds the last message spooled to that partition. For more information, see Last Value Queues.
|
|
Owner |
The queue owner has full unlimited permissions for the queue. The owner can consume, delete, or modify topics in the queue. By default, users with access to Broker Manager have ownership privileges. You can also give ownership to client applications. Client access to the durable message queue must first be disabled before assigning an owner. |
|
Non-Owner Permission |
Specifies the access level given to consuming client applications other than the queue owner:
Authorization to publish to the queue is not affected by this setting. |
|
Maximum Consumer Count |
Specifies the maximum amount of consumer flows that can bind to the queue.
|
|
Maximum Message Size |
Specifies the maximum message size, in bytes, for the queue. |
|
Maximum Delivered Unacknowledged Messages per Flow |
Specifies the maximum number of messages delivered but not acknowledged per flow for the queue. After this maximum number of delivered unacknowledged messages is exceeded, the event broker stops delivering messages to the client on the flow until the client acknowledges messages that are already delivered. |
|
DMQ Name |
The name of the dead message queue (DMQ) used by this queue. The default is A DMQ collects undelivered messages that would otherwise be discarded from the queue because the Maximum TTL or Maximum Redelivery Count has been reached. Messages are sent to a DMQ only if the publisher specifies that the message is DMQ-eligible and if a queue with the specified DMQ name exists on the same |
|
Respect DMQ Eligible |
Specifies whether the queue respects or ignores the publisher specified DMQ-eligible flags on messages.
For this setting to take effect, the This setting is available only for |
|
Enable Client Delivery Count |
Specifies whether client applications can query the message delivery count of messages received from the queue. Enabling client delivery count is a Controlled Availability (CA) feature. Please contact Solace to find out if this feature is supported for your use case. |
|
Delivery Delay |
Specifies the number of seconds of delay between the message arriving in the queue and being sent to the consumer. For more information, see Delayed Delivery. The default is 0, or no delay. |
|
Respect Message Priority |
Specifies whether the queue supports priority message delivery and delivers higher priority messages first. For more information, see Message Priority. |
|
Message Expiry |
Specifies whether messages that have not been delivered to the consumer expire at the end of the message time-to-live (TTL). If a message is not consumed and its TTL time is reached, the message is discarded or moved to a dead message queue (DMQ). Message expiry has two settings:
Messages can also have a publisher-supplied TTL, which indicates how long the publisher considers a message to be valid. This differs from the maximum TTL for the endpoint in that the publisher TTL expiration starts when a message is published and counts down as the message passes through the network. If a message has both a publisher-assigned TTL and an endpoint-assigned maximum TTL, the event broker uses the minimum of the two TTL values when the message is in the endpoint. |
|
Redelivery |
Specifies the options for message redelivery attempts if the message is not delivered to the consumer on the first attempt. Disabling message redelivery and enabling delayed redelivery are Controlled Availability (CA) features. Please contact Solace to find out if those feature are supported for your use case. Redelivery has the following settings:
|
|
Reject Messages to Sender on Discard |
Specifies when and how negative acknowledgments are returned to the sending client on message discards.
|
|
Reject Low Priority Messages |
Specifies whether low priority messages are discarded to protect against congestion scenarios. When enabled, low priority messages are checked against the reject low priority messages limit. The queue can selectively discard low priority messages only after the total number of spooled low priority and high priority messages exceed the value set for the reject low priority messages limit . Before enabling it is recommended that the reject low priority messages limit has a non-zero value to avoid inadvertently discarding all low priority messages. |
|
Reject Low Priority Messages Limit |
Specifies the limit above which low priority messages are not admitted but higher priority messages are allowed. Before enabling it is recommended that the reject low priority messages limit has a non-zero value to avoid inadvertently discarding all low priority messages.
|
|
Consumer Acknowledgment Propagation |
Specifies whether consumer acknowledgments received on the active replication Message VPN propagate to the standby replication Message VPN. Bridges cannot bind to queues configured with consumer acknowledgment propagation. |
To configure advanced queue settings perform these steps:
- Open Broker Manager. For instructions, see Broker Manager.
- Select a Message VPN.
- Select Queues in the left navigation bar.
-
Click the name of the queue.
-
Click Edit
 .
. -
Click Show Advanced Settings.
- (Optional) To set a delivery delay, enter a value in the Delivery Delay (sec) field.
- Configure the settings required for your use case.
- When you have finished configuring the queue, click Apply.


