Configuring an Event Broker Service to use Client Certificate Authentication
The tutorial provides an example of how to configure client certificate authentication, from generating the certificates to using the Solace Cloud Console to upload the certificate. For more detailed information, see Managing Domain and Client Certificate Authorities.
The tutorial uses the widely available OpenSSL tools to create an internal certificate authority that you can use to sign client certificates. It also uses the MQTT.fx tool to demonstrate connecting an MQTT client using the client certificate. The MQTT.fx tool is open source and can be downloaded here. Packages are available for Linux, Windows, and Mac.
The tasks in this tutorial include:
- Create an Internal Certificate Authority
- Create a Client Certificate
- Enable Client Certificate Authentication
- Upload a Certificate for an Internal CA
- Add the Client Username from a Client Certificate
- Connect an MQTT Client to an Event Broker Service
Before You Begin
Before starting this tutorial make sure you have:
- An event broker service of the Enterprise service type. For information, see Creating Event Broker Services.
- OpenSSL tools installed
- MQTT.fx tool installed
Create an Internal Certificate Authority
Certificates signed by a public certificate authority (CA) are expensive and are necessary only if you want to allow clients from the public to connect to your event broker service. Typically, this is not the case, so an internal CA is suitable. An internal CA is also potentially more secure because your organization controls the entire certificate issuing process.
To create your own internal CA, you can use OpenSSL, which is included in most Linux-based operating systems. You can install it on most operating systems if it is not already available. For more information about installing OpenSSL, see the OpenSSL Wiki.
All you need to do to create your own internal CA is generate a private key to sign client certificates and a CA certificate that you can distribute to validate that your CA is the signer. To create an internal CA:
- Use Open SSL to generate a private key and a public certificate for the CA. The command below generates two files, one for the private key and one for the public certificate. The certificate common name will be *.messaging.solace.cloud, as specified as part of the -subj parameter in the command line. If you prefer to enter the common name and the other values interactively, omit the -subj parameter.
openssl req -newkey rsa:2048 -nodes -keyout MyRootCaKey.key -x509 -days 365 -out MyRootCaCert.pem -subj "/C=GB/ST=London/L=London/O=Global Security/OU=IT Department/CN=*.messaging.solace.cloud"
Make sure you store the private key file (MyRootCaKey.key) in a safe place. You can make the certificate public. You will upload it to the event broker service later.
Create a Client Certificate
After you create your internal CA key and certificate files, follow these steps to create a client certificate and have the CA sign it.
This procedure explains how to configure a client certificate using a common name (CN). You can configure the event broker service to use a Microsoft universal principal name (msUPN) from the otherName field of the SAN extension if the client certificate has one. Event broker services only support using msUPNs from the SAN extension. They do not support other SAN, including email addresses, DNS names, or UP addresses. See Subject Alternative Name in the x509v3_config documentation on the OpenSSL website for more information.
- Use Open SSL to create a private key for the client. The client application needs the private key file (client1.key) to connect to the event broker service. Keep this file secure.
openssl genrsa -out client1.key 2048
- Create a certificate signing request (CSR) for the client certificate. The common name for the client certificate is
client1.messaging.solace.cloud. The common name is important because it identifies the client. As before, you can omit the-subjparameter to add the common name interactively.openssl req -new -key client1.key -out MyClient1.csr -subj "/C=GB/ST=London/L=London/O=Global Security/OU=IT Department/CN=client1.messaging.solace.cloud"
- Sign the client certificate using your internal CA private key and certificate that you already created. The new client certificate is valid for one year.
openssl x509 -req -in MyClient1.csr -CA MyRootCaCert.pem -CAkey MyRootCaKey.key -CAcreateserial -out clientCert1.pem -days 365 -sha256
The following files, created during this step, need to be accessible by the client:
- client1.key—This is the private key for the client. Keep this file safe.
- clientCert1.pem—This is the client certificate that has been signed by your internal CA. It authenticates the client with the event broker service.
Enable Client Certificate Authentication
After creating an internal CA and signed certificate for the client, you can enable client certificate authentication for your event broker service. By default, the event broker service has basic authentication enabled, which allows authentication using a username and password. You will keep basic authentication enabled so that the existing usernames and passwords for your service still work.
You can only configure client certificate authentication for Enterprise-100 Standalone service types in an Enterprise account.
To enable client certificate authentication, follow the steps below.
- Log in to the Solace Cloud Console if you have not done so yet. The URL to access the Cloud Console differs based on your
- On the navigation bar, select Cluster Manager
 .
. - Select the event broker service that you want to configure. If the event broker service is not listed, make sure you have the right environment selected. For more information, see Selecting Environments.
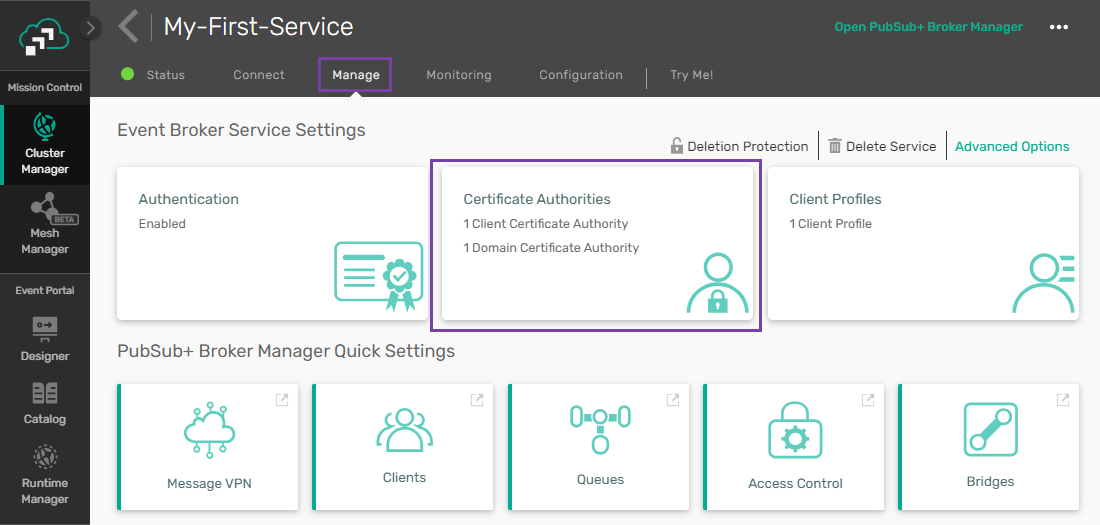
- On the Service Details page, click the Manage tab.
- On the Management Settings menu, select Authentication and Security.
- Click the Service Authentication tile and perform one of the following steps:
- In the Client Authentication section, click Open Broker Manager.
- In Broker Manager, click Edit
 .
. - Click the Client Certificate Authentication toggle to enable it.
- Click the Validate Certificate Dates toggle to require event broker services to check the expiry dates of certificates.
- Update any of the client certificate settings for your implementation:
- Certificate Thumbprint—the username is computed as the SHA-1 hash over the entire DER-encoded contents of the client certificate.
- Common Name—the username is extracted from the certificate's first instance of the CN attribute in the subject distinguished name (DN).
- Common Name Last—the username is extracted from the certificate's last instance of the CN attribute in the subject DN.
- Subject Alternate Name—the username is extracted from the certificate's other name type of the subject alternative name and must have the Microsoft user principal name (UPN) signature.
- User Identifier—the username is extracted from the certificate's first instance of the user identifier attribute in the subject DN.
- User Identifier Last—the username is extracted from the certificate's last instance of the user identifier attribute in the subject DN.
- Allow All— the result of client certificate revocation check is ignored. This option allows clients to connect with revoked certificates.
- Allow Unknown—allows the client to authenticate when the revocation status of his certificate can't be determined.
- Allow Valid—allows the client to authenticate only when the revocation check returns an explicit positive response.
- Click Apply.
- To return to Cluster Manager, select the Service details | Solace Cloud tab in your web browser.
- (Optional) Click Allow API Provided Username to allow authentication using API provided usernames. This overrides the username provided in Username Source with the one provided by an API. Solace recommends against using client-provided user names, as they are less secure than those in the Username Source. It can allow an authenticated user to assume any client username rather than restricting that user to a particular client username.
- In the Username Source list, select the type of username for authentication. Selecting Common Name uses the Common Name (CN) in the Subject field of your client certificate. If you select Subject Alternative Name (SAN), the Microsoft universal principal name (msUPN) inside the SAN section of your client certificate is used. The msUPN is typically found in the otherName field of the SAN (the event broker service does not support other SAN identities, such as email addresses, IP addresses, or DNS names).
- Click Save.
| Setting | Description |
|---|---|
|
Maximum Chain Depth |
The maximum number of signing CA certificates that can exist in the chain back to a trusted self-signed root CA certificate. |
|
Allow API Provided Username |
Allows an incoming client connection to specify a Client Username using the API connect method. When disabled, the certificate Common Name (CN) is always used. |
|
Username Source |
The field in the client certificate to use as the client username. You can select these options: |
|
Enable Certificate Matching Rules |
Enables certificate matching rules. When disabled, the event broker service accepts any valid certificate. |
|
Revocation Check Mode |
Specifies the client certificate revocation checking behavior. You can select these options: |
Upload a Certificate for an Internal CA
Now that we have enabled client certificate authentication, we need to make sure that client certificates signed by our internal CA are trusted by the event broker service. To do that, we need upload the certificate for our internal CA to the list of CAs trusted by our event broker service.
You can only configure client certificate authentication for Enterprise-100 Standalone service types in an Enterprise account.
To upload a certificate for a trusted CA, perform the following steps:
- Log in to the Solace Cloud Console if you have not done so yet. The URL to access the Cloud Console differs based on your
- On the navigation bar, select Cluster Manager .
- Select the event broker service that you want to configure. If the event broker service is not listed, make sure you have the right environment selected. For more information, see Selecting Environments.
- On the Service Details page, click the Manage tab.
- On the Management Settings menu, select Authentication and Security.
- Click on the Certificate Authorities tile.
-
On the Client Certificates tab , click Add Client Certificate Authority to upload a new CA certificate.

- In the Add Client Certificate Authority dialog, enter a name for the client certificate CA. The name can't contain spaces or special characters.
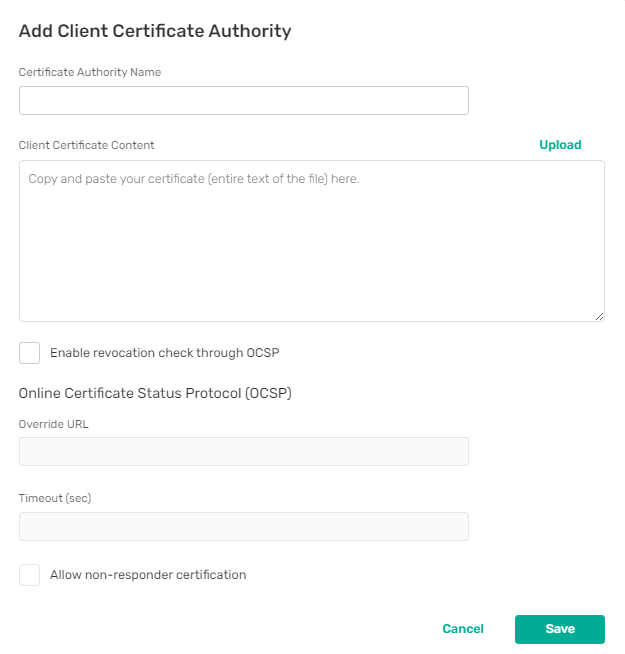
- Open the public certificate (
MyRootCaCert.pem) for the internal CA that you created in a text editor. The public certificate was create in Create an Internal Certificate Authority. - Copy all of the text in the certificate file, including the
-----BEGIN CERTIFICATE-----and-----END CERTIFICATE-----lines.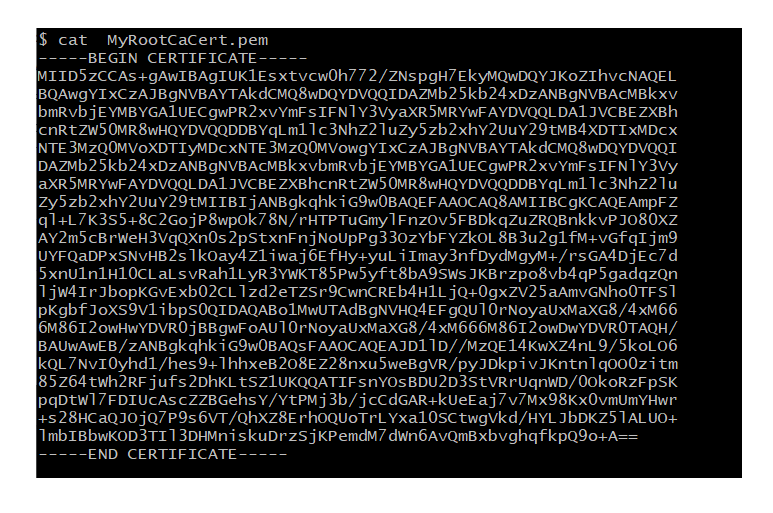
- Paste the certificate text into the Domain Certificate Content text box.
- Click Save. After the certificate has been uploaded, click OK in the confirmation dialog.
For more information about adding and managing CA certificates, see Managing Certificates in the Cloud Console.
Add the Client Username from a Client Certificate
For a client to authenticate when connecting with an event broker service, it must provide a valid client username. By default, the event broker service uses the first Common Name (CN) from the Subject Name field of the certificate as the client username. In the case of the certificate you created at the start of this procedure, that is client1.messaging.solace.cloud. You can configure the event broker service to use a different source for the username, including:
- A universal principal name (UPN) from the subject alternative name (SAN) otherName field if the certificate has a SAN extension.
- An API provided usernames.
Consider the following details when adding client usernames:
-
Client certificate SAN extensions must carry a UPN using the otherName field. Other identities, including email address, DNS name, or IP address, are not supported.
-
If multiple SAN extensions with UPNs exist, the first is used.
-
If you enable the Allow API Provided Username toggle, usernames provided by APIs take precedence over those in the SAN extension.
-
If you leave Allow API Provided Username toggle disabled, and are using subject alternative names to authenticate, clients connecting with certificates without SAN extension fail authentication.
To add a client username
-
Log in to the Solace Cloud Console if you have not done so yet. The URL to access the Cloud Console differs based on your
- On the navigation bar, select Cluster Manager.
- Select the event broker service that you want to configure. If the event broker service is not listed, make sure you have the right environment selected. For more information, see Selecting Environments.
- Click Open Broker Manager.
- In the new browser tab, click Access Control in the navigation bar and select the Client Usernames tab.
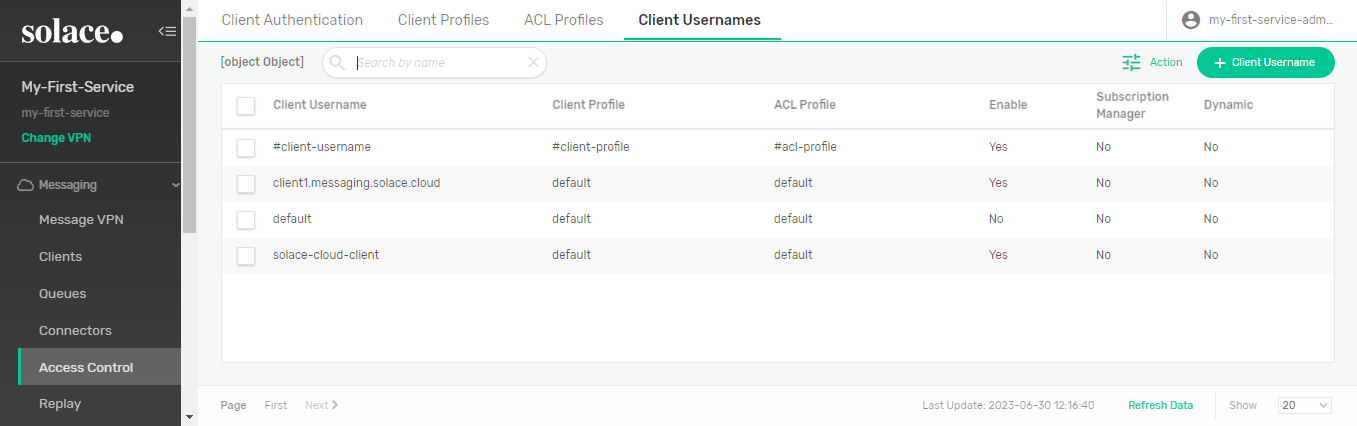
- Click + Client Username.
- Enter a username from the client certificate and click Create. The username can be the CN or a UPN from the SAN extension. For example, the common name from the certificate you created earlier was
client1.messaging.solace.cloud.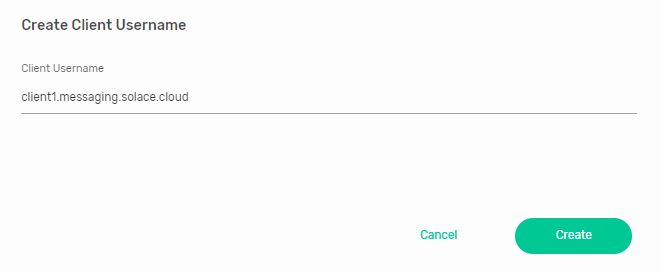
- Click the Enable toggle and then click Apply. The client username is added and enabled.

Connect an MQTT Client to an Event Broker Service
The event broker service is now configured to authenticate a client using a client certificate. If you want to authenticate an MQTT client, you need to gather some connection details from the event broker service. We need to know the host name and secure MQTT port for our service. We also need the certificate for the public CA used by the event broker service so that the client can validate our server certificate.
Note: The certificate for the public CA is not needed in all cases. The CA certificate used to sign the server certificate is highly trusted and installed in most default trust stores. However, not all clients have access to a default trust store, especially IoT client which may be running in a minimally configured environment. The MQTT.fx tool that we will use in the next step requires that we specify the root CA certificate when using client certificates. If we were not using client certificates, the MQTT.fx tool would trust our server certificate (using the CA signed server certificate setting).
To gather connection information for an MQTT client:
- From the service details page, click the Connect tab.
- Click the View by drop down and select Protocol.
- Click the MQTT tile to expand it.
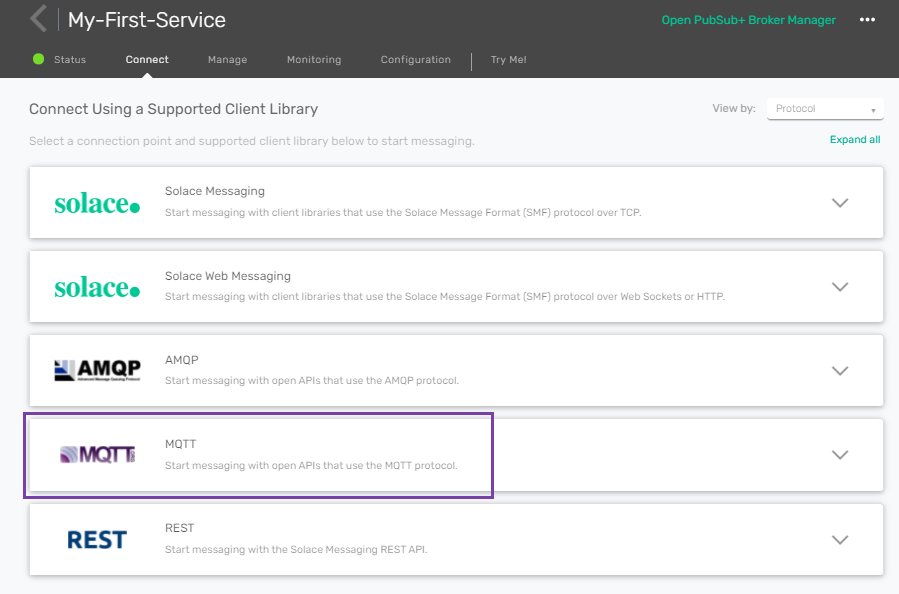
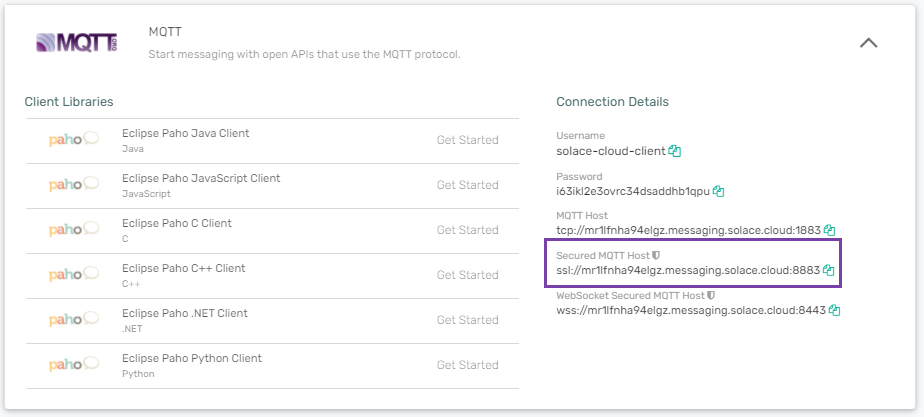
- Click the tile for the language your client application is written in. For example, we have selected Java. Under Connections Details, record the value for the Secured MQTT URI. This includes the host name and port for the secure MQTT connection in URL format.
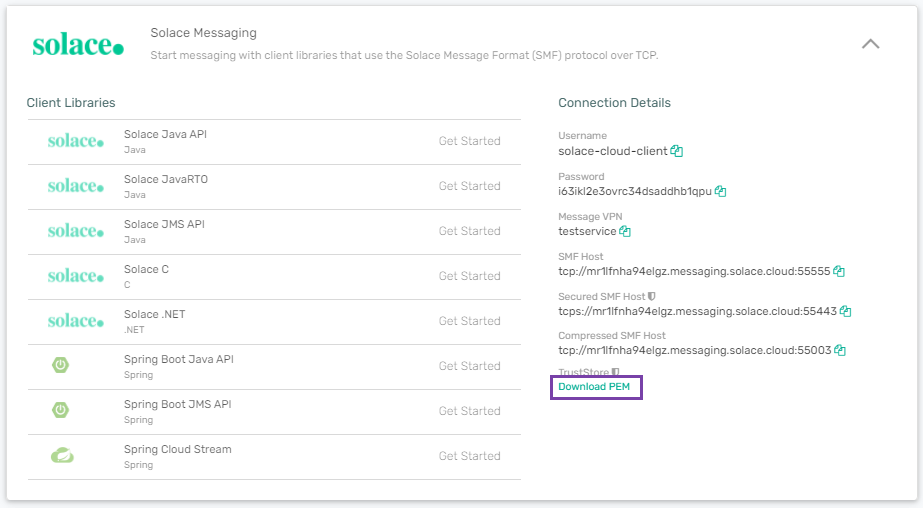
- At the top of the page, click the Solace Messaging tile to expand it and click the tile for the language your client application is written in.
- Click the Download PEM link and save the file. Note the location of this file. This is the certificate for the public CA.
Connect an MQTT Client using the Client Certificate
The event broker service is configured to authenticate a client using the client certificate we created in step 2. We will now using the MQTT.fx tool to connect an MQTT client to our service using a client certificate. If you haven't already, you can download it from MQTT.fx.
To connect an MQTT client, do the following:
- Start the MQTT.fx tool.
- Click the settings icon in the top bar, near the middle.

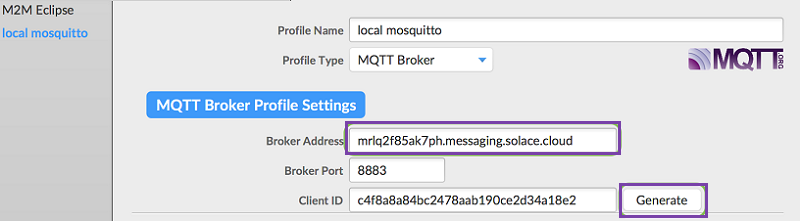
- In the MQTT Broker Profile Settings section, enter the host value from the connection details in the Broker Address and the port value in the Broker Port (typically 8883). Click the Generate button to generate a random client ID.
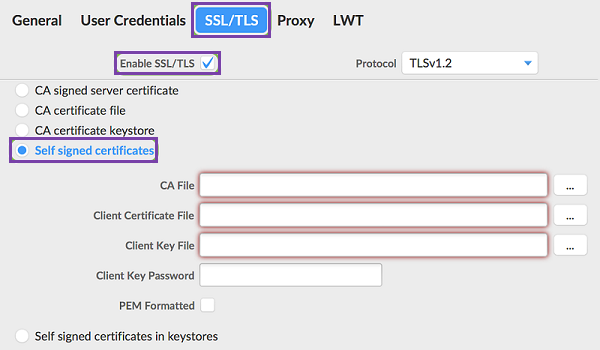
- Click the SSL/TLS tab underneath the MQTT Broker Profile Settings section. Click on Enable SSL/TLS, then click the Self signed certificates radio button.
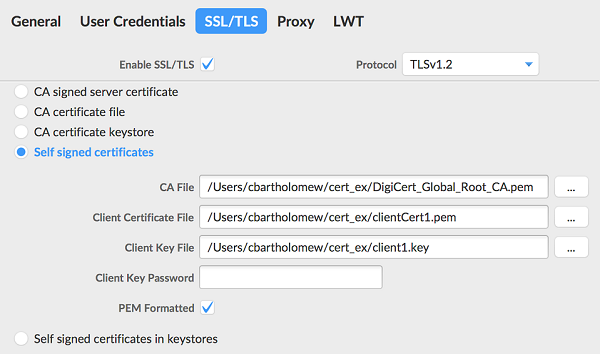
- In the CA File field enter the path to the public CA certificate you downloaded in the previous step. In the Client Certificate File field, enter the path to the client certificate you created in step 2. In the Client Key File field, enter the path to the client key you created in step 2. Select the PEM Formatted checkbox since all files are in PEM format.
- Click on OK.
- Click the Connect button in top bar beside the settings icon to connect the MQTT client to the event broker service using the client certificate.

- When the client is successfully connected, the circular indicator in the top right turns green. Since the client is encrypted, a padlock icon also appears.

- You can use the MQTT.fx tool to publish and subscribe using the MQTT connection.
Next Steps
Congratulations! You've done a lot in this tutorial. You created an internal CA, generated a client certificate, configured your event broker service to authenticate using that client certificate, and connected an MQTT client with mutual (two-way) authentication. Still want to learn more?
- See the other APIs you can use for Developing Applications with Solace Cloud.
- Learn how to manage your event broker service with SEMP.
- Learn more about client authentication, see Authentication and Authorization to Solace Cloud.