Step 1: Install Slide Assemblies in the Rack
Slide-mounted equipment is not to be used as a shelf or a work space.
To install the provided slide assemblies in a rack, follow this procedure.
- Choose 2 RUs (rack units) of space (that is, 3.5 in. or 88.9 mm) in the rack to install the appliance event broker. The slide assemblies must be installed in the bottom 1 RU, and when the chassis is later attached to the slide assemblies it will occupy both RUs.
When choosing a 2 RU section of rack, ensure that the following considerations are met:
- The appliance event broker should have easy access to the connections for power and local communications.
- If possible, choose a space near the bottom of the rack because of the weight of the appliance event broker.
- The chosen 2 RU section of the rack must use a properly-defined three hole pattern (as shown below).
Required RU Rack Pattern
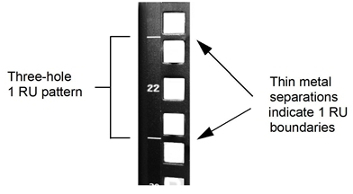
On many racks, RU space boundaries are permanently marked on the posts. However, if they are not already marked on your rack, you can use a felt-tipped marker or pieces of masking tape to indicate on each of the rack’s posts where the bottom RU boundary will be. Be sure that the 3.5 in. (2 RU) space above your marks follow the RU pattern shown above.
- At the front of the rack, position the front of the left slide assembly (as indicated by a label on the slide assembly) so that it aligns with the lower 1 RU boundary of the chosen 2 RU space.
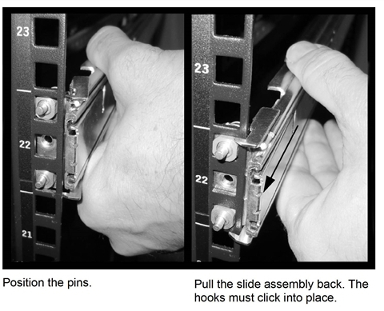
- Insert the pins of slide assembly’s mounting brackets into the top and bottom holes of a proper three-hole 1 RU space, and ensure that the mounting bracket does not go outside of the lower 1 RU boundaries.
When the bracket is properly positioned, pull back on the slide assembly. Both spring‑loaded hooks must click into place.
Mount Front of Slide Assembly
- Extend the rear of the slide assembly and align it with the corresponding mounting holes on the back post of the rack.
For proper operation, the front and rear mounting brackets must be set in the same positions, so that the slide assembly is level in the rack.
- Insert the pins of slide assembly’s mounting brackets into the top and bottom holes in a proper three-hole 1 RU space, and ensure that the mounting bracket does not go outside of the lower 1 RU boundary.
- When the bracket is properly positioned, push the slide assembly to the back of the rack. Both spring‑loaded hooks must click into place.
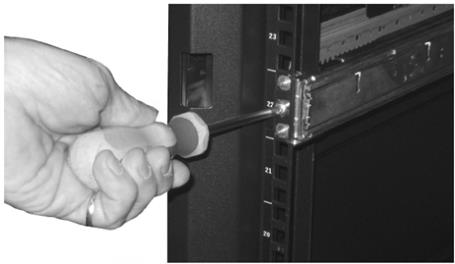
- (Optional) To further secure the slide assembly bracket to the rack post, at the front of the slide assembly, insert one of the four provided slide rail screws through the center hole between the two slide assembly pins, and tighten it with a Phillips No. 2 screwdriver. Then repeat this process for the rear mounting bracket.
Fasten Front of Slide Assembly
- At the front of the rack, position the front of the right slide assembly (as indicated by a label on the slide assembly) so that it aligns with the lower 1 RU boundary.
- Repeat steps 2 to 6 for the right slide assembly.
For proper operation, the mounting brackets for both slide assemblies must be set in the same positions, and they must be level in the rack.