Blade Replacement in Solace 3560s and Solace 3530s
You can remove and replace blades in CHS-3560AC-05, CHS-3560AC-06, and Solace 3530 appliance event brokers. For instructions describing how to remove and replace blades in CHS-3560AC-08 appliances, see Blade Replacement in 3560AC-08 Appliance Event Brokers.
Depending on the type of blade you are replacing, see one of the following sections before attempting the replacement:
- NAB: See NAB Replacement.
- ADB: See ADB Replacement.
- HBA: See HBA Replacement.
Some videos that supplement the instructions are also available.
Unlike other hardware blades, the HBA in a Solace 3560 is installed in blade slot 7 rather than in a blade carrier. For information on how to replace the HBA in a Solace 3560, see HBA Replacement in Solace 3560s.
ESD/Safety Precautions
Before replacing a system blade, review the following safety warning.
To prevent equipment damage from ESD, always ensure that the appliance event broker chassis is electrically connected to earth ground. Always follow ESD prevention procedures when removing and replacing power supplies. Use an anti-static wrist strap, or another anti-static device. If no wrist strap or mat is available, ground yourself by touching the metal part of the chassis.
Tool and Equipment Requirements
The following tools and equipment are required to replace system blades in deployed Solace 3560s or Solace 3530s:
- No. 2 Phillips head screwdriver or a slotted screwdriver
- electrostatic discharge wrist strap
- anti-static mat
- replacement system blade (ordered from Solace)
Handling NABs
The 4x10G (NAB-0410EM) and 8x10G (NAB-0810EM) NABs have densely populated memory (DIMM) connectors that can be damaged if the blade is flexed during handling. Whenever you unpack, carry, or install one of these NABs, support the blade with both hands, one at each short edge. Never lift the NAB with one hand at either end, and never squeeze it in the middle with one hand. Either grip flexes the board and can damage the DIMM connectors.
Step 1: Turn Off Power to Appliance Event Broker
To turn off power to the appliance event broker, enter the following Privileged EXEC command:
solace# power-down
The appliance event brokers do not restart automatically after this command is run.
Notify the appropriate personnel to ensure that all traffic to and from appliance event brokers is stopped before issuing the power-down Privileged EXEC command. Otherwise, the power-down command will cause a disruption in customer service when run.
Step 2: Identify Blade Carrier to Remove
- Determine the correct location of the blade to be replaced.
Valid Blade Slot Assignments for CHS-3530AC Blade Type Valid Slots Blade Carrier HBA-0204FC-02
HBA-0208FC-01
HBA-0208FC-02
HBA-0216FC-02
1/2 1 ADB-000000-02 1/3 1 TRB-000000-02 1/4 2 NAB-0401ET 1/6 (also blocks 1/5) 2 Valid Blade Slot Assignments for Chassis CHS-3560AC-05 and CHS-3560AC-06 Blade Type Valid Slots Blade Carrier ADB-000000-02
ADB-000004-01
ADB-04210M-01
1/3 1 TRB-000000-02 1/4 2 NAB-0210EM-01
NAB-0210EM-04
NAB-0410EM-01
NAB-0610EM-01
NAB-0801ET-01
NAB-0801ET-04
NAB-0810EM-01
1/6 (the blade also blocks 1/5) 2 HBA-0204FC-02
HBA-0208FC-01
HBA-0208FC-02
HBA-0216FC-01
HBA-0216FC-02
1/7 NA
Step 3: Remove Blade Carrier from Chassis
To remove the blade carrier from the appliance event broker chassis, follow this procedure:
- Remove the appliance event broker’s top cover (refer to Replacing Solace 3530/Solace 3560 Top Covers).
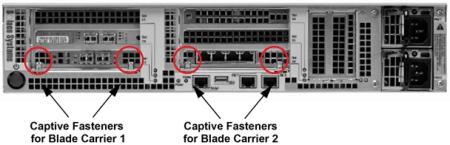
- Using either a Philips No. 2 or a slotted screwdriver, undo the two captive fasteners of the blade carrier that contains the blade to be removed. The captive fasteners are located on the rear of the appliance event broker chassis as shown below).
Location of Blade Carrier Captive Fasteners
- Using either a Philips No. 2 or a slotted screwdriver, undo the two captive fasteners of the blade carrier that contains the blade to be removed. The captive fasteners are located on the rear of the appliance event broker chassis as shown below).
Location of Blade Carrier Captive Fasteners
- From inside the appliance event broker chassis, squeeze the blade carrier's extractor levers toward each other to release the blade carrier from the chassis.
Ejecting the Blade Carrier
- Lift the blade carrier out of the appliance event broker chassis and place it on a flat, stable, static-free surface.
- Using either a Philips No. 2 or a slotted screwdriver, undo the two captive fasteners of the blade carrier that contains the blade to be removed. The captive fasteners are located on the rear of the appliance event broker chassis as shown below).
Step 4: Remove Blade from Blade Carrier
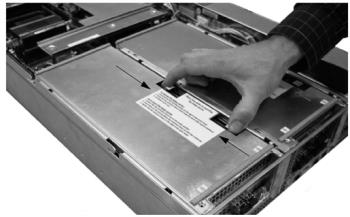
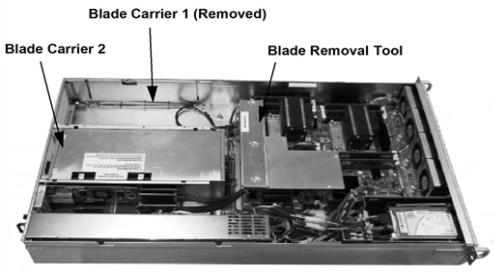
- Locate the Blade Removal Tool at the center portion of the chassis (as shown below ), and pull up on it to remove it from the chassis.
This three-pronged metal tool is clearly labeled as the “Blade Removal Tool”.
Blade Removal Tool Location
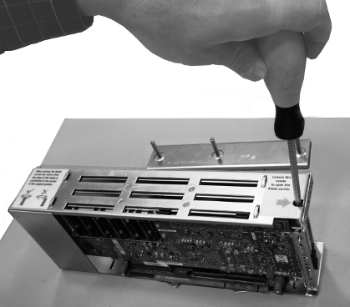
- Using either a Philips No. 2 or a slotted screwdriver, undo the captive fastener located on the side of the blade carrier, as indicated by the label on the blade carrier.
Loosening the Captive Fastener
- Open the hinged blade carrier lid to expose the system blades.
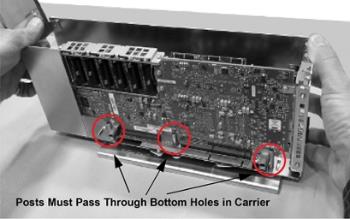
- Carefully line up the upright posts of the blade removal tool with the holes beneath the blade that you want to remove, then lower the blade carrier onto the tool. The posts must pass through the holes of the carrier and rest on the edge of the blade to be removed.
Place Carrier on Top of Removal Tool
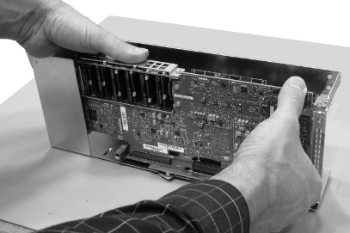
- Press down on the blade carrier to the unseat the blade from the blade carrier backplane connector.
- Firmly grasp the unseated blade, and pull up until it is fully removed from the backplane connector.
- Avoid touching the solder side of the blade, pin connectors, or any exposed components.
Lifting out the Blade
- Place the removed blade in anti-static packaging.
Step 5: Install Replacements and Reinsert Carrier
To install a replacement blade into the blade carrier and the blade carrier back into the appliance event broker chassis, follow this procedure:
- Carefully align the connector edge of the blade with the appropriate blade carrier backplane connector.
- Push down firmly on the system blade until it is fully seated in the backplane connector.
- Close the hinged blade carrier lid and reattach the captive fastener using either a Philips No. 2 or a slotted screwdriver.
- Ensure the blade carrier’s two extractor levers are in the center position.
- Insert the populated blade carrier into the appliance event broker chassis by pressing down on the area between the extractor levers to seat the connector.
- Refasten the screws of the blade carrier located on the rear of the appliance event broker chassis.
- Reinsert the Blade Removal Tool to its original position in the center portion of the chassis.
Step 6: Reattach Top Cover
Reattach the appliance event broker’s top cover (refer to Replacing Solace 3530/Solace 3560 Top Covers for details).
Step 7: Restore Power to Appliance Event Broker
To turn on power to the appliance event broker, follow this procedure:
- Restore power to the appliance event broker by doing one of the following:
- Press the (
 ) on/standby button on the rear panel of the appliance event broker.
 - Use Wake On LAN (WOL) to turn power back on to the appliance event broker through a WOL magic packet (refer to Powering Up an Appliance Event Broker With WOL for details).
- Press the (
- Monitor the LED on the front of the appliance event broker to verify that it is powering up properly.
- Verify that the Green LED located on each power supply is on.
- Ensure that the following CLI login prompt displays on your management console screen:
System Software. SolOS Version x.x.x.x
Copyright 2004-2017 Solace Corporation. All rights reserved.
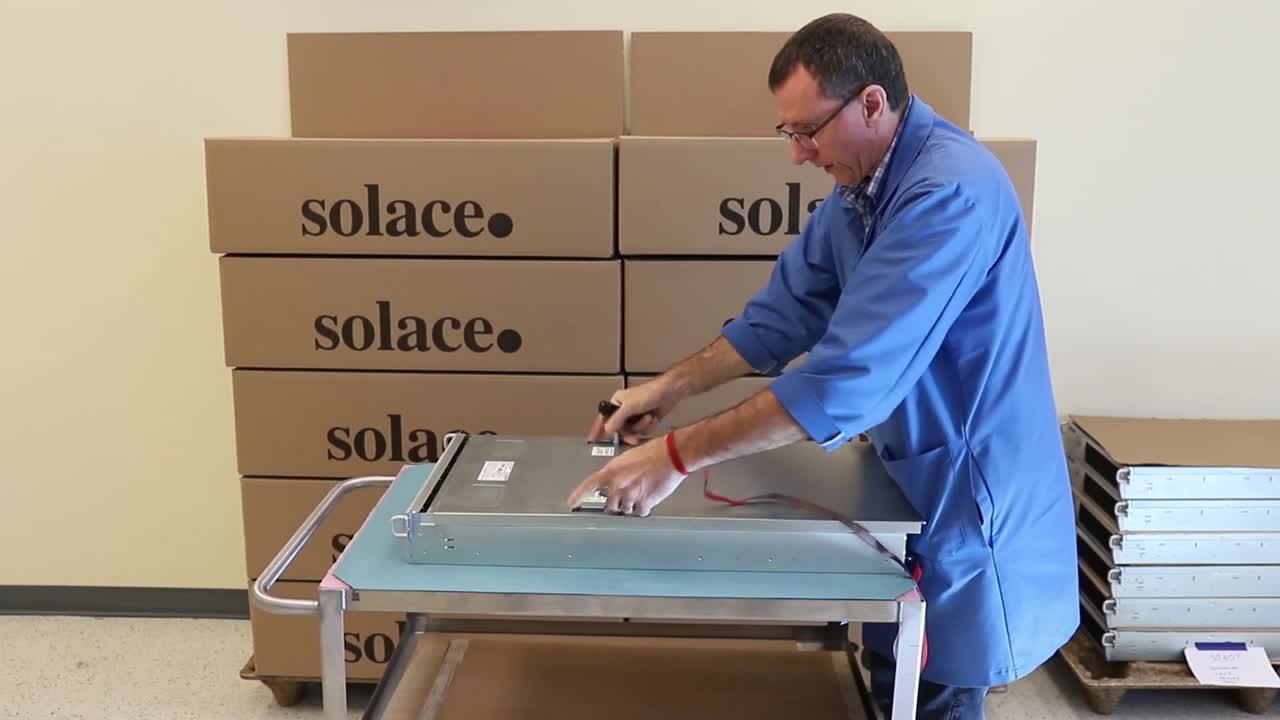
Video: Changing an ADB and HBA on the Solace 3530
Solace's Blair Murphy shows you how to change an Assured Delivery Blade (ADB) and a Host Bus Adapter (HBA) on the Solace 3530.
Video: Replacing the NAB on a 3500 Chassis
Solace's Blair Murphy shows you how to change a Network Acceleration Blade (NAB) on a 3500 series chassis.