Two-way SSL Authentication for REST
This section shows you how to set up two-way SSL authentication for REST in the Solace event broker using self-signed certificates. The steps show you how to generate self-signed certificates, configure the certificates in the event broker instance, and validate the SSL communication.
Overview
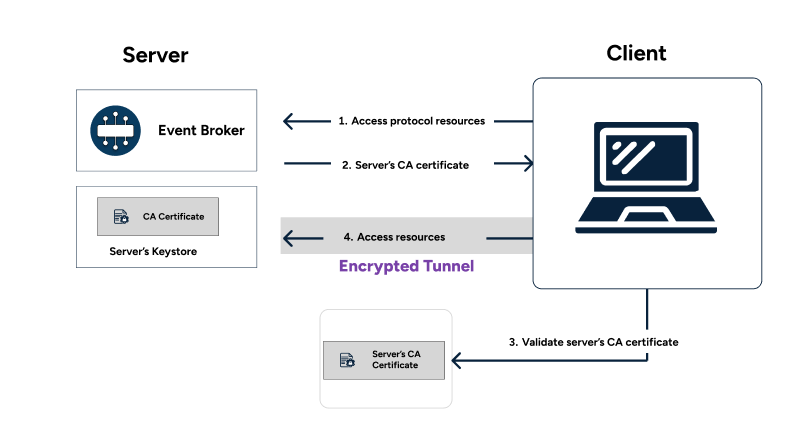
One-way SSL / Server Certificate Authentication
In one-way SSL authentication (Server Certificate Authentication), only the client validates the server; the server does not verify the client application. When implementing one-way SSL authentication, the server application shares its public certificate with the client.
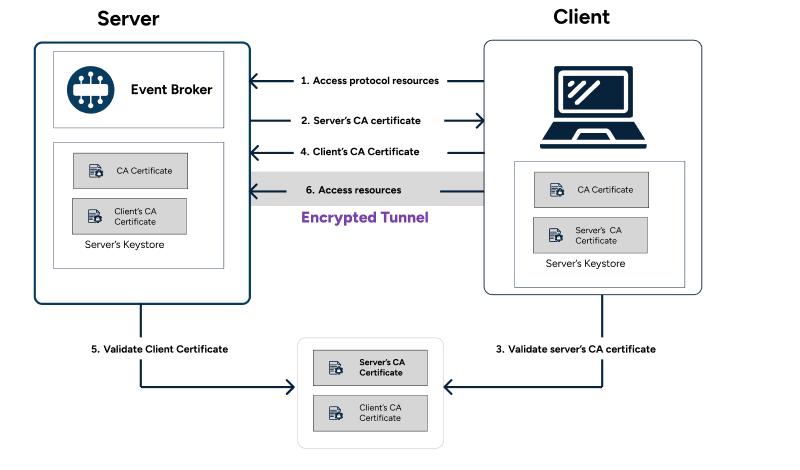
Two-way SSL/ Client Authentication
In two-way SSL authentication, the client application verifies the identity of the server application, and then the server application verifies the identity of the client application. Both parties share their public certificates, and then validation is performed. Two-way SSL authentication works with a mutual handshake by exchanging the certificates. You can also authenticate through a username or Common Name injection.
Prerequisites
- Install OpenSSL to generate self-signed certificates.
- Install Postman to test client authentication.
- Create FTP user through the Solace CLI to transfer files.
- Create a client username in the event broker which is assigned as a common name (CN) to the client key file
Assumptions
- Admin access to configure certificates in the Solace event broker
- Possess working knowledge of the Solace CLI.
Configuring Two-Way SSL Authentication for REST
To configure a two-way SSL authentication,you generate self-signed certificates using OpenSSL, configure the certificates in the event broker instance, and validate client authentication using Postman.
Step 1: Generate SSL server certificate
You can generate a self-signed certificate using the methods described below or get one from your organization's certificate authority.
To generate a self-signed SSL server certificate, perform the following steps:
- Create TLS key for the event broker:
openssl genrsa -des3 -out root.key 4096
Enter the pass phrase in the prompt.
- Create a server certificate and generate a signing request:
openssl req -new -x509 -days 1000 -key root.key -out server.pem -subj "/C=/ST=/L=/O=/OU=/CN=root"
- Create a pem file by concatenating the private key and server certificate:
cat root.key > server_cert.pem
cat server.pem >> server_cert.pem
- Place the certificate in the
/usr/sw/jail/certsdirectory using the “SCP” service:scp -P2222 /home/<username>/server_cert.pem <Solace FTP User>@<Host>:/certs/
Ensure to create the FTP user through the Solace CLI.
Step 2: Enable SSL on the event broker
To enable SSL for REST on the event broker, do the following:
- Log into the Solace CLI.
- Enable SSL for the Message VPN:
solace(configure)# message-vpn <vpn-name>
solace(configure/message-vpn)# service rest
solace(configure/message-vpn/service/rest)# incoming
solace(...ure/message-vpn/service/rest/incoming)# listen-port 9443 ssl
solace(...ure/message-vpn/service/rest/incoming)# no ssl shutdown
You can also enable SSL using Using Broker Manager with Self-Managed Event Brokers.
- Set the server certificate that you created in Step 1 for the event broker to use:
solace(configure)# ssl
solace(configure/ssl)# server-certificate <filename>Where:
<filename>is the filename of the certificate. This file must be located in the/usr/sw/jail/certsdirectory on the event broker. In this case, server_cert.pem is the filename of the certificate.For more information about using server certificates, see Setting Server Certificates To Use.
Step 3: Verify REST over SSL
- Access the URL with https and SSL port:
https://<host>:<9443>/
-
Verify that the configured certificates are loaded in the browser.
Step 4: Generate client-specific certificates
In this step, we generate a client key and client pem files based on the root key and server certificates.
- Create client key and csr file:
openssl req -nodes -new -newkey rsa:4096 -keyout client.key -out client.csr -subj "/C=/ST=/L=/O=/OU=/CN=Client_User"
In the above script,
Client_Useris a Solace client username. - Generate the client pem file and signing request for REST Client:
openssl x509 -req -in client.csr -CA server.pem -CAkey root.key -CAcreateserial -out client.pem -days 1825 -sha256
The
root.keyandserver.pemfiles were generated in Step 1: Generate SSL server certificate. - Create the client certificate pem file:
cat client.key > client_cert.pem
cat client.pem >> client_cert.pem
Step 5: Configure the CAs in the event broker
In this step, we configure the CAs and enable client certificate authentication for the given Message VPN.
- Create a certificate authority (CA) and assign the certificate created in the previous step:
solace> enable
solace# configure
solace(configure)# authentication
solace(configure/authentication)# create certificate-authority <ca-name>
solace(.../authentication/certificate-authority)# certificate file <ca-certificate>
Where:
<ca-name>is the name of the CA. You can use a maximum of 64 characters for aca-name. Acceptable characters are alpha-numeric characters, period (.), hyphen (-), and under score (_).<ca-certificate>is the filename of the CA certificate. This file must be located in the/usr/sw/jail/certsdirectory on the event broker. In this case, server.pem is the CA certificate.Take a look at Configuring the Client Authentication Certificate Authorities List for additional configuration and event broker's version-specific information.
- Assign a username source for the Message VPN:
solace(configure)# message-vpn <vpn-name>
solace(configure/message-vpn)# authentication
solace(configure/message-vpn/authentication)# client-certificate
solace(...vpn/authentication/client-certificate)# username-source common-name
solace(...vpn/authentication/client-certificate)# no shutdown
In this case, Client_User is the common name that we use for authentication.
For more information on username source, see Client Client Username Sources.
Step 6: Validate client authentication
Finally, we perform client authentication using Postman. (Version 7.14).
-
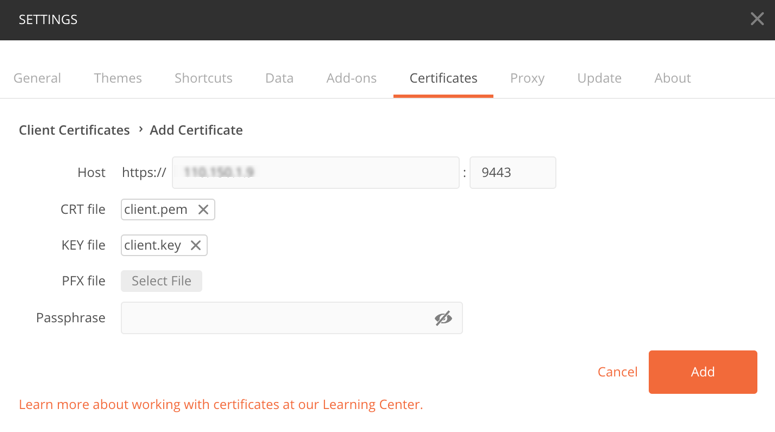
Open Postman, navigate to Preference and click on Certificate to add the client certificates
-
As shown in the example below, provide the host, port, client.pem and client.key file.

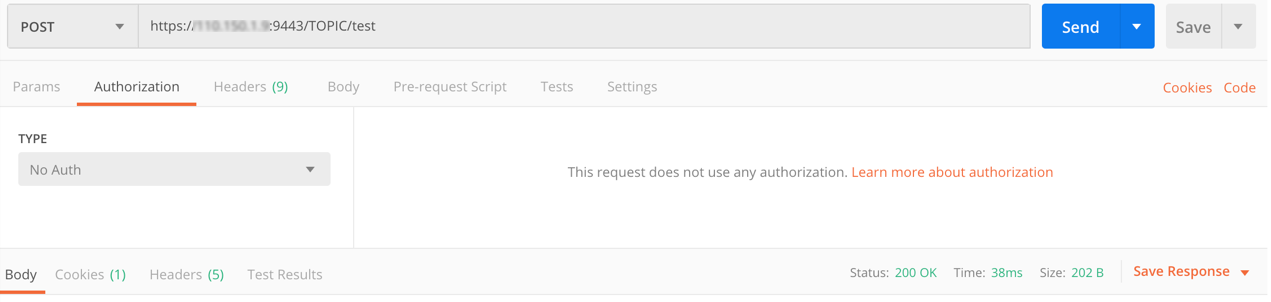
-
You can now validate client authentication on the browser (https://<host>:9443/TOPIC/test) with No Auth configuration. You should be able to post the message without credentials with 200 OK response.
-
Optionally, you can also perform negative validation by disabling the <Client_User> and posting the message. It should fail with the “Client Username Is Shutdown” error message in Postman.
Ensure the default user is disabled.
Configuring Two-Way SSL Authentication for Client Connections
To configure two-way SSL authentication for client connections, we generate self-signed certificates using OpenSSL, configure the certificates in the client and broker, and validate secure communication by ensuring both the client and server authenticate each other's certificates during the connection process.
Step 1: Generate and Sign Certificates
The following steps show you how to generate and sign the necessary certificates for establishing two-way SSL authentication, which ensures secure communication between the client and server.
- Create a 4096-bit RSA private key, which acts as the root key to sign the server certificate for secure communication.
openssl genrsa -des3 -out root.key 4096
- Generate a self-signed server certificate, valid for 1000 days, with the root key and associate it with a specific IP address:
openssl req -new -x509 -days 1000 -key root.key -subj "/C=CA/CN=MyName" -addext "subjectAltName = IP:192.168.169.85" -out server.pem
- Create a new client RSA key and a certificate signing request (CSR) to request the server to sign the client certificate:
openssl req -nodes -new -newkey rsa:4096 -addext "subjectAltName = IP:192.168.169.85" -keyout client.key -out client.csr -subj "/C=/ST=/L=/O=/OU=/CN=MyName"
- Sign the client's CSR with the server certificate. This validates the client certificate for secure two-way authentication:
openssl x509 -req -in client.csr -CA server.pem -CAkey root.key -CAcreateserial -out client.pem -days 1825 -sha256
Step 2: Manage the Keystore
After the certificates are generated and signed, you can now manage the keystore, which securely stores the certificates and keys required for client authentication during the SSL handshake.
- Combine the server’s private key and certificate into a single server certificate file that the event broker uses to authenticate itself to clients:
cat root.key > server_cert.pem
cat server.pem >> server_cert.pem
- Create a new keystore, protected by a password, to securely store certificates and manage keys required for client authentication:
keytool -genkeypair -alias boguscert -storepass MyName -keypass MyName -keystore mqtt.keystore -dname "CN=Developer, OU=Department, O=Company, L=City, ST=State, C=CA"
- Remove the placeholder certificate from the keystore to prepare it for the actual client certificate:
keytool -delete -alias boguscert -storepass MyName -keystore mqtt.keystore
- Import the signed client certificate into the keystore to authenticate the client during the SSL handshake:
keytool -import -alias MyName -file client.pem -keystore mqtt.keystore
The server_cert.pem file must be configured as a server certificate on the event broker, and the server.pem file should be configured as the client-certificate-authority.
You can test the configuration using the following sdkperf command. The command below connects to an MQTT broker over a secure (SSL/TLS) connection, authenticates using a client certificate, and publishes messages to a specified topic at a rate of 40 messages per second, asynchronously:
sdkperf_mqtt_trunk \
  -cip=mqtts://192.168.132.60:8883 \    # Connects to the MQTT broker using the specified IP address and port over MQTT Secure (MQTTS)
  -mr=40 \                              # Sets the message rate to 40 messages per second
  -msa=1 \                              # Sends messages asynchronously (msa=1 means asynchronous mode)
  -mn=100000000 \                       # Sets the maximum number of messages to 100 million
  -ptl=t00000001 \                      # Uses the topic 't00000001' for publishing messages
  -mpq=1 \                              # Sets the message payload size to 1 byte
  -as=client-certificate \              # Uses client certificate authentication
  -sslcf=client.pem \                   # Specifies the client certificate file (client.pem) for SSL/TLS
  -sslksp="myname" \                    # Specifies the SSL/TLS keystore password (in this case, 'myname')
  -sslks=/home/mycomputer/mqtt.keystore # Specifies the keystore file location

# Complete command without comments:
sdkperf_mqtt_trunk \
  -cip=mqtts://192.168.132.60:8883 -mr=40 -msa=1 -mn=100000000 -ptl=t00000001 \
  -mpq=1 -as=client-certificate -sslcf=client.pem -sslksp="myname" -sslks=/home/mycomputer/mqtt.keystore