Enabling Solace Insights Advanced Monitoring
Solace Insights Advanced Monitoring lets you access more advanced monitoring functionality and details directly within Datadog (the central monitoring service). Advanced Monitoring is a feature of Insights and is enabled by an Administrator. Datadog collects monitoring data from event broker services no matter the deployment. Advanced Monitoring provides you with access to Datadog and its rich ecosystem of dashboards that many Operations, Integration, and Application Support teams use to analyze monitoring data. This monitoring data is processed by Datadog to build meaningful historical and real-time metrics that you can use to analyze the health and performance of the event broker services that you've deployed.
You can configure access to the monitoring data in Datadog with a subscription to Insights. Access to Insights provides you with valuable information to manage and get insights into your event broker services. With direct access to Datadog, you can customize and build your own dashboards to higher levels of granularity that may better suite your use case and requirements.
Direct access to Datadog requires that you have an understanding of how to work with Datadog dashboards. Not all users in your account may require this access. When giving users in Solace Platform the role, a corresponding Datadog account is created for that user.
- For considerations about providing your users access to Datadog, see Considerations for Providing Direct Access to Datadog.
- For information about how to configure users Datadog access, see:
- For information about how to activate and access a Datadog account, see:
- It is possible to share the dashboards in Datadog with users who do not have the Insights Advanced Editor role, see Sharing a Dashboard Using a URL.
Considerations for Providing Direct Access to Datadog
Here are some considerations for providing access to the monitors and metrics within Datadog directly.
-
As part of your Solace Insights subscription, Solace sets up a Datadog sub-organization for your account so that you can see information that's related to your account. If your subscription to Insights ends, access to that Datadog account ends as well.
-
If your organization has the controlled availability feature to configure single sign-on for the Datadog account, you can map user permissions to existing Insights roles. For more information see Single Sign-On for Solace Insights Datadog Accounts.
-
With your Insights subscription, you have access to your own sub-organization containing the metrics, monitors, and dashboards for your account. If you belong to multiple accounts, you may need to select the proper sub-organization when you log in to Datadog directly. Any user that has the role of Insights Advanced Editor is granted the necessary permissions to manage their Insights monitors and dashboards, including:
-
Solace Insights dashboards (read, write, and public share)
-
Solace Insights monitors (read, write, and manage downtime)
-
The write permission only provides the ability to edit cloned monitors. The default Insights monitors are locked and cannot be edited.
-
-
Logs read Index Data
-
Logs read data
-
Trace data if you have a subscription to Distributed Tracing.
-
- Users with the role of Insights Advanced Viewer are granted permissions to view Insights dashboards and monitors. They cannot manage or change Insights monitors and dashboards.
- Viewing Insights Advanced Role Permissions
- You can view the Datadog permissions associated to the Insights Advanced Editor or Insights Advanced Viewer roles in Datadog. To do so hover on your account in the bottom-left of the screen in Datadog and select Organization Settings from the menu that opens.
- On the Organization Settings page click Roles and select either Insights Editor or Insights Viewer from the list.
- A page slides open from the right, and should open on the Permissions tab, if not, click Permissions.
Permissions granted to the Insights Advanced Editor or Insights Advanced Viewer role will be indicated with a green check mark. These permissions map to the Datadog Role Permissions, as outline in Datadog Role Permissions in the Datadog documentation.
-
You must assign the Insights Advanced Editor or Insights Advanced Viewer role for a user to access the Datadog monitors and metrics. As the Administrator, you must assign the Insights Advanced Editor role to yourself since it's not included in the Administrator permissions.
-
If a user is assigned both the Insights Advanced Viewer and the Insights Advanced Editor the Insights Advanced Editor role will take precedence.
-
If you have the Insights Advanced Manager controlled availability feature, you can assign a user the role, allowing them to manage API and APP keys, as well as Datadog Integrations. For more information see Insights Advanced Manager Role.
-
A separate invitation from Datadog is sent so the user has a separate Datadog account from the Solace Cloud account.
When inviting a new user to Solace Cloud, it is possible for a user to get two invitations when that user is given the Insights Advanced Editor or Insights Advanced Viewer role.
The user will receive one invitation from Solace Cloud and a second invitation email from Datadog. Both must be accepted to access both Solace Cloud and the corresponding Datadog account
-
The password for Datadog is separate from the one for Solace Cloud. We recommend that you make these passwords different from the Solace Cloud password. Single Sign-On for Datadog is available as a controlled availability feature.
-
Before your organization can start using Advanced Monitoring and the Datadog account that comes with Insights, someone in your organization must accept the Insights Acceptable Use Policy (AUP). The user accepting the AUP must:
-
be assigned the Administrator role in Solace Cloud
-
have completed the First Name and Last Name fields on the My Profile page (User & Account > My Profile)
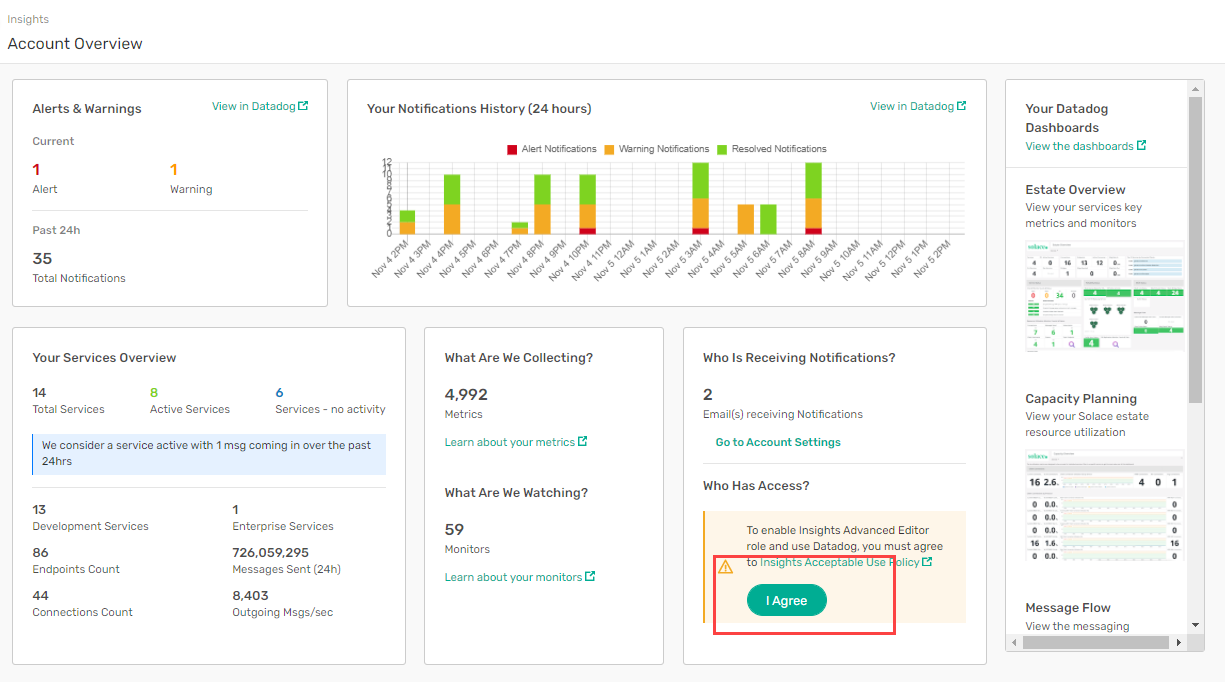
You can view the Insights AUP from the Solace InsightsAccount Overview page. The named Administrator accepts the AUP by clicking I Agree. Accepting the AUP allows the Administrator to grant access to the Datadog account that comes with Insights. You only need to accept the AUP once per Solace Cloud account.
The image below shows an example of the Acceptable Use Policy agreement from on the Insights Account Overview page:
-
Configuring an Existing User to Access Datadog
You can configure an existing user's (or new user's) access to Datadog provided you have the Administrator role in Solace Cloud. To give access to Datadog, you assign the Insights Advanced Editor or Insights Advanced Viewer role, which triggers a separate invitation to the user from Datadog. For more information about configuring roles when you add a user, see Managing Users, Groups, Roles, and Permissions.
The following steps are to provide an existing user access to a Datadog account.
- Log in to the Cloud Console if you haven't already.
- On the navigation bar, select User & Accounts
 and then Account Details.
 - On the Account Details page, select the User Management.
- Click Actions
 beside the name of the email of the user you'd like to enable direct access to Datadog, and select Edit.
 - On the Edit User Roles dialog, select either Insights Advanced Editor or Insights Advanced Viewer role in the Datadog Access field and then click Save.
After these steps, an invitation is sent to the user that you assigned the role Insights Advanced Viewer or Insights Advanced Editor to.
Removing Datadog Access for a User
You can remove Datadog access from an existing user provided you have the Administrator role in Solace Cloud. When access is removed for a user, the corresponding Datadog account for that user is disabled.
The following steps are to remove access to Datadog from a user.
- Log in to the Cloud Console if you haven't already.
- On navigation bar, select User & Accounts and then Account Details.
- On the Account Details page, select the User Management.
- Click Actions beside the user whose access to Datadog you'd like to remove, and then select Edit.
- On the Edit User Roles dialog, remove the Insights Advanced Manager, Insights Advanced Editor, or Insights Advanced Viewer role from the Datadog Access field and click Save.
After completing these steps, the user's Datadog account is disabled.
Resending an Invitation Email from Datadog
Invitation Emails for Datadog accounts expire after a time if the user doesn't accept the invitation. As an Administrator of Solace Cloud, you can resend the Datadog invitation to the user if they did not activate their account in time. To do this, perform the following steps:
- Log in to the Solace Cloud Console if you haven't already.
- On navigation bar, select User & Accounts and then Account Details.
- On the Account Details page, select the User Management tab.
- Identify the user for whom you want resend the invitation. Optionally, you can type in the Search Emails field to filter the user accounts that are visible.
- Beside the user for whom you want to resend an invite, click the Actions and select Re-send Datadog Invite. Note that this option is available only if the user hasn't accepted their invitation to Datadog.
Have users check their spam folders or junk mail to ensure that the invitation email has not been filtered.
The user should receive an invite shortly. For more information about accepting the invitation, see Accepting a Datadog Invitation.
Accepting a Datadog Invitation
If you're a user who has been given the role of Insights Advanced Manager, Insights Advanced Editor, or Insights Advanced Viewer by an Administrator in Solace Cloud, you may notice that when you log in to the Cloud Console that you have a new permission in your Profile details. At this time, if you're assigned the Administrator role in Solace Cloud, you can also decide to configure notifications as required. For more information about configure notifications in Solace Insights, see Understanding Insights Notifications.
When you are given access to Datadog, you will receive an invitation email for a separate Datadog account. You must activate your Datadog account using the invitation email before you can use it.
Have users check their spam folders or junk mail to ensure that the invitation email has not been filtered.
To accept the Datadog invitation, open the invitation email from Datadog. Depending on whether you had an existing Datadog account previously, perform one of the following sets of actions based:
-
If you have an existing Datadog account that uses the same email as the one being used for your Solace Cloud account to identify you, you will not need to set a password. Instead, in the invitation email, click Join Account to link the new Datadog account to your existing one. You can use your previous password for your Datadog account, or sign in using your Google account credentials (provided the same Gmail account is being used in the Solace Cloud account to identify you).
Note that if you use your Google account credentials to log in and you have multiple Solace Cloud accounts or Datadog accounts, you periodically may be prompted to select the Datadog account to use. This periodic prompting does not occur if you use the password that you had set for Datadog rather than your Google credentials.
-
If you previously did not have a Datadog account, the invitation email that you receive will indicate to click Set Password to set up your new Datadog account. To do this, follow these steps:
- Click Set Password in the email and you are redirected to the Datadog website.
- On the My Settings page for your Datadog account, enter a new password account in the New password and Verify password fields, and then click Set Password.
Solace recommends that this password for your Datadog account is different from your account password for Solace Cloud.
Here's what the email looks like if it's your first time seeing an invitation from Datadog so that you can distinguish it from a phishing email.

After you've set the password to confirm your Datadog account (or joined the account if you had a pre-existing Datadog account), you can:
- get to detailed / raw data collected, and monitors
- access dashboards created by Solace(read-only access)
- create your own assets that include dashboards and monitors
- search for logs and explore events from monitors
For more information about using the Solace Insights dashboards for Datadog, see the Datadog documentation.
Accessing Datadog from Cloud Console
After you've activated your Datadog account, you can directly access Datadog from your account in Solace Cloud. This is particularly useful if you have multiple accounts on Solace Cloud.
To do this, perform the following steps.
- Log in to the Cloud Console if you haven't already.
- On the navigation bar, select
 and then click on a service that you want to see.
 - On the Service page, click the Monitoring tab.
- Click Open Advanced Insights in Datadog for a service in your account to go directly to the Datadog dashboard for your service.
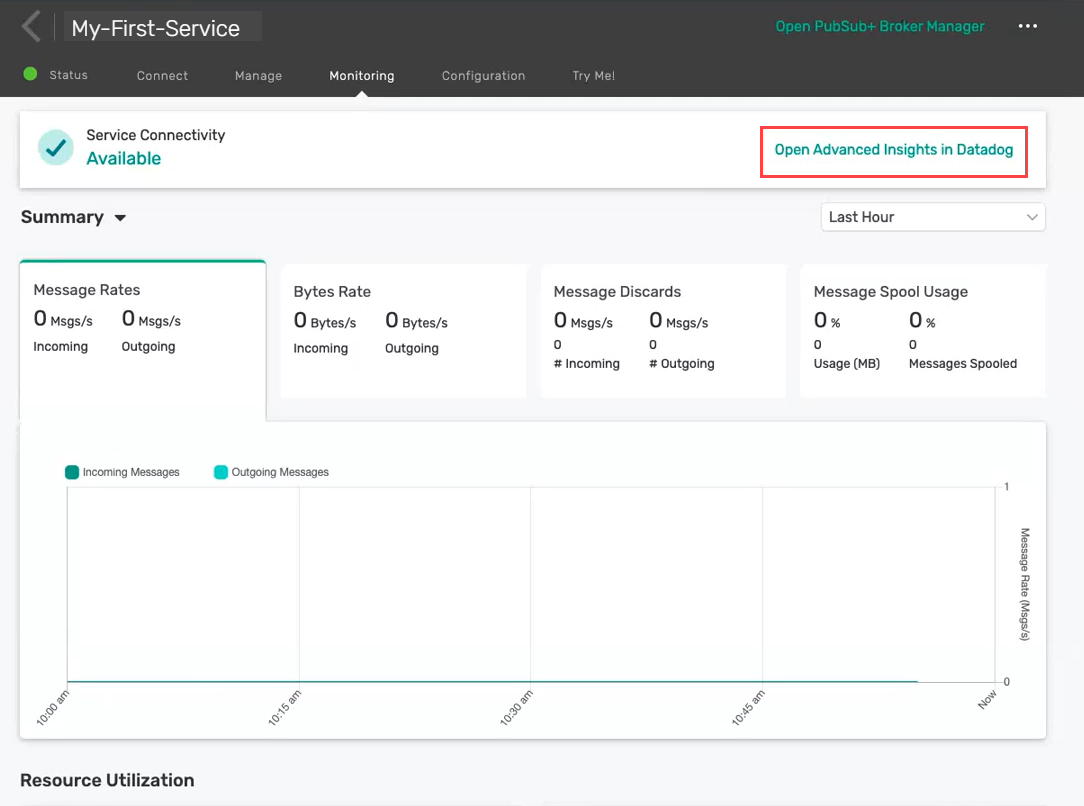
A separate browser window or tab appears to access your Datadog account.
Sharing a Dashboard Using a URL
If you have the Insights Advanced Manager or Insights Advanced Editor role, you can generate a shared URL for a dashboard. This gives you the ability to share a dashboard with people who do not usually have access to the Solace Insights dashboards for Datadog dashboards that are provided with Insights. The URLs shared this way are managed by you, and can be limited in who they are shared with, and the length of time that the URL is accessible. This allows you to share the valuable information in Datadog without needing to change your Insights permissions.
Any dashboard that is being shared is indicated as such in the list of Dashboards in Datadog with a SHARED icon, as shown in the image below:
![]()
To share a Solace Insights Dashboards for Datadog using a URL
- In Datadog go to Dashboards > Dashboard List to access the list of monitors.
- Select a dashboard you want to generate a shared URL for by clicking on it in the list.
- Click on the gear icon
 in the top right corner and select Generate shared URL from the menu that opens.
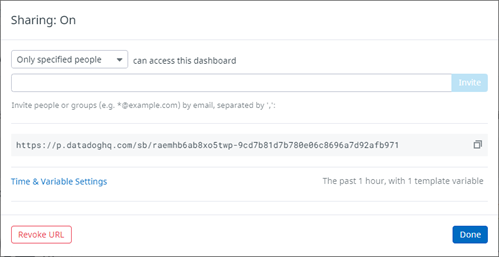
 - The Sharing window opens.
- From this window you can select who to share the URL with, and any time and variable settings you want to configure.
- Use first field to specify who to share the URL with:
- Only specific people - You can use the provided field to specify who to share the link with by individual or group email address.
- Anyone with a link (public) - The URL The link will display in the field below. You can copy this link and share it with anyone you want to provide with access to the dashboard.
- Clicking on the Time & Variable Settings opens a screen where you can configure various elements that will be displayed on the shared dashboard, including:
- The time visible on the shared board, and whether users can change the time frame they are viewing.
- Use the Default and Available value fields to select specific services to from their associated menus.
- When you are ready to share the URL click Done.
If you specified to share the dashboard with specific people, they receive an email from Datadog with the URL. The link in the email is good for one use, and expires within one hour of being sent.
If you selected to share with anyone, you must provide the URL to whomever you want to share the dashboard with. When the URL is shared with anyone, you can copy it from the menu or the Sharing window and email it to a person. Sending a URL designed for specific people does not work in this manner.
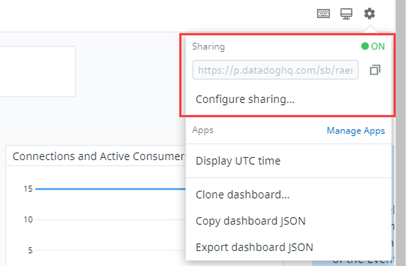
For dashboards with sharing enabled, the menu accessed by clicking the gear icon acquires a Sharing section. The Sharing section indicate the shared status of the Dashboard. You can also copy the URL from this section, and click Configure sharing to access the Sharing window.
Revoking a Shared URL
You can revoke the URL for a shared dashboard at any time.
- In Datadog go to Dashboards > Dashboard List to access the list of monitors.
- Select a dashboard you want to stop sharing by clicking it in the list. Note that any dashboard that is currently being shared by URL will have a SHARED icon
- Click on the gear icon in the top right corner and select Configure sharing from the menu that opens to access the Sharing window.
- Click Revoke URL and then Revoke Access on the confirmation window that opens.
![]()
Revoking the URL immediately stops sharing the associated Solace Insights dashboards. Anyone accessing or attempting to access the revoked URL receives a 404 page from Datadog.