Configuring Custom Hostnames for an Event Broker Service
Each event broker service (or its connection endpoints) has a unique, randomly generated hostname, such as mr1egxydp8fguv.messaging.solace.com. You can configure up to five additional custom hostnames for an event broker service.
Custom hostnames give you a personalized name for the host in the messaging.solace.com domain. You can access the event broker service using its initial generated hostname and any custom hostnames you've assigned. A custom hostname is useful for migration, improving client application integration (for example, using names that are simpler to remember or align with your hostname naming conventions), or application partitioning. For more information, see Use Cases for Using Custom Hostnames.
You can use different hostnames for different connection endpoints, which allows client applications to use different hostnames depending on whether they connect via the public Internet or private IP addresses. Regardless of whether the endpoint is public or private, the hostname must be unique and exist within the messaging.solace.com domain. For more information about connection endpoints, see Configuring Client and Management Ports and Changing the Port Configuration for Event Broker Services.
When you create an event broker service, its initial, generated hostname (or connection endpoint) is assigned the Default status. If it has more than one connection endpoint, the public endpoint is assigned the Default status. If you assign Default status to a hostname, the URL of that hostname:
- becomes the primary URL that is used to access Broker Manager
- is shown as the hostname in the Status or Connect tabs in Cluster Manager.
You can make a custom hostname the Default. You can also use a custom domain name rather than have your hosts use the messaging.solace.com domain. For example, you could have a custom domain, such as example.com. If you want to use a custom domain name, it has specific configuration requirements, requires a custom TLS certificate to be used as part of your deployment, and may affect connectivity of existing event broker services. For more information, see
Configuring Custom Domain Names for Event Broker Services.
Use Cases for Using Custom Hostnames
The following are the most common uses cases for using custom hostnames:
- Hostname Migration
-
You may need to migrate a hostname from one event broker service to another. For example, when an event broker service is deleted (or about to be deleted), its custom hostname can be used for another the event broker service so that previous client applications can connect using the same custom hostname. Any connections from the client applications need to be re-established with the new event broker service, but the configuration for the connection doesn't need to change. For example, you could have a name such as
myfirstservice.messaging.solace.comthat you use. If you needed to create another event broker service, you could simply move the hostname to the new event broker service without the need to change the configuration any of your client applications – provided you also copied over the client event broker service configuration (such as client usernames, authentication, certificates, and client profiles). -
In addition, you can create different hostnames that are accessible using private IP addresses or public Internet. This permits you to have a different hostname based on the connectivity from the public Internet or from a private network (via private IP addresses).
- Application Partitioning
-
If you need to spread the load of clients connected to an event broker service, you can use multiple hostnames to spread the load (horizontally-scaling) or evenly partition the load. For example, you could configure your applications to perform a round-robin of specific hostnames to distribute the load across a set of event broker services, where each hostname maps to a different event broker service.
You can configure custom hostnames using the Solace Cloud Console or use the REST API for Solace Cloud. For more information, see the following sections.
Configuring Custom Hostnames in the Cloud Console
In the Cloud Console, you can configure custom hostnames for an existing event broker service provided the calling application or your user profile is assigned the proper permission or role, respectively. The hostname you add can be used as a custom hostname to access the event broker service.
You can specify a custom name provided you have the permissions and follow the guidelines found in Considerations for Using Custom Hostnames. Specifically, you can:
- Add a custom hostname to an existing event broker service
- Set a hostname as the Default status to make its URL the primary one to access the event broker service when using Broker Manager or be shown as hostname in the Cloud Console.
- Move an existing custom hostname from one event broker service to another event broker service
- Delete a custom hostname from an existing event broker service
- Copy the hostname from an event broker service to your clipboard
Considerations for Using Custom Hostnames
Be aware of the following considerations when using custom hostnames:
Considerations for Naming Custom Hostnames
- Hostnames must be alphanumeric characters or dashes. The first and last characters cannot be dashes. The maximum length is 255 characters.
- A hostname must be globally unique within the domain. A validation error appears if a hostname is not unique.
-
Separate hostnames can be created for private and public endpoints. Event broker services are accessible via the configured hostname, provided that the correct ports are used.
Considerations for Updating Hostnames
- When you add, move, or delete a hostname, the operation takes time to complete.
- The initial, generated hostname for each connection endpoint or event broker service can't be deleted.
- You also can't delete the hostname that is currently assigned the Default status.
Permissions Required to Update Custom Hostnames
The following permissions are required to add, update, or delete custom hostnames:
- For calling applications that use the REST API, they must have one or both of the following:
- the Update Services permission (under My Service) to configure hostnames for services the user owns
- the Update Services (under Organization Services) to configure hostnames for event broker services owned in the account
- Users in the Cloud Console must be assigned the Mission Control Manager role.
Considerations for Using Custom Hostnames with Single-Sign On Enabled
The Default hostname is used for managing event broker services in Broker Manager. If you change which hostname is assigned Default status, you need to update the single sign-on (SSO) configuration for the event broker service.
To re-enable SSO for management of your event broker service, follow these steps:
- Add the new URI of the hostname to your identity provider. Users with the Administrator role can copy the URI from the Infrastructure SSO tab in the Account Details. For more information, see Retrieving the URI for an Event Broker Service .
- Update the SSO configuration on the event broker service which contains the URI for the custom hostname. For more information, see Updating the SSO Configuration for an Event Broker Service.
- Test the SSO configuration and confirm that the URI for the custom hostname is used to access Broker Manager. For more information, see Testing SSO for an Event Broker Service.
Adding a Custom Hostname
You can add a custom hostname to access an existing event broker service. That hostname is not used to access Broker Manager unless it is assigned as Default. That name however can be used by client connections to access the event broker service.
To add a custom hostname to an existing event broker service, perform these steps:
- Log in to the Solace Cloud Console if you have not done so yet. The URL to access the Cloud Console differs based on your
- On the navigation bar, select Cluster Manager
 .
. - Select the event broker service that you want to configure. If the event broker service is not listed, make sure you have the right environment selected. For more information, see Selecting Environments.
- On the Service Details page, click the Manage tab.
- On the Management Settings menu, select Network Access.
- On the Hostnames tile, click Create.
- In the Create Hostname dialog, in the Hostname field, enter in a name using these rules:
the name can contain only alphanumeric characters or dashes (
-)the length of the name cannot be more than 255 characters
the name must be unique in the domain
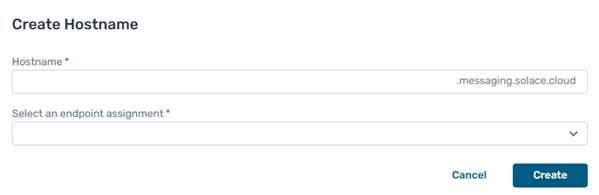
- In the Select the endpoint to assign the hostname to list, select the name of the endpoint to assign. The type of endpoint available is based what endpoints are configured for the event broker service.
- Click Create. You return to the Hostnames tile, and your hostname appears in the Hostname list.
If you want to assign the new hostname you created as Default, see Setting a Hostname as Default.
You can test the new hostname you've created using the Try Me! tab for your event broker service by entering the hostname in the Broker URL field found in the Advanced options.
Setting a Hostname as Default
You can set the Default status to another generated hostname or a custom hostname. The hostname that is set as Default becomes the primary URL that is used to access Broker Manager and shown as the hostname to connect to the event broker service in the Cloud Console. You can only set one hostname with the Default status at one time.
If you set a different hostname as the Default and you have SSO enabled for the event broker service, you also need to update the SSO configuration for the service. For more information, see Considerations for Using Custom Hostnames with Single-Sign On Enabled.
If you are using a hostname with a custom domain name, you must set it as the Default or your custom fully qualified domain name will not work.
To set a hostname as Default, perform these steps:
- Log in to the Solace Cloud Console if you have not done so yet. The URL to access the Cloud Console differs based on your
- On the navigation bar, select Cluster Manager .
- Select the event broker service that you want to configure. If the event broker service is not listed, make sure you have the right environment selected. For more information, see Selecting Environments.
- On the Service Details page, click the Manage tab.
- On the Management Settings menu, select Network Access.
- On the Hostnames tile, beside the hostname, click Actions
 and then select Set as Default.
 - The Default indicator appears beside the selected hostname.
Moving a Custom Hostname
You can move a hostname from one event broker service to another event broker service. When you move a hostname, you can also choose whether to move it to the public or private endpoint if the endpoint exists on the target event broker service. When you move a custom hostname, only the hostname is migrated—not the settings. You are responsible for migrating any required event broker service settings when you move a hostname so that client applications can connect using the same hostname as expected.
These settings can include:
- authentication settings (including any client certificates)
- client profiles
- ACL profiles
- client usernames
-
If you attempt to move a hostname to another event broker service that has the maximum number of hostnames configured, a warning message appears.
- You can't move a hostname that is set as Default. You must move the default status to another hostname first. See Setting a Hostname as Default.
- Moving a hostname containing a custom domain name requires installation of a custom TLS server certificate containing the domain name on the target event broker service.
To move a hostname from one event broker service to another, perform these steps:
- Log in to the Solace Cloud Console if you have not done so yet. The URL to access the Cloud Console differs based on your
- On the navigation bar, select Cluster Manager .
- Select the event broker service that you want to configure. If the event broker service is not listed, make sure you have the right environment selected. For more information, see Selecting Environments.
- On the Service Details page, click the Manage tab.
- On the Management Settings menu, select Network Access.
- On the Hostnames tile beside the hostname that you want to move, click Actions and then in the drop-down list select Move.
- In the Move Hostname dialog, use the Select the service your wish to move it to field to select an event broker service to move the hostname to.
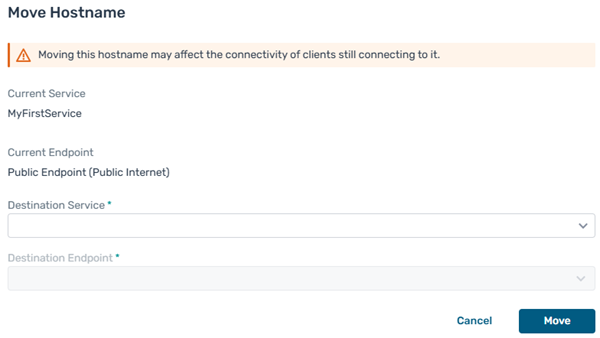
-
Use the Select the endpoint to assign to hostname field to select the name of the endpoint to assign. The type of endpoint available is based on what endpoints are configured for the event broker service.
- Click Move.
A progress bar appears at the bottom of the Move Hostnames dialog until the operation completes. The process may take a few minutes.
Deleting a Custom Hostname
You can remove a custom hostname from an event broker service. It's important to note that you can't remove system-generated hostnames assigned event broker services, and you can't delete a hostname that is set as Default. To delete a custom hostname, you must remove Default status first. See Setting a Hostname as Default for more information.
Deleting a hostname impacts the connectivity of clients that use the deleted hostname. Don't delete an existing hostname if you don't want connectivity to be impacted.
To remove a hostname from an event broker service, perform these steps:
- Log in to the Solace Cloud Console if you have not done so yet. The URL to access the Cloud Console differs based on your
- On the navigation bar, select Cluster Manager .
- Select the event broker service that you want to configure. If the event broker service is not listed, make sure you have the right environment selected. For more information, see Selecting Environments.
- On the Service Details page, click the Manage tab.
- On the Management Settings menu, select Network Access.
- On the Hostnames tile beside the hostname you want to remove, click Actions and then select Delete.
-
In the Delete Hostname confirmation dialog, click Delete to confirm that you want to delete the host name.
A progress bar appears at the bottom of the Delete Hostnames dialog until the operation competes. The process may take a few minutes.
Copying the Fully Qualified Domain Name for the Hostname
You can copy a hostname from an event broker service to your clipboard to paste elsewhere. The copied name is the fully-qualified domain name (FQDN), such as mr-1egxydp8fguv.messaging.solace.com.
To copy the FQDN of the hostname to the clipboard, perform these steps:
- Log in to the Solace Cloud Console if you have not done so yet. The URL to access the Cloud Console differs based on your
- On the navigation bar, select Cluster Manager .
- Select the event broker service that you want to configure. If the event broker service is not listed, make sure you have the right environment selected. For more information, see Selecting Environments.
- On the Service Details page, click the Manage tab.
- On the Management Settings menu, select Network Access.
- On the Hostnames tile, beside the hostname that you want to copy, click Actions and then select Copy to Clipboard.
The FQDN is copied to your clipboard is available for you to paste.